


DIY Hole Maze Yard Game for Kids

Whether you're having a cookout or just a boring summer day, yard games can really keep kids entertained. We love DIY outdoor games like cornhole, ladder golf, or giant versions of Jenga, dice, checkers, or Connect Four. These are all classics, but I decided to make one you might not have heard of just yet -- it's called "Gruyere".
What is a "Gruyere" ball maze game?
This fun wall game featuring a ball maze is most often called "Gruyere", named after the Swiss-style cheeses that this hole-covered board resembles. But it also goes by names like "The Cheese Grater", "Cheese Board", "Hole Maze", or "Hole Board".
How to play Gruyere
Playing Gruyere is simple and deceptively tricky to master. You pull the strings on either side to move the holder up the board, carefully maneuvering it so the ball inside makes it to the top hole without falling in any of the holes along the way.
How to build your own Gruyere hole maze game
While this game might be hard to explain, it's actually pretty easy to make, and very fun to play.
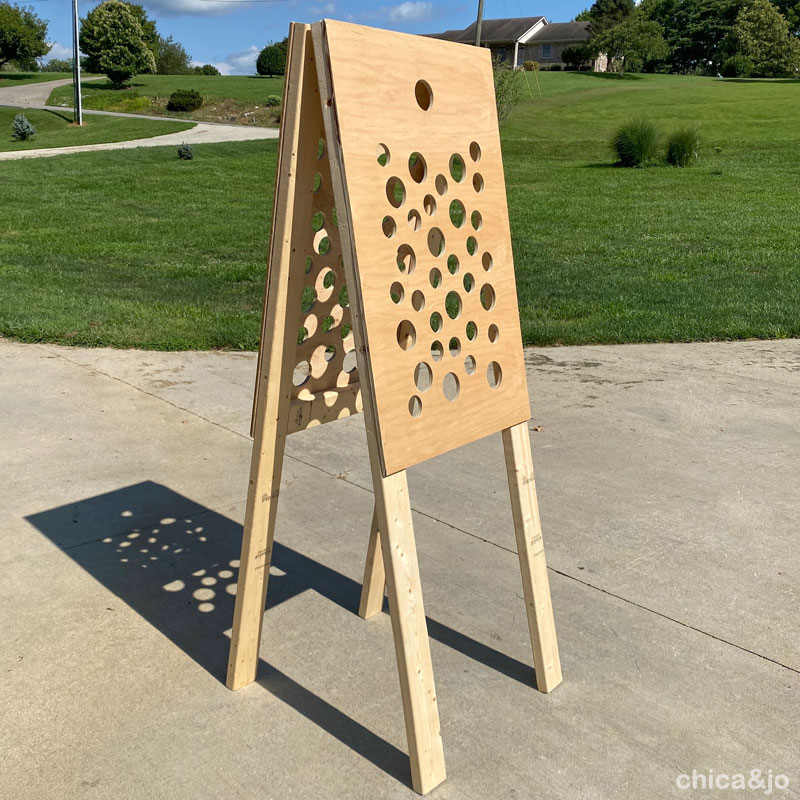
I decided to make my Gruyere hole maze two-sided so that two kids could play at once, and even have timed races to the top. This would have made an excellent challenge for our Survivor party. I wish I'd had it at the time!
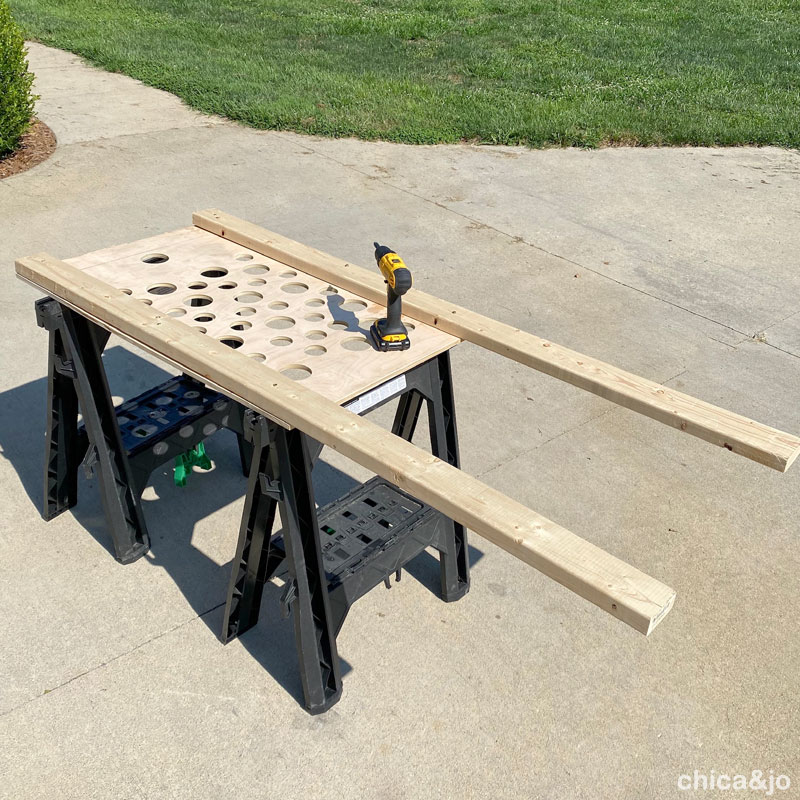
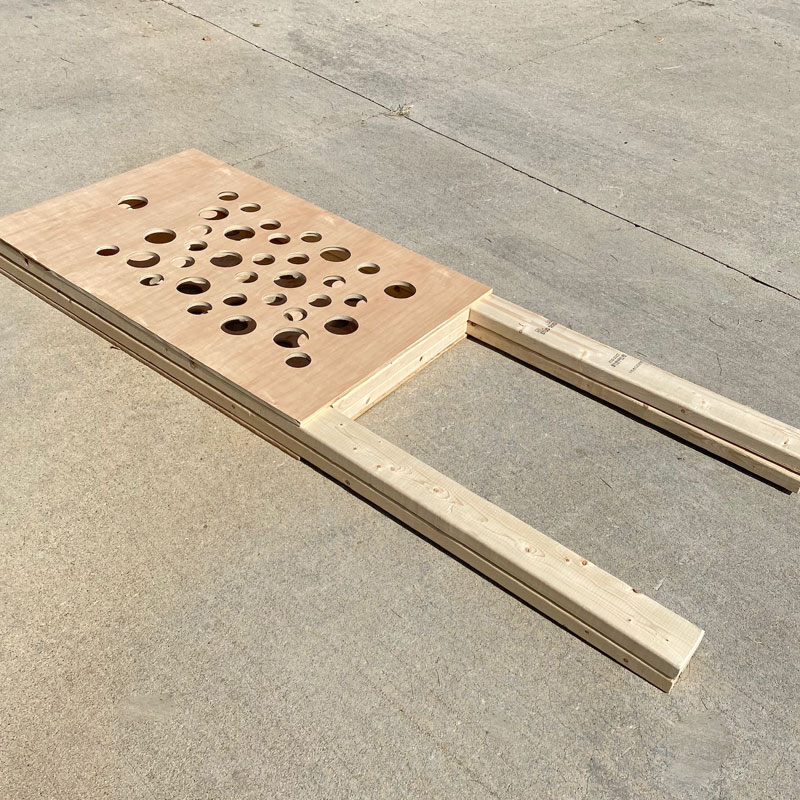
Step 1: Cut the wood
Start by cutting some finish plywood (at least 1/2" thick for sturdiness) into two rectangles. You can make this as big or small as you like, but my pieces were 26" x 41".
You'll also need four 2x4 boards cut to 6' lengths. (If you're making this for small kids, you might want to do 5' so it's not as tall).
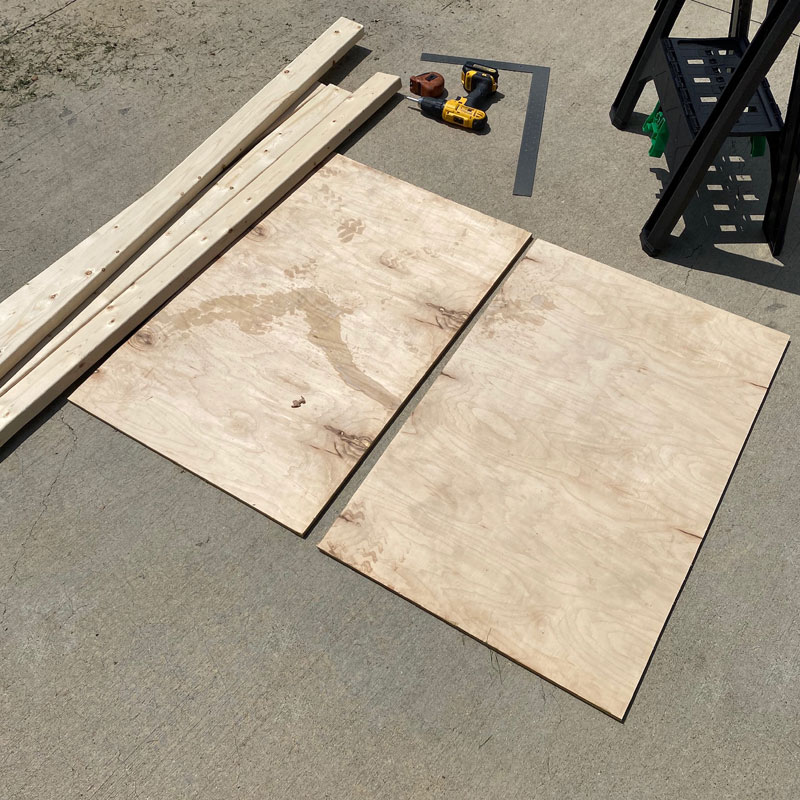
Now lay the 2x4s on one of the rectangles, lined up with one end and hanging off the other. Measure the distance between them and cut two cross pieces of 2x4 (mine were about 19") to fit between and form a frame. Go ahead and cut the cross pieces for the second side, too, but don't attach anything yet. We're just dry fitting at this point.
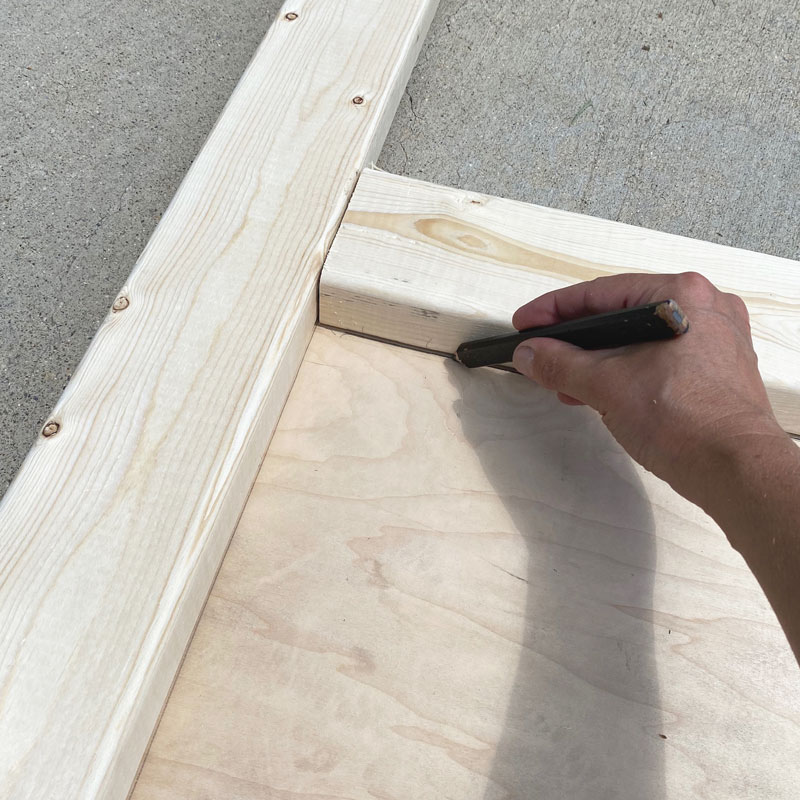
Step 2: Mark the edges of your frame
Use a pencil to trace inside the 2x4 frame on all four sides. These lines will help you know where NOT to drill holes in the next step. This is important because you don't want holes that will have 2x4s behind them... balls won't be able to fall through!
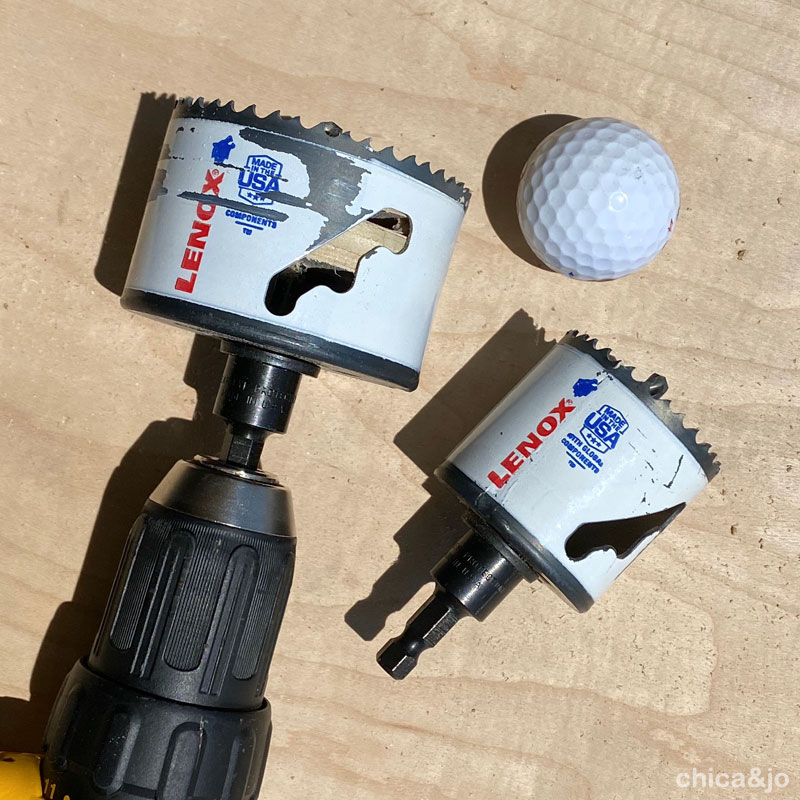
Step 3: Choose the right hole saws
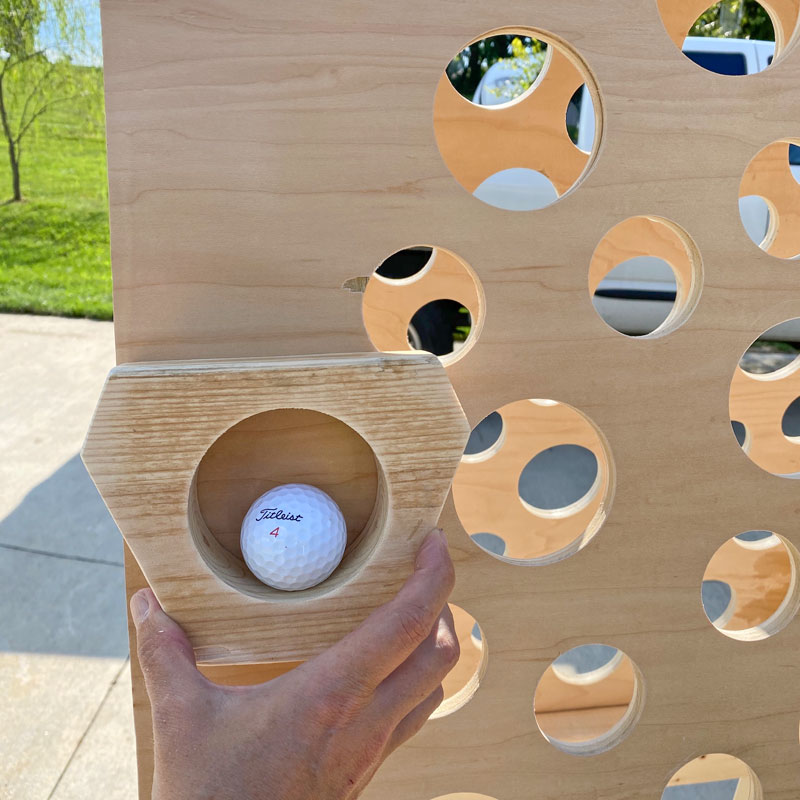
To play the game, you'll need a small, heavy ball. A golf ball works perfectly, and they are super easy to find.
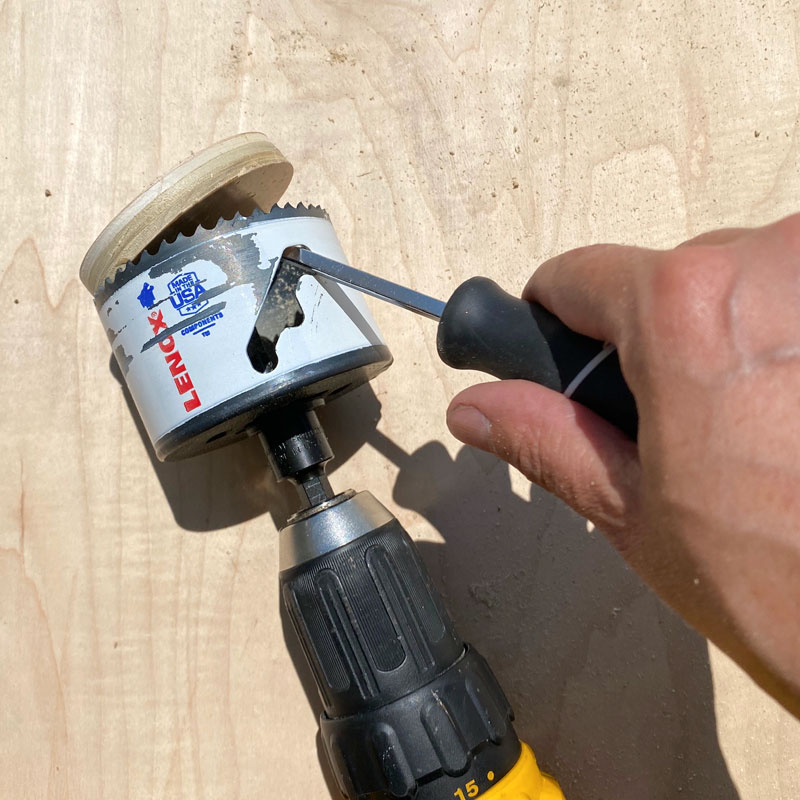
You'll then need two hole saws that are both bigger than your ball, so that the ball can fall through the holes they create. For a golf ball, I recommend using 2-1/8" and 3" hole saws.
I've had really good results with the Lenox Tools Speed Slot arbored hole saws. They work really well and hold up to lots of cuts, and come with an arbor already (which removes the need for separate adapters).
Step 4: Prepare to cut the holes
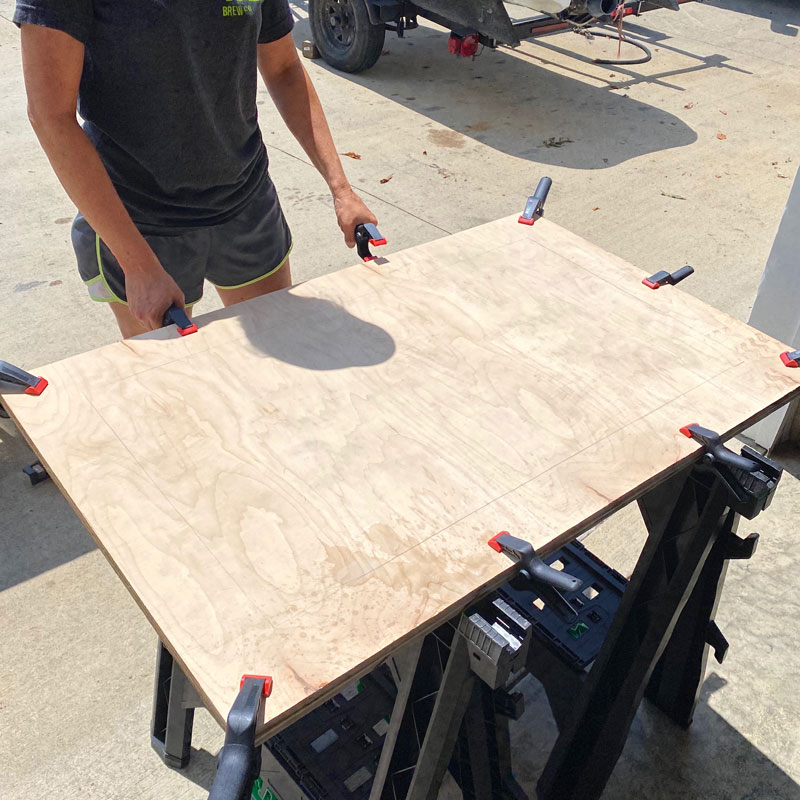
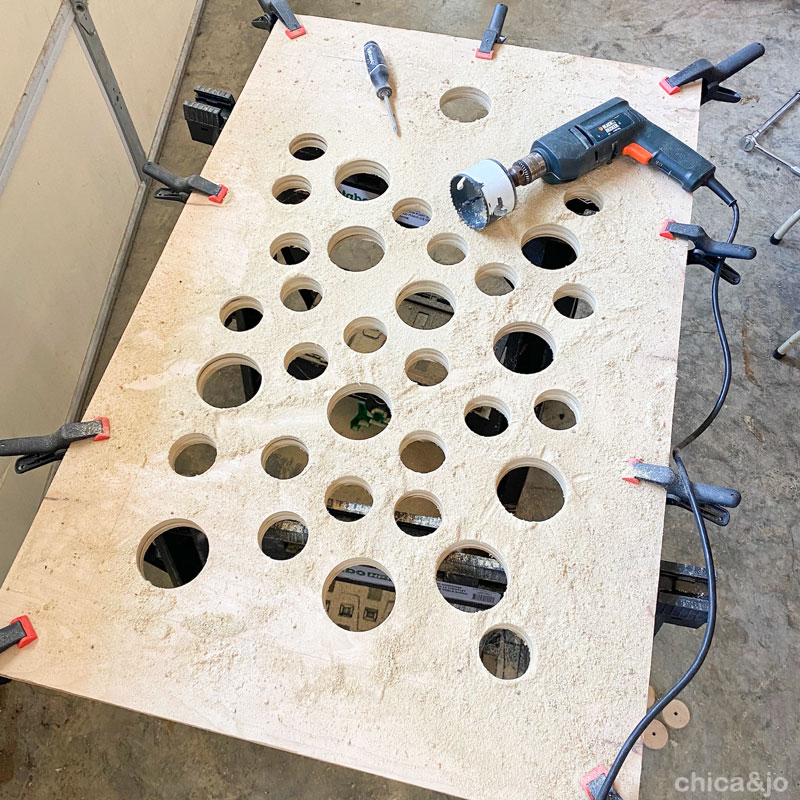
Now remove the 2x4s (set them aside) and stack both of the rectangles on some sawhorses. Clamp the two boards together in several spots so that they stay together and lined up.
Why? Well, this game will have two sides, and you want them to be identical for fairness. The easiest way to do this is to cut the holes through both boards at the same time. (It's also a lot faster then doing them each individually.)
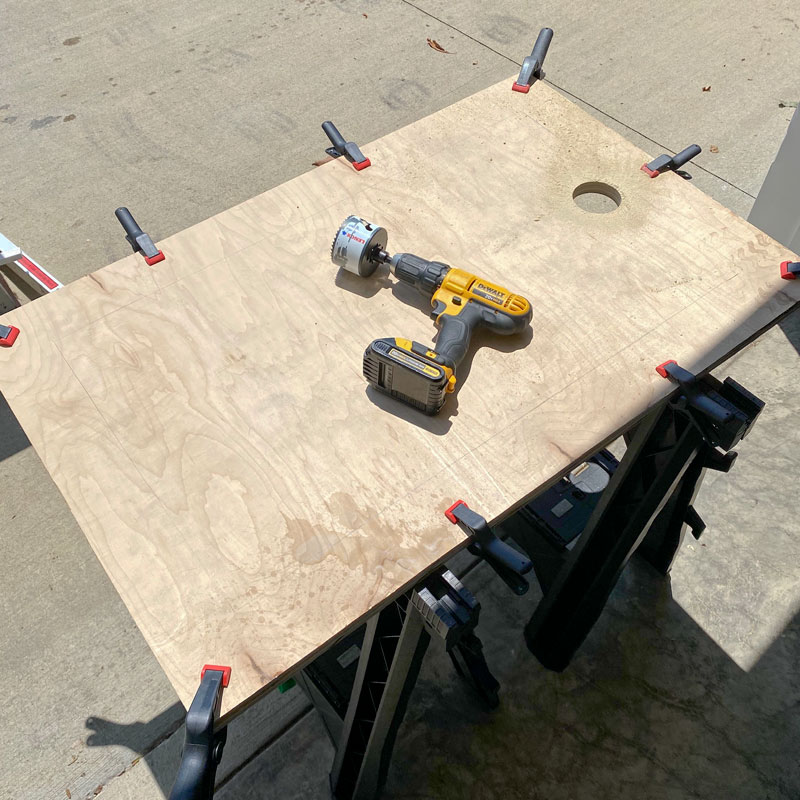
Step 5: Cut the top hole
Use the 3" hole saw to make a hole at one end of the board, centered and about an inch inside the pencil line. This hole will be your target during gameplay.
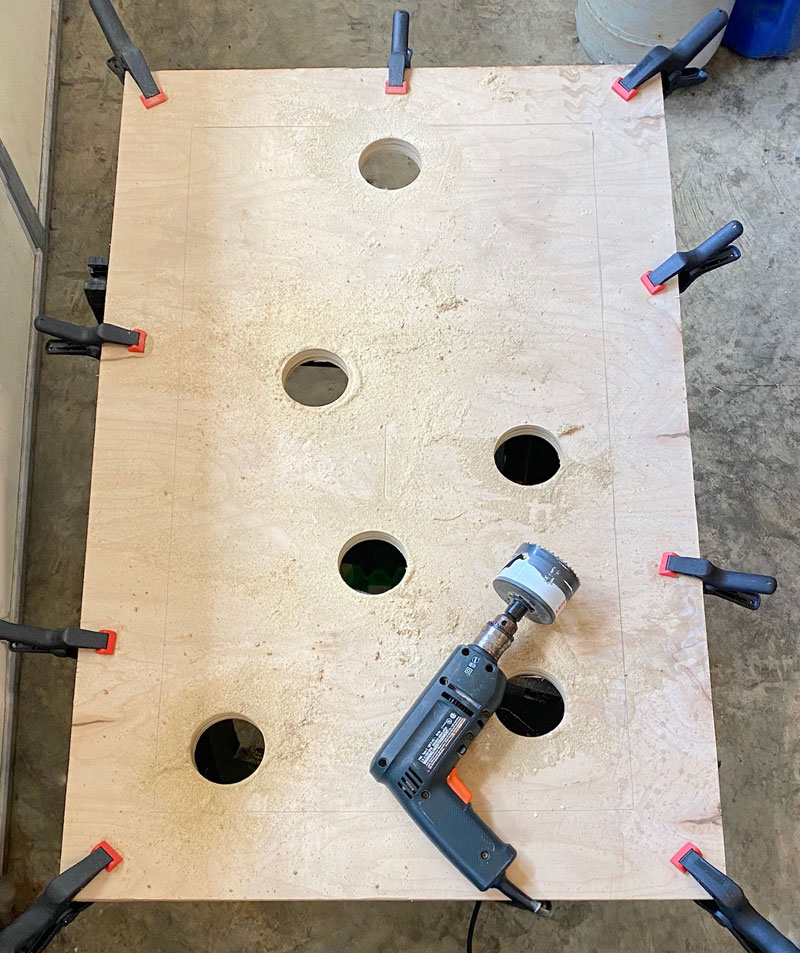
Step 6: Cut the remaining holes
Next, make a dozen or so 3" holes randomly around the game board, keeping two things in mind — don't put any holes very close to the target hole, and keep all your holes inside that pencil line you traced earlier. Remember that the 2x4s will be attached later, and holes shouldn't overlap with them.
As you work on the holes, you'll soon realize why the Speed Slot on these Lenox hole saws is so great. You can stick a screwdriver in the slot and poke out the wood plug after each hole. I can't even tell you how hard the plugs are to remove without this slot!
After getting some 3" holes done, switch to the smaller 2-1/8" saw and make some more holes. Switch back and forth as necessary to fill in the game board with lots of random holes.
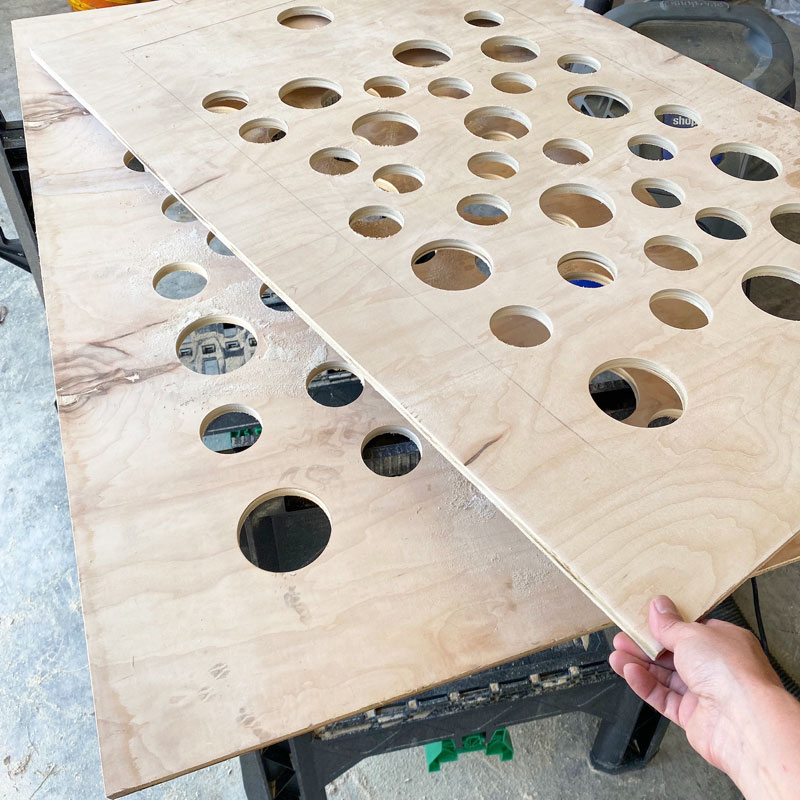
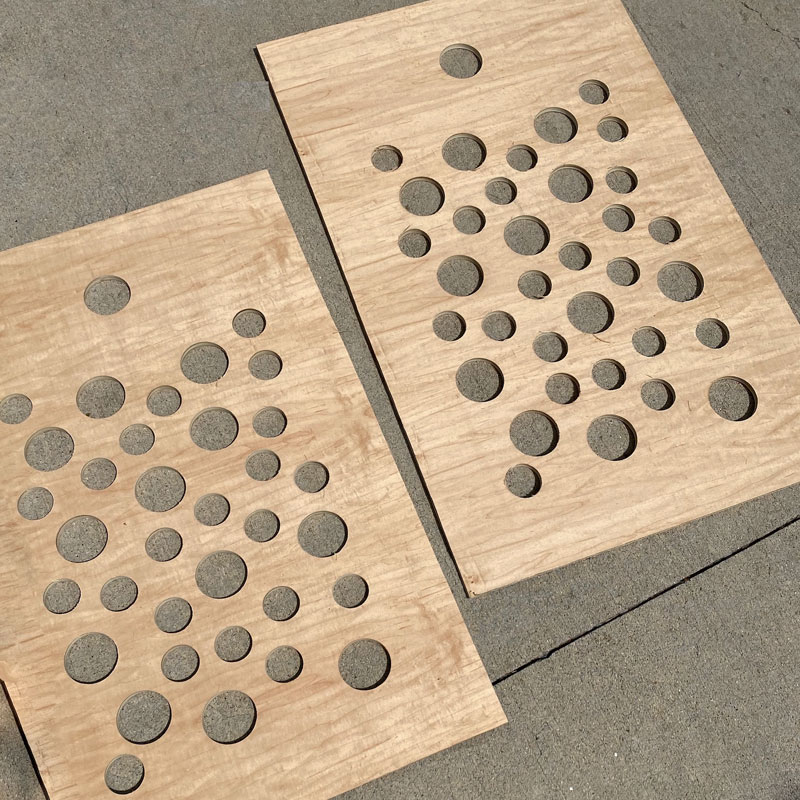
When you're done, remove the clamps to reveal your two identical game boards. Yes, it was more work to drill through both boards at once, but it was worth it because you now have two identical boards so that both sides of your finished game will be the same. How else could you have fair races?
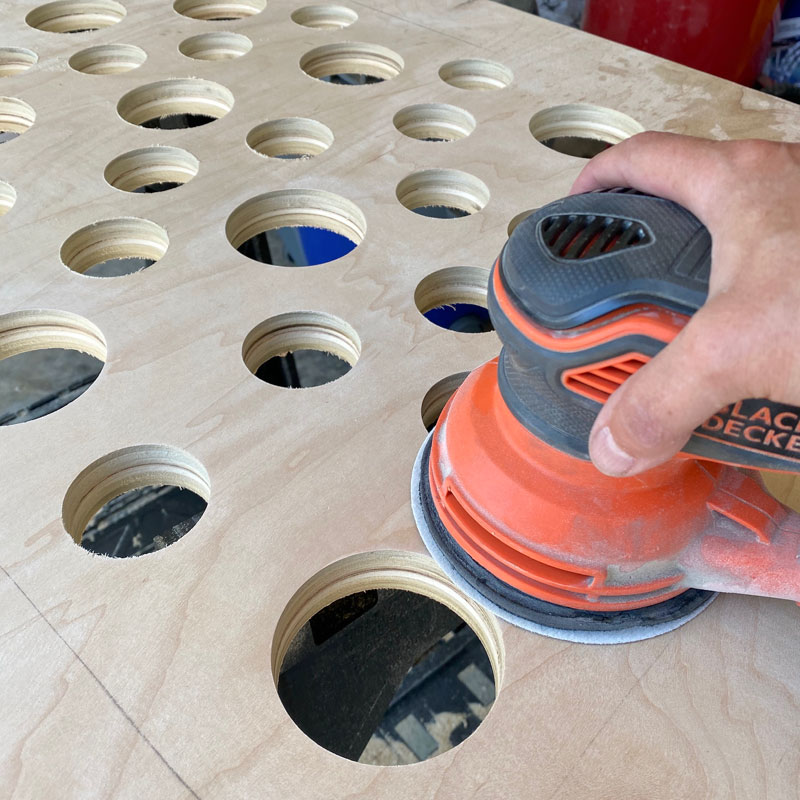
Step 7: Sand the boards
Sand the board smooth, especially to get rid of any splinters around the edges of the holes.
If you want the sides to be identical, take a good look at your boards and flip one over if needed to be sure the holes are lined up exactly the same on both pieces.
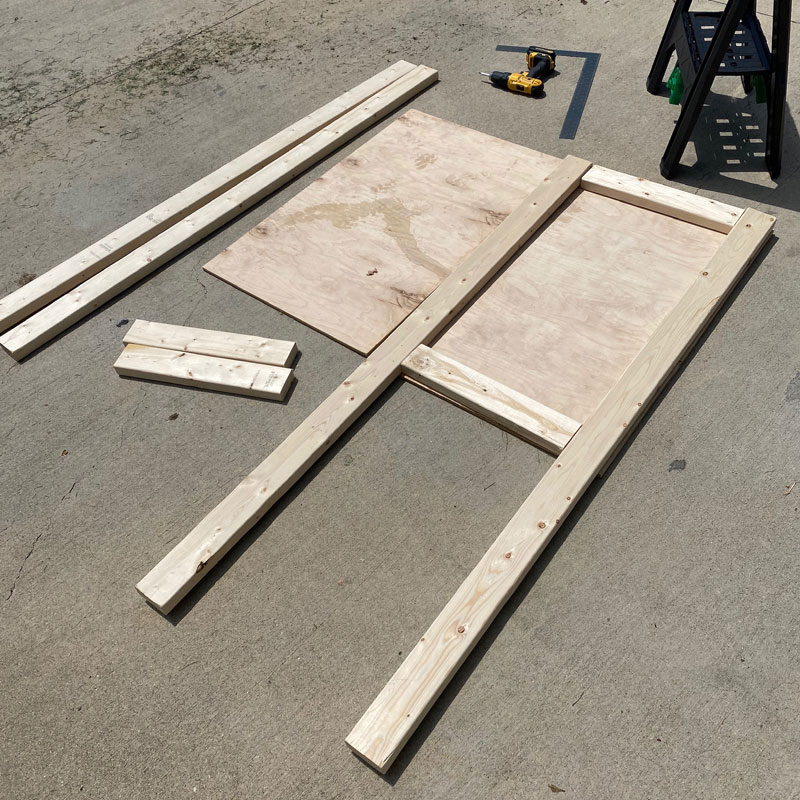
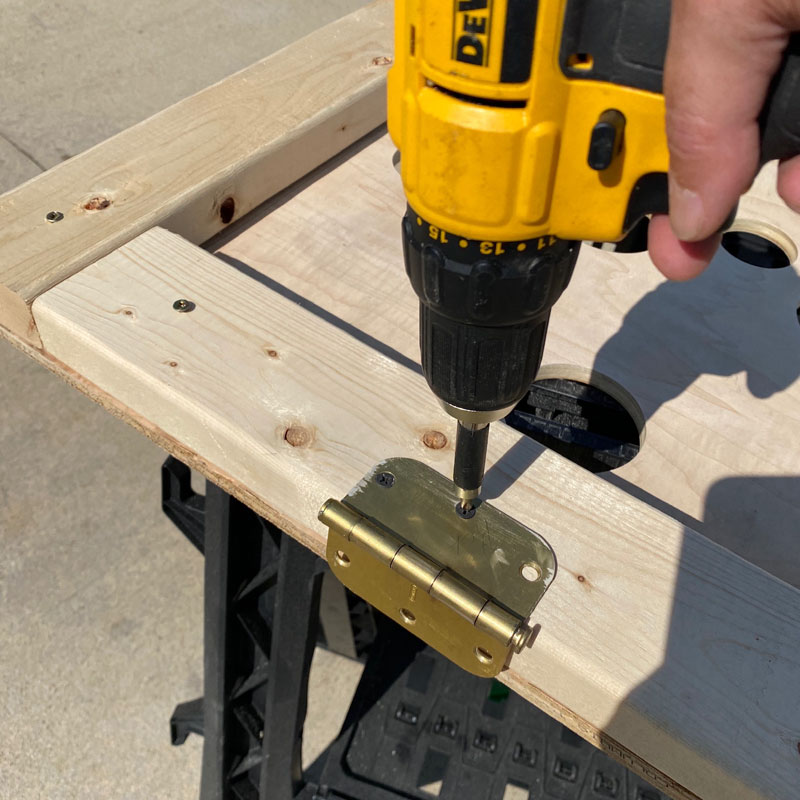
Step 8: Assemble the frame
Time to attach the frame and legs! Put the hole board, finished side down, on sawhorses and place those 6' long 2x4s back on the sides, with the excess length hanging off the bottom end.
Screw them in place with screws that are jusssst long enough to secure without going through the front. (If your game boards are very thin, you can attach them from the front... I just wanted to keep the front of my game clean and neat, so I attached from the back.)
Now put the cross pieces in place and screw those down as well.

Do the same thing for the other hole-filled board, so that you have two identical framed boards.
To attach the two halves together, grab two or three wide, strong hinges, and attach half of each to the top of one of the frames, on the back. I used some salvaged door hinges that I had in my workshop.
Place the two frames end to end on the ground and attach the other side of the hinges to the other frame.
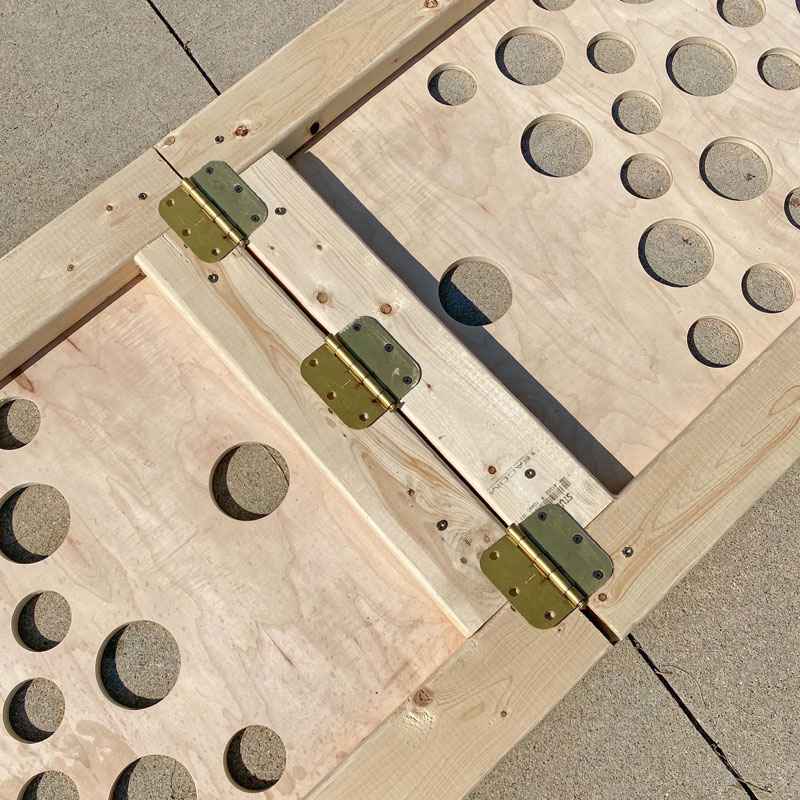
Now fold one half over the other...
...and you've got a game that lays flat when it needs to be stored...
...and stands up when it's time to play!
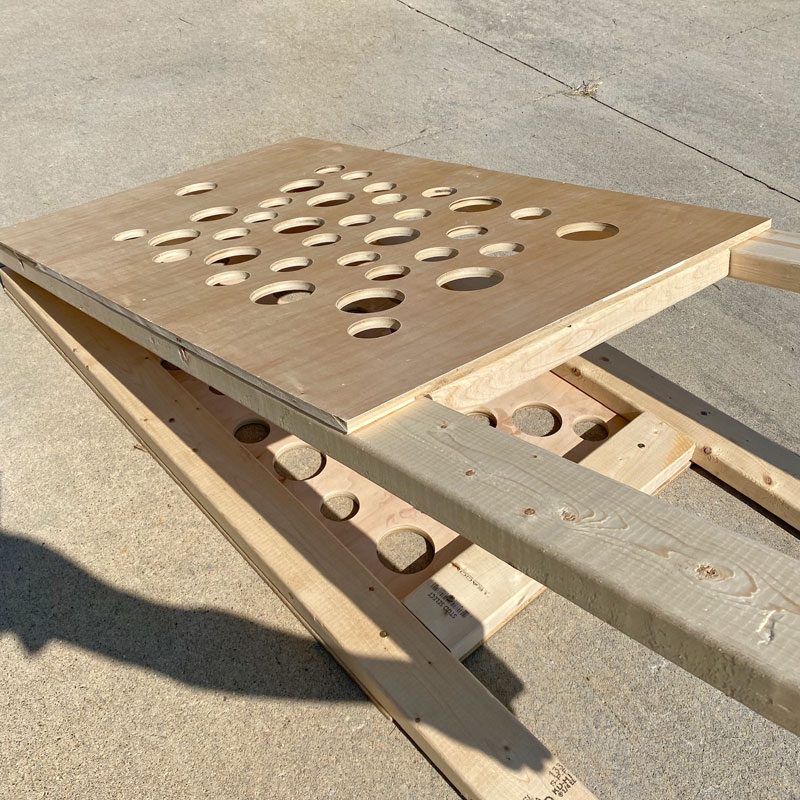
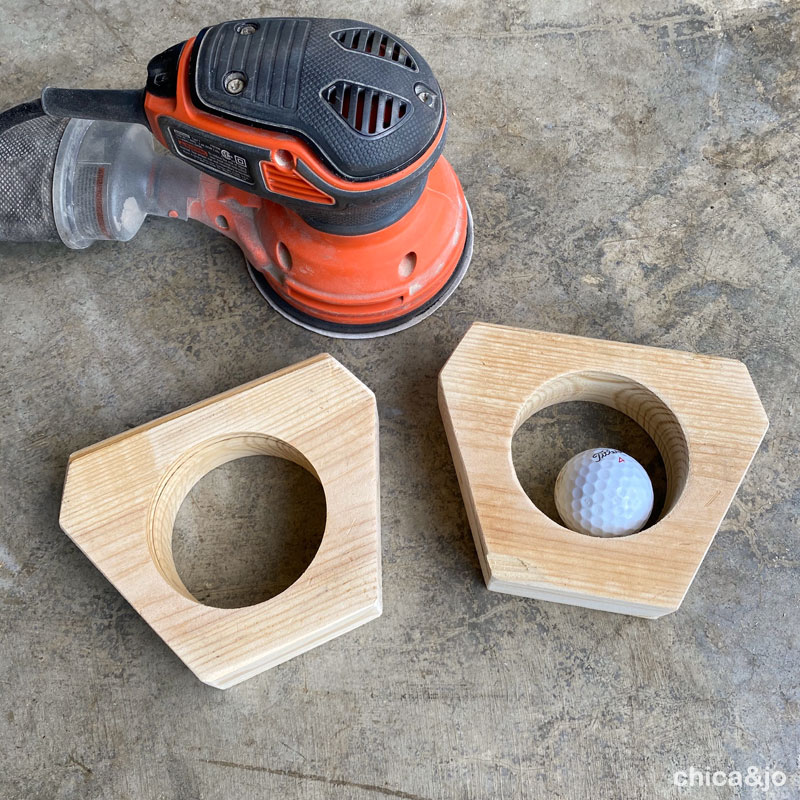
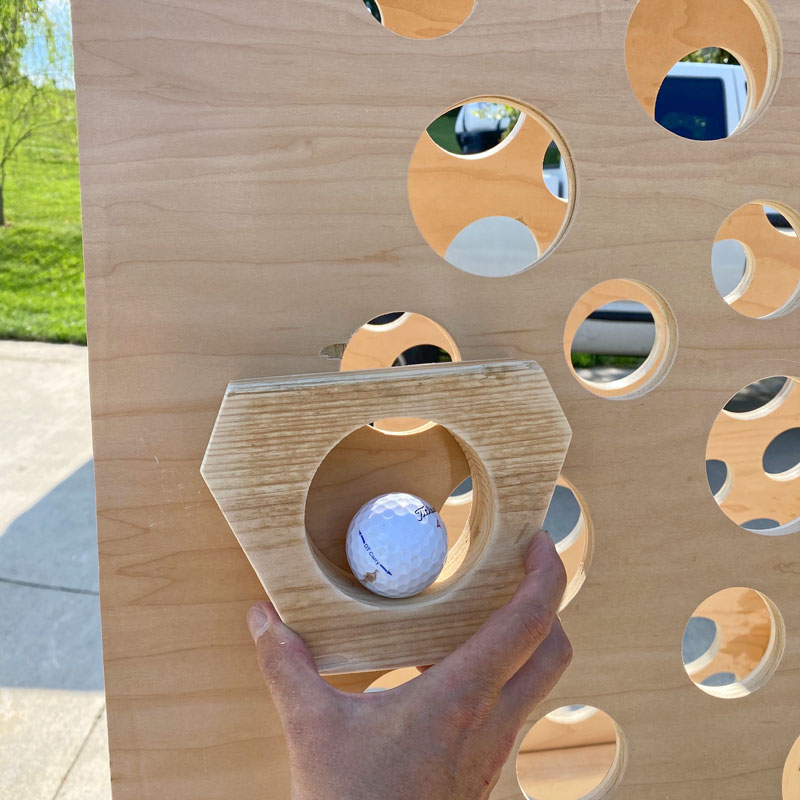
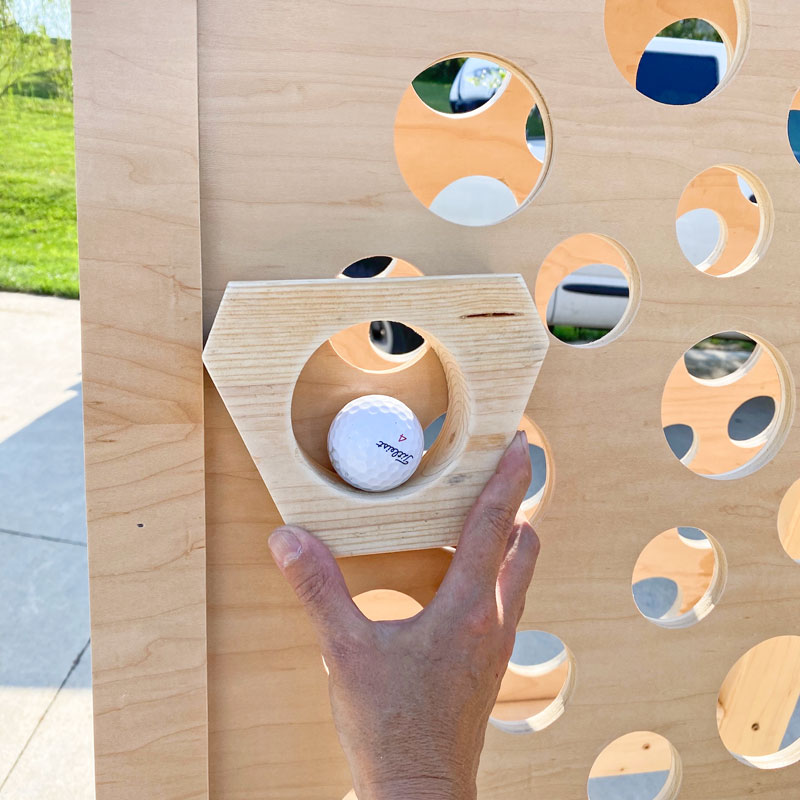
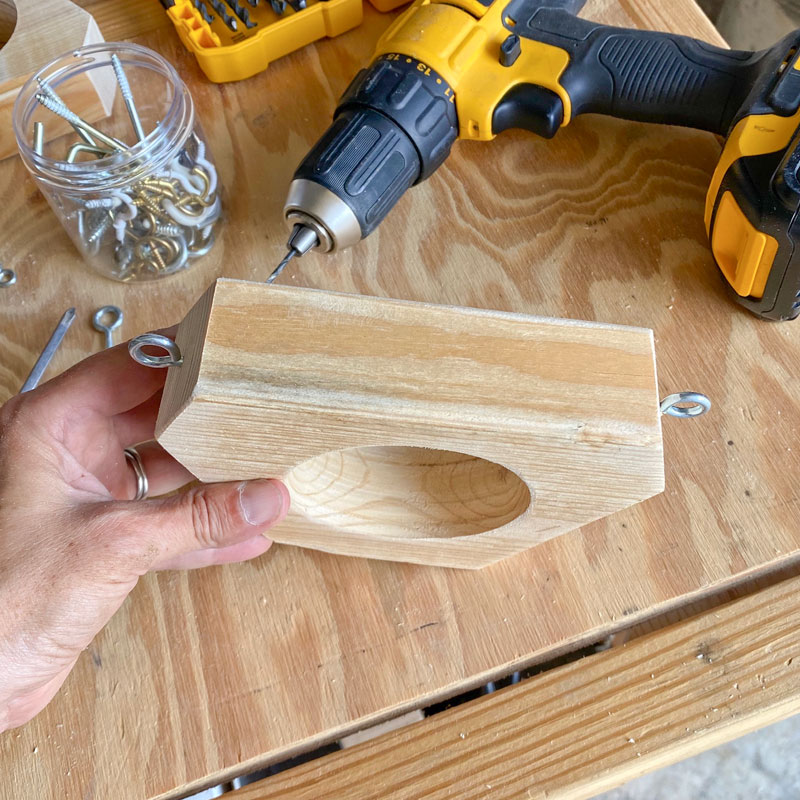
Step 9: Make the ball carriers
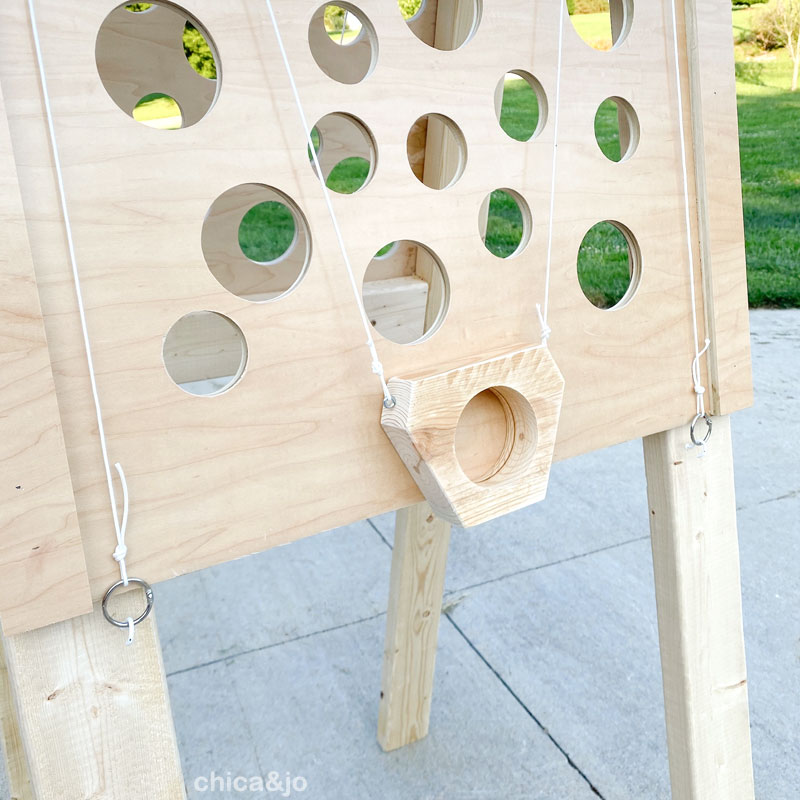
Next, you need to make the little frames that will carry the ball up the board during play. You can make these any shape you like, such as round, triangular, or square. I started with a triangle and cut off the corners to make it smaller.
Make sure you use wood that's thick enough to hold the ball without it falling out. For a golf ball, you'll need 2-by stock (I used a 2x6).
After creating your shapes, cut a 3" hole in the middle of each one, and sand everything smooth.
Step 10: Add side gutters
If you place your ball carrier onto the board, you'll soon see there's a problem along the sides. By keeping holes away from the 2x4 frame, we've left a giant path that would make it super easy to take the ball straight to the top.
Really, we need to restrict the ball carrier so that it stays away from the edges, and forces the player to deal with the holes.
To accomplish this, cut some 2" wide strips of the same board you used for the rectangles, and attach them to the sides of the maze. I used my handy Arrow PT18G Brad Nailer to quickly attach them, but you could use screws or even glue if you wish.
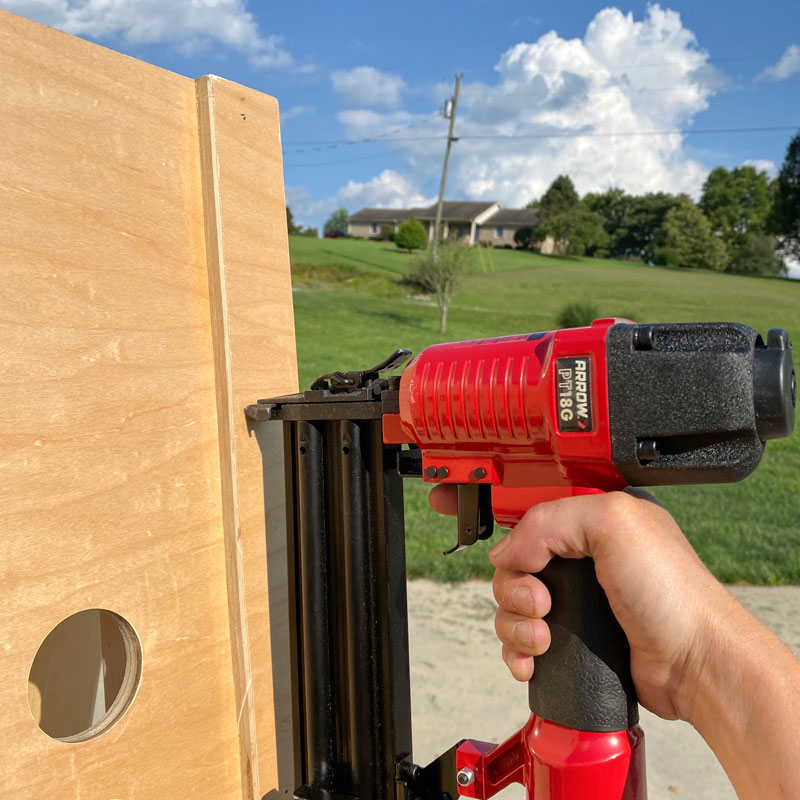
With these side pieces in place, our ball carrier is now restricted to the difficult part of the game board. Perfect!
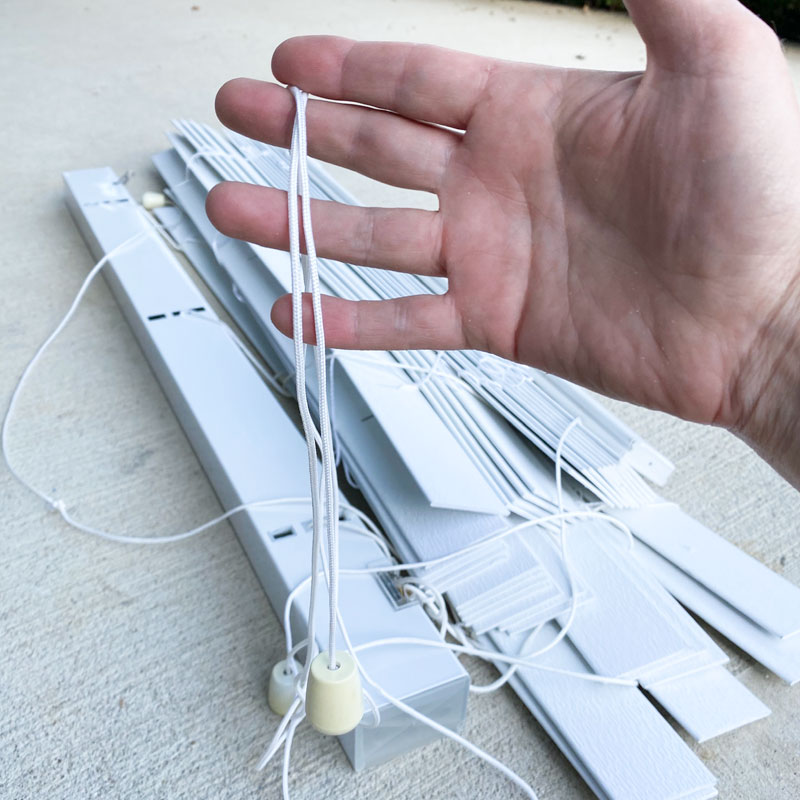
Step 11: Add the strings
Now you're ready to string up the ball carrier. Well, okay, first you need some string! You'll want to choose something non-stretchy, thin, smooth, and super flexible.
You can find thin nylon cording or even rope at the hardware store. I used one of my favorite durable cord sources I know — I pulled it from a broken pair of window blinds.
I never throw away blinds without first salvaging that awesome cord, like I did for my copper wind chimes project. (Oh and I created something fun from the slats, too!)
You'll need a total of four pieces of cording that are twice as long as the game board is tall (mine were about 8 feet long)
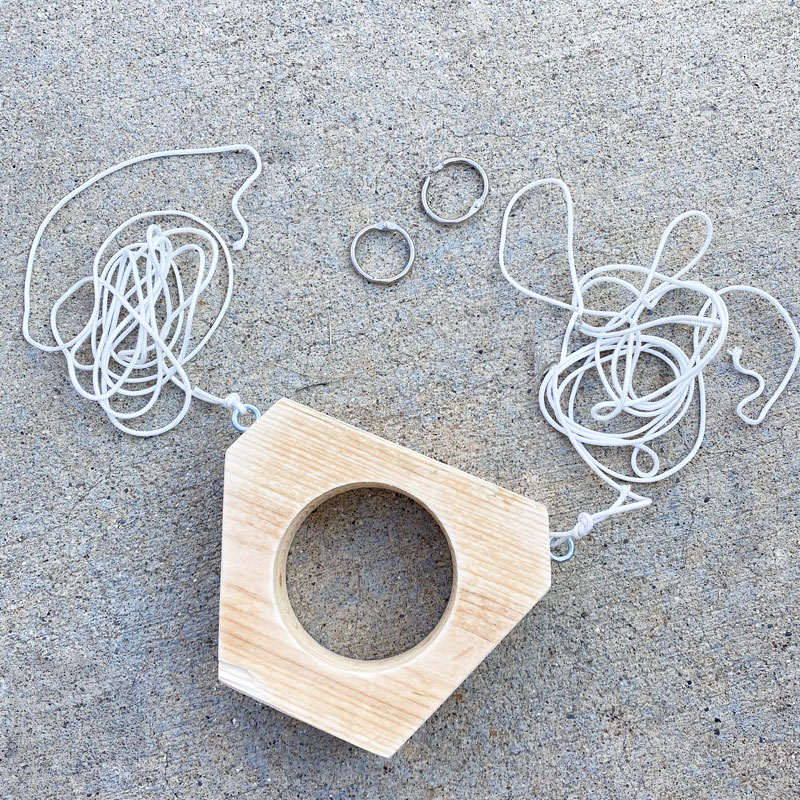
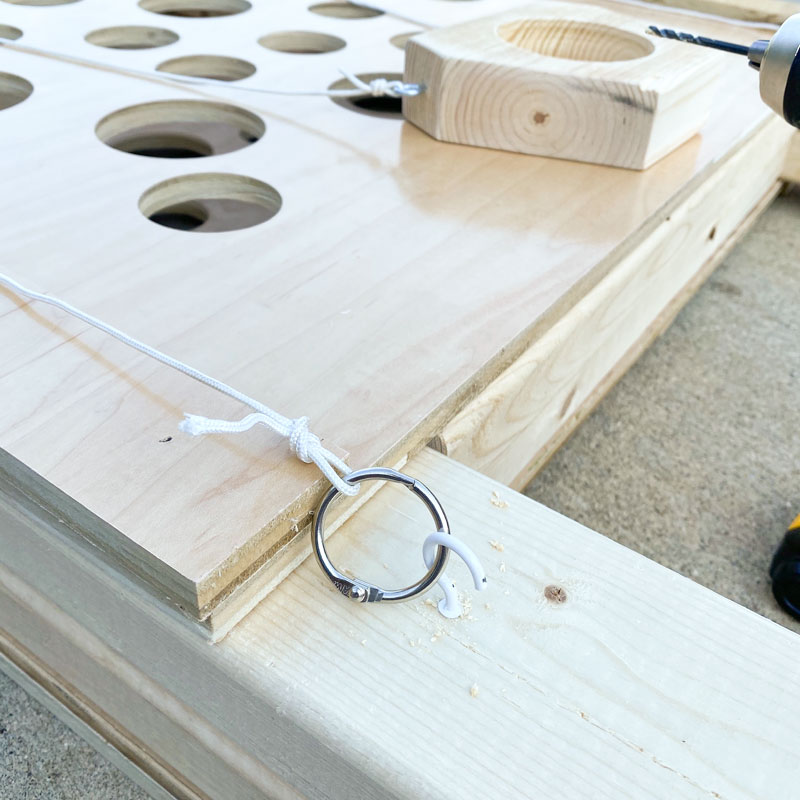
Pre-drill and attach two small eye hooks to the top corners of your ball carrier.
Then tie one string to each eye hook. While you're at it, find some small rings to use for the other end of the string. You'll need four rings that are at least big enough to stick a finger through. I used 1" binder rings.
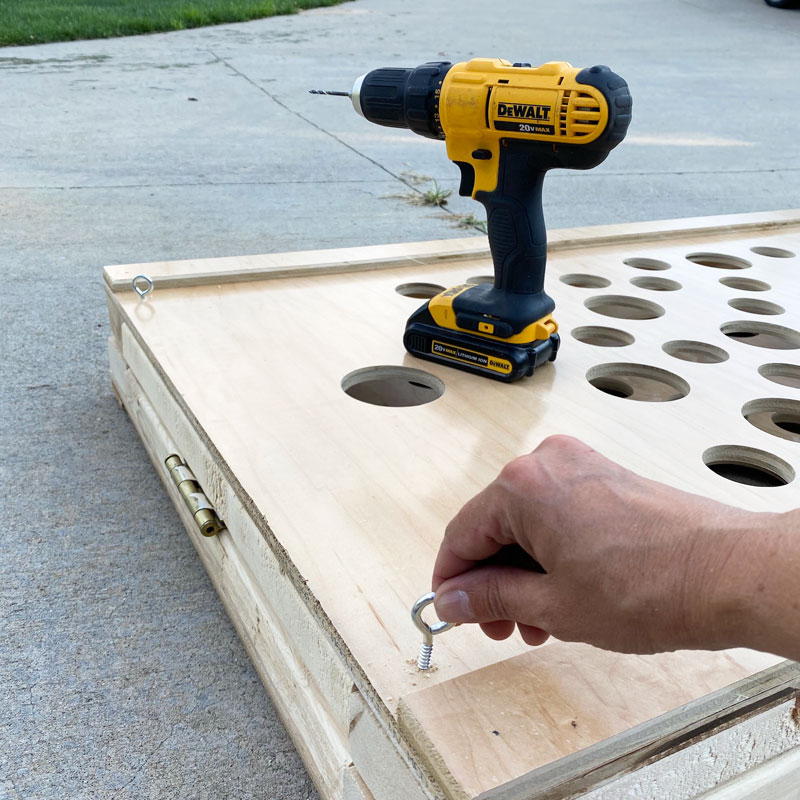
Attach two more eye hooks to the top corners of the board.
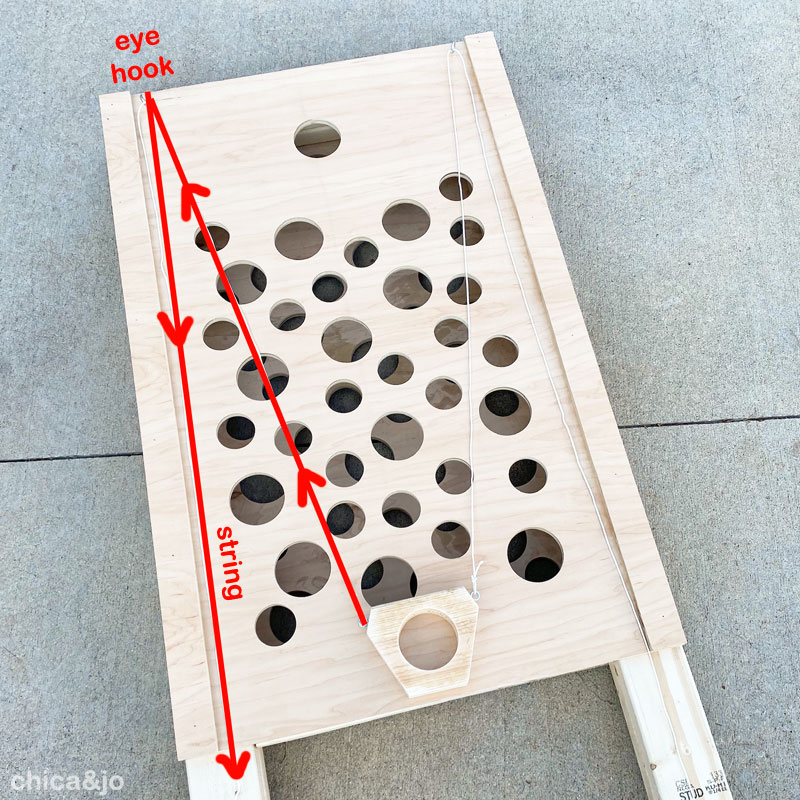
Place the ball carrier in the middle of the bottom of the board and run the string up to the corner eye hook, then back down again to the 2x4 leg. Run both strings in this manner, to opposite corners.
Tie the binder ring to the other end of the string, pull the string so it's taught, and secure the ring to the base with a cup hook.
When you stand the game back up, you should have a perfectly balanced ball carrier that's strung up and ready.
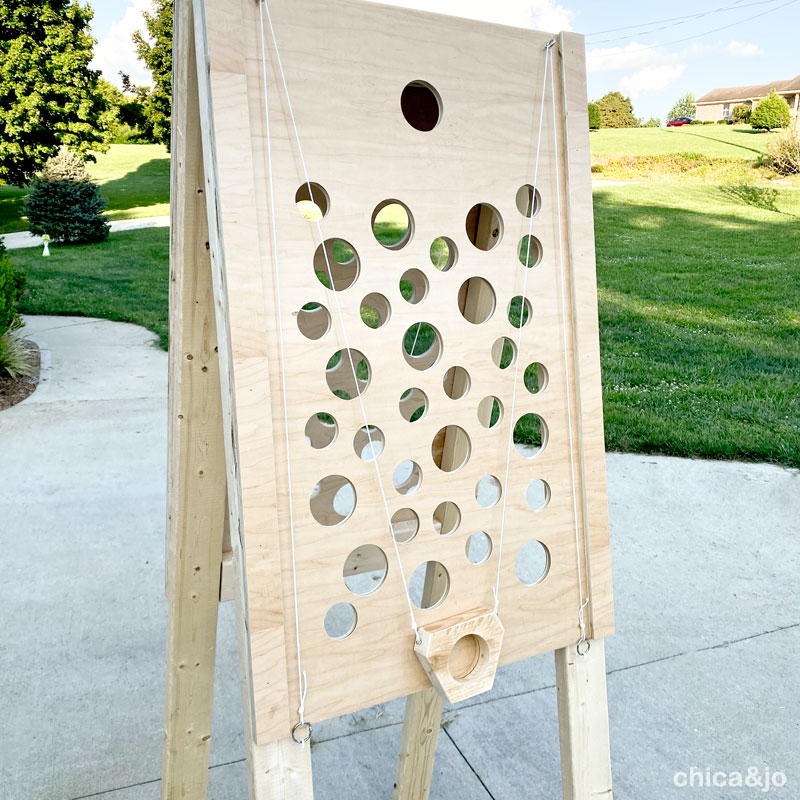
The hooks at the bottom will hold the rings while it's not in use. When someone wants to play, they can just take them off the hooks and go.
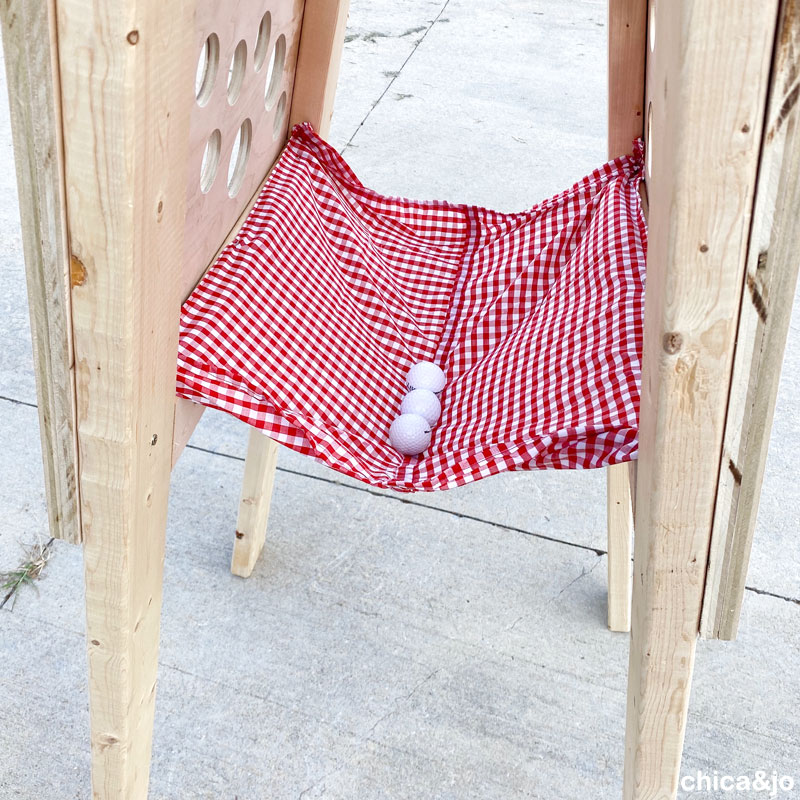
Step 12: Add a ball catcher
We just need to add one more thing before this game is done and ready to play, and that's something to catch the balls that fall through the holes.
Get a rectangle of fabric and quickly hem the edges, then staple it to the frame. Gather up the sides a little and staple again to create a slight bowl shape.
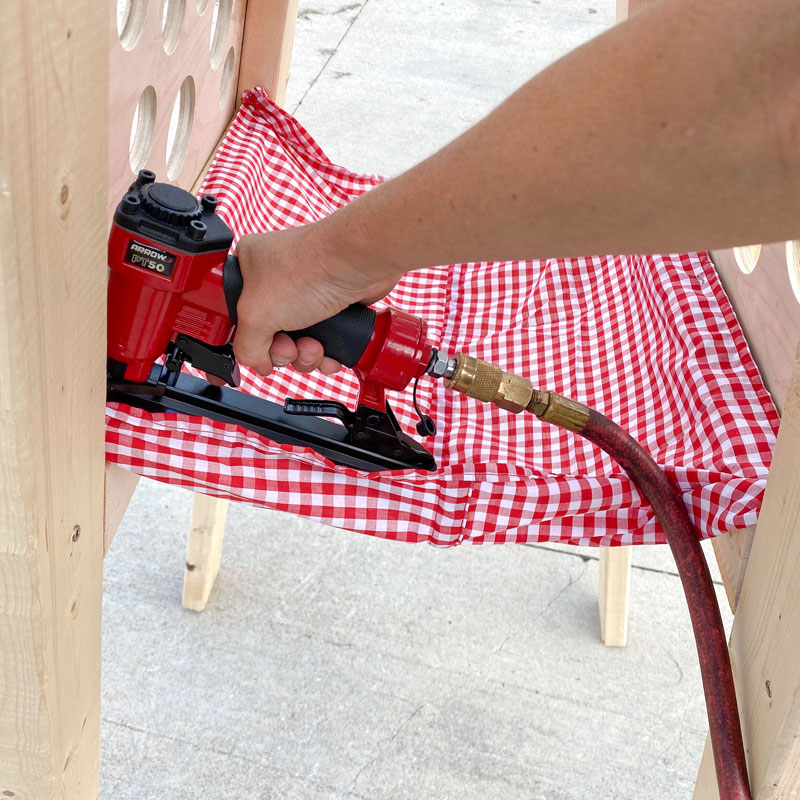
Isn't this so much better than chasing bouncing golf balls all over the driveway?
Step 13: Paint and finish (optional)
At this point you can paint, stain, or seal the game as desired. I opted to leave mine with natural wood and just applied a thin coat of mineral oil.
The finished maze game
Now your game is all done and ready to play!
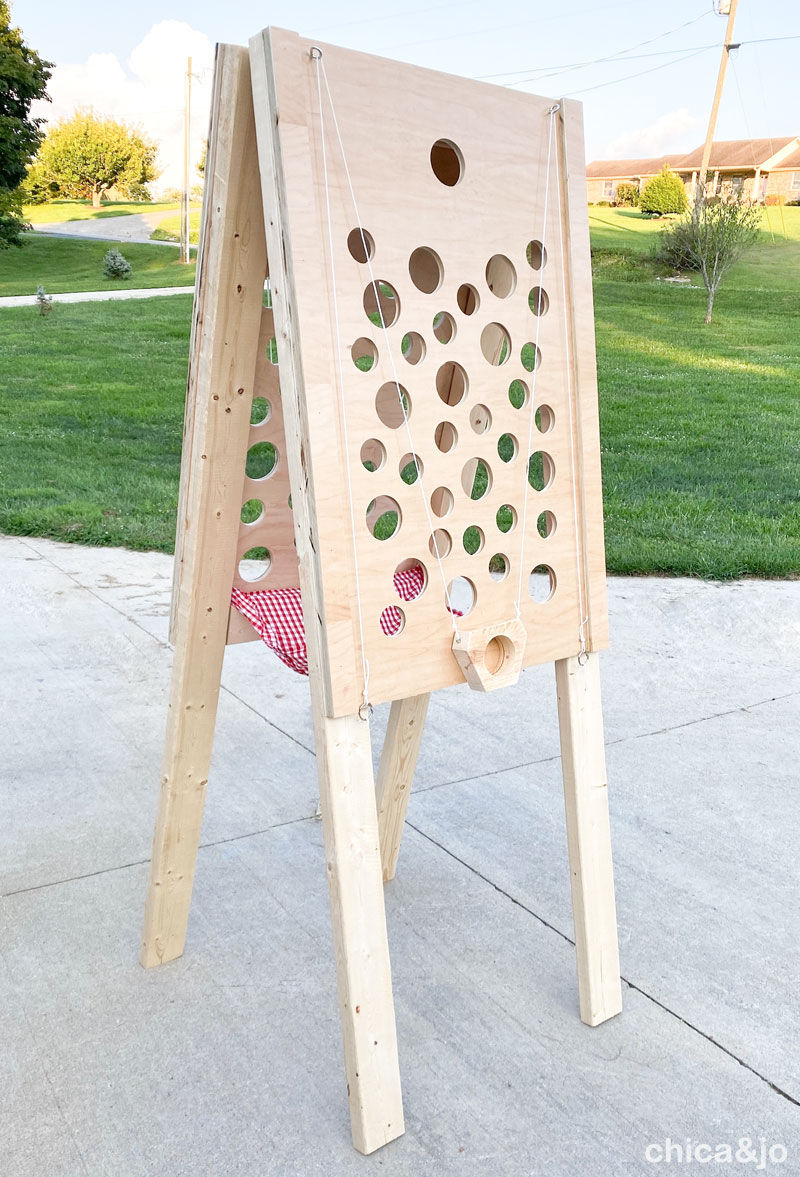
To play, put your fingers through the rings, and place a golf ball in the carrier. Pull on both of the strings strategically to move the carrier left and right, up and down, around the obstacles. If you can make it to the top target hole without falling into one of the others along the way, you win!
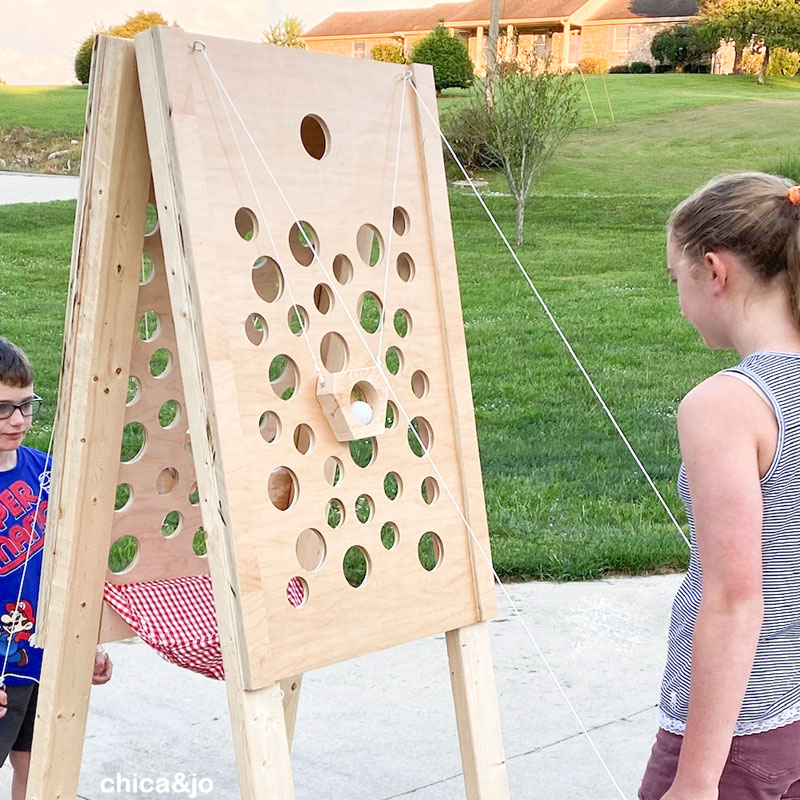
Because this game is two-sided, two people can play at once. And since we made the mazes identical, it makes for a fair race between two players to see who can get there first.
similar projects
Christmas Plinko Game for Kids

Halloween Plinko Game for Kids
Thanksgiving Kids' Table Game


7 comments so far:
Very well explained and it looks like it will be really easy to build. Thanks.
Dave, we hope you enjoy the build. If you share on social media, tag us @chicaandjo so we can see how your game came out!
Just the perfect gift to make for a summer party. I think you read my mind.
I am going to make this next week
Michael, have fun with it! And if you share your results online, be sure to tag @chicaandjo so we can see.
OK, so when I first started reading it, I was a little confused but after reading the entire directions and how to play I completely understood everything. I love this. I just love this! It’ll be a few months down the road before I’m able to build it, but this is something that would be fun for not only kids but adults as well. I’m looking forward to it.
Shirley, I'm glad you stuck with it to understand the game. I actually just went back and cleaned up the post a bit to hopefully make it clearer for your next read. Good luck with your build.