


DIY Wedding Program Booklet Template

For our respective weddings, Jo and I both made our own wedding programs. Hers were a tri-fold wedding programs and mine were more of a booklet style, tied up with ribbon. In case you want to make your own DIY wedding program booklets, I thought you might like to see how I put mine together, and I've even got a free template to share to get your started.
The template I'm sharing today can be opened up in Microsoft Word/Office and edited to create as many pages as you need for your wedding. Just download our free wedding program booklet template and customize the text to suit your ceremony, creating however many pages you need for your booklet.
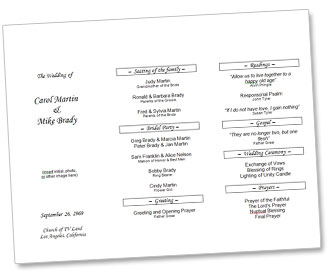
After editing your program, print the pages onto any 8.5" x 11" paper you like, whether it's a simple white printer paper, a lovely patterned background paper, or a classy linen paper.
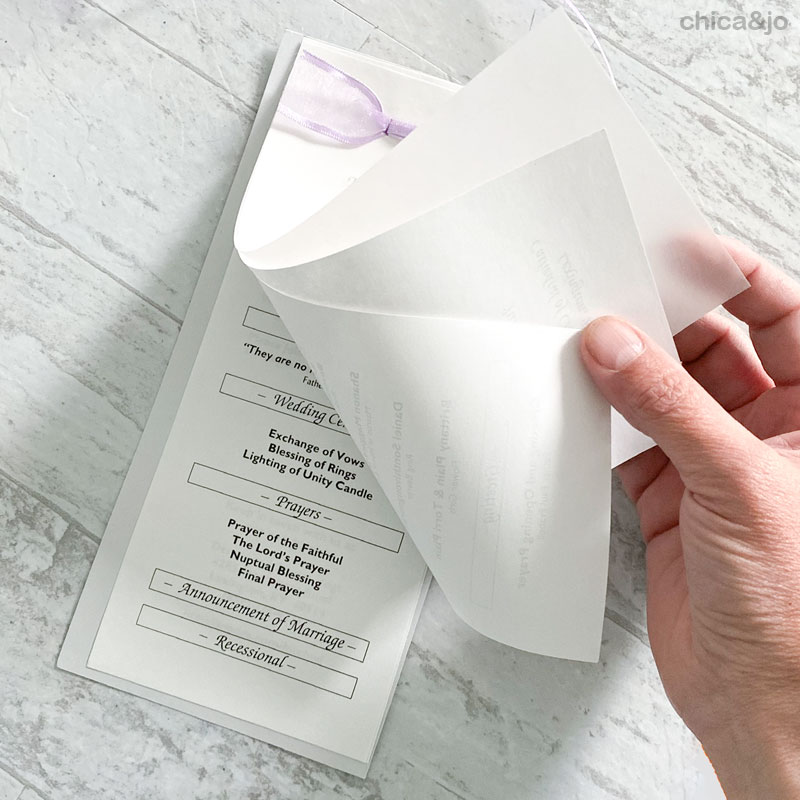
When everything is printed, use a good paper trimmer to cut each page into three even pieces that are 8 1/2" tall and just under 3 3/4" wide. For a dreamy translucent overlay on top of the booklet, also cut a sheet of white vellum the same size as the pages.
Finally, cut a piece of coordinating cardstock to a little bit larger than the booklet pages — make them 4-1/4" wide and 8-3/4" long.
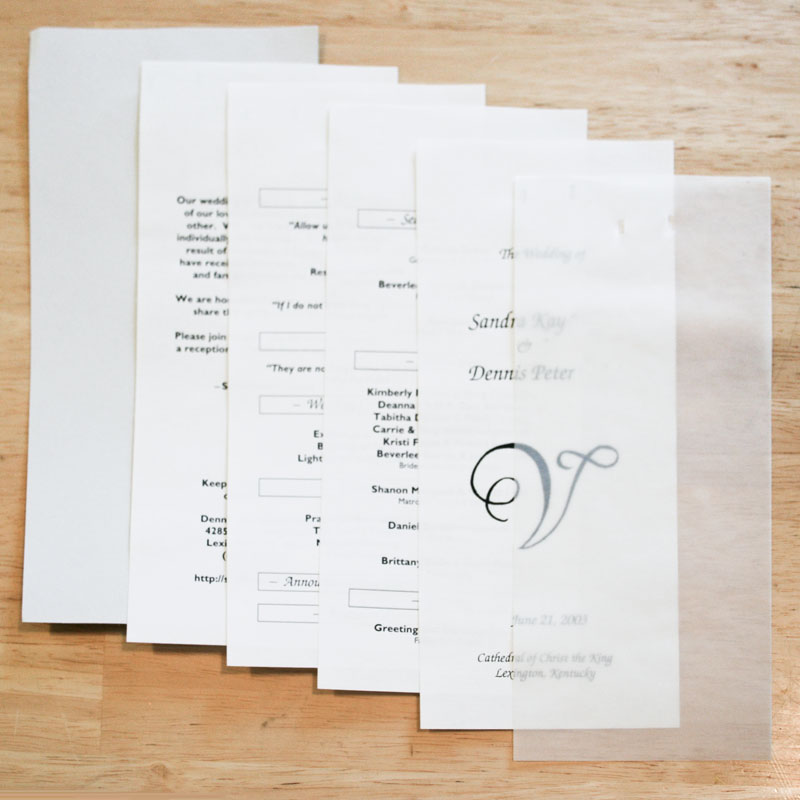
When you stack the pages all up in order, your backer piece of cardstock should be flush on the top, and stick out about 1/4" on each of the other three sides, creating a nice border.
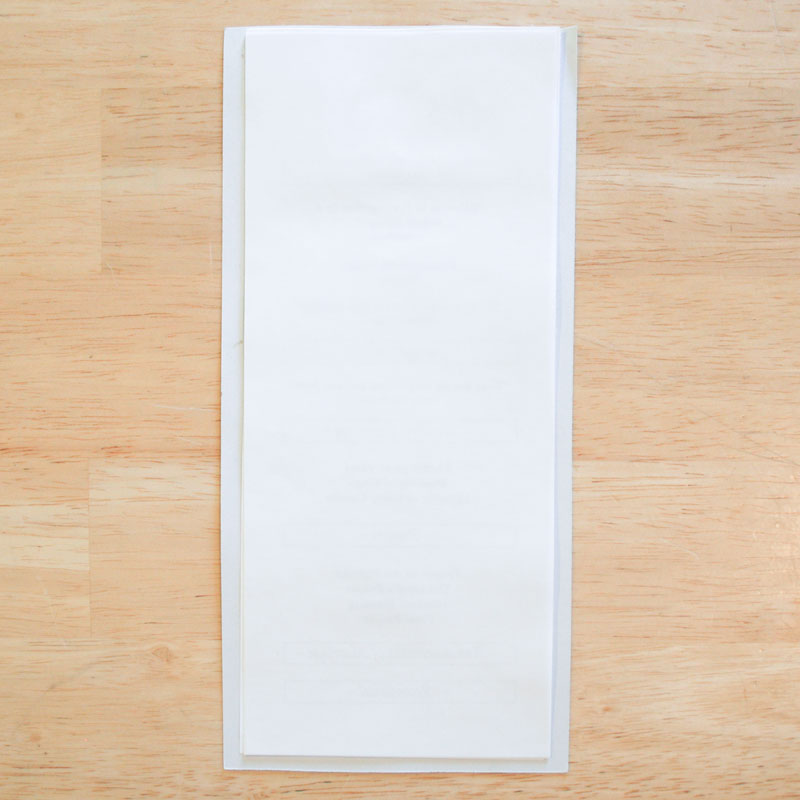
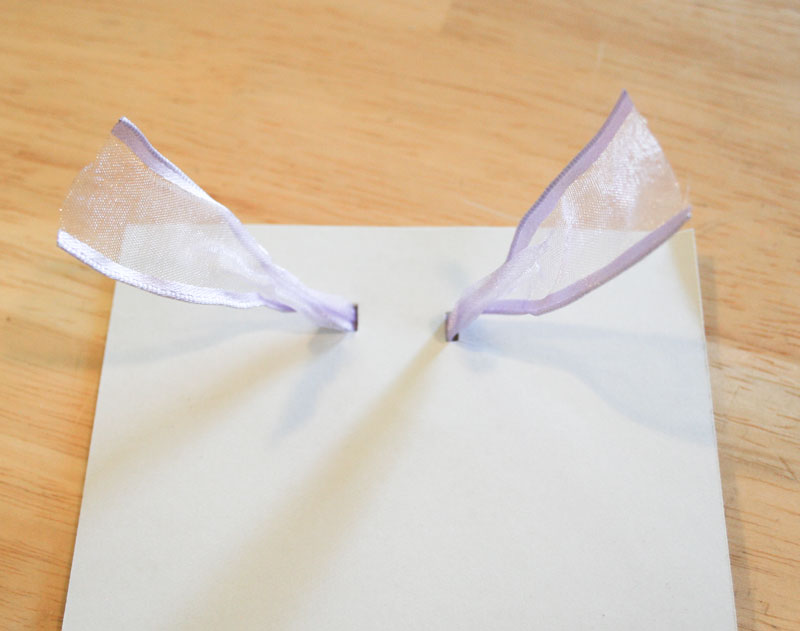
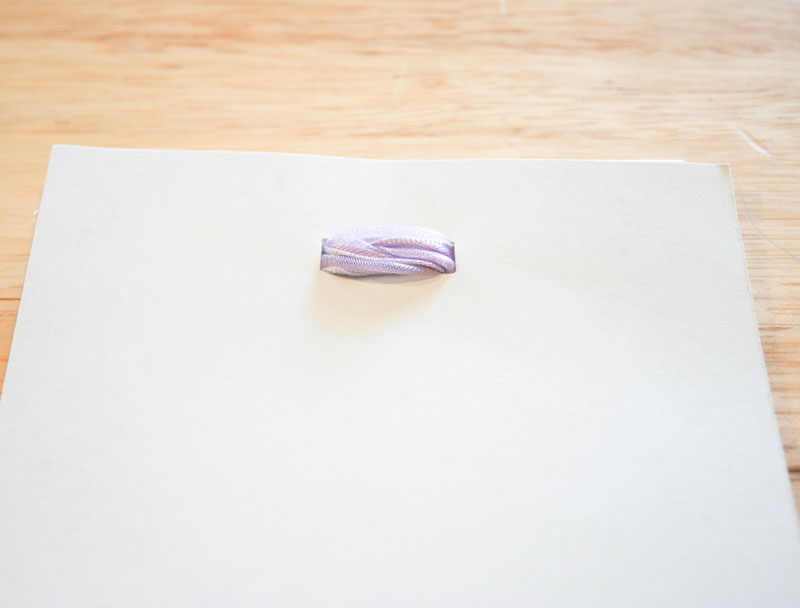
When everything is cut and stacked, you're ready to assemble! Take one set of pages (including the vellum and card stock) and align all the top edges together. Then use a 1/4" rectangle punch to punch two slots in the stack, about 1/2" apart and 1/2" down from the top. This is where your ribbon is going, so may you need to use a larger, round hole if your ribbon is bulkier.
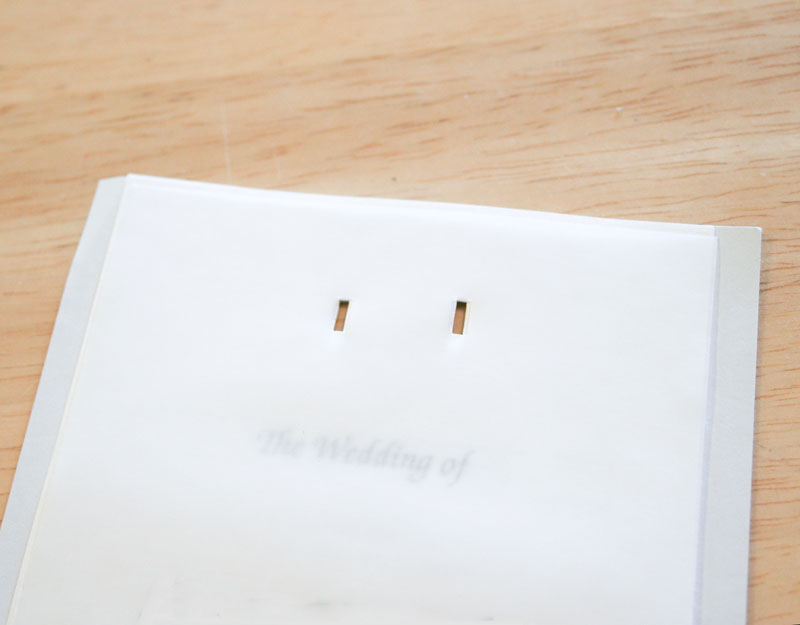
For best effect, choose a fairly wide ribbon (I used a 3/4" ribbon) but remember that you may need to adjust your hole size if you choose a thicker or thinner ribbon. I used a wired ribbon, which helped me to form the ribbon the way I wanted it and gave the "knot" a nice firm hold on the paper. The length of ribbon you need will depend on the look you want to achieve and how far apart you put your holes, but my pieces were about 6" long.
Start by poking both ends of the ribbon through the holes, from front to back.

Lay the stack face-down on the table, so the ribbon is pointing up and you're looking at the back of the booklet.
Take the ribbon on the left and poke it through the hole on the right, so that it comes out the front.
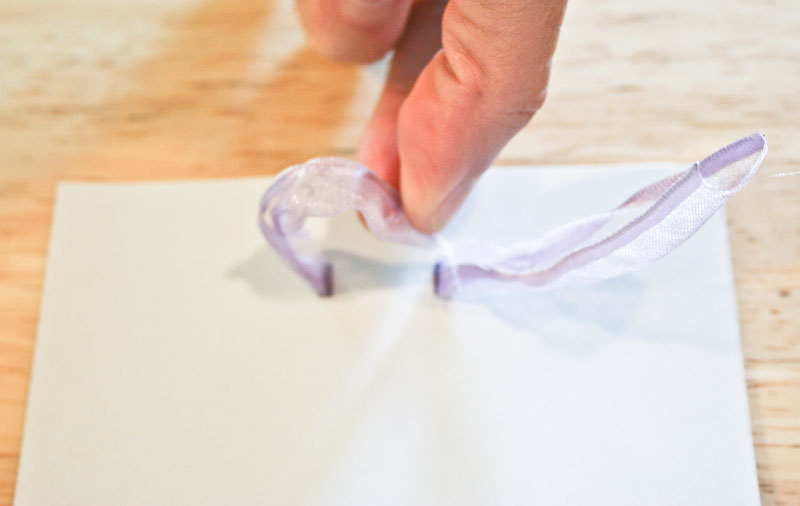
Then take the ribbon on the right and poke it through the hole on the left, leaving you with a criss-cross of ribbon on the back of the booklet.
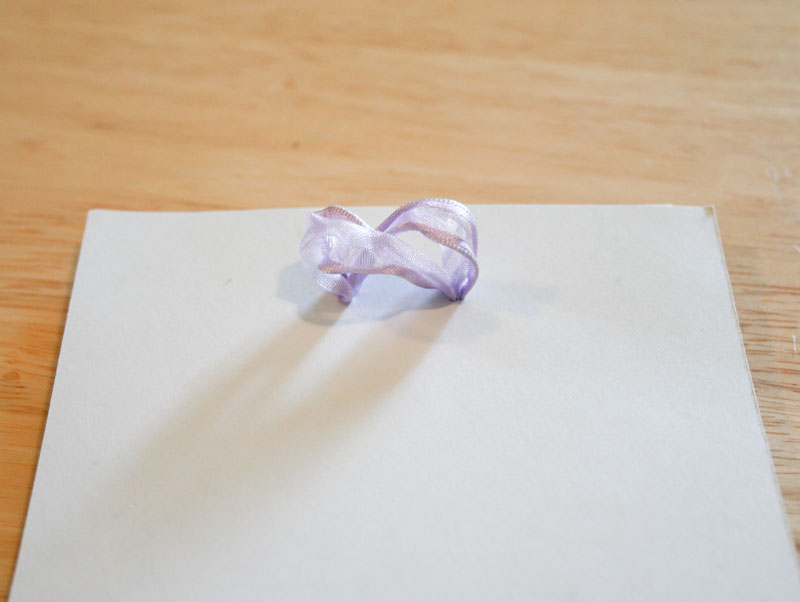
Flip the booklet over and you'll see both ends sticking out the front. Pull them snug and tight.
Flip it back over to the back and make sure the crossed ribbons are flat and smooth.
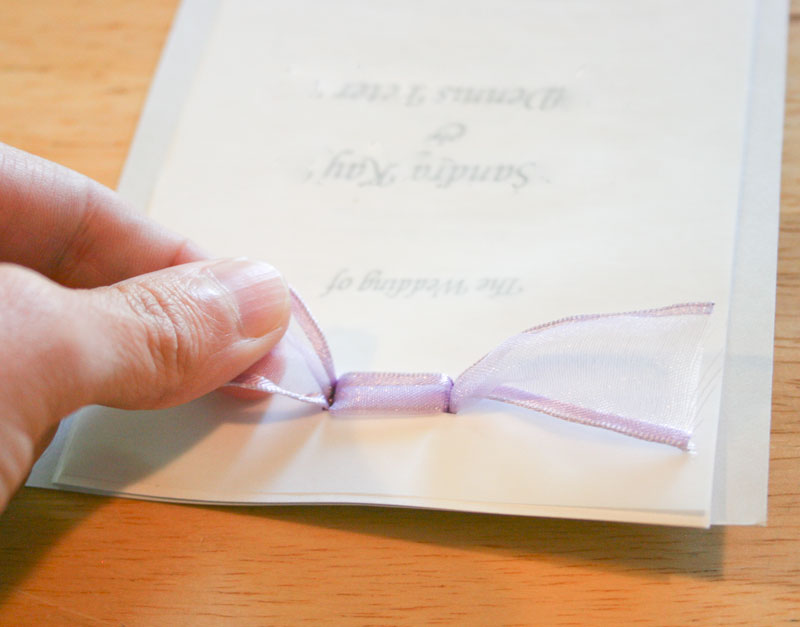
Now flip it back to the front again and you'll see a pretty faux bow on the front, with no tying required! Adjust and trim as needed, and your bow is done.
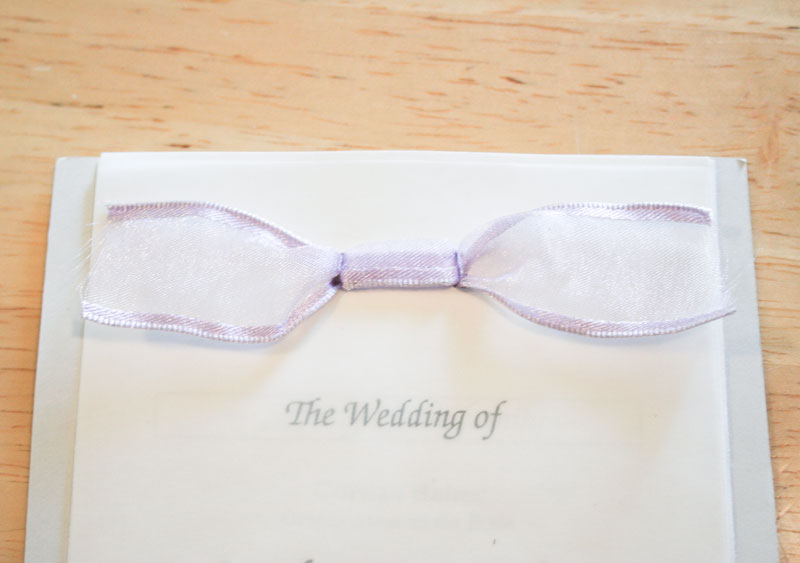
This simple knot has bound the pages together into a booklet that guests can easily flip through on the big day.
similar projects
Free Tri-fold Wedding Program Template
Free Wedding Favor Box Template
Easy DIY Wedding Invitations


108 comments so far:
And if the frayed ribbon edges bother you, you can also use a flame to slightly melt the edges, which seals them completely - no more fraying! Just be careful not to get the ribbon too close to the flame, and keep it moving.
Thanks for the template I am making them for my own wedding, they look really good and our colors are black white and red so I used black card stock backing and red ribbon!
I appreciate the suggestions, it is just slow going as I am making them myself and have to make 150 and have 40 done so far! I think I underestimated supplies so I will have to go back to Michaels.
Suzanne, I'm happy the program is working out for you, and I bet it looks really pretty with your colors. I know what you mean about it taking a while, though. When I made mine, I got my parents to come over one evening and we did the whole stack assembly line style, which really helped a lot :)
Thank you so much for the template. I've looked all over the internet and yours was the best and easiest to work with. I LOVE IT. I'm making my own wedding programs and am thinking about making my own invitations too. My wedding is more than a year away but I'm already getting all the supplies ready. Thank you again.
Thanks, Karen! I'm glad you like the template and we'd love to see your programs when you're done. As for starting a year early -- I don't blame you one bit! I started really early for my wedding, too. It was the only way to get as much handcrafted stuff done as I could, which saved money and made the wedding that much more personal. Have fun!
This is amazing! I've been searching all over for a template--and once I found this one I knew it was the one. I've gotten the template done and just need to go buy the supplies to get them done! I love your site--you guys are amazing!
Thanks, Miranda! Good luck with the programs and let us know how it goes :)
can you tell me where I can find the slit style hole punch that you used in this program design. I have not been able to find side hole punch.
Thanks,
Esther
Hi, Esther. The slot-style hole punch is available on Amazon. There's a link to it in the project description, but here it is again for easier reference: 1/4" rectangle hole punch. I'm pretty sure I've seen them at Michael's craft store, also, so you might want to check them out if you've got one in your area.
Hi! I like this idea. Can you tell me..if you remember..How much ribbon you used for one program? Thanks!
Hi Delanie. I think the ribbon was about 6" long. Hope that helps and good luck with your programs!
Cool! Thanks!
Hi there- can you tell me where you got your ribbon and what type of ribbon it is? Also, about how many spools of ribbon did you need? Thanks so much!
Kerry, I bought the ribbon at Michael's, I think. You need about 6 inches of ribbon per program, so how many spools you need will depend on how much ribbon is on a spool and many programs you are making. Good luck!
Hi - this is a great template. One question I had was, do you write the same text on the vellum page as you do the first page? One idea I was thinking of is to just put our initial on the vellum page but wasn't sure if that would look weird....
Hi Kerryann! I did not print anything at all on the vellum because I wanted the text from the first page to show through. It made for a nice soft effect.
One thing you'll have to be careful of if you decide to print on vellum is that inkjet printers don't tend to print very well on vellum, but laser printers seem to do a better job.
Hi Chica,
Thank you very much for the templet. I have one question, I have a very large wedding party (16 bridesmaids). Can I use the same templet for my wedding.
Hi Francesca. That sure is a large party! You can modify the template to include any information you want, so you ought to be able to fit all your bridesmaids' names on there. The list might just have to stretch to two pages :)
Hello, This may sound silly but I want to use the tri-fold program template, but I am not able to unsert my own names and things, is that how it is suppose to work? Or am I doing something wrong? Can someone help me please I would like to use the template.
I am sorry you are having problems with the template. If you click the link to download and tell it to open it in Microsoft Word, you should be able to edit it freely and then save it to your hard drive. Do you have Microsoft Word installed? If you are still having troubles, please send me an email at jo@chicaandjo.com and I will send you the file directly.
Hello I was wondering if I can use 2.5" satin edged wired ribbons for this project. I can not find 3/4" ribbons anywhere. Thanking you in advance.
Which size ribbon do you suggest also keep in mind that my colors are of the rainbow. Which are pastel colors of pink,green,blue,orange,yellow,and purple.
Hi Francesca. You can really use any size ribbon you like, as long as it will fit in the holes you punch. I personally think 2.5" ribbon might be too large and overwhelm the page, but if you like it and it works for you, go for it! Just buy one roll and try a few samples first and see how it looks before doing them all :)
As for the colors, why not get 6 different ribbons, each in one of the colors, and mix the programs up? Some folks would get pink, some would get yellow, etc. That would be very pretty, I think.
Hi Chica,
I am thrilled that I came across your booklet template. It is the exact type of program I wanted to make and you made it that much easier for me. Thank you for posting it!
Awesome, Dawn! We'd love to see your programs when you're done, so feel free to post them to our Flickr group.
Hi I love the "V" what font did you use and what put the size? I need and "A" where you V. I am also trying to make this smaller and convert it to a tri-fold. thanks so much
I also need to add a small 2.5 x 2.5 picture to the front of this program. Any suggestions on how to do that? Thanks again
Hi Cynthia. I don't remember where I got that "V" or what font I used, but I just searched one of my favorite sources for free fonts, 1001freefonts.com, and found one I think you'll like. Check out Baroque Script. It has a very fanciful "A".
As for the photo, Word should make that pretty easy for you. Just put your cursor where you want the photo to be, and choose "Insert" -> "Picture" -> "From File" in the menu. Then browse for your photo on your computer and insert it. You can then re-size it and move it as desired.
Good luck and we'd love to hear how it goes!
Thank you sooooo much. I am doing this for a friend and I want this to be special. I'm excited to see the finished product!! You're awesome!!!
Thank you for this great tutorial, I like these alot! Quick question, with no cut marks on the print out, how did you know exactly where to cut so that everything was the correct width?
Hi Nik, thanks for the nice comments. It has been a few years since I made those programs, but if I remember right, I just started on one side of the paper and used the ruler on my paper trimmer to measure each cut. This may vary depending on how your printer prints the pages, but just try to get them as even as possible, and remember that every program doesn't have to be the exact same width :)
Hi Chica!
I am so happy I found this template! I downloaded it, but it only lets me view the actual document. How can I get it to let me write in my own information? Thanks so much for all your help!
Hi Dee. The template is a Microsoft Word document, so when you downloaded it, it should have launched directly into Word (assuming you have Word installed on your computer!). Once you've got the template open in Word, you can just backspace/delete over the text that appears and replace it with your own text.
If you are not able to edit the text you see, my guess is that your browser is attempting to launch the template into something other than Word.
Hope that helps. Let me know!
Hi, im tyring to copy a font from 101 free fonts but when i download it. it only saves as wuick brown fox speil? How do i copy just a J and N for the cover?
Hi Lee. When you download a font for Windows, it should be in the form of a .ttf file (which might be zipped up into a .zip file). You'll need to install the font before you can use it. To do that, copy the .ttf file into your "fonts" folder (found in the Control Panel). Once the font has been installed, you should be able to choose it when creating text in whatever application you are using (like Word or Photoshop).
If you need more help with installing fonts on Windows, check out this page from Microsoft
I love this program, its the one I am going to use for our wedding. It is pretty much exactly like the Invitations I purchased!! Thanx!!
What a stroke of luck, Nancy. We'd love to see the programs you create. Congratulations on your wedding!
Chica!!! Thank you so much for posting this template...exactly what we wanted! I am defintely a DIY bride so this is great! We saw these programs in the store but they were too expensive and over our budget! I am blessed to have my brother printing them out for us, so now we just have to do the assemebling...thanks again...hope to send you a pic of the finish product!
Samica, I'm so glad we could help and save you some money. Please do share a photo after the event, and congratulations on getting married :)
Thank you for your talented advice. I am excited to begin the project for my September wedding.
You're welcome, Thalia. We hope you have a wonderful wedding!
Thanks so much! This Program is exactly what I was looking for. And affordable since we're both students!
Hi, where'd you get your materials from? Do you remember how much it cost?
Thanks! :)
Hi Mary. If I remember correctly (it has been quite a while!), I got the vellum and ribbon at Michael's. If you watch the sales carefully, you can get them for a good price. The gray cardstock came in a ream from an office supply store, since I needed so much of one color, it was more affordable than buying single sheets. The white paper is just regular copy paper. Hope that helps!
Hi Chica! I know this is an OLD post but what did you use to punch your holes? I am new to paper crafts and that is the only part I can't seem to get right. I used a regular hole punch but the poor thing bent and broke just trying it's first hole :( Thanks!!!
Hi Cyndi. It's never too late to comment on one of our projects :) I used a 1/4" slot-style paper punch for the holes in this program. I like the rectangular slot better than a round circle. You may also be able to find a two-hole ribbon punch, which saves time. If you're having trouble getting a punch to go through, you might want to try just punching a few sheets at a time. Hope that helps!
Hi Chica,
What was the length of the ribbon you used? I'm trying to estimate how much ribbon to buy. Thanks.
Natalia, I think I used about 6 inches of ribbon for each program. Hope that helps!
Hi Chica,
I'm so happy that I came accross this post. I have been searching for this exactly and finally found it. You explained it so well, and its so helpful. So happy I found a wedding program I love.
Yay, Marie! Welcome to our site and we hope you stick around and enjoy more of our project ideas :)
this is so nice. its the first template i saw & fell n love with it. i wile be using it for my wedding in feb
Yay, Nina! We'd love to see how your programs come out, and congrats on your upcoming wedding.
Wow, ladies! This is impressive, simple, and oh so elegant! I cannot wait to try this out!
Hello, just wondering how I go about making the 3 colums just a little bit wider?? I have the whole thing done, but I would like for the words to go further out to the edges. How do I do that?
Jen, to make your columns wider, you'll need to adjust their settings in Word. Depending on which version of Word you have, this may be in a different place, but try to find the Column settings and then adjust the "width" and "spacing" until you have more room for your text. In our template, the width is set to 3" and the spacing is 1/2" currently. Hope that helps!
Hi, I was wondering what size paper did you start with for the card stock and program?
Kimberly, the paper was all 8.5" x 11"
Hello, this is an absolutely amazing idea. I had been looking and looking for ideas to do for my programs and I didn't like anything until I saw this.
With my wedding only months away and me running around because of everything else I didn't think I'd ever find anything, that was in my budget and looks very good, but this is simple, affordable, and something I can do, so thank you for posting this and helping me.
That's wonderful to hear, Meg! Good luck with the rest of your wedding planning. I know it can be overwhelming at times :)
Thank you so much for this template! I'm getting married in a week and this is perfect. I've been working on them all weekend, and I think their going to be beautiful!!
So glad we could help out, Kristi! We'd love to see what you come up with if you want to share a photo in our Flickr group for reader projects.
Thank you so, so much for this template! I am in the process of finishing up my programs for our upcoming wedding and they look fantastic! Your generosity is much appreciated! Thanks again for sharing!
I LOVE this template!! But for some reason I am unable to edit the microsoft file - it opens up, but then will not let me save or change anything... Is it a doc or docx?
Renee, I'm sorry you're having trouble editing the template. It is a Microsoft Word file in .doc format. I just tried opening it myself and it launched into Word, where I was able to edit it. Is yours launching into Word or is it trying to display in your browser or in some other editor? Maybe try saving it (right click and select Save File As) and then opening it from Word?
Thank you so much for the template!!! I just love this idea!!! I have already printed all of my programs and can't wait to get to the craft store to get my ribbon and card stock! Thanks again!
So glad you like this template, Shanna. We'd love to see how your programs come out if you want to upload a photo to our Flickr reader's group.
Thank you so much for the template and your page was a HUGE help!!!!!!! I have got my supplies on order and the program typed up...thanks so much again!!!!!
You're welcome, Missy. Congrats on your upcoming wedding :)
I love this template, I will be using it for my wedding :) For those looking for a nice curly font to use for the monogram letter on the front... "Janda swirlygirl" is a nice free one which can be found on dafont.com
I have a question... where did you get the wired ribbon. I have had trouble finding a plum colored ribbon with the wire :-(
I did find some 7/8" ribbon though, do you think that would be too wide? (sorry for all the comments!!!)
Angela, your comments and questions are welcome! I don't remember where I got my ribbon, but I suspect it was Michael's, because that's where I tend to buy most of my ribbon. You can certainly use any width of ribbon you like, depending on the look you're going for. You may need to adjust the size of the hole depending on the thickness and width of the ribbon you use, though. Hope that helps!
Do you happen to remember the length of the ribbon you cut to thread through the slotted holes?
Leah, I think my ribbon was about 6" long, but you may need to use more or less depending on how you space your holes and the look you want to achieve.
I am at the hole punching stage in this project. Were you able to punch through all the layers at once with your hole punch or did you do them individually & line them up during assembly? This hole punching part has become challenging for me.
Leah, I don't remember having an issue with punching the holes, but it would be harder if you have more sheets than I did or thicker paper. Perhaps try doing half the stack, then add the rest of the pages, line it all up, and punch through the existing holes to the other pages. This will help you keep everything aligned.
Did you use the hole punch that you posted the link to on Amazon? I have looked everywhere for one & only found one at AC Moore but it's not going to work.
Yes, Leah, that is the punch I used.
This template saved my life!!
Making them for my daughters wedding next week.
Thank you!!
So glad we could help, Josett!
Thank you, thank you, thank you, thank you.... You have no idea how much my stress level just decreased. I have made numerous trial and error attempts. I finally came up with one that i liked and went to buy the paper and started to feel ill over the amount of money for a DIY project...I would have saved money if I had them professionally done. I say this because my version would have required me to print one page PER section (a page for the cover, a page for the wedding party, a page for the wedding ceremony, etc) that would have been 280 pages total (4 pages for each of my 70 guest) to have a booklet style wedding program for all of my guest. Basically I couldn't figure out how to get more than one segment on a page to cut my cost, time, and energy down. I woke up at almost 4 am this morning and came across your site. After a short time later and feeling unsure because it just seemed to easy, I did my first "test" print...I actually started to cry. It was perfect! My wedding is next week so I have half a million things left to do and creating my programs was the most stressful and becoming too costly. I can now print all 5 sections (I was able to add a new page now) on ONLY 2 PIECES PAPERS. Thank you a million times over, you really have know idea what a blessing this was to find.
Kida, we're so happy we saved the day! Congrats on your wedding, and good luck with the programs :)
I was so unsure how I wanted to make my programs... and this is PERFECT!!! Classy and modern. Thank you!
I came across your site from a string of pictures of programs during a google search. Thank Goodness!! I loved the way they looked, and after reading the directions they seemed easy. I have already made all the pages on my computer, and printed out test pages. Now I just need to print everything and put them together. Crossing my fingers they come out great.
thanks again!
Wow, thank you so very much for the template and the wonderful "how-to" guide!! I am making the programs for my sister-in-law's wedding, and these are just beautiful. Thanks again :)
You're welcome, Lauren, and thanks for saying hi!
What thickness of Vellum paper was used on this program?
Kayla, I don't know how thick the Vellum I used was. It was pretty basic stuff that I picked up at the local craft store.
we want our program to be smaller in size like about 5x5 for example how can you adjust your template for this?
Shane, the template has been divided into columns, three on a page. You would only be able to fit one 5x5 page on a piece of paper, so there's no sense in messing with columns. Your best bet would probably be to start from a new Word doc and add a "Text area" and specify a size of 5x5. Hope that helps!
I love these!!! My question though is the measurements. In the template it says to cut them 3.75" wide- but that would be longer than an 11inch piece of paper. Do you remember your width measurements?
Jenienne, you're right that you can't get three 3.75" pieces out of one standard sheet of paper, but it's really close to that, and just a little bit less (3.67" actually). I've corrected the instructions in the downloadable template to indicate this. Just do your best to divide it into three even pieces!
I love this!!!! I sat down tonight and finished my wedding programme..... Chica and Jo thanks a million..... Will post pictures of the finished product later on......
Thank you SO much! My future daughter-in-law asked if I would make the programs and you just made my job about 1000 times easier! What a truly beautiful and elegant program!
So glad we could help, Mary Anne!
How much do you think it will cost to do this for 200 guests regarding all the supplies I will need?
Does anyone sell them like these for cheap?
THANKS!
April, the cost will depend on what type of cardstock, paper, vellum, and ribbon you use, as well as how many pages you put into your program. You'll have to do some price shopping to see!
Just finished all the programs and they look beautiful! One tip I'd like to pass on: It was difficult trying to keep all the pages and card stock backing of the program together -- and all the edges straight -- while trying to use the ribbon punch (I had to apply so much pressure that the pages kept slipping out of alignment). So I got everything perfectly in alignment and then placed a simple binder clip on each side to hold everything firmly in alignment. You could go ahead and use the hole punch then, but I went an additional step: while the binder clips were holding everything in place I applied a very thin strip of hot glue (with a glue gun) jut under the top edge of each page, creating a permanent 'binding'. Sounds like overkill, but the now the pages stay in perfect alignment and absolutely will not shift from left to right as it tended to do when only the ribbon was holding it in place. The gluing was actually the fastest part of the process! Thanks again for your fabulous idea and template!!
Glad you liked our template, Mary Anne, and thanks for sharing your clever solution!
I thought I was going to pay to have programs done and my fiance was down with that plan. I stumbled across your website and I am so excited to try this out. Our wedding is over a year away but this gives me time to experiment and make it our very own. Thank you, thank you, thank. Now it is off to find the perfect paper and ribbon.
We love helping people be crafty and save money, Kenyatta! Best of luck with this project :)
Thanks for this template. The programs for my daughter's wedding came out perfect. You can check out where I linked back to you here: http://buildingabrandonline.com/SingleMomSucceeding/tiffany-blue-diy-wedding-invitations-and-programs/
Tina, your programs came out great. Thanks for sharing!
My wedding is 12 days away. Whew. Programs are finally complete. Love, love, love this template. Wish I could show you the finished product.
Kenyatta, we'd love to see what you created! You can email a photo to us at chicaandjo@chicaandjo.com or share it with everyone on our Facebook page.
Wedding is 13 days away and this was our final thing to get ready and agonize over for my daughter's wedding. This template is making it so much easier that we actually decided to go the diy route! Wish us luck in putting it all together - the tips in the comments are helping also.
Lynette, so glad we could help you out with one of your last tasks!
Thanks for this great tutorial, I love this template sooo much. I do not think at the first place if good and well design: images and tutorials like this exist. CHICA & JO, thanks so much - this tutorials are helpful.