


Make Copper Wind Chimes

If you love the look and sound of copper windchimes but don't love the price, why not make your own? Making DIY copper wind chimes is fun, easy and affordable.
I have created a full tutorial video that walks you through every step of how to make your own windchimes from copper pipes, wood circles, and cording.
VIDEO: Make DIY Copper Windchimes

Supplies needed for DIY copper windchimes
To make these copper wind chimes, you'll need the following:
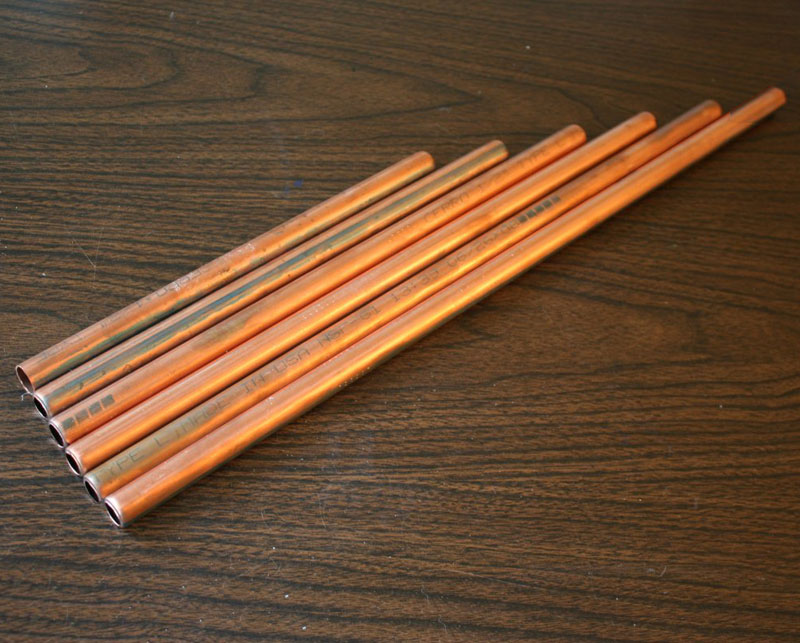
- 10' length of 1/2" copper pipe
- 7" round wooden plaque
- 4" round wooden plaque
- 3.5" flat wooden circle (or 2" x 4" rectangle)
- 1.5mm nylon cord
- Pipe cutter tool
- Copper protectant or mineral oil (optional)
Our tutorial video has all the details, but here is a summary of the overall steps you'll follow for making your own copper windchimes.
Step 1: Cut the pipes to size
To make these windchimes, you'll need a 10' length of ordinary 1/2" copper pipe, which you can find at your local hardware store.
Use a handy tubing/pipe cutter tool to cut the pipe into 6 pieces, measuring 10", 12", 14", 16", 18", and 20".
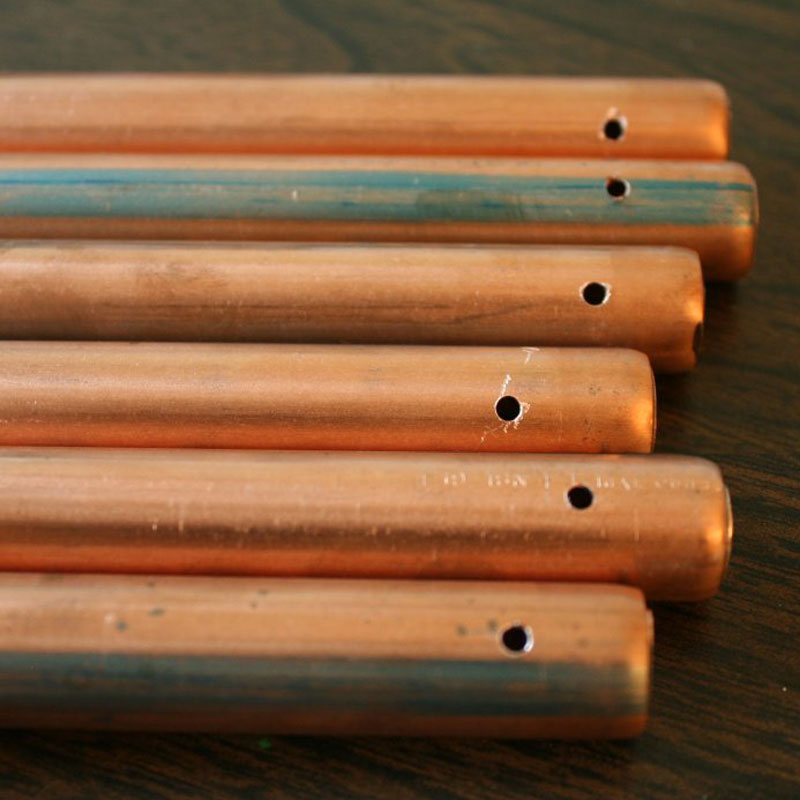
Step 2: Drill a hole in each pipe
Use a 1/8" drill bit to drill a small hole in the end of each pipe, making sure to drill all the way through the pipe so that the hole is on the back, too.
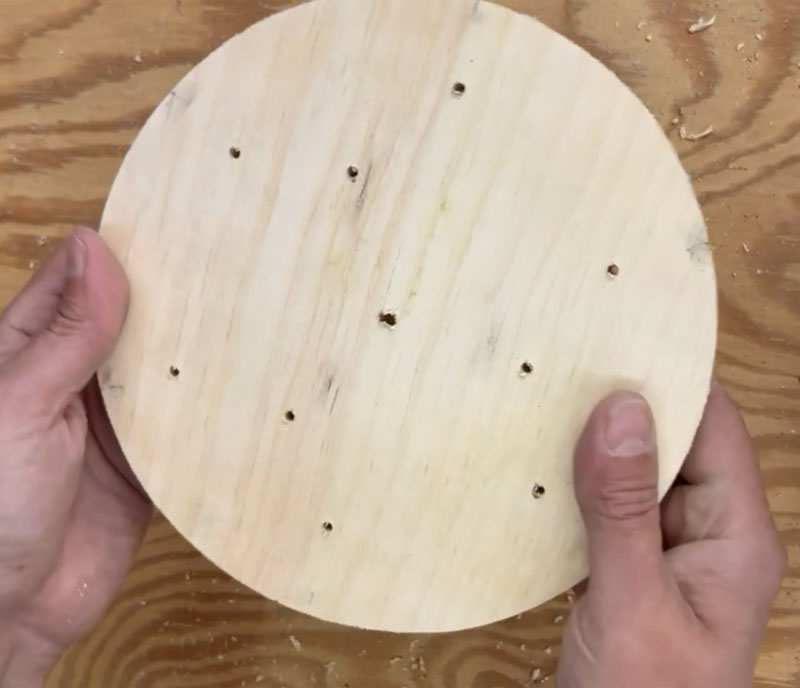
Step 3: Drill holes in the wooden pieces
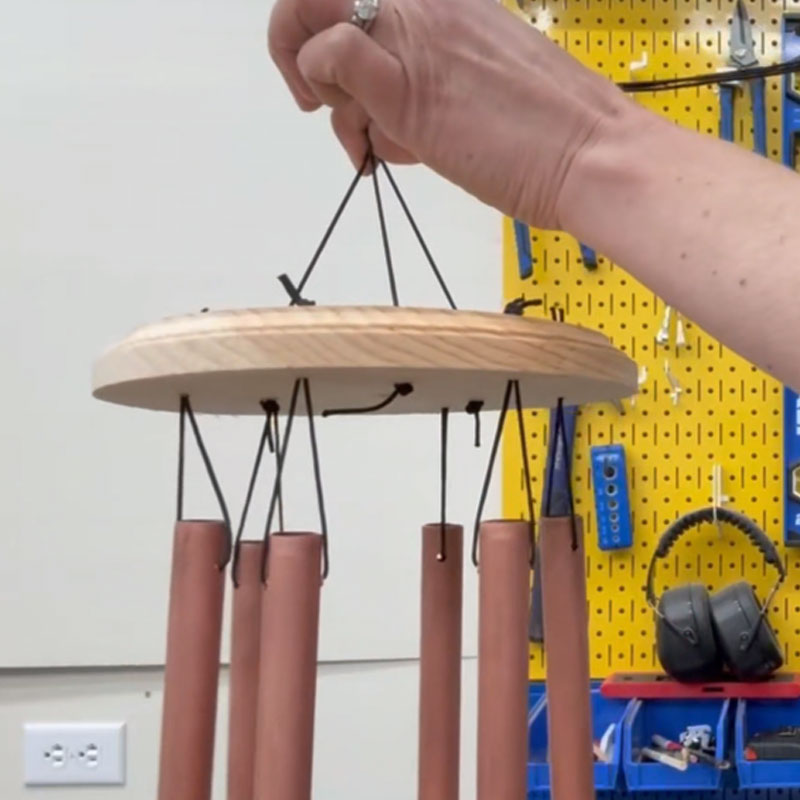
Using the measuring and spacing techniques described in the video, mark and drill the holes in your wooden pieces — the 7" top, the 4" clapper, and the round wind catcher.
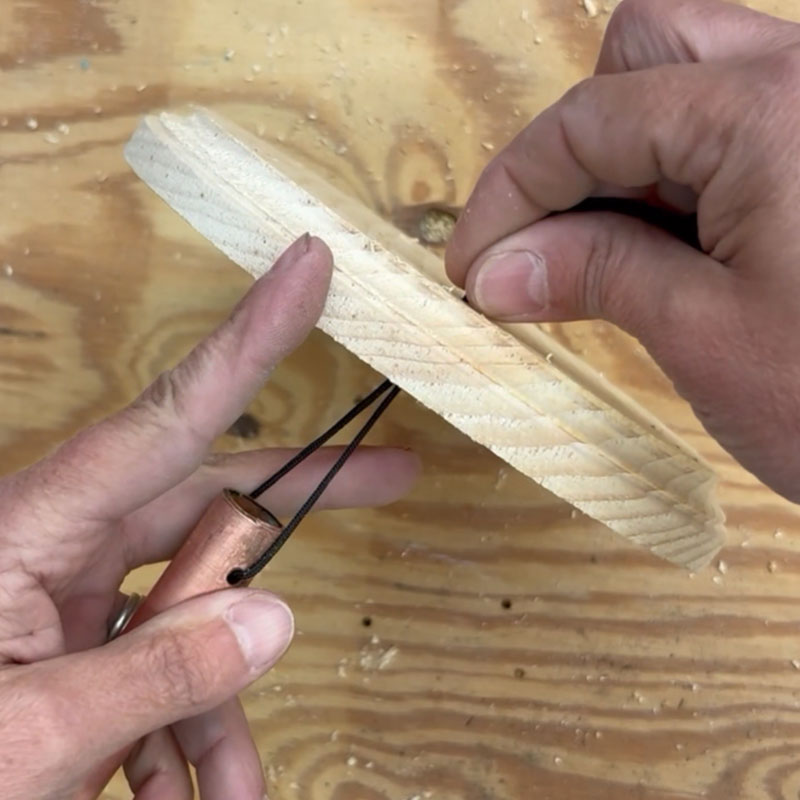
Step 4: String and hang the pipes
Feed a piece of the 1.5mm nylon cord through the holes in each pipe, then up through the holes in the top board. Tie a knot so that the pipe hangs down.
Repeat with the other pipes, making sure to hang them all at the same distance from the board. Make sure you hang the pipes in order from shortest to longest (or vice versa!).
Step 5: Add a hanger to the top board
After all your pipes are hung, add the hanging cords to the top. You'll use three cords, and you'll need to adjust each one carefully so that your windchimes hang straight and even — remember that each pipe is a different length, and therefore has a different weight.
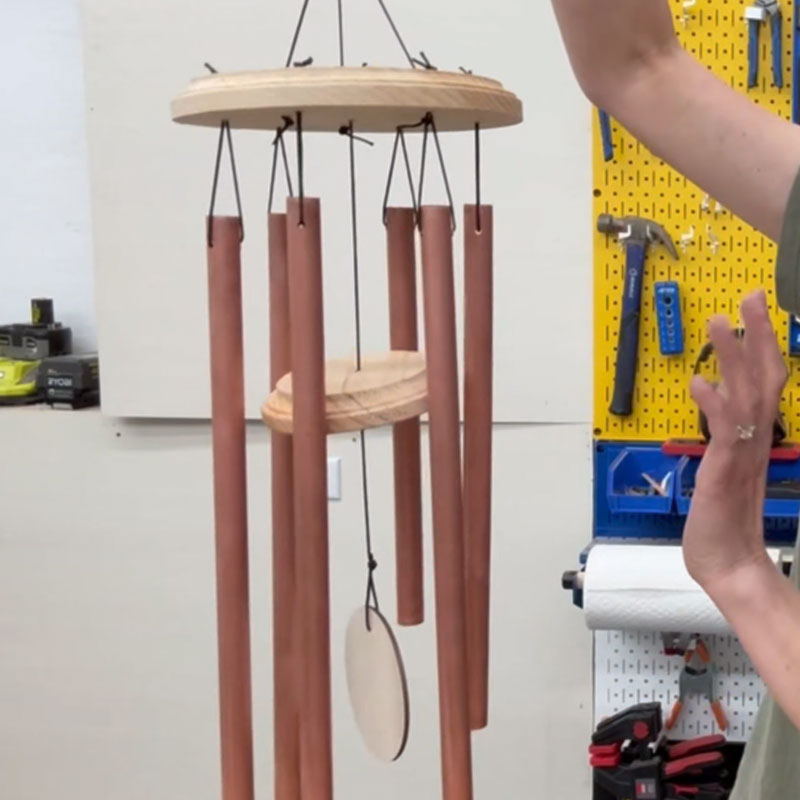
Step 6: Add the clapper and wind catcher
Tie another length of cording to the wind catcher, knot it, then feed it up through the clapper. Hang it in the middle of the chimes, feeding the cord up through the hole in the center of the top.
Step 7: Protect and decorate (optional)
Copper will patina over time, which can look very appealing to some. But if you would like to keep the shiny copper finish, you can optionally protect your pipes with either a coating of mineral oil or some copper protectant spray or cream.
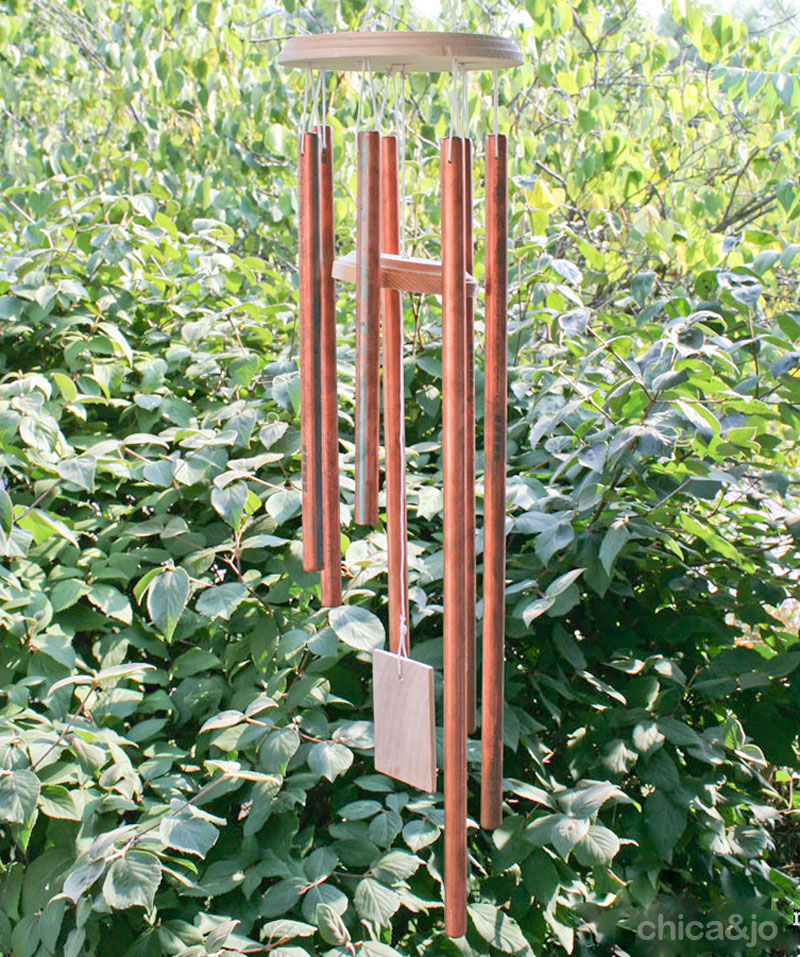
The finished windshimes
When your windchimes are done, you can hang them outside and enjoy the lovely sounds. The breeze will hit the wind catcher and swing the clapper into the pipes.

See, wind chimes are really not very hard to make! Once you've got the method down, you can adjust it to suit your style. You can use different pipe sizes and lengths, paint or stain the wood, or even choose other materials than wood and copper.


56 comments so far:
Yet another idea I absolutely must try. Thanks, again, for the inspiration.
What a cool idea! I had no idea it was that easy! I hate that windchimes are so expensive so this is a great cheap way to make your own! Thanks!
How does the sound compare to other windchimes? I was wanting to do something like this for my kids to bang on, but wasn't sure how it would sound. Love all your projects I've viewed so far - I'm off to explore the rest now! :)
Kristen, the sound is lovely! A good way to hear how it sounds before committing to the purchase is to visit a hardware store and grab a small piece of trim wood, and tap it on a piece of pipe over in the plumbing section. If you like the sound from that test, you'll probably like the finished result too.
My husband and I made this today. I had been looking for wind chimes for my back porch and ones 1/2 this size cost $50 bucks! Thanks for the instructions!
Aloha! This site is great! Your custom copper pipe wind chime project inspired me so much that I decided to start this project today, I've already cut the pipe and I'm ready to cut out the wood pieces. My wife was asking for a wind chime for years, but I could never find one (that wasn't ridiculously over-priced). I'm modifying the design slightly with different diameter pipe, but they sound great. Thanks for posting process/instructions!
Scott, we're so happy our tutorial could help you score some brownie points with the Mrs! We'd love to see how your wind chimes come out :)
Hi!I've been wanting to make wind chimes for years. I even thought of copper pipe because when they get wet and over an extended period of time they would get the verdigris look. You have inspired me to try it. Thanks for posting the instructions.
Karen, I'm so happy to have inspired you! Exposed copper will turn green eventually, so if you don't like that look you can spray the pipes with a copper sealer to protect them.
Chica, I was so happy to find this. My wind chimes broke several years ago but I could not throw them out. This will help me put them back together. One question, where did you get the wood circles I have looked everywhere for them?
Peggy, so glad we could help you save your wind chimes! I got my wood circles at my local Michaels craft store.
Chica, Thank You so much for the clear and easy directions,bought my copper today,and my wood at Micheals and getting ready to make mine. Wish me luck, I know it shall be sweet sounding sucess!
Iris, best of luck to you. Let us know how it goes!
I love windchimes and have been wanting to make some. Thanks for the great instructions! I hung a set I received as a gift over my heat and air unit and whenever the fan kicks on the windchimes make thei beautiful music. I love that I can hear them without any wind!
This is great info. I have a couple of purchased wind chimes that the string has broken or they have come undone where they were stapled to the bottom of the wooden circle. My staple gun won't insert the staples enough to hold it, so I was trying to figure out a way to fix them. I will now use your drilled hole method and fix them. Thanks you! Oh and a suggestion to those who will have theirs hung out in the weather, to keep the wood in good condition, you might either paint, stain or clear seal the wooden parts. I had to seal the wood on my store bought chime after I used wood glue to seal a crack that developed in the wood after being outside for a while.
I have always look at the large one thy sounds like church bells,icant aford one but I will try this thank you very much
Thank you for posting these easy to follow instructions. I have been asked to fix several wind chimes that have broken and I have been putting it off because I didnt know what type of string to use for outside use. Now I can get busy and they can enjoy their sweet music again. You have helped make several elderly people happy. :)
OM GOSH, I LOVE LOVE LOVE WIND CHIMES AND I HAVE BOUGHT THEM OVER THE YEARS AND THEY CAN GET PRETTY PRICEY!!! THE LAST ONE I BOUGHT WAS 65.00! THANK YOU SO MUCH FOR THIS , I AM GOING TO MAKE MY OWN AND WOW WHAT GREAT GIFTS THESE WILL MAKE! THANK YOU AGAIN, THEY ARE BRILLIANT!! :0)
Have the knots in the string held the pipes? Seems they might slip through eventually. Also, what did you use to thread the string through the holes? Great project!
Sheila, the knots were big enough to hold the pipes and they haven't slipped through. My cord was stiff enough that I was able to poke it through the holes without a problem, but if it's not working for you, you could probably use a toothpick to push it through.
Am redoing my plumbing and now I can use the copper pipes to make some wind chimes. To seal the wood circles I am going to use outside house paint. It is made to endure all kinds of weather. Or deck sealer would work I would think. To seal the knots so they don't come undone a little clear sealer applied to the knot. In days gone by when nylon stockings developed a snag or run a little clear nail polish was applied.
amazing worked perfectly! Me and my daughter made it and we had great fun!!!!!!!!! Lovely and easy
I love this type of chimes, but they are so very expensive to buy! Thank you so much for providing instructions on your beautiful chimes.
I found the copper pieces at Lowes in different lengths, so my project will start very soon.
I made a similar 5 tube wind chime a week ago and found your website today... Great tutorial!
A few things that I tried:
I used the wires from medium sized binder clips to slip inside the tubes and 'spring out' inside the tube and connect a single string.
I used a buffing wheel on angle grinder/polisher and used rubbing compound to create mirror finish on the tubes, then light coat of wax to preserve finish.
I had some old 1x12 cedar planks that I used for the top and clapper. For the sail, I had some old scrap mirrored plexiglass that I shaped into a teardrop, then glued 2 pieces back to back (for mirror on both sides) In sunny wind, the mirror reflects everywhere. (think audio & visual stimulation)
I used MS Word and created a 5 slice pie chart for 5 pipes and used it for the template for all my holes... I marked my first outer holes, then rotated the template 1 inch to space my outer holes 1 inch apart. If you need 7 pipes, make a 7 slice pie chart. Save ink by printing grey scale. NOTE: I used .74 in Word as my slice dimensions for 5 even slices.
I used a single string from tube, went through bottom of left hole, looped through right hole, back up through left hole, then up to steel hanging ring at top.
Only takes a second to center my pie chart, mark my holes and start drilling. (If I continue to make these, I'll make a template out of thicker material.)
Enjoyed it so much, I'm working on my second set of chimes with different sized tubes or may even try 7 tubes. Thanks for the tutorial also.
Brian, it sounds like you did a great job. Thanks for sharing your tips with everyone!
For the best sounding wind chimes you can do a search on google. And find the list of the correct lengths for pipes especially if you want them to sound harmonic. The actual 2 inch step is an OK idea for a general sound.... I tried it a few years ago also. But a beautiful sounding win chime (those pricy ones) should be pricy because they are harmonic. And lengths also change if you get decide to do one set of chimes in 1/2" pipe and a different one in 1" pipe etc
We just repaired our wind chime using your technique. So much easier than using one piece of cord for all 6 chimes. Thank you so much.
Such great directions! After researching how to make wind chimes on other sites, your directions are by far the easiest and simplest to follow (and I'm not overwhelmed by them like I was with all the others). Great job! Thank you!
Cary, thank you! We try to make all of our tutorials as thorough as possible.
I always had a hard time getting the center flat 'clanger' to stay level. It kept on drooping to one side. Then I discovered by using a round wood ball there was no droop! You can drill a hole through it, or attach small screw-in hooks opposite each other for attaching the strings. It works perfectly! I also added small washers to prevent the knots from falling through the holes in the wood. LOVE the sweet sounds!
Dianne, thanks for sharing those tips!
I have made several windchimes and repaired numerous store bought ones. There is a problem here in the desert of Southern Colorado of the string wearing out after sometimes only a month or so. Another problem is that where the hole is drilled in the pipe, it is sharp and often cuts the string. Someone had asked where to find rubber grommets, you can find them in auto part stores, they are used to protect wires that go through body parts. That would be a good option, but what I do, is take my dremel, and file the hole so it isn't as sharp. I think someone mentioned using a paper clip or wire to attach the pipe to the holder, haven't tried it, but with some experimentation, it might work. And, I always use a nylon cord. As far as them not being noisy enough, maybe you have them too close to the house and they aren't getting enough wind? The more out in the open they are, add wind, and resistance (the flapper), it should be wonderful. Also, try conduit for piping, you can often get it free near the dumpster at electrical services places. The heavier the pipe, the more dramatic the sound. Conduit is more tinkley, copper is melodic, and heavier pipe is dramatic and bass. Of course remember that the heavier the pipe, the heavier your clapper needs to be. Just go down the aisle at your home store and look at the different pipes they have. Definitely, have them cut it! Thanks for the tute, it was great!
Sunny, thanks for all the tips!
This is the best tutorial I have seen on pinterest. It is straight forward. Loved it. Gonna make some on the weekend. Thank you.
I'm new to making wind chimes. Your tutorial is excellent. I'm really geeked up now. Working in my work shop tomorrow definitely. I've been gathering everything imaginable for 2 years to make chimes. Thanks.
Katie, that's awesome! Best of luck. :)
I love the project and the product, but even more than that I must say this is probably the best tutorial I have ever read. It's so plain and simple and matter-of-fact! I'm setting my alarm so I can hit Home Depot first thing and start working on my first wind chime. Thanks for the motivation! :-)
Lesley, thank you so much! That's exactly what we strive for with our tutorials, so I'm glad to hear we hit the target.
One way to cut costs would be to buy copper piping at a scrap yard. May not be as pretty. But you can buy it by the pound rather than the length. Be aware of the gauge. A thicker walled pipe will have a deeper sound and be heavier too.
I've heard a deeper sound vibration is a good aversion for snakes. Another good reason to have wind chimes.
heck of a nice job,, and it looks great. i was wondering if anyone knows how to tune the tubes or if there is such a thing,, wind wont blow the same way all the time so just wondering??????
TUNING: Wind chimes tune by length. The longer, the more bass (lower); the shorter, the more treble. You tune them initially by cutting them to a particular length, then finer tune by grinding off very small bits, as little as 1/16ths. If you tune them to a particular scale, all the tones will sound good together no matter which ones the wind plays. Look up "notes scales" on the internet. As far as what kind of tuner to use to make sure you hit the right notes ... someone with perfect pitch can help there. If not, you can use a guitar tuner or an internet tuner. But beware of a couple of things: (1) tuning based on a "heard" sound (e.g. a microphone on an internet tuner) will be different than one based on vibrations (a clipped on tuner); (2) depending on where and how hard you test- tap the pipe you'll get different sounds; (3) tones deteriorate, so the note will change as the tone resonates-- pay attention to the first note your tuner shows you, ignore the dying tones. If your chimes tone sounds muddy, there it's something inhibiting free vibrations. Even the supporting string will do this to a limited extent, but more likely it's a grommet or placement of the holes or something inside or outside the tube. Our it could be that you got crappy metal.
Abufarley, thanks for those excellent tuning tips!
Helper note. The sound of 3/8 compared to 1/2. Compare wall thickness to diameter ratio. In relation the 3/8 is thicker resulting in a thud compared to ring.
You and your friend are talented, artistic AND prolific. I have found that a few drops of medium CA (superglue) on a knot will keep string or cord, cotton or synthetic, from working loose.
We managed to nab two beautiful sets of heavy chimes at a Walmart clearance years ago and we love the deep sounding gongs. Eventually, over the years, the clappers and strings broke, so we went into DIY mode, replaced the clapper with pre-cut circles from the local hardware store and the string with fine linked chain. We attached the chain to each pipe using a C clip inserted through the pipe and chain, then bent the ends out to hold everything securely in place. Even high winds haven't dislodged them.
Oh My Goodness! I love this idea. The Hubby and I are planning to do this for our 17th Anniversary "project date"! We have a ton of logs from a beloved tree on our property that came down after a hurricane, now we can use some of them to make the top and clapper!!! This will make a wonderful keepsake for years to come!
Rachel, that's a lovely idea! Tag us @chicaandjo if you post photos on social, so we can see!
Hi Chica, I love this idea and the great instructions. One question is how to finish the cut edges of the copper pipe? On commercial chimes they are usually turned in. Can you explain what you did / used to get the edges finished? TIA, Paula
Paula, I didn't do anything special to the edges. The pipe cutter naturally curved the edges in a bit, as shown in the photos.
I think using copper wire instead of string or rope would be a great idea as well.
George, that's a lovely idea visually, but I'm not sure the pipes would swing freely enough in the wind if hung on wire, which can have some stiffness to it. If you try it out, let us know how it goes!
Made my 2nd set of these and sound great.
Thank you for your great instructions. Just completed my version of the chimes (I had built a similar version of your chimes years ago but they fell apart). A few alterations in design - used 3/4” copper pipe (had a length left over from our house construction) - 5/16” eye hooks instead of drilling holes for string and used the wire handles from medium size binder clips instead of string to support the pipe - the 4” wood striker was just too soft to make the pipes chime so I encircled the outside edge with a strip of metal strapping used to support plumbing pipes - had to move the copper pipes in about 3/4” (so they now hang about an 1 1/2” in from the edge of the 8” diameter supporting disk) as they were too far away from the striker disk (they’re now about 1/4” away from the disk) . All in all I like how it sounds!
Jeff, thanks for sharing your modifications with us. Glad you were able to put together custom windchimes you love :)
Music to my ears. I love the sound of wind chimes and they are so beautiful. Great job.
I live in Arizona and I find out the different string and twine we used to hang the wind chimes eventually gets rotten from the Sun and the dry weather so I'm trying to find something that will not do this like fishing wire