



How to Raise Monarch Butterflies at Home: What I Learned Raising Them from Caterpillars


; "Pinterest")

This summer I enjoyed one of my favorite hobbies, raising monarch butterflies. I started this spring by selecting butterfly-friendly plants and flowers for my garden, along with specific varieties of milkweed to feed the caterpillars.
By mid-August, the monarchs found my oasis and laid their eggs, and I found 12 caterpillars. I brought them inside and set up a special habitat for them to transform into a chrysalis. Eventually all 12 emerged into beautiful new butterflies, and observing the transformation was utterly amazing.
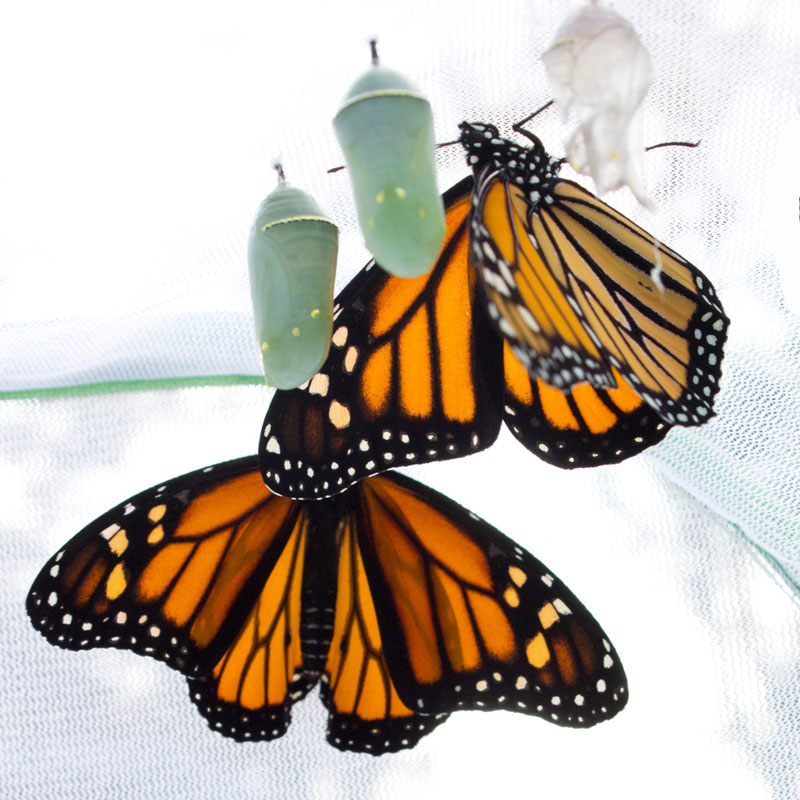
I've documented my monarch-raising journey and I'd like to share the entire process with you, including photos of each stage and time-lapse videos of the transformations. I'll share what I learned, including my tips and my mistakes.
My goal is to give you a how-to guide for raising your own monarchs next year and also share my personal experience and what I learned doing it.
How to Attract Monarch Butterflies to Your Yard
This is where the process really begins. If you don't have anything to attract butterflies in your yard (or at least in your neighbor's yard!) you'll never get caterpillars.
You need these two kinds of plants: flowers to feed the adult butterflies and milkweed to feed the caterpillars.
Why monarchs need milkweed
Milkweed is the "host plant" for monarch caterpillars. This is where the adult monarchs will lay their eggs. When the eggs hatch, the caterpillars will eat the milkweed — and I mean a TON of it — as they grow and prepare to turn into a butterfly.
There are various types of milkweed available, and monarchs prefer some over others. This is especially important based on your region, so you should choose something common and local to your area.
Here in Kentucky (and much of the eastern US), "Swamp Milkweed" (Asclepias incarnata) was a great match. The monarchs love it and it grows in lovely clumps about 3-5' tall and 2-3' wide with pretty pink flowers. It's sometimes labeled as "Cinderella" as well, but always look for that "Asclepias incarnata" name to be sure you have the right variety.
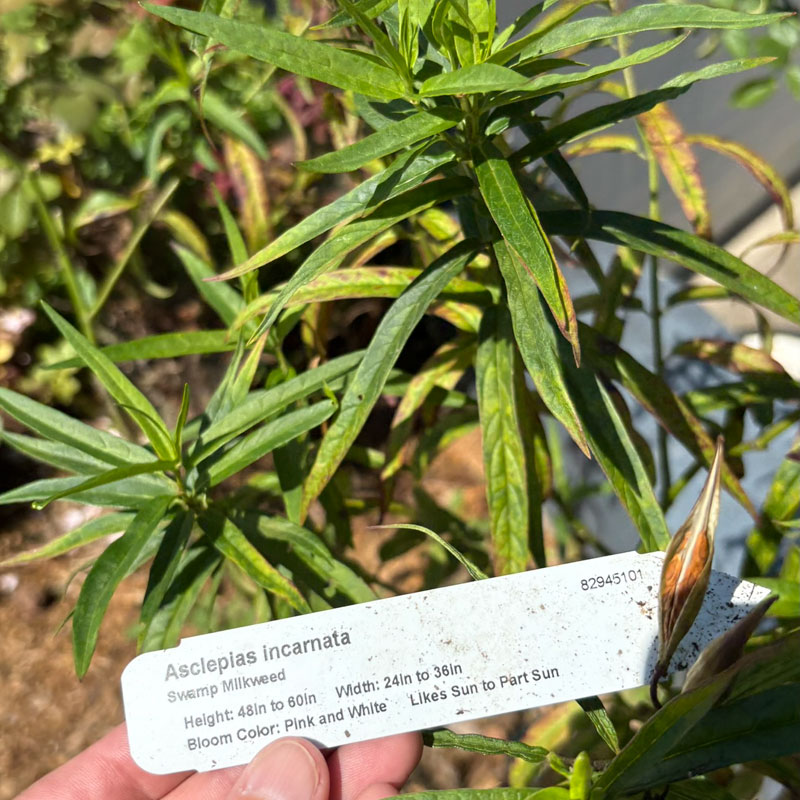
Other options you may see are "Common Milkweed" (Asclepias syriaca) and "Butterfly Weed/Milkweed" (Asclepias tuberosa). These could be good options if they are local to your region.
Check your local garden shops for advice and be sure to go early, because they might only get a few plants in each year, and you'll want to grab yours before they run out.
Swamp Milkweed is a "short-lived" perennial plant that will last for 2-5 years, dying back to the ground each winter and growing back from its roots in the spring. The good news is that it readily re-seeds, generating seed pods loaded with gems to plant next year.
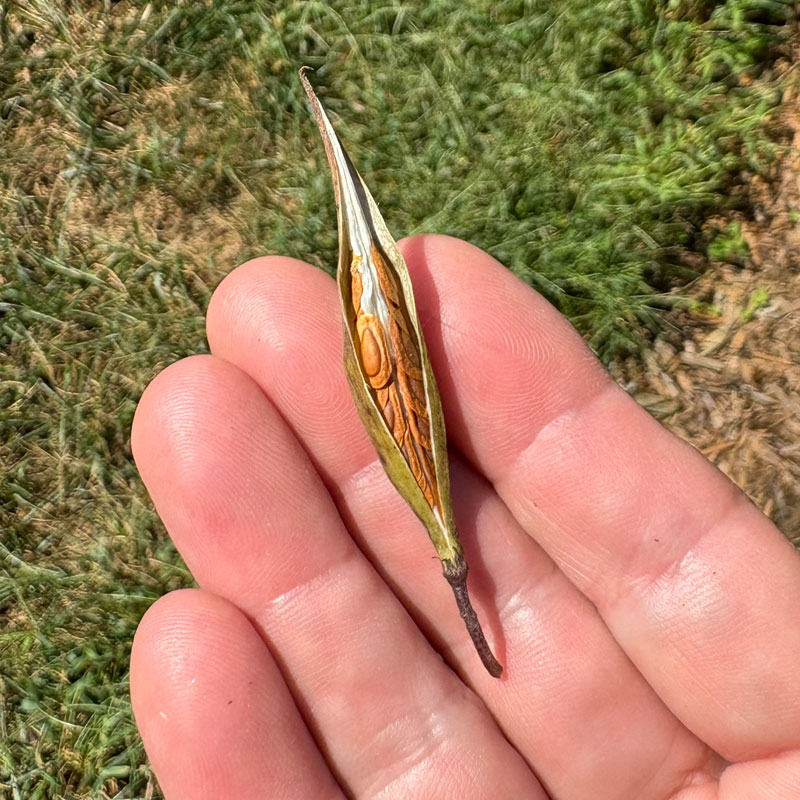
Plant flowers that provide nectar for adult monarchs
In addition to the "host plant" milkweed to feed the caterpillars, you need "nectar plants" to feed the adult butterflies. If you don't have butterfly-friendly flowers and plants around to attract the butterflies themselves, they won't stick around long enough to lay their eggs.
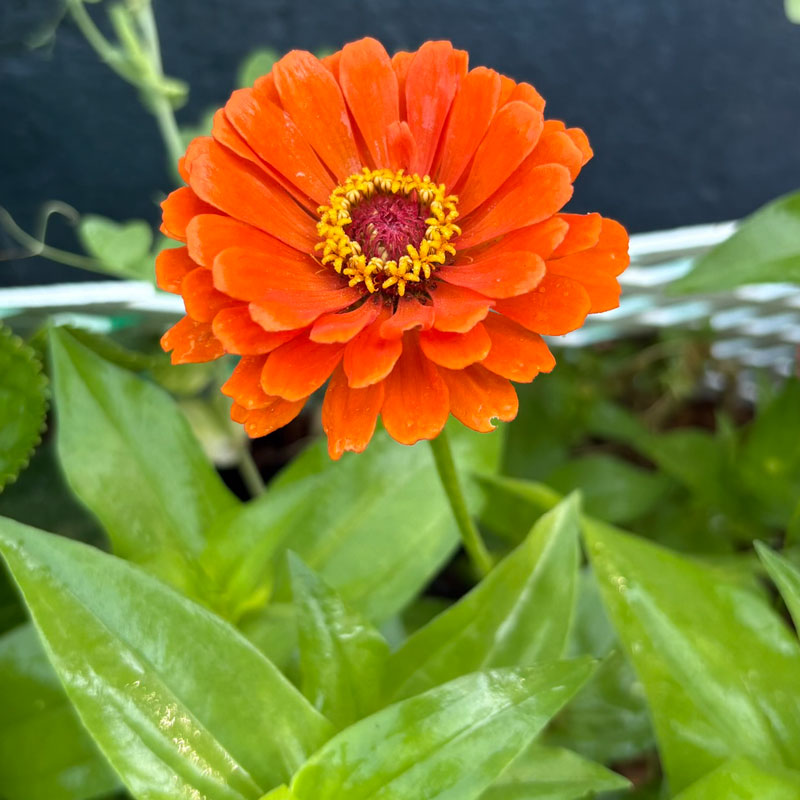
My favorite butterfly-friendly flowers are zinnias, and I always plant lots of them nearby for the monarchs (and for myself). Other good flowers to try are goldenrod, asters, and coneflowers.
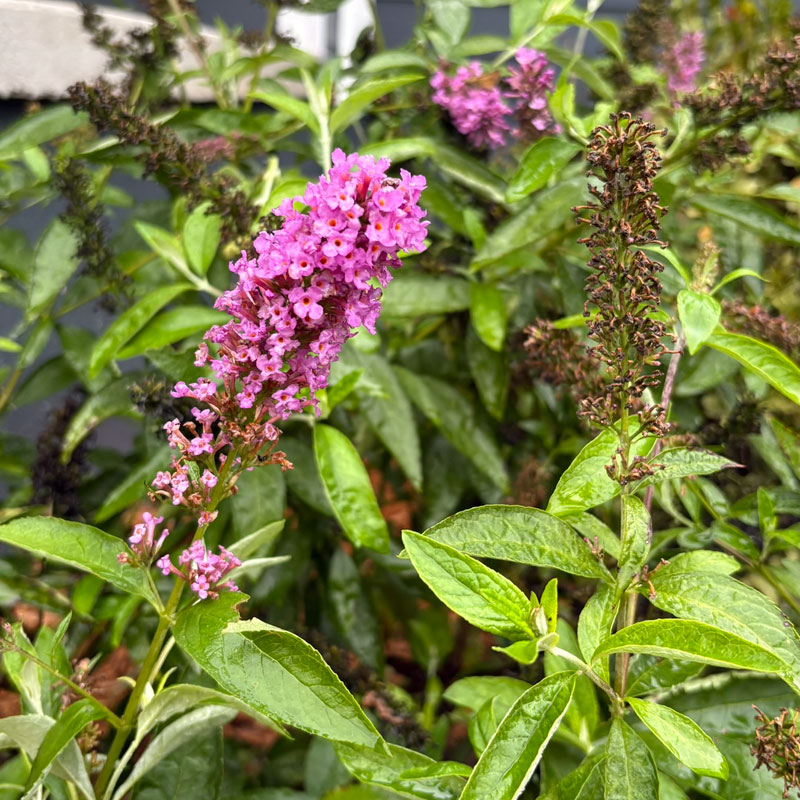
Plant-wise, I had great success this year with a Monrovia Flutterby Tutti Fruitti Butterfly Bush that I planted new this spring. It gave me tons of lovely purple flowers and attracted lots of butterflies to my yard.
Will monarchs find milkweed if you plant it?
As long as you have tempting flowers nearby with bright colors to attract the butterflies, they will probably find the milkweed if it's close by. But of course it depends on their migration patterns, population, and habitat, so there's no guarantee.
BUT you have to be patient! I waited all summer for mine to appear, anxiously checking the milkweed daily for eggs and caterpillars to appear. Then in the middle of August, when the full-on summer heat hit, suddenly there were butterflies everywhere and I was finding caterpillars almost every day.
The exact timing for when the monarchs appear in your area will vary. Here in central Kentucky, mid-to-late August was the prime time. Check resources like this one to get an idea for when to expect them to show up near you.
Where to Find Monarch Eggs and Caterpillars
Once you finally hit the right time of year for the monarch migration to travel through your area, you'll start to see the adult butterflies visiting your flowers. This is a sign to start checking for eggs and caterpillars.
Where to look for monarch eggs on milkweed
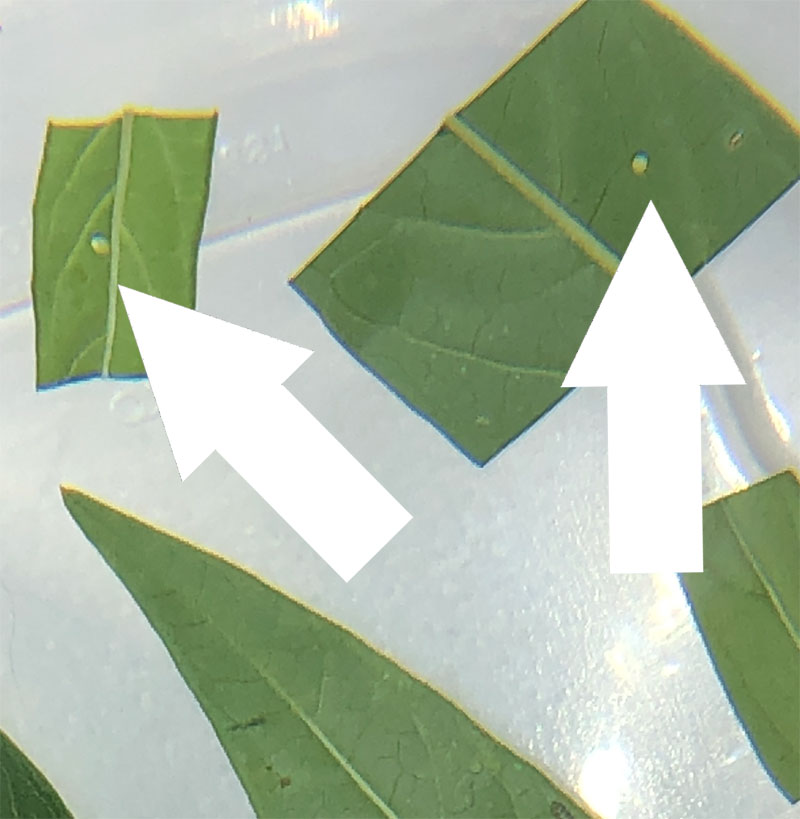
The monarch eggs will be on the bottom of the milkweed leaves. This location offers the most protection for the eggs and the newly hatched baby caterpillars. Crouch down and look up or gently bend the stems to peep underneath.
How to identify a monarch egg
Monarch eggs are unbelievably small, off-white, and dome- or cone-shaped with tiny vertical ridges.
Is it better to raise monarchs from eggs or caterpillars?
When you identify an egg, you have a choice whether to bring it inside or leave it in nature. There are pros and cons.
From an observation perspective, it's great fun to monitor the egg inside and watch it daily until it hatches (which takes 3-5 days). The babies are SO TINY it's amazing to see. Just look at them here next to a dime!
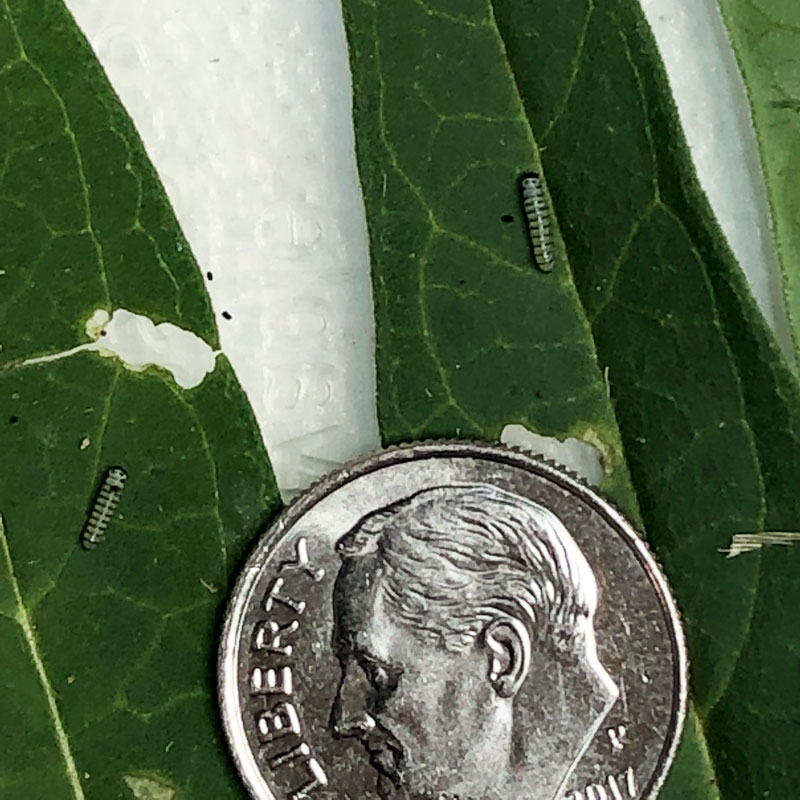
But there are a couple of risks, too. First of all, it's very easy to "lose" the newly hatched baby in the habitat because it's so small that you can barely see it (ask me how I know this). It's possible you could accidentally throw it out with dried up milkweed leaves, or it could struggle to find its way to a branch to munch on.
Having experienced both the joy of watching one hatch and the sadness of losing one in the shuffle, I can say that in the future I plan to only grab caterpillars, and not eggs.
How do you find caterpillars?
The trick to finding a caterpillar (especially a small one) is to look for holes in the leaves. Their main mission is to eat as much milkweed as possible, so they'll get to chewing right away. When you spot holes and chewed leaves, odds are there's a caterpillar nearby.
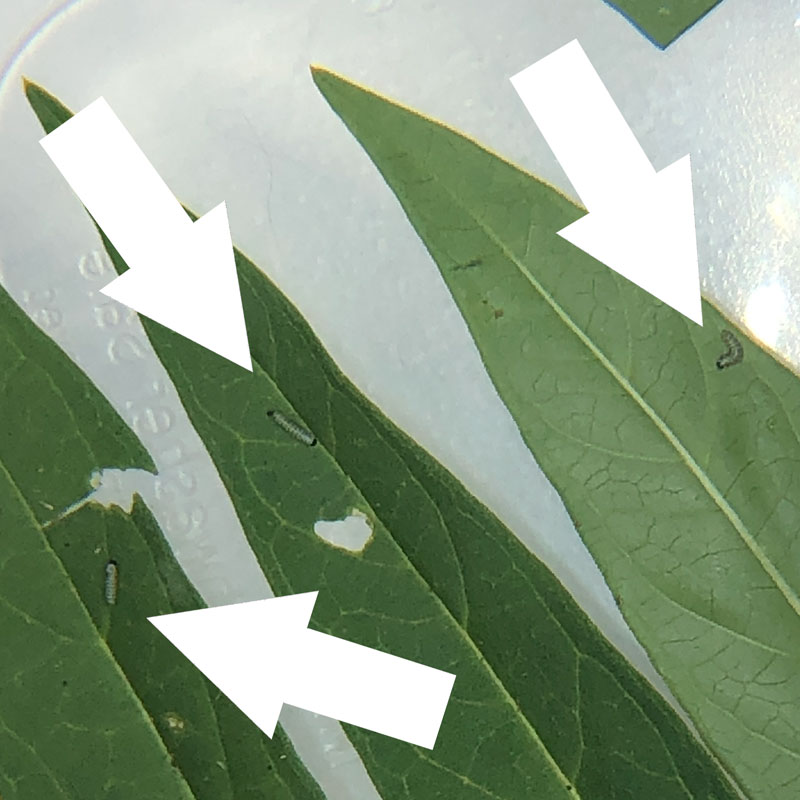
If you don't spot them when they're babies, though, don't worry... they'll grow quickly and you'll soon see them appearing in all sorts of sizes.
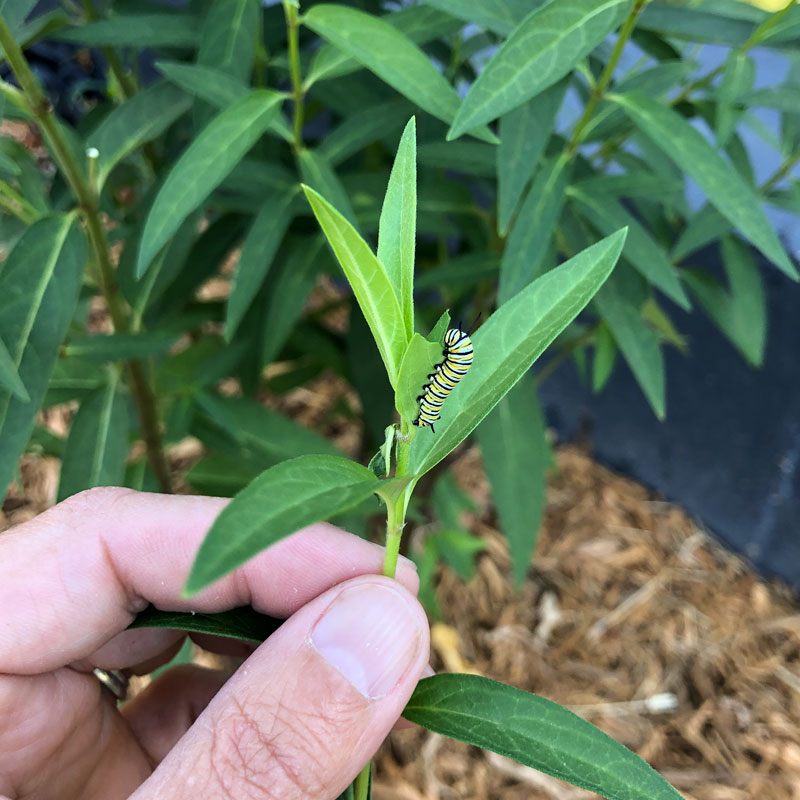
They're pretty good at hiding under leaves and blending in with the milkweed, which is a great self-defense tactic against predatory birds. But keep looking around and you're likely to find one or two new ones each day during peak season.
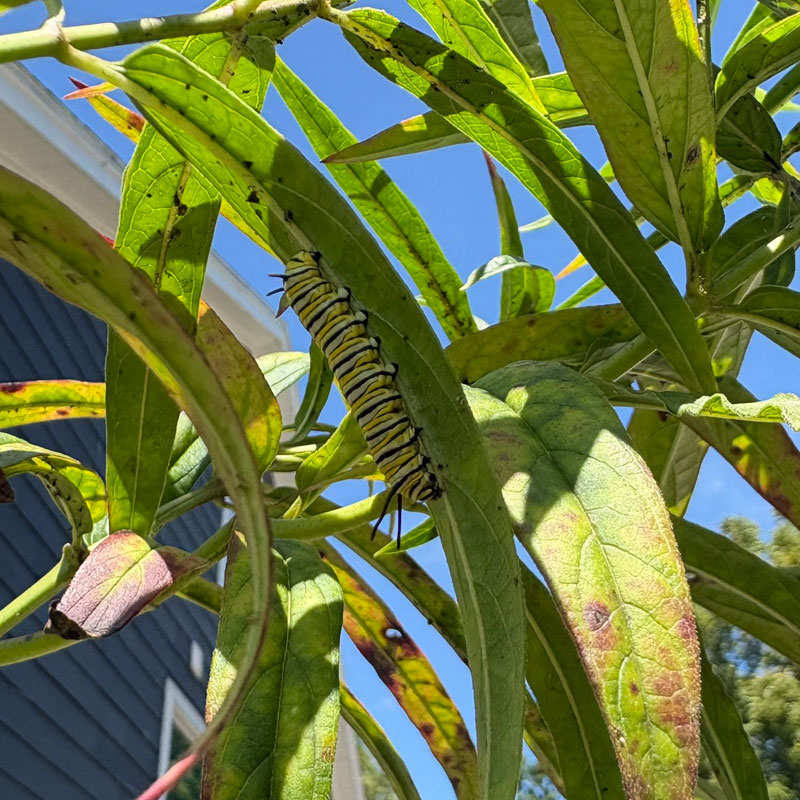
How to identify a monarch caterpillar
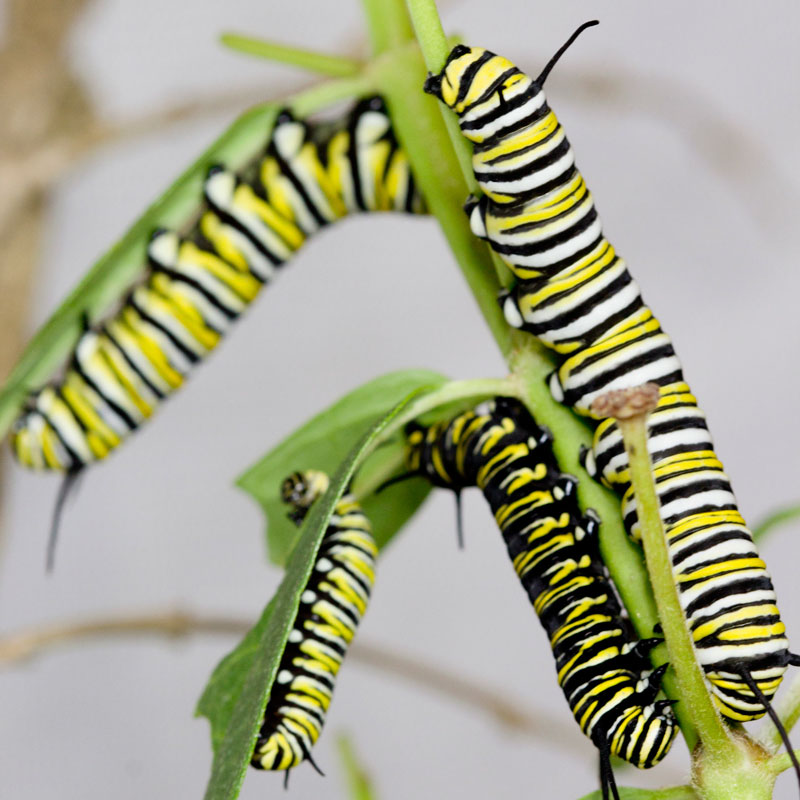
Once you've seen the unmistakable striped pattern of a monarch caterpillar, you'll have no trouble identifying them. They have bold black, white, and yellow stripes and two pairs of long black filaments (a.k.a. tentacles). And of course, lots of tiny feet grabbing onto the branches.
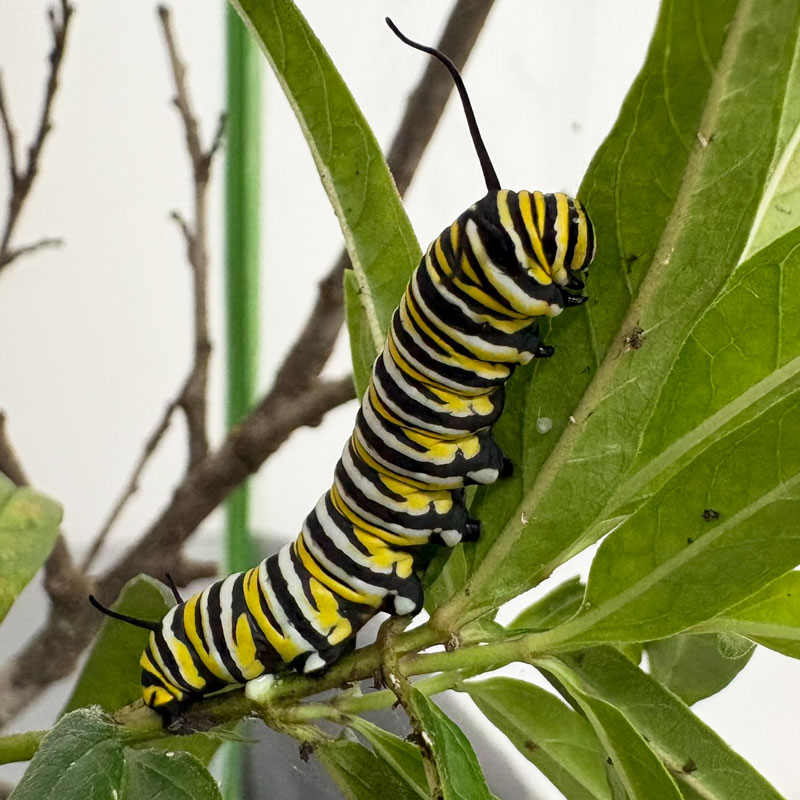
They can get to about the size of your pinky when fully grown, and are definitely easy to spot at that size.
Before you bring anything in your house, though, make sure it's a monarch. If you're in doubt, leave it alone. Some caterpillars are not safe to handle and won't survive in the habitat I'm describing here.
How to safely move a monarch caterpillar
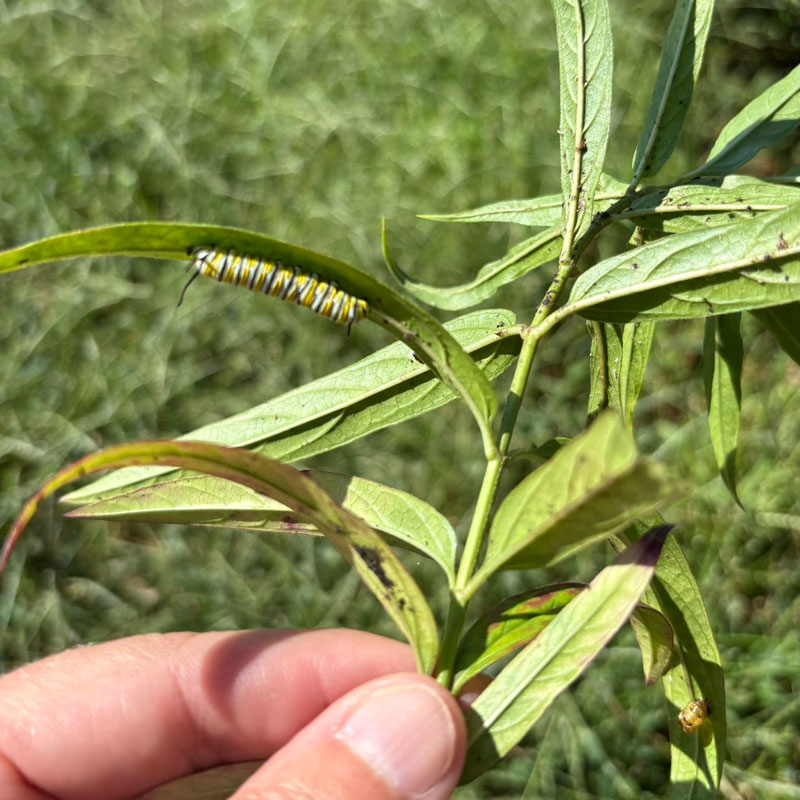
When you're ready to bring one in, be sure to not touch the caterpillar itself if at all possible. The best approach is to just cut the entire stem of milkweed that it's on and bring it all inside. You'll need that milkweed for it to continue eating anyway, and this prevents added stress to the caterpillar.
In other words, don't move the caterpillar itself — move its food and let him come along for the ride. (More on that below)
Before You Bring Monarch Caterpillars Inside
I want to pause to share some information about raising monarchs responsibly. The point here is to observe the magical transformation for education and fun. It's a remarkable process and engaging for kids and adults alike.
But keep in mind that you're generally not "saving" the monarchs or improving their population at this scale. If you want to help grow the population, the best thing you can do is to plant lots of flowers and plants that they need to survive.
Don't try to purchase or ship monarchs around the country. Avoid overcrowding in your habitat, and only take in what you need to experience the fun of this summertime hobby.
What You Need to Raise Monarch Caterpillars at Home
Now that you've got caterpillars in your garden, you're ready to bring them inside to observe and enjoy. And the supplies you need are actually quite simple!
Supplies for raising monarchs inside
- Mesh butterfly enclosure
- Paper and cardboard
- Large tray or plastic tub (optional)
- Jar or bottle
- Plenty of fresh milkweed
- Sticks or branches
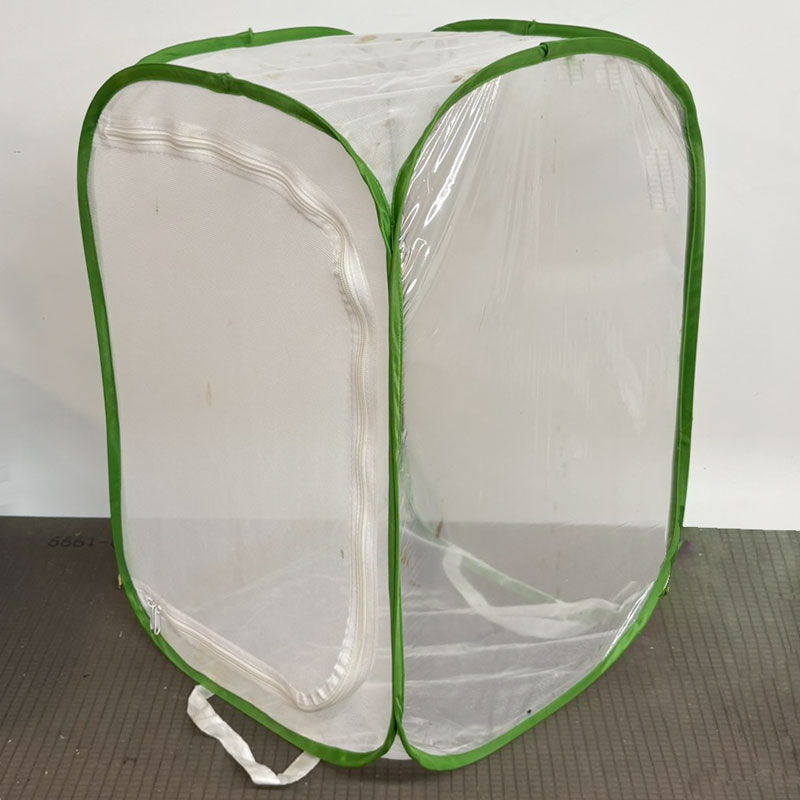
Mesh butterfly enclosure
There are numerous mesh butterfly enclosures available that can contain your monarchs, and they typically all fold flat for easy storage after the season.
I personally use this exact enclosure because it also has a clear vinyl panel on one side, which allows for easy viewing of the creatures inside without having to open the zipper and risk disturbing them.
Paper and cardboard
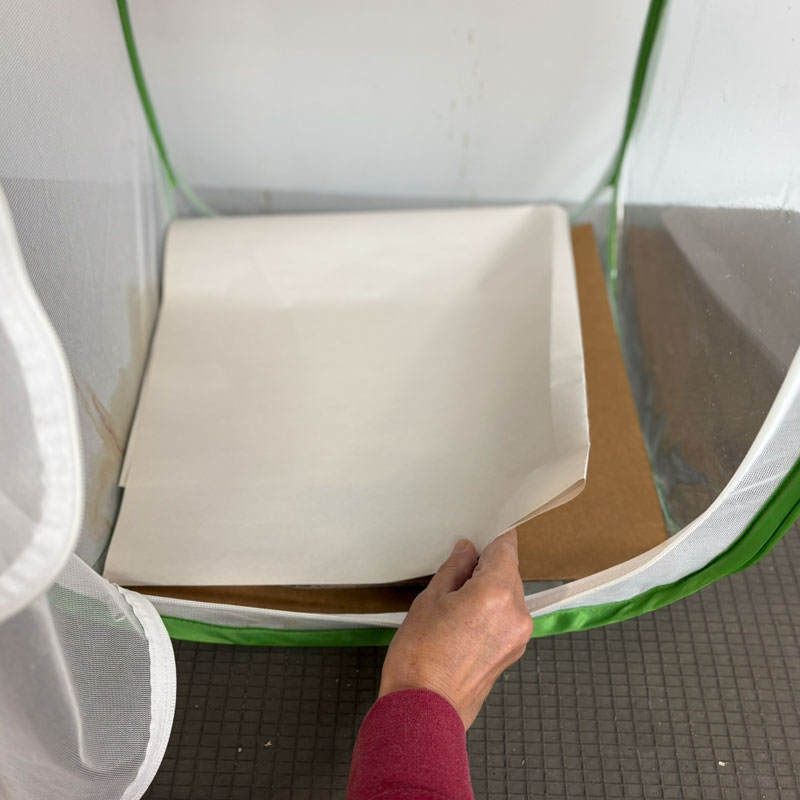
To help with cleaning and add structure, I place a piece of stiff cardboard (cut to size) in the bottom of the enclosure. This provides a solid base if I need to pick the entire habitat up and move it (which I do when it's time to release the butterflies).
On top of the cardboard, I place sheets of packing paper (a few sheets of regular copy paper would work too) to make it easier to clean up the extensive amounts of "frass" coming my way (more on that below). It's just like lining a birdcage with newspaper... this will make it much easier to clean up.
Location of your enclosure is an important consideration. You'll want to put it somewhere that it won't be disturbed by kids or pets, but that you can monitor and access easily every day.
Temperature is also important, because the timing of the life cycle stages will be slower in cooler temps and faster in warmer temps. Just something to keep in mind if you're wondering why your creatures aren't progressing as quickly as you expected.
Large tray or tub (optional)
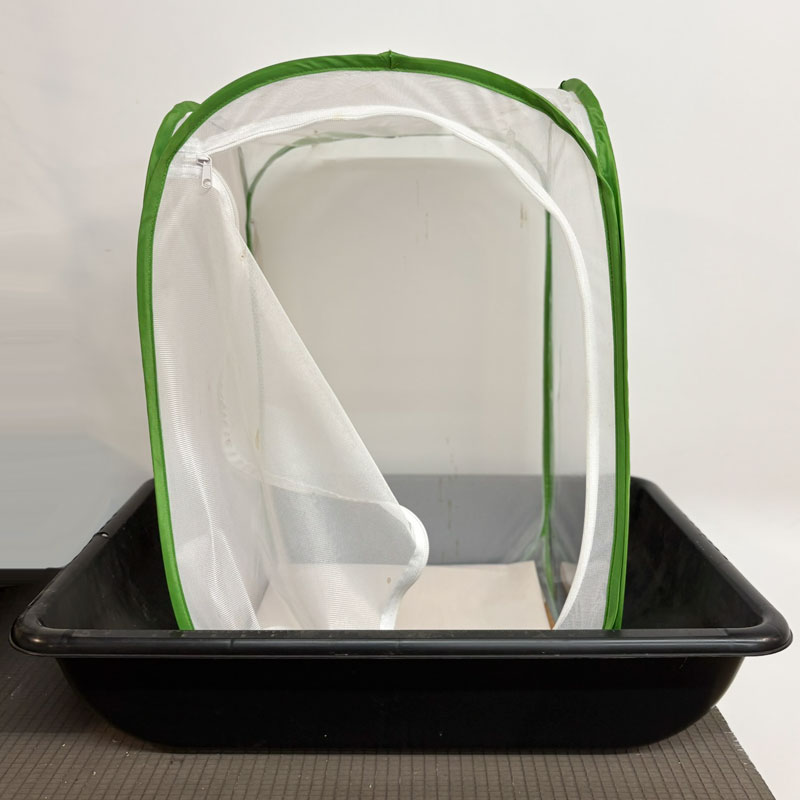
To keep everything as contained and easy to clean as possible, I put the entire thing in this large plastic tub from Lowe's that keeps everything contained and easy to move if needed. (P.S. These concrete mixing tubs are under $10 and SO versatile... I use a half dozen of them all around the house for tons of things!)
Jar or bottle
You'll need to keep milkweed in the habitat the entire time, and the best way to keep it fresh is with a jar or bottle of water. Fill it no more than 2/3 full and if the opening is very wide, you might consider covering part of it with tape so that the caterpillars don't go down into the water. (I haven't had this happen yet, but it's something I always worry about!)
The water will discolor after a few days (especially when the "frass" starts coming) so be ready to change it out as needed.
Plenty of fresh milkweed
I can't stress enough just how much milkweed your caterpillars will go through. They grow a LOT during their 10-14 day larval stage, and if you've got 5-10 of them in your enclosure, that adds up quickly.
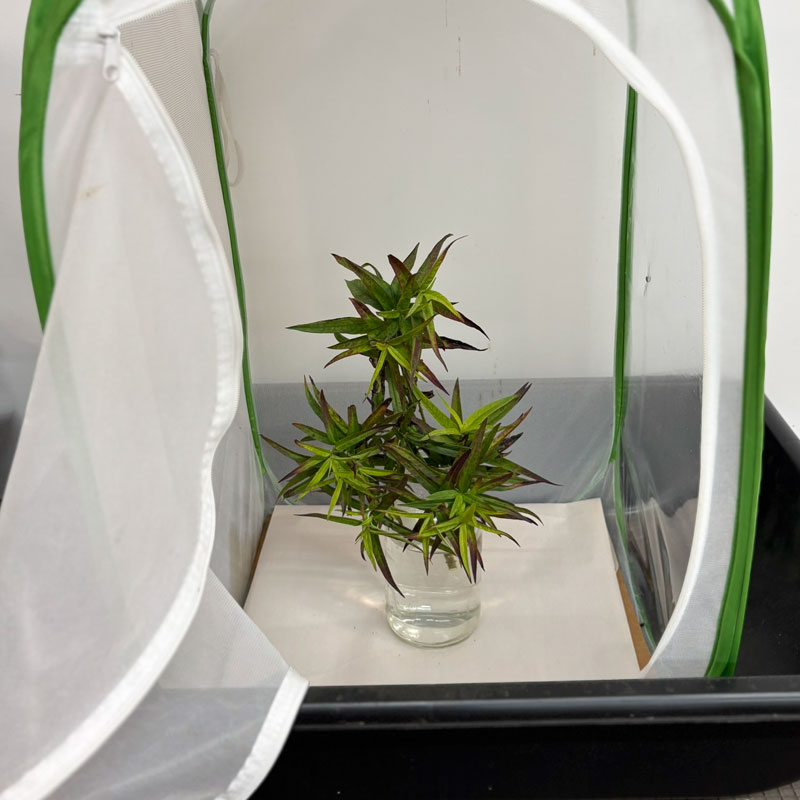
I check my milkweed daily and if there isn't a bunch available, I add more. I can't tell you how many times I've filled the jar only to come back the next morning and it's all gone, having been decimated by the crew of hungry caterpillars.
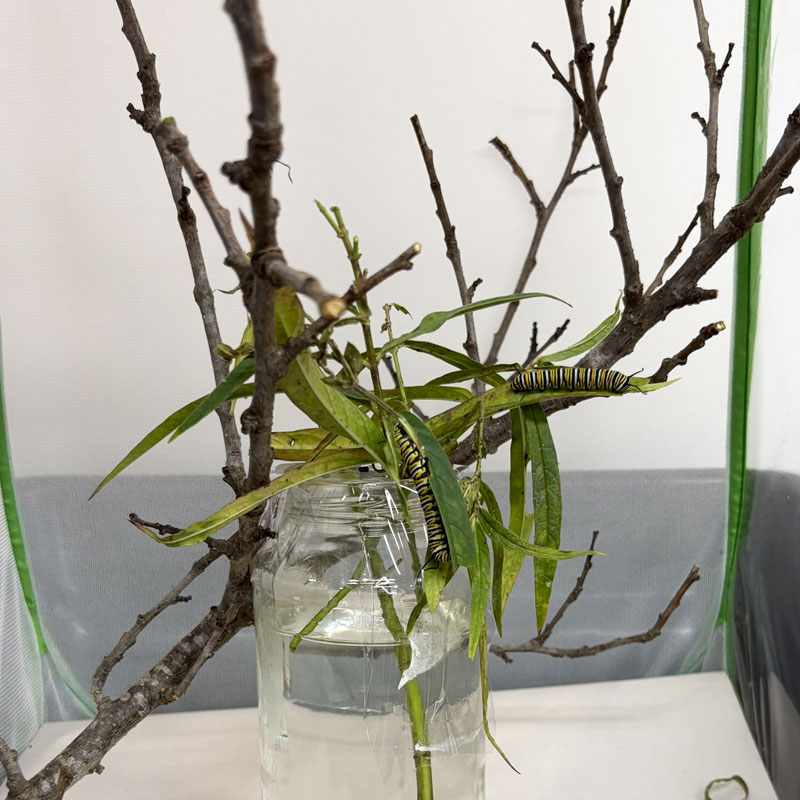
And don't be surprised when you bring in a new branch or two of milkweed if you accidentally harvest a caterpillar at the same time. This happens to me quite often, especially with tiny ones I can't see immediately.
Sticks or branches
As the caterpillars eat everything in sight and prepare to move on to their next stage, it's possible that they won't have an easy way to travel around the enclosure to find a good spot to form their chrysalis. To help with that, I usually put a few branches or sticks inside to provide lots of extra landing zones.
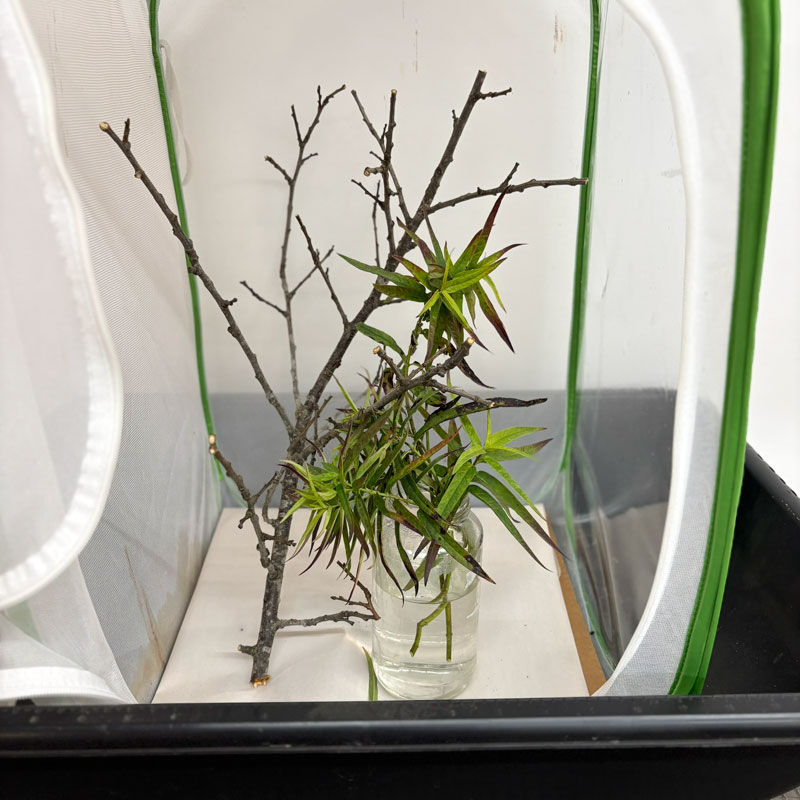
These sticks also serve as potential hanging spots for the chrysalis, and great perching spots for emerging butterflies as well.
How to Raise a Monarch Caterpillar Step by Step
Before you can get butterflies, you have to get those caterpillars through their larval stage. Here are the basic steps for this part of the process, which typically takes 10-14 days.
Step 1: Set up the monarch enclosure
Set up your butterfly enclosure in a good location so you're ready when the caterpillars start showing up.
Step 2: Bring in your caterpillars.
Add caterpillars to your enclosure as you find them, remembering not to overcrowd it or pull in more than you can feed sufficiently with your current milkweed supply.
Step 3: Provide fresh milkweed every day
Monitor the milkweed in your jar daily and provide more as needed to be sure your caterpillars have enough to eat. Pick full stems and put them into the jar to provide lots of food at once. They eat a lot. Really. A LOT.
Remove the stems when they are completely eaten away or dried up. (But be sure to check them carefully for baby caterpillars before tossing them!)
Step 4: Keep the enclosure clean
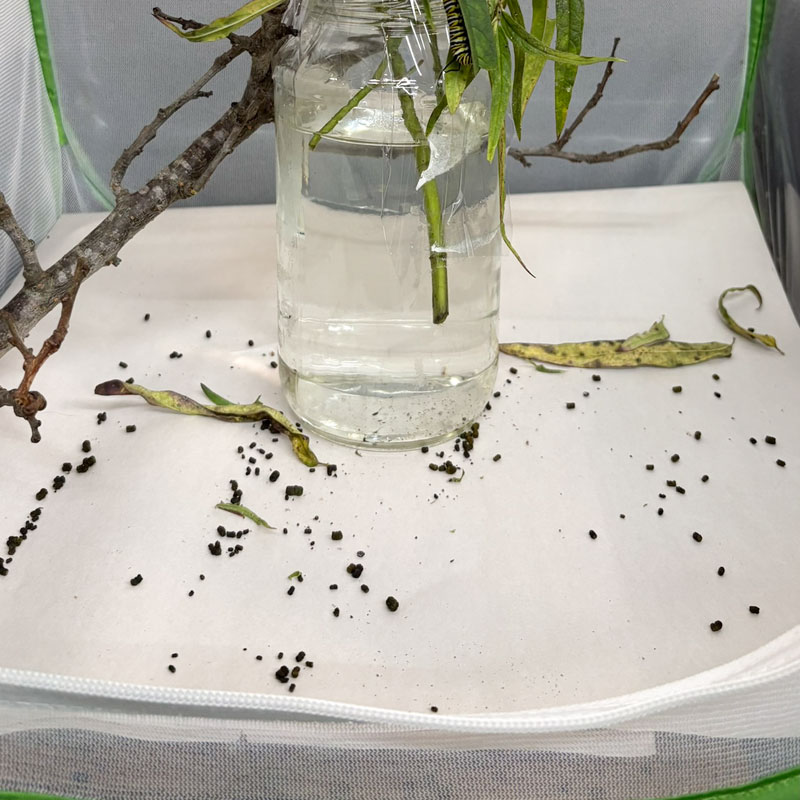
It's imperative to keep the enclosure clean as the caterpillars work their way through their eating frenzy. The result of all that eating is frass, a nice word for "poop". They eat a lot and they poop just as much.
The frass looks like peppercorns and will litter the bottom of your enclosure very quickly. This is why I line the bottom with paper — it makes it super easy to remove the entire sheet and replace it with a clean one every day or two, and I can dispose of the frass without having to handle it.
Step 5: Watch your caterpillars grow
You'll be amazed at how quickly the caterpillars grow, especially if you happen to catch one that's the tiny, newly hatched size. The entire process takes 10-14 days, depending on the temperature (faster if it's warmer, slower if it's cooler).
When they start to travel around the enclosure and head to the top, you're about ready to enter the next stage, where they'll transform into a chrysalis and then a butterfly!
My daily process for cleaning and refreshing the milkweed
Here's my daily routine for taking care of the caterpillars and their enclosure as they grow.
- Carefully remove the jar from the enclosure (without removing any milkweed or caterpillars from it)
- Remove and discard any spent/dried milkweed stems (check carefully for caterpillars before tossing!)
- Remove the frass-covered paper liner from the enclosure and replace it with a fresh sheet
- Replace the jar in the enclosure
- Determine if more milkweed is needed, and if so add more stems
- Check the milkweed plant outside for any new caterpillars and add them to the crew
The Five Caterpillar Growth Stages (Instars)
If you carefully watch your caterpillars grow, you'll see them go through five distinct "instars" or stages.
First instar
Measuring 2-6 mm, the caterpillar hatches from the egg, eats the eggshell, and starts as a pale, translucent green with a black head and tiny bumps instead of filaments. This stage lasts 1-3 days.
Second instar
Measuring 6-9 mm, the caterpillar will have clear black, yellow, and white bands appearing on its body, and small front filaments become visible. This stage lasts 1-3 days.
Third instar
Measuring 10-14 mm, the caterpillar will have both pairs of filaments clearly visible and the color patterns are much darker and more distinct. This stage lasts 1-3 days.
Fourth instar
Measuring 13-25 mm, the caterpillar displays thicker black stripes, distinct spots on its legs, and feeds heavily on milkweed. This stage lasts 1-3 days.
Fifth instar
Measuring 25-45 mm (or as much as 55 mm!), the caterpillar will look very plump and its filaments will be long (about 11 mm) and droop to feel the surface. This stage lasts 3-5 days and is the last step before the famous "J hang" to come.
Why Did My Monarch Caterpillar Stop Eating or Moving?
You're used to seeing the caterpillars eat like crazy, but what if they seem to suddenly stop eating? Don't panic! If a caterpillar stops eating but looks otherwise healthy, it could just be preparing to molt into its next instar. And if it's already on its last instar, it's probably getting ready to go into the next stage — the J hang!
How Do You Know When a Monarch Caterpillar Is Ready to Make a Chrysalis?
When your caterpillar is ready to form a chrysalis, you'll see the following clear signs:
- It stops eating
- It wanders around the enclosure
- It climbs up the walls to the top
- It creates a silk pad in the mesh
- It attaches itself to the mesh
- It hangs upside down in the signature "J" formation
That "J" is the sure sign that things are about to get very exciting.
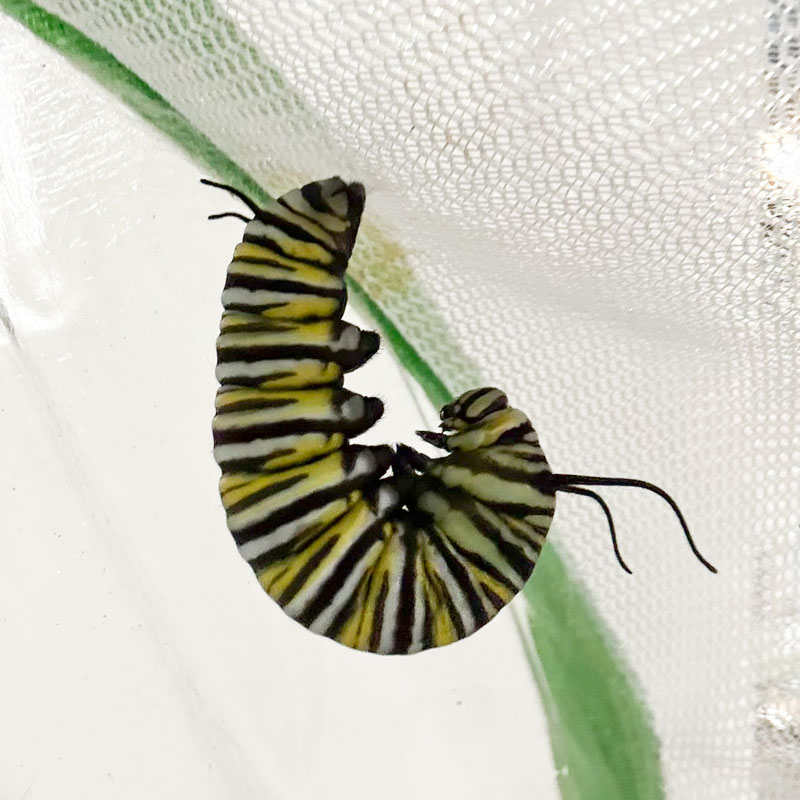
Your caterpillar will be in this position for 12-16 hours before forming its chrysalis. Try not to disturb it or move the enclosure during this time, as it will cause him to change position to protect himself from what it probably perceives as wind.
Start watching carefully when you see this step. He's about to molt!
Watching a Monarch Caterpillar Molt and Turn Into a Chrysalis
Here's the most interesting part about the formation of the chrysalis, and this REALLY took me by surprise the first time I saw it. The chrysalis doesn't form on the outside. Instead, the caterpillar molts to shed its striped larval skin to reveal the green chrysalis underneath.
I managed to capture time-lapse video of this molting process for one of my caterpillars. The whole process only took a couple of minutes and it absolutely blew me away.
Time-lapse video of a monarch caterpillar forming a chrysalis
Interesting on its own is the fact that the old skin comes off from bottom to top, and ends up hanging on the top before falling off onto the floor of the enclosure. (Another good reason why I line mine with paper for easier cleaning!) I was also surprised to see that when the green chrysalis first appeared, it wasn't quite the shape I expected.
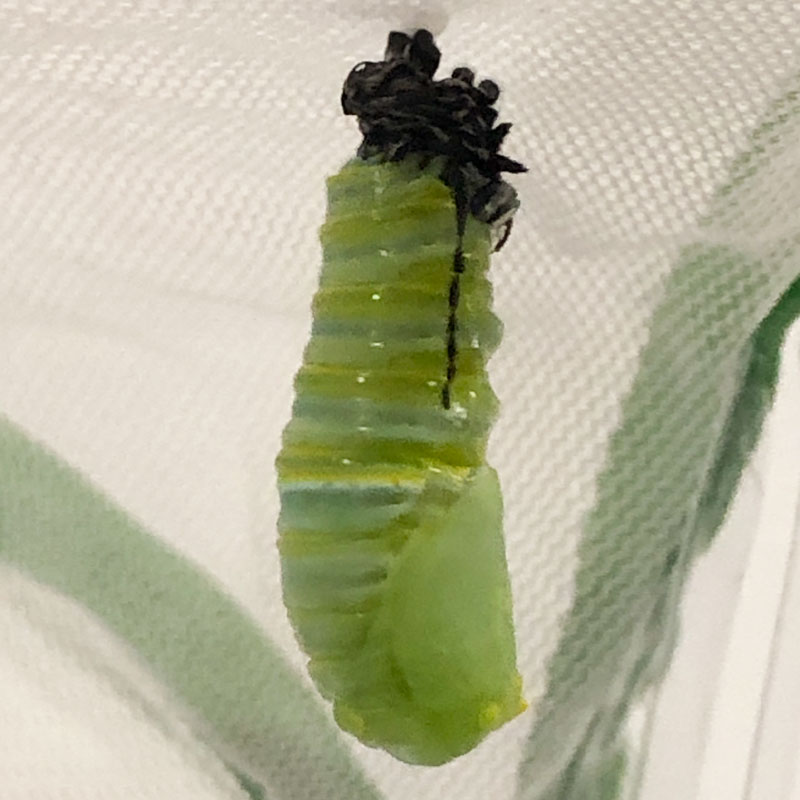
But the caterpillar inside continued to wiggle itself into shape and soon settled into the smooth chrysalis shape we all recognize. Absolutely magical!
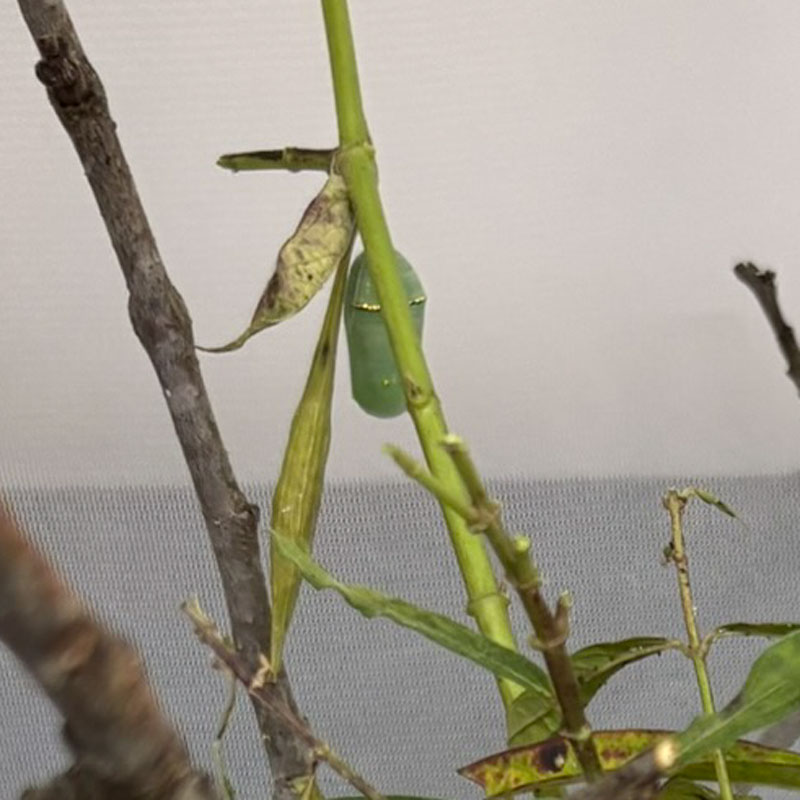
What if the caterpillar chooses a bad place for its chrysalis?
While most of the time they will travel to the top of the enclosure, that's not always the case. If your caterpillar chooses a different place, leave it be.
I had one this year that hung from a spent stem of milkweed, but it eventually emerged just fine. I just had to be extra careful when cleaning the enclosure to move that stem very carefully.
How Long Does a Monarch Stay in Its Chrysalis?
The monarch will stay in its chrysalis an average of 8-14 days, depending on temperature. Warmer environments will encourage a faster transformation. The room I kept my enclosure in is on the cooler side, so mine took closer to the 14-day period to emerge.
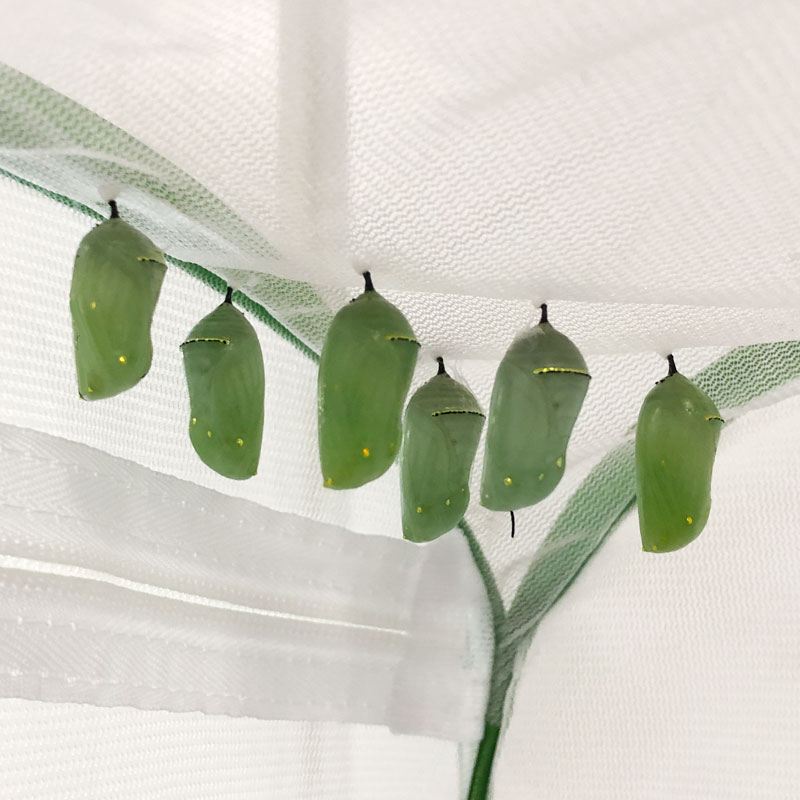
If you're wondering when yours will emerge, the good news is that there's a VERY clear sign that it's about to happen. The chrysalis will darken and turn from green to nearly black.
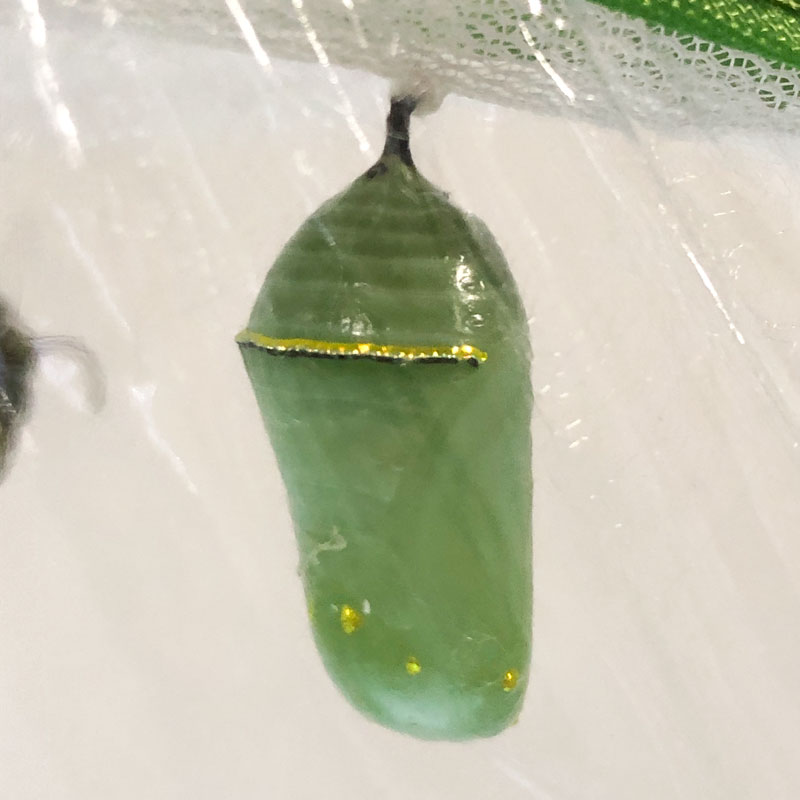
What Are These Gold Specks on My Chrysalis?
After you have a chrysalis or two in your enclosure, your next question is likely to be "why are there gold specks on it?"
As lovely as the idea is of our beloved monarchs truly having gold in them, it's really an optical illusion. The metallic markings are created by the combination of yellow "carotenoid" pigments (found in the milkweed it ate) and the raised microscopic structures on the chrysalis that reflect light.
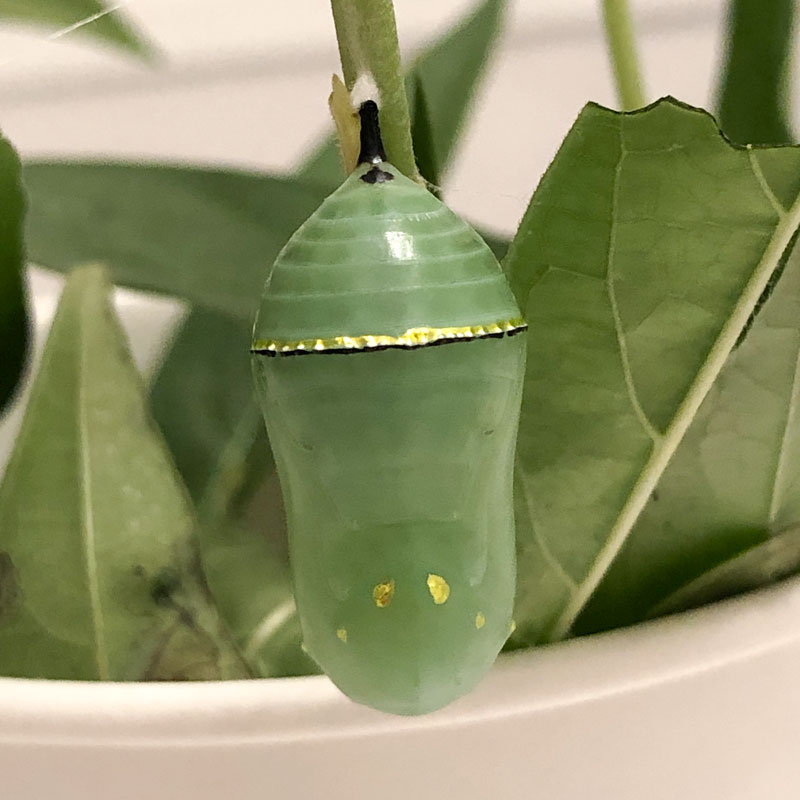
But why have metallic-looking spots? Theories suggest that it could be for camouflage or to deter predators. I personally think it's just to add to the magic.
Why Is My Monarch Chrysalis Turning Black?
If your chrysalis is turning black, then get ready, because the most exciting part of all is coming! Your butterfly will be emerging within the next 12-24 hours.
The transition to black starts with a subtle darkening, and you'll start to see the outline of the wings showing through the green chrysalis.
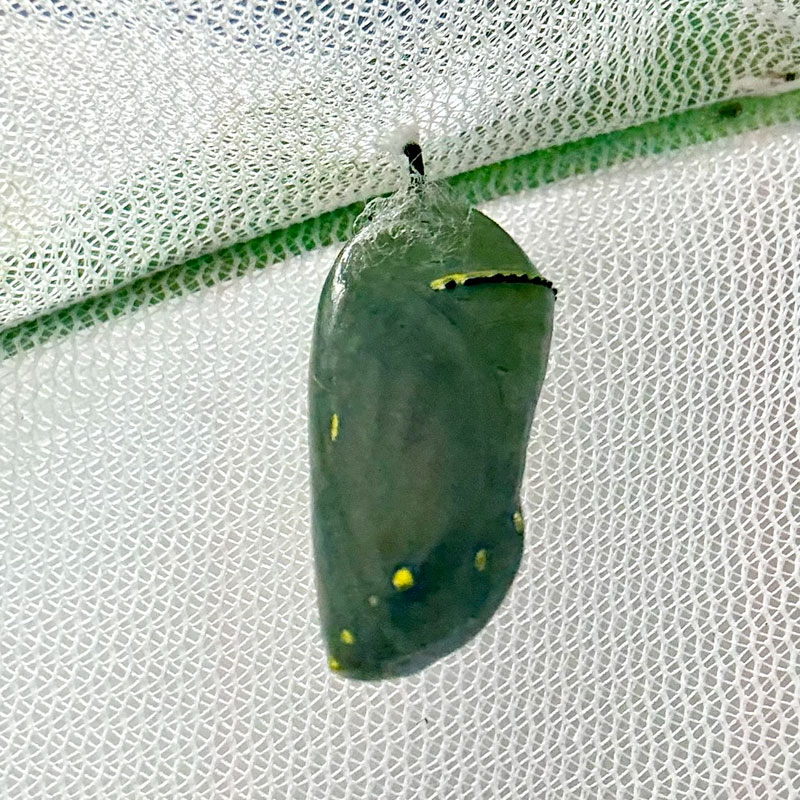
As the chrysalis becomes more transparent, the overall color darkens more as the butterfly's black and orange wings show through. It's mind blowing to see the butterfly's signature colors showing through the tiny chrysalis.
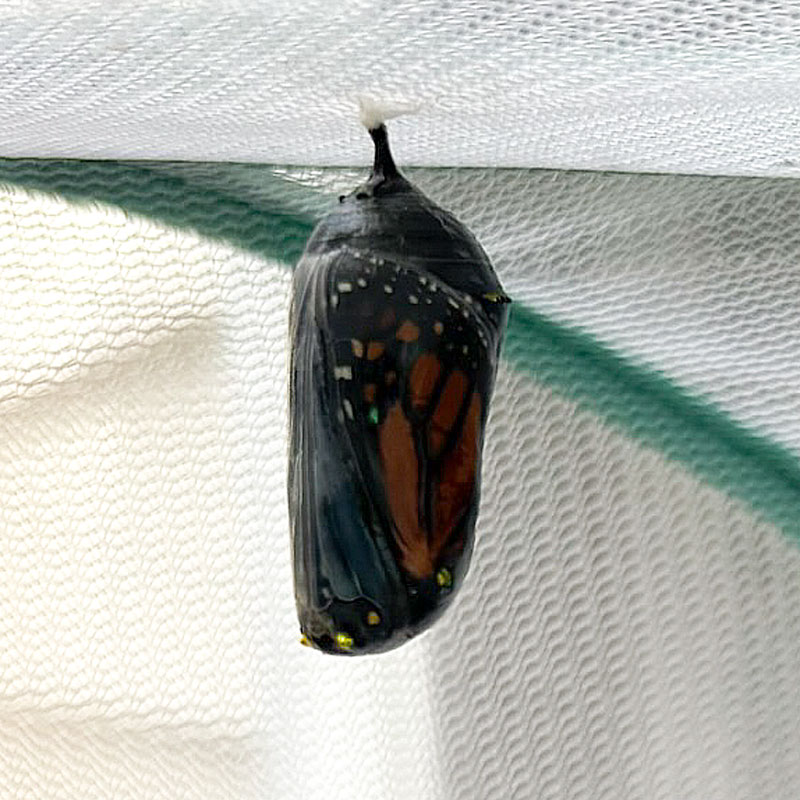
From this point, it's typically 12-24 hours before the butterfly emerges.
What If I See Spots on the Chrysalis?
Every once in a while, you might see unusual black spots appear on the chrysalis that don't match the expected coloring of the wings.
The spots could be a sign of a parasite or sickness in the butterfly. Or it could be just fine. I've only encountered this once, and my butterfly emerged normally and appeared healthy as it flew away, although appearance alone can't rule out disease.
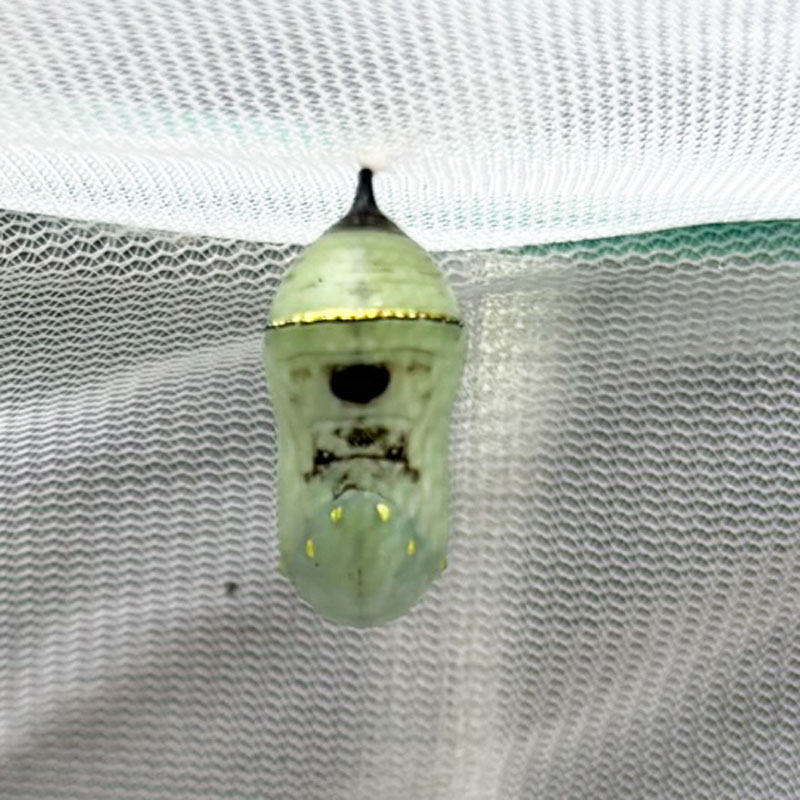
If you see spots on a chrysalis, separate it if you can, and avoid touching it if possible, just to be on the safe side. And cross your fingers... he might be just fine inside!
How Can You Tell When a Monarch Butterfly Is About to Emerge?
If you see any of the following:
- Chrysalis darkens
- Wing pattern becomes visible
- Chrysalis becomes transparent
...then get the camera ready. Things are about to happen quickly.
Watching a Monarch Butterfly Emerge from Its Chrysalis
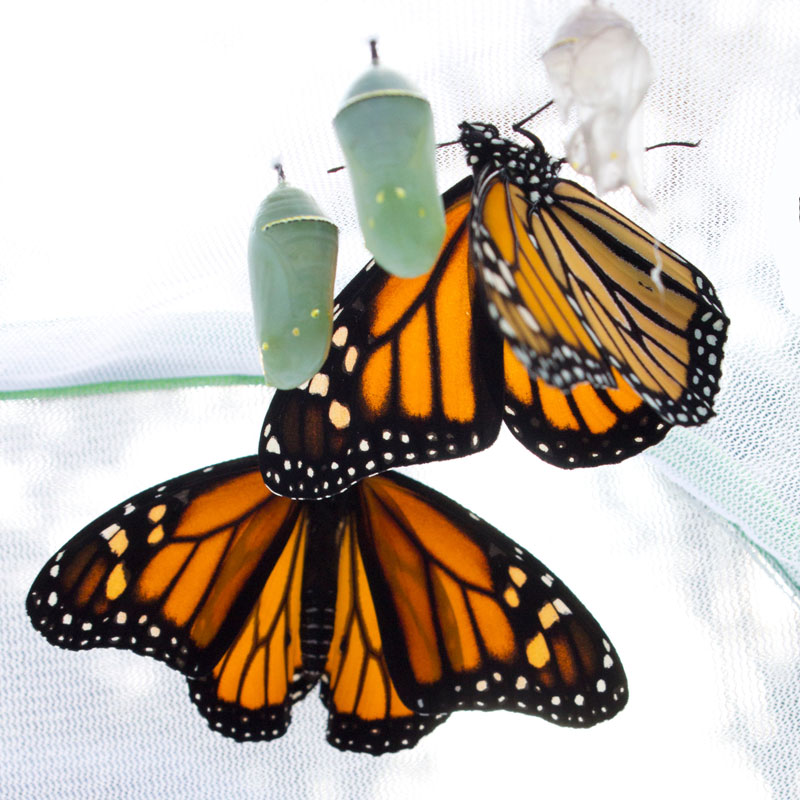
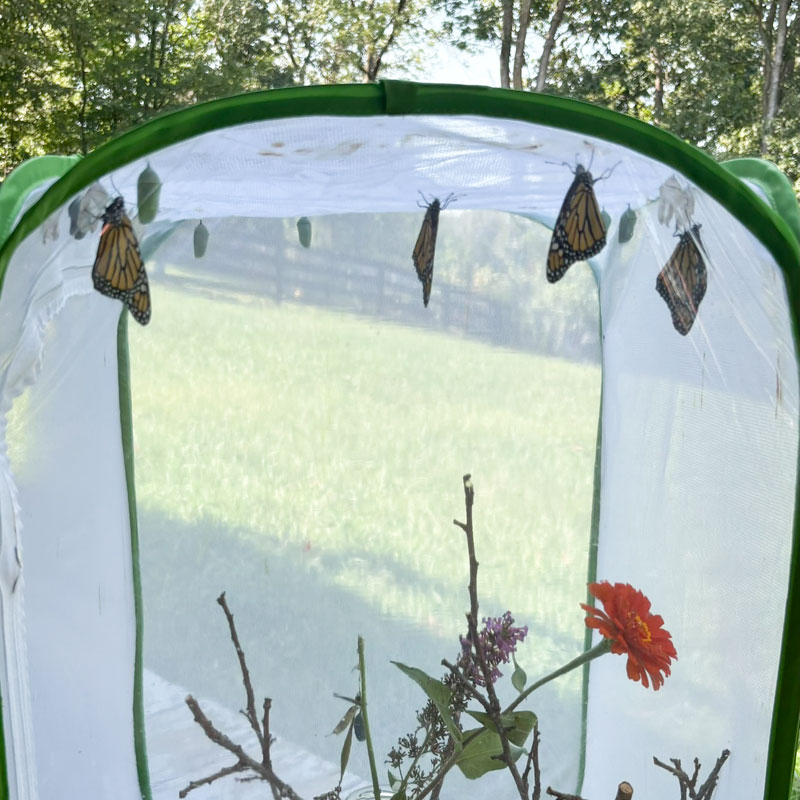
Within a matter of seconds, the butterfly will break free from the chrysalis, flip around to face upwards, and begin the process of readying itself for flight.
Immediately after leaving the chrysalis, the wings will be very bunched up, wrinkled, and wet.
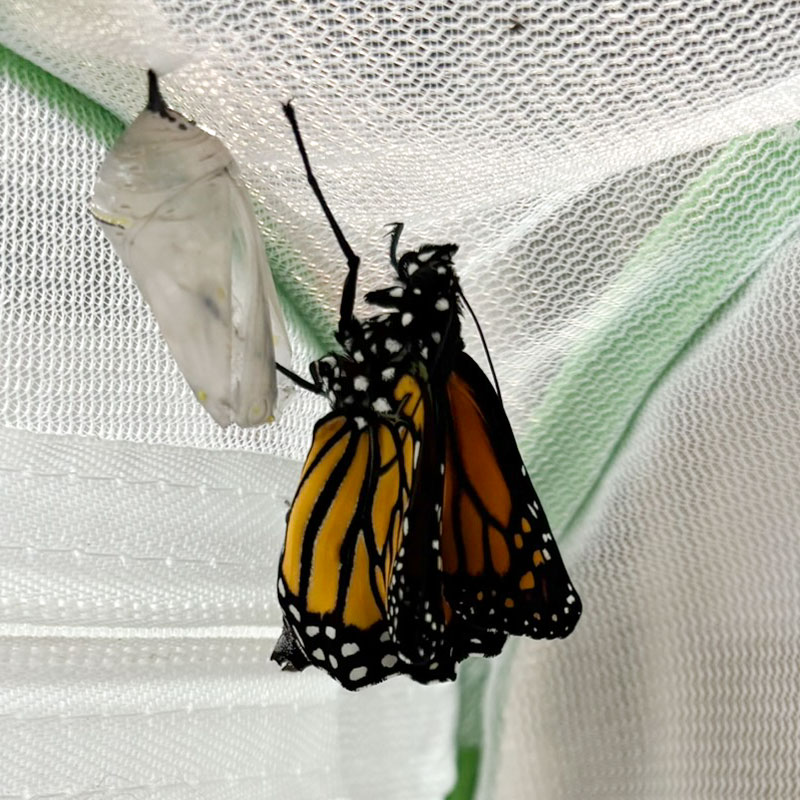
Over the next few minutes, the wings will unfurl and expand as they dry out. They'll hang down and the butterfly will rest as it prepares for life in its new body.
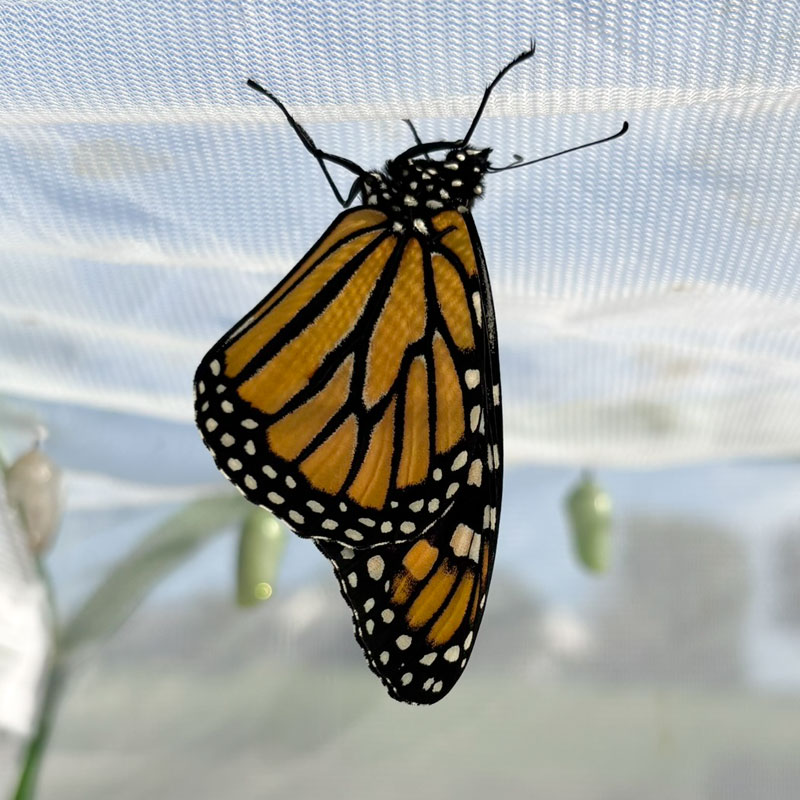
I was lucky to capture time-lapse video of two of my butterflies emerging from their chrysalises.
Time-lapse video of a monarch butterfly emerging from its chrysalis
Isn't that amazing? Each emergence took an elapsed time of just a couple minutes.
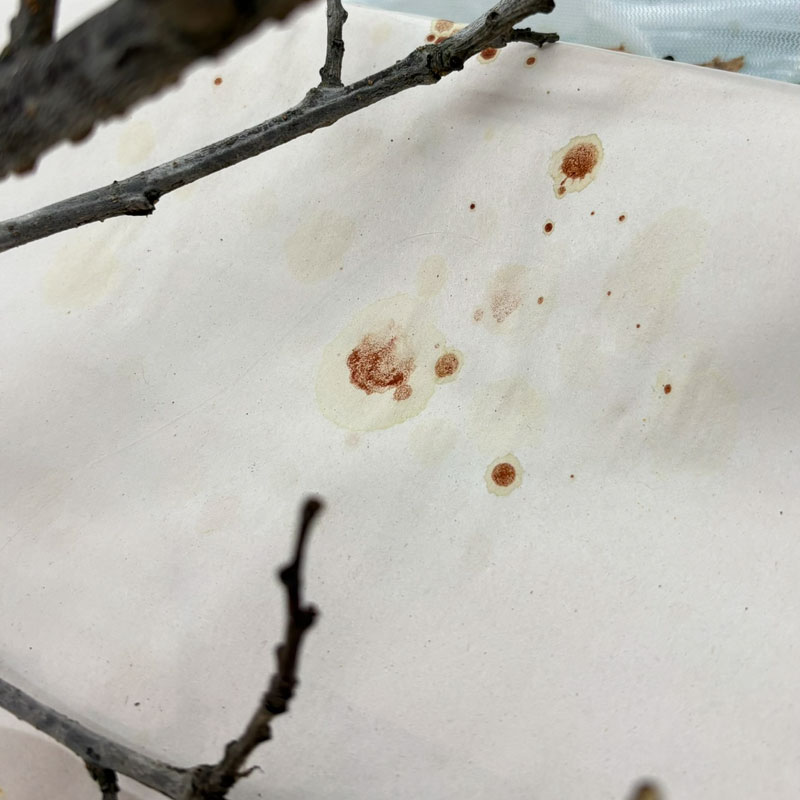
What is the red liquid that comes out of a newly emerged butterfly?
Don't freak out if you see a splash of a weird reddish liquid under the newly emerged butterfly. That's "meconium" and it's a normal part of the process. It's not blood, so don't fret. (Also, thank goodness for that paper liner which will make this easy to clean up!)
What to Do After a Monarch Butterfly Emerges
After your butterfly emerges, leave it alone for a few hours and do not try to handle it. It will hang while its wings expand and harden.
When the butterfly starts to wander around the enclosure, you know it's feeling good and the wings are dried out and fully expanded.
Will the butterfly be hungry?
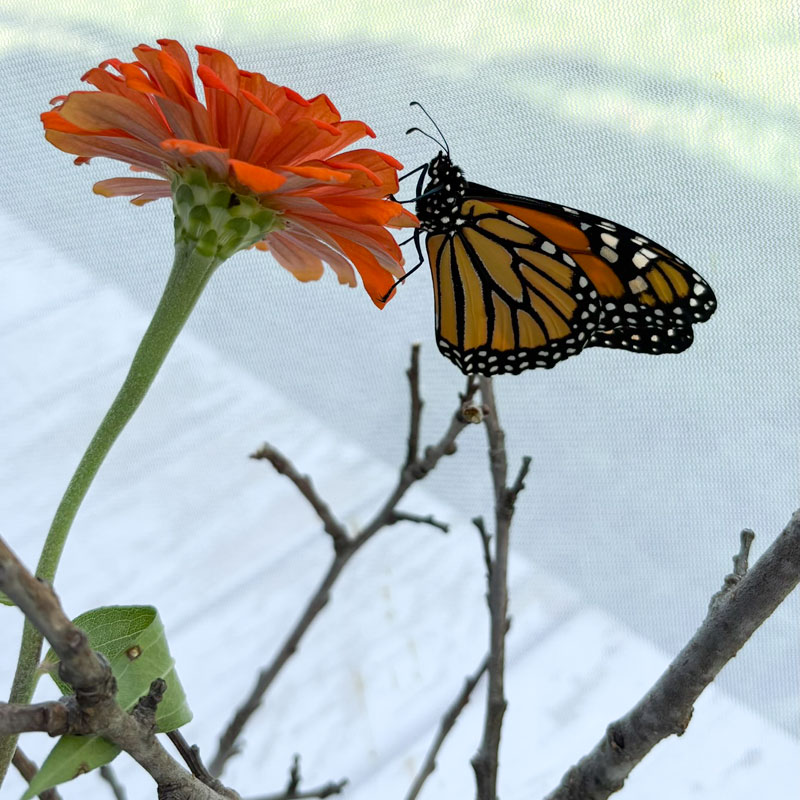
A newly emerged adult generally doesn't need to feed until the following day. It cannot and will not eat its empty chrysalis shells, though. Instead, it will seek out nectar or sugar water for nourishment. For this reason, I usually keep a few cut flowers and a very shallow dish with a sponge soaked in sugar water in my enclosure when the butterflies begin emerging.
How and When to Release a Monarch Butterfly
Once your butterfly is wandering around the enclosure and opening its wings, it's potentially ready to be released. You'll need to time the release carefully and you've got a choice to make on how soon to do it.
Option 1: Wait 24 hours
Ideally, wait 24 hours before releasing your butterfly. This time is important for full development, and it won't need to eat the first day anyway, so it will be fine in the enclosure for a day. When you see it flying all over the enclosure, it's trying to tell you it's fully mature and ready to fly into the vast open sky.
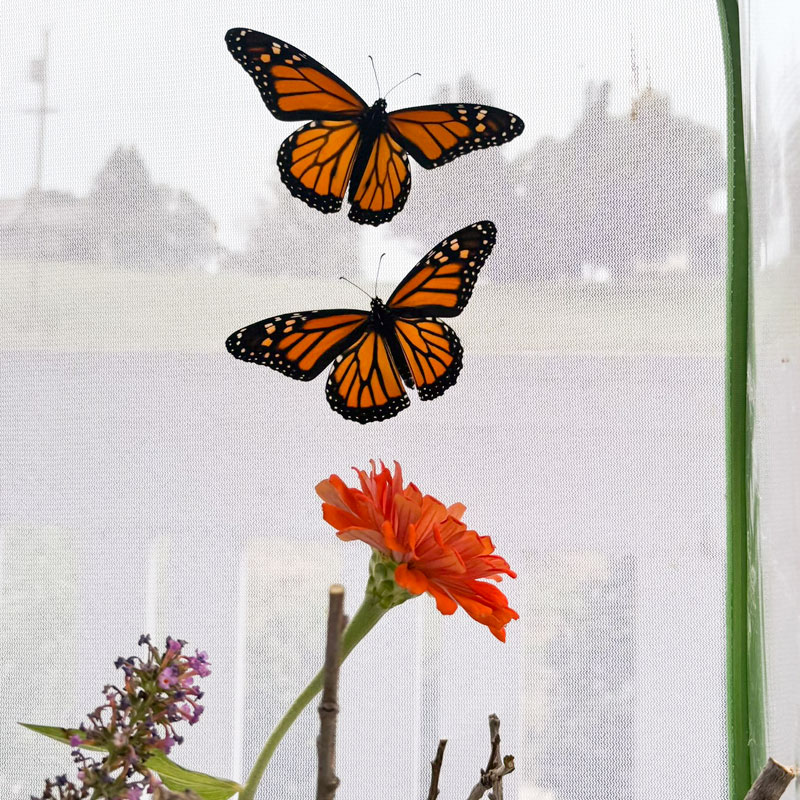
Releasing mature butterflies is a pretty quick process. Just unzip the enclosure and they'll fly away as soon as they see the opening.
Option 2: Release early and get to hold it
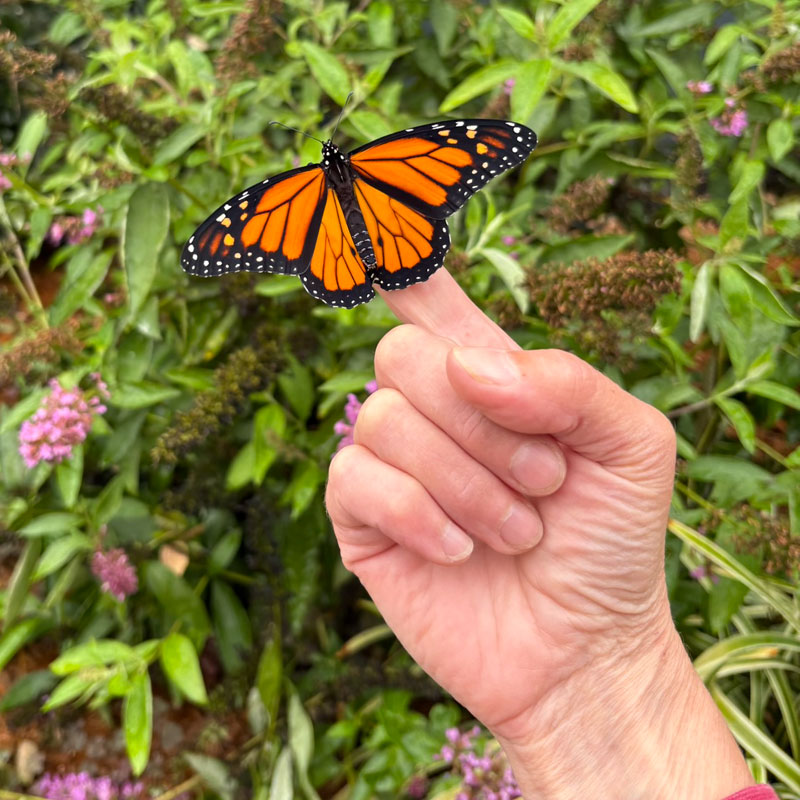
While 24 hours is ideal, technically the butterfly can make short flights after 3-4 hours, so it's not out of the question to release it early. What's delightful about this short window of time is that the butterfly is still tame enough to — are you ready for this — let you hold it.
When I want to hold one of my butterflies, I put my hand into the enclosure and place my finger in front of the butterfly, and it'll walk right onto it. Then I can remove my hand (slowly!) and usually hold the butterfly for a few minutes before it flies away.
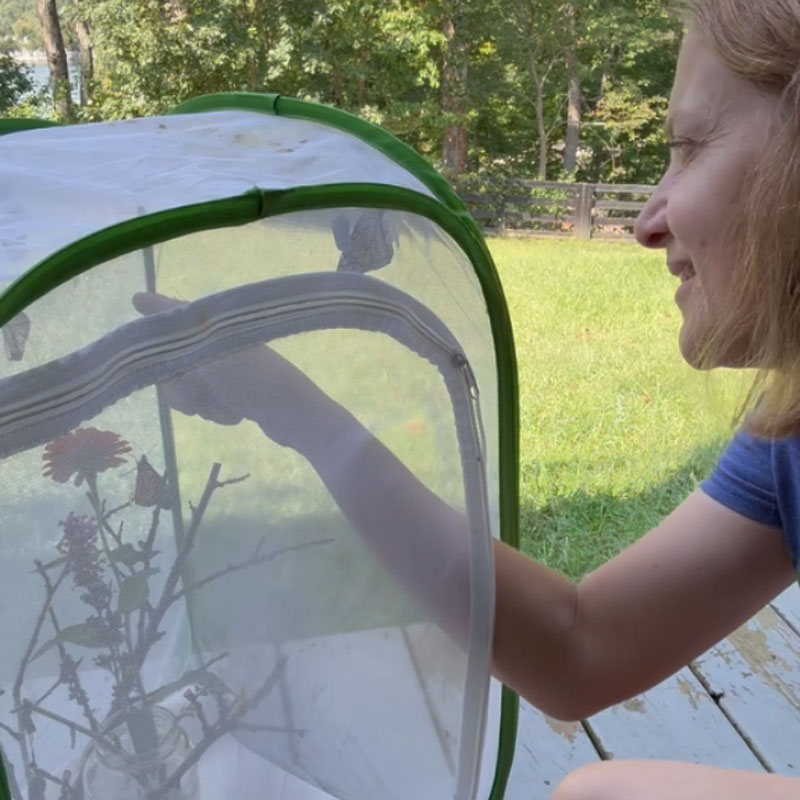
If you thought it was magical watching the transformations... you have no idea how delightful it is to actually get to hold a butterfly on your finger.
Precautions during any release
There are some precautions you should take with any release, regardless of timing.
- Ideally, release 24 hours after emerging
- Release near nectar flowers so they have the best chance at finding food
- Don't release when it's really hot or really cold
- Don't release in strong wind or rain
- Be careful not to touch their wings
One extra wrinkle to consider when timing a release is the other butterflies that happen to be in your enclosure at that time. Because I raised 12 butterflies this year, I often had more than one ready at any given time, so I timed releases based on what worked best for the current crop. Sometimes that means one or two early ones and one or two late ones.
How to Tell if a Monarch Butterfly Is Male or Female
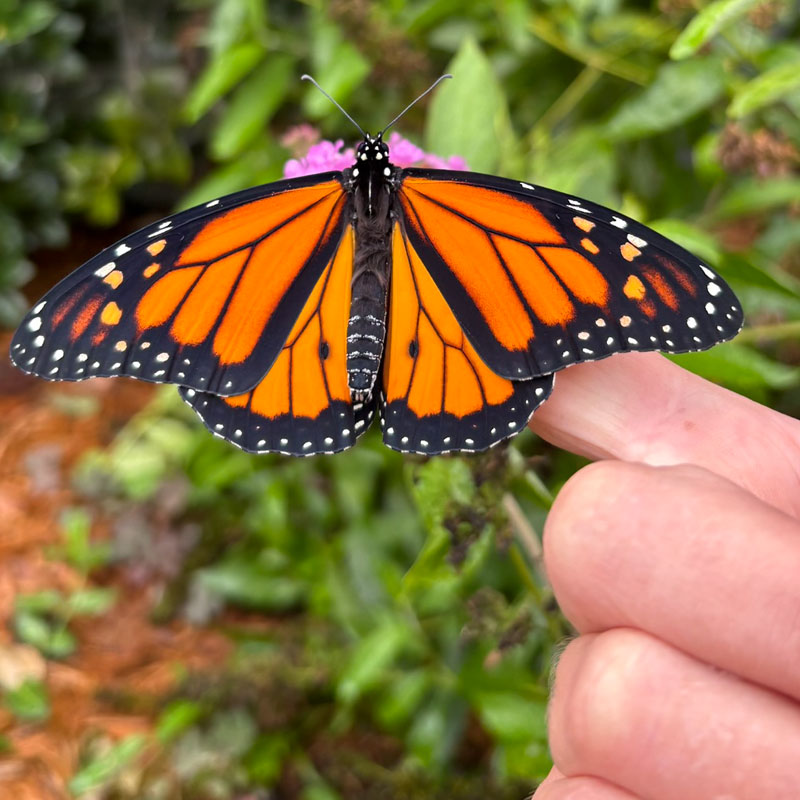
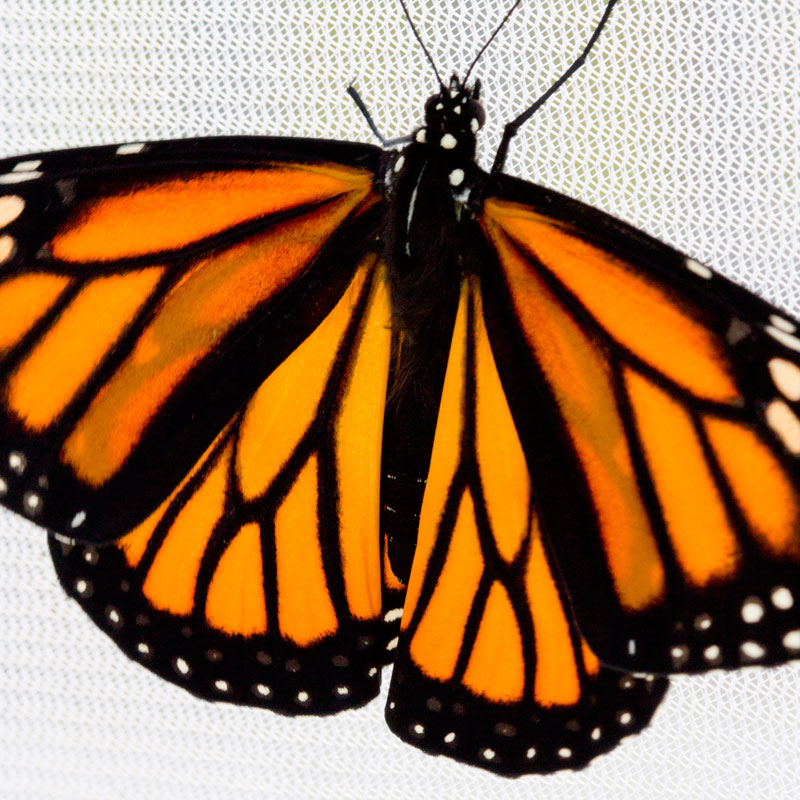
As you release your butterflies, you should take note of which ones are male or female, just for curiosity's sake. It's really easy to tell by looking at the pattern on their wings.
A male butterfly will have two oval spots on his lower wings.
A female butterfly will not have these spots.
Of my 12 butterflies this year, I had 7 male and 5 female.
What to Do After They're All Released
After all your butterflies are released, you can give the enclosure a good cleaning. Pull all the empty chrysalis shells out and discard them. Grab them from the top stem so you can pull off the silky web along with it.
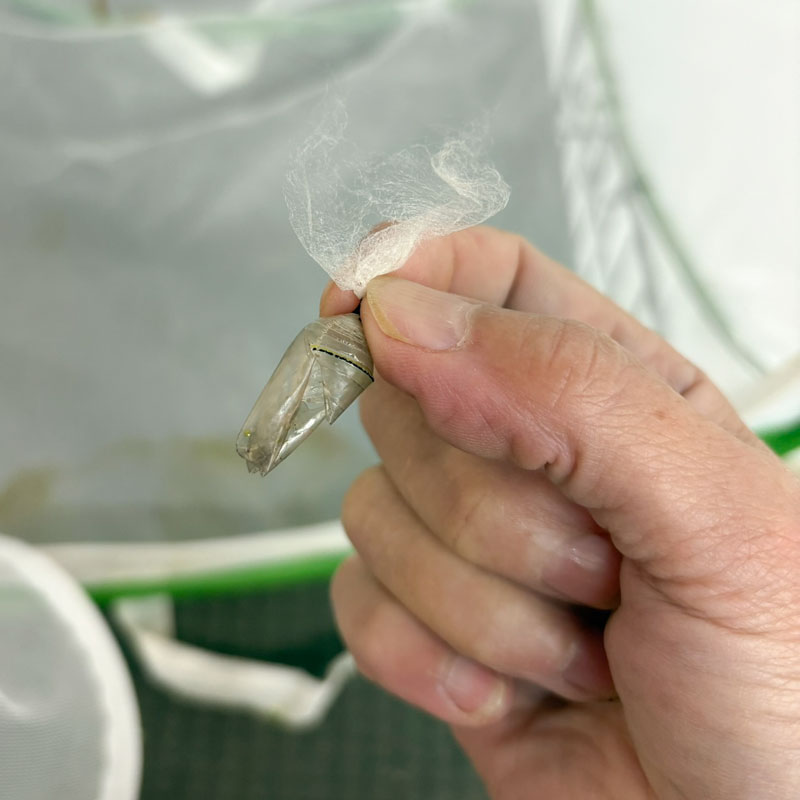
Dump out any remaining frass and wash off any spots on the mesh that need it. Then disinfect / sanitize the enclosure with a simple bleach solution.
Sanitizing the enclosure between uses is one of the most important measures you can take to prevent diseases such as OE (Ophryocystis elektroscirrha), which is a parasite that can affect monarchs, especially in captive conditions.
Let the enclosure dry fully, flatten it, and store it away until next year.
Mistakes I Made Raising Monarch Butterflies
The biggest mistake I made this year was losing a caterpillar. I found an egg, brought it inside in a little cup, and managed to hatch it into the tiniest little caterpillar. I've done this before and had great success, but unfortunately, this one disappeared.
I'm not sure if it didn't survive the trek towards the milkweed or if I accidentally threw it out with the spent branches. Either way, my lesson learned is to not bring eggs in in the future... at least if I can help it. (Sometimes they sneak in on me.)
If this is your first time raising monarchs, I suggest starting with bigger caterpillars to make them easier to keep track of.
Things Nobody Told Me About Raising Monarch Butterflies
As I went through this journey, I realized there are some things I learned along the way that I had no idea about going into it.
- Caterpillars eat an unbelievable amount.
- Consequently, they poop an unbelievable amount.
- The actual transformations happen FAST.
- A chrysalis looks dramatically different right before emergence.
- A newly emerged butterfly doesn't initially look like the perfect butterfly you're expecting.
- Butterflies emerge as full-size adults, not small like you might expect.
- You'll get oddly attached to those caterpillars.
And most of all... it's unbelievably magical.
Is Raising Monarch Butterflies Worth It?
Yes. Given the low cost of supplies and easy DIY nature of this journey, it's absolutely worth it to experience the joy of seeing the transformation and releasing your butterflies at the end.
I shared the experience with my neighbors as well, letting them each come and release a butterfly or two as they became ready. If you have kids, it's an even more enjoyable hobby and a great science lesson too.
But even if you don't want to go all-in on raising them yourself, remember that you CAN make a difference in the monarch population by simply planting lots of flowers that they thrive on. Even if you don't take in the caterpillars, you can plant a habitat and let the monarchs come visit you!
similar projects

Hosting a Cooking Themed Bridal Shower for the Foodie Bride
Harry Potter Hedwig Party Invitation
Beach Sand Collection


 info@chicaandjo.com