


Oyster Shell Cake for an "Under the Sea" Birthday

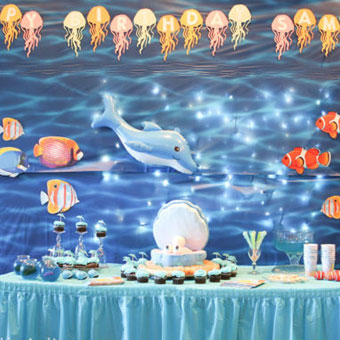
We've already shared some details with you about Little Jo's "Under the sea" birthday party this year, and today I'd like to tell you more about the cake I made for the party.
Sweet Little Jo, knowing that she can ask for whatever her imagination dreams up and I'll do my best to deliver, came to me with one of the party napkins she and Jo had picked out. I took a deep breath as I waited for her to tell me exactly what part of the napkin she wanted recreated in cake. Would it be the cute turtle? The Nemo-looking fish? Or maybe the entire scene in frosting? Nope. It was the oyster. Little Jo wanted the oyster recreated in cake, and if the shell could stand up, that would be the best. Hmm... could I do it? I was pretty sure I could, so I said "yes".

Before I get into the details, let me just say that this was not an easy cake. I've shown you easy cake decorating before, like the red rose Derby cake or our famous swirled frosting technique, but this cake... this is not an easy one. I'm not saying you guys can't do it, because I know you can do anything you set your mind to, just be prepared for lots of steps and work. Hopefully those of you who don't have much need for an oyster cake in your lives will at least enjoy seeing how I build this one. It was a lot of fun!
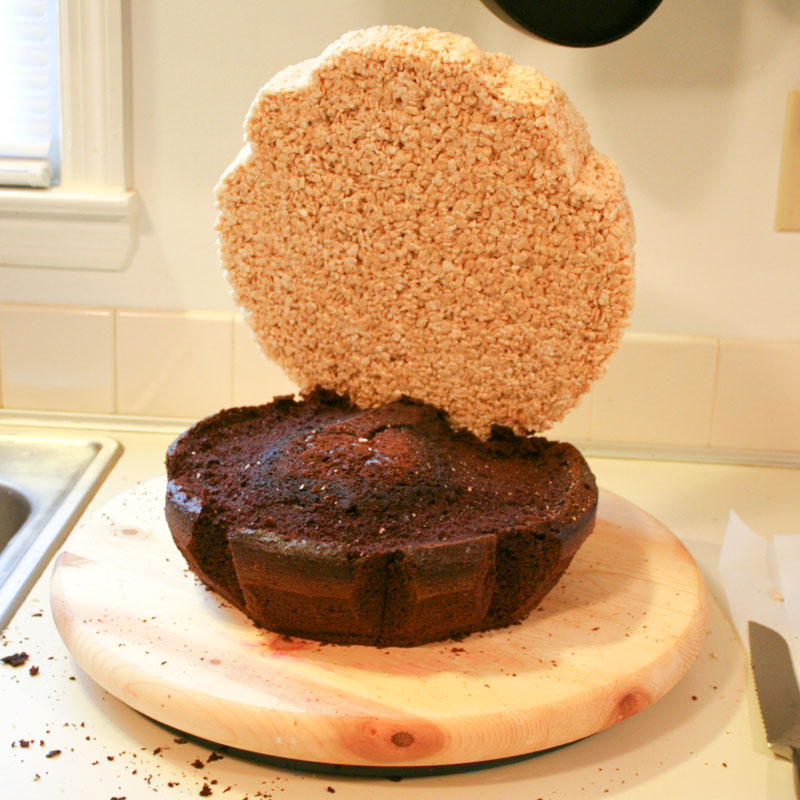
This would be my first carved cake and my first with a freestanding piece, so I thought long and hard about how to build the support that would hold the top of the cake. I finally came up with a plan, and started with the top of the shell. I first grabbed the cake pan I planned to use for the bottom of the shell, and traced it onto some cardboard.
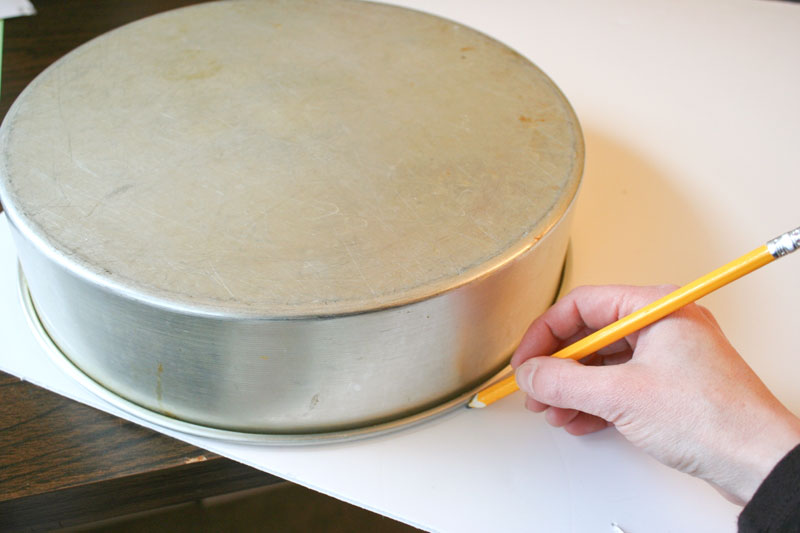
I cut out the circle, but then trimmed it about an inch smaller than that, all the way around, so that it would be slightly smaller than the cake. The cardboard will be all covered up in a minute, so the edges didn't have to look perfect.

Then I hot-glued a wooden dowel rod to the cardboard so I could stand the piece up later.
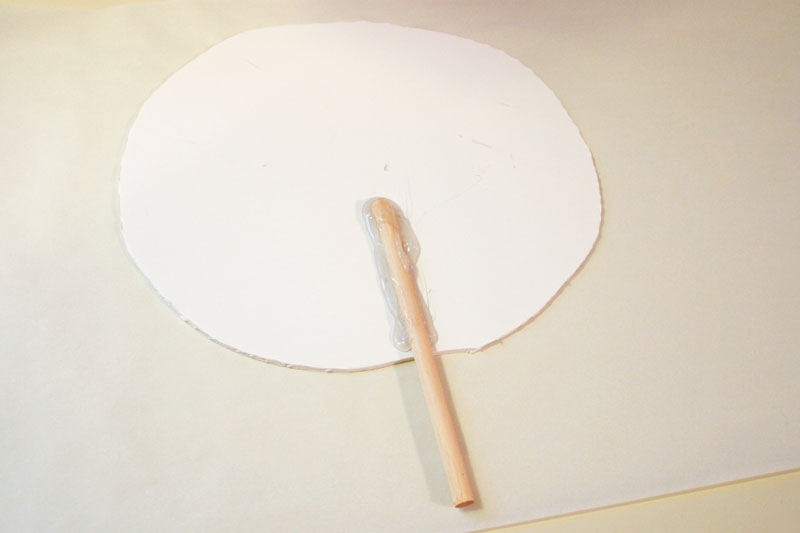
I mixed up a double batch of Rice Krispies Treats and added that to the cardboard. I bet you didn't see that coming, did you? Well, I wanted the entire cake to be edible, but I knew that real cake would be way too heavy to use for the top of the shell. Rice Krispies Treats were the perfect solution because they are really lightweight and moldable.
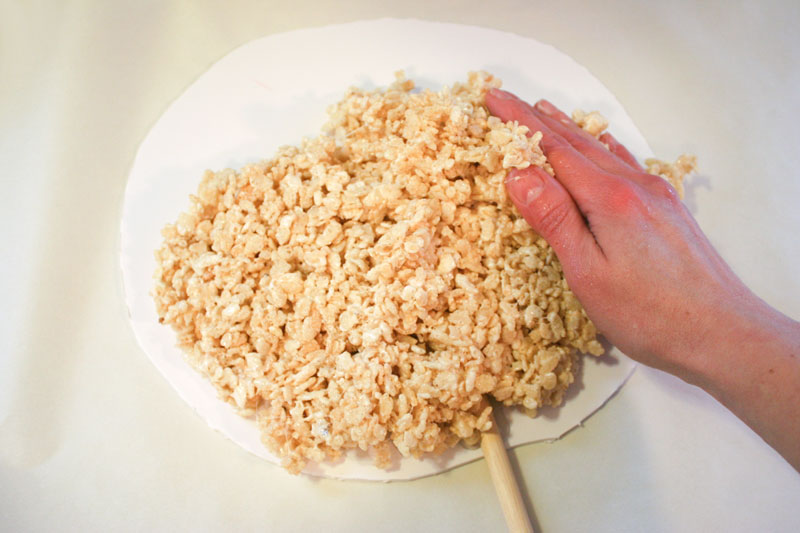
I got to work molding the cereal around the cardboard paddle, starting with a thin layer on one side. Then I flipped it over and covered the top, making sure the edges were smooth and rounded. I used my hands to press a few grooves into the cereal to make it look like the grooves of a shell. I worked on a piece of parchment paper so that nothing stuck, and as I went, I realized what a great material this was to work with. Gosh, you could create just about any shape in Rice Krispies Treats!
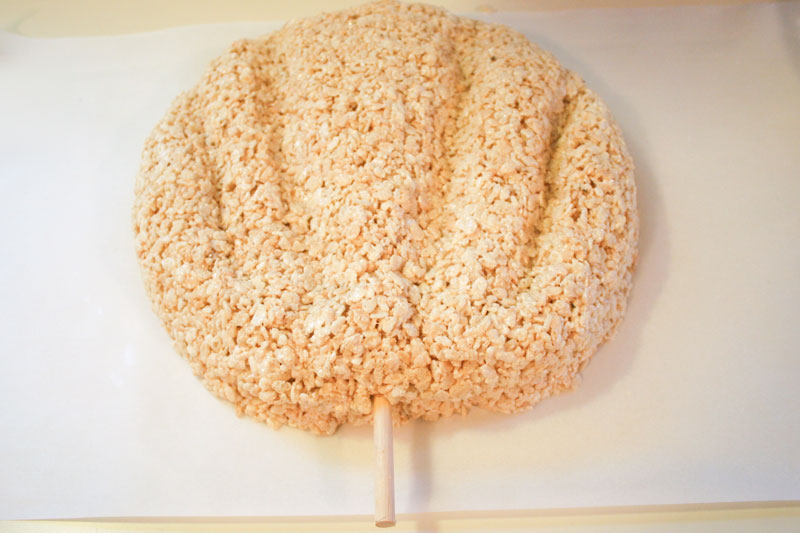
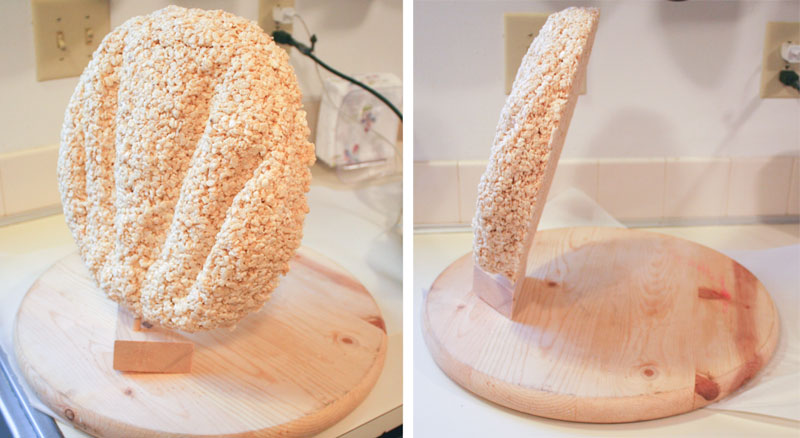
I actually made the Rice Krispies shell piece a day ahead of time, so that it would have plenty of time to harden and dry a little. I wanted to be sure that it was firm enough to not fall apart once I stood it upright.
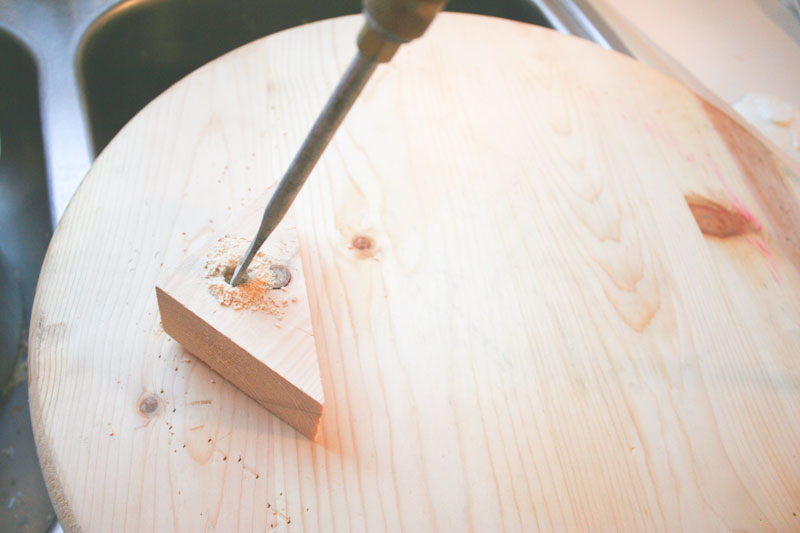
In the meantime, I worked on the rest of the structure that would let me mount it. I grabbed a scrap of wood from my stash and screwed it onto my trusty wooden cake board. Then I drilled a hole into the scrap piece, at a slight angle, making sure the hole was the same size as the dowel rod.
By the way, if you make a lot of cakes, I recommend you browse the craft wood section at your local home improvement store and look for the round, solid wood, tabletop pieces. I picked up an 18" circle a couple years ago and I use it as a cake board all the time, usually covering it with coordinating fabric. It's super durable and strong, and was the best $20 I've ever spent on cakes, that's for sure.
When it was time to start assembling the cake, I just put the dowel into the hole and that was it -- the shell stood up perfectly!
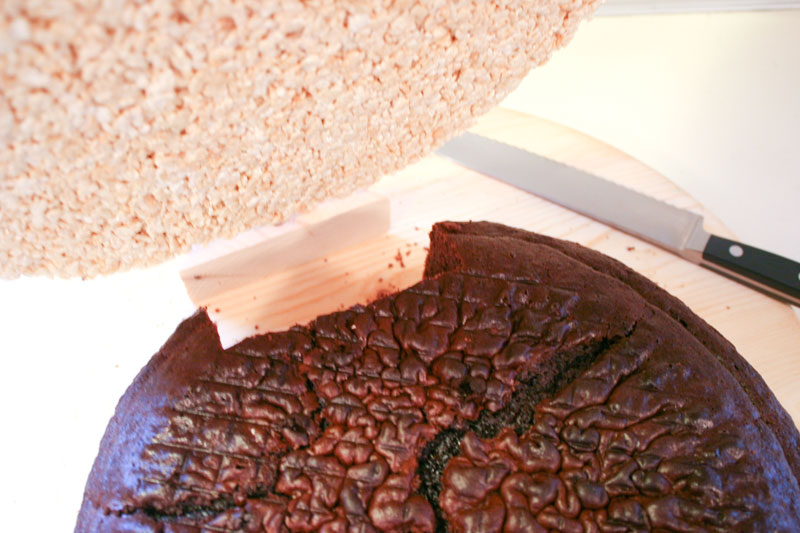
Then it was time to put the actual cake part in place. I cut a notch out of one side so that I could push it up against the wood block, so that the top of the shell matched up. This was probably my favorite step, because I got to eat the little piece of cake that I cut away!
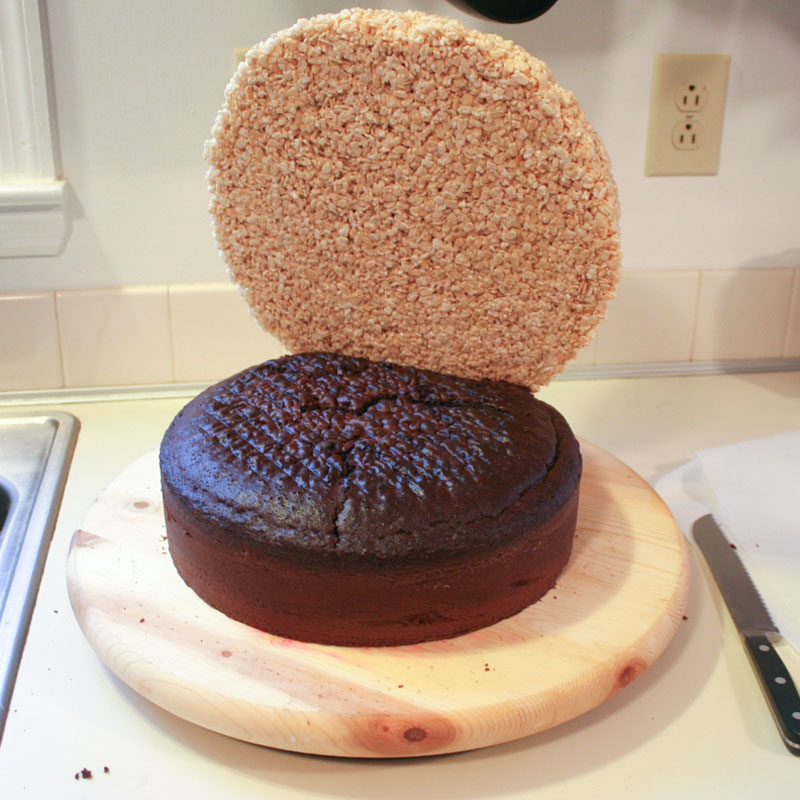
Next came the trickiest part -- the carving. I used a serrated knife to carve the cake into as much of a shell shape as I could manage. I made the sides more narrow, made a gradual bump on the top, and cut notches in the edges. It's kind of hard to describe just what you need to do here, but just cut slowly until you get a feel for it and aim for rounded edges. I also did some cutting on the Rice Krispies Treat top, because I decided I wanted the notches more pronounced along the top edge.
Once everything was cut the way I liked it, I frosted the whole thing.
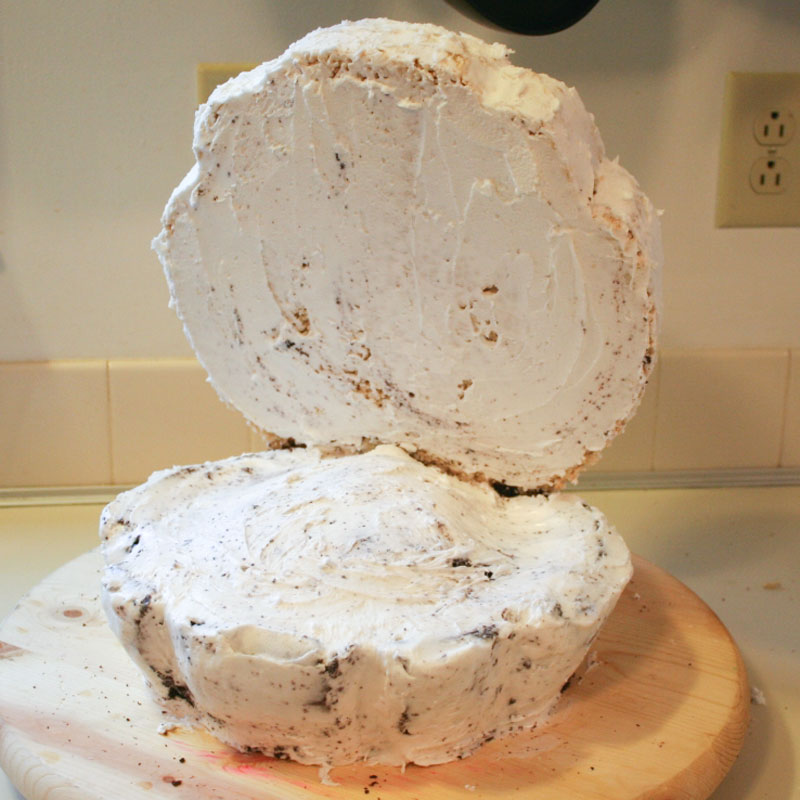
As you can see, there are lots of crumbs mixed in with this frosting, but that's pretty much impossible to avoid since the cake was carved and there are crumbs everywhere. Fortunately, it doesn't matter at all, because the whole cake will be covered in fondant anyway. I made sure to fill in every nook and cranny of every groove all around the cake. I used lots of frosting on the back area, around the wood block, to fill it in and make it look like the base of a shell.
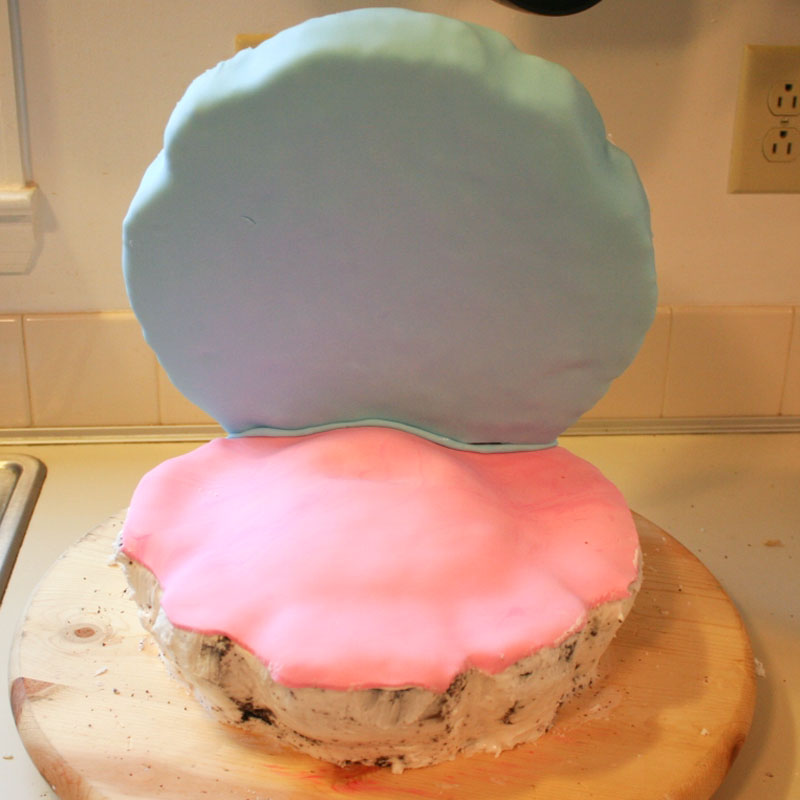
With the frosting done, it was time to move on to the fondant. I used about 5 pounds of white fondant for this cake, which I tinted various colors as needed. I started by making some pink and rolling it out with a rolling pin, using cornstarch to dust my work surface. Then I laid it on the bottom cake and used my fingers to gently smooth it into place.
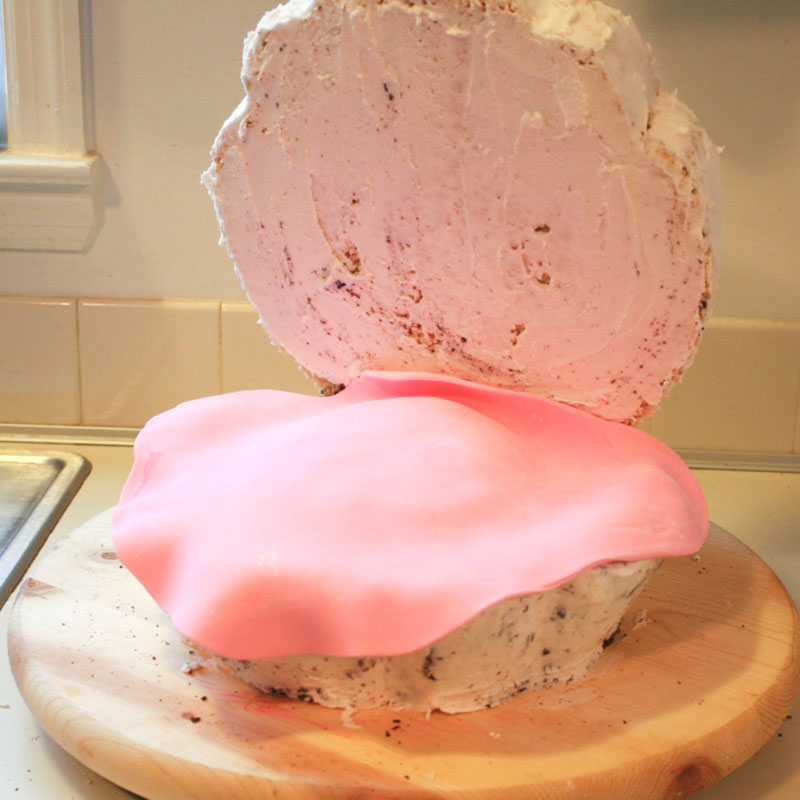
I used my fingertips to made an indention in the middle, so that I could nestle a pearl there later, then I trimmed the excess pink fondant away with a paring knife. I rolled out a sheet of light blue fondant, and applied it to the underside of the top shell.
I let the light blue wrap around the edges and onto the back a little. The basecoat of frosting had dried while I was working on the pink, so the fondant wasn't really sticking to it, but I fixed that by just dabbing the frosting with a wet paper towel.
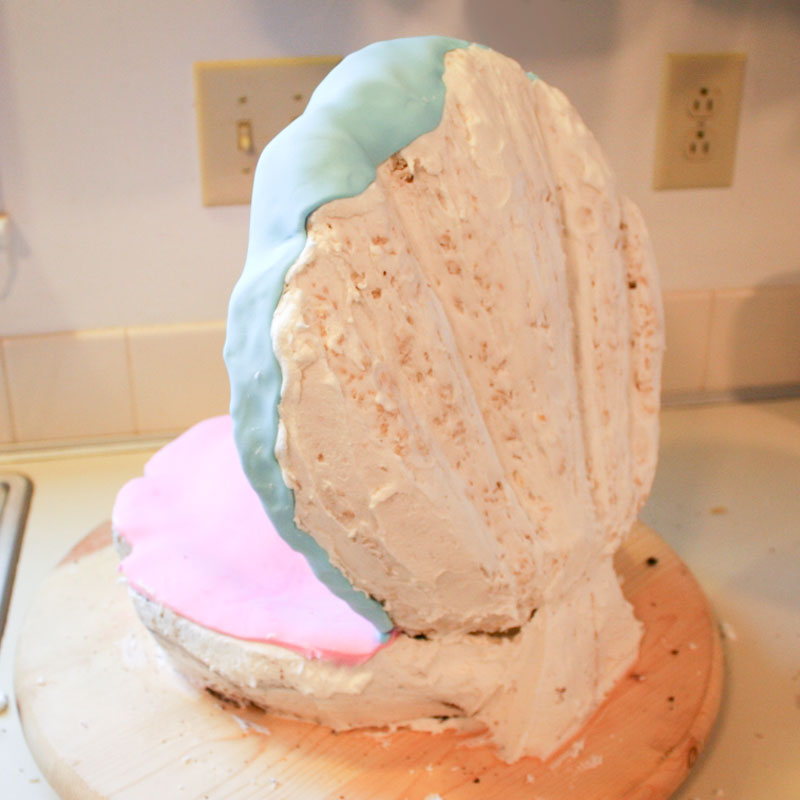
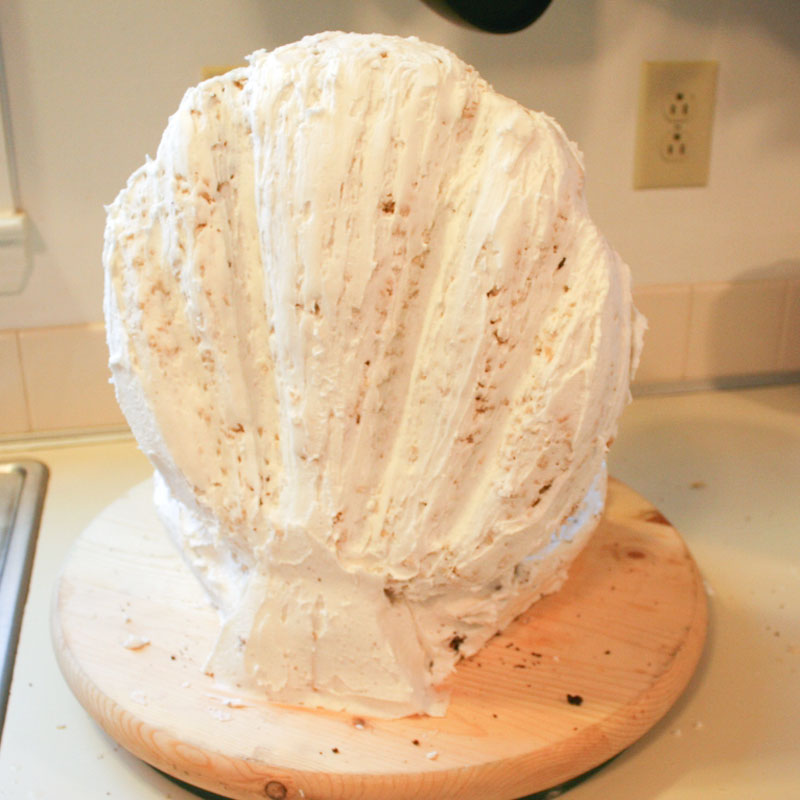
For the back of the top shell, I used a darker blue and let the fondant come down to cover the base of the shell as well. I took care to push the fondant into the grooves I had made in the Rice Krispies Treats as I went. The frosting makes this pretty easy because it gives way when you apply pressure.

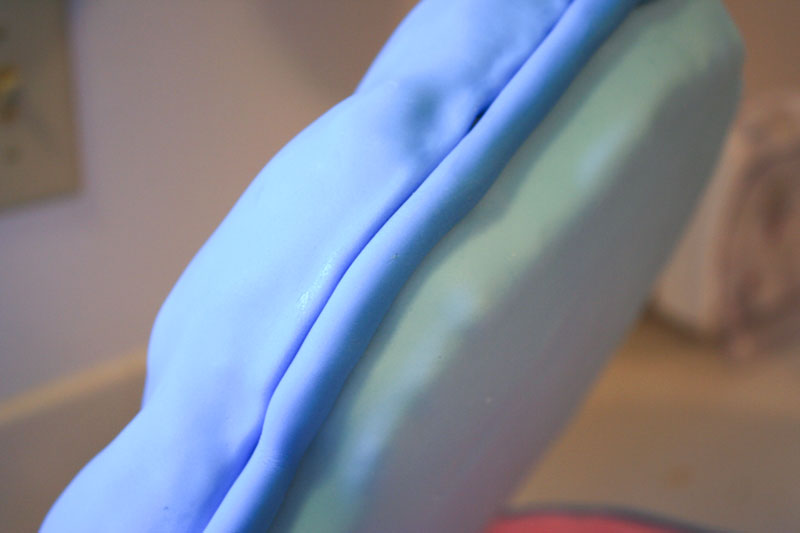
After trimming the edges of the blue, I wasn't happy with how it looked against the lighter blue, so I rolled a snake of fondant and put it along the seam. This made it look SO much better. As before, I used a little water to make the fondant stick to itself.
The last piece of fondant to apply was around the base of the shell. I used the same darker blue color, and rolled out a long band that I wrapped around.
I let the top edge stick up just a tiny bit over the pink, so that it looked more like the edges of a real shell.
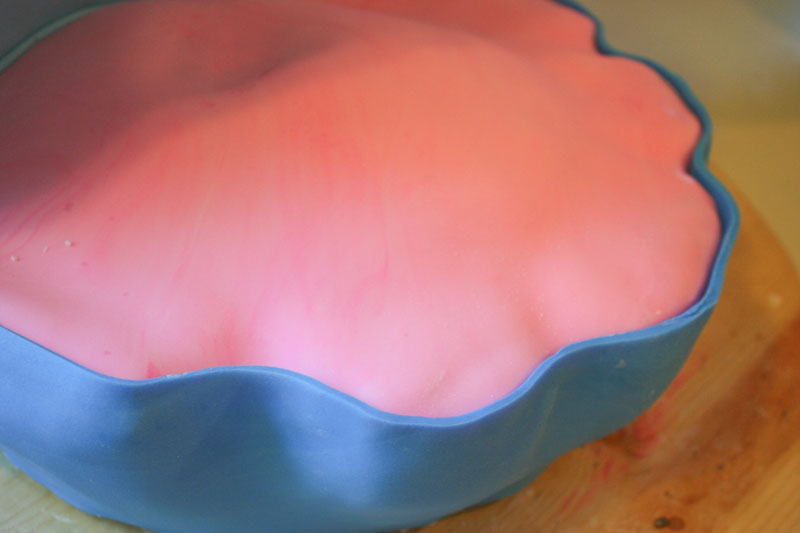
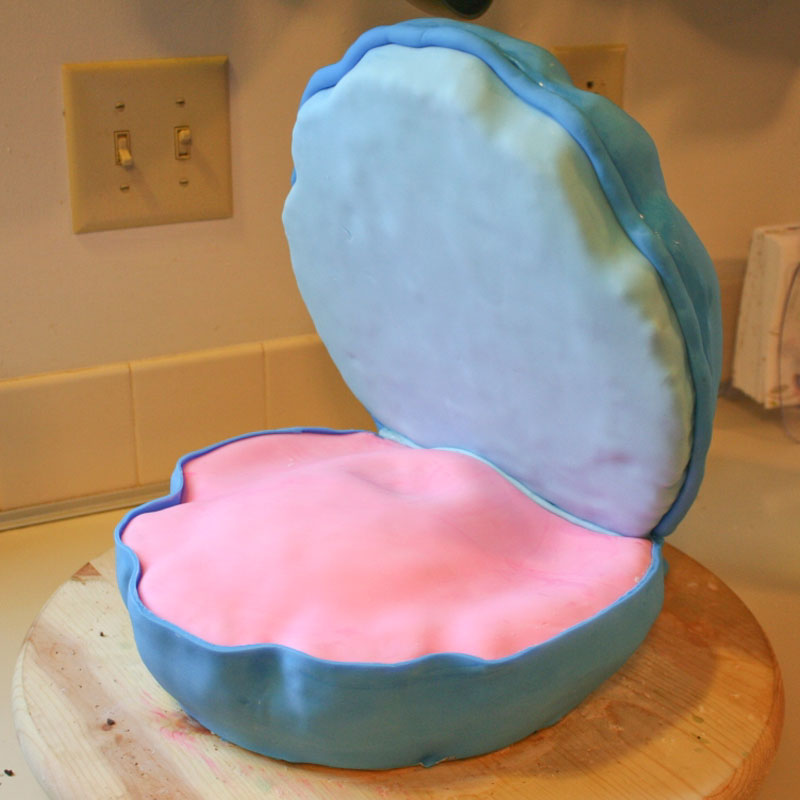
Whew, the cake was finally covered in fondant!
Now, on to the decorations. Even though there was no pearl in the oyster pictured on the napkin, I thought it would be a nice touch to add for such a large cake. Plus, I had recently acquired a chocolate ball mold and I really wanted to use it on something! I melted some white chocolate and poured it into the mold, then swirled it around to coat it.
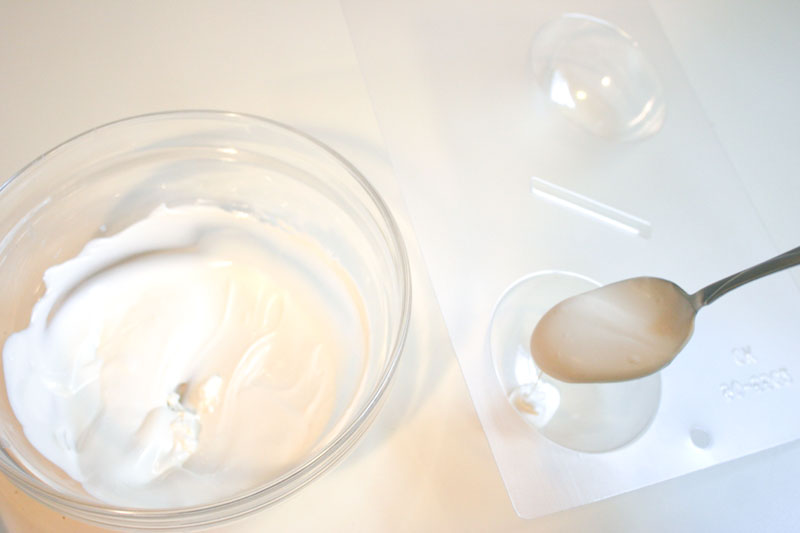
Once the mold was evenly covered with chocolate, so I flipped it upside down to cool, so that any excess would drip back out rather than settle in the bottom.
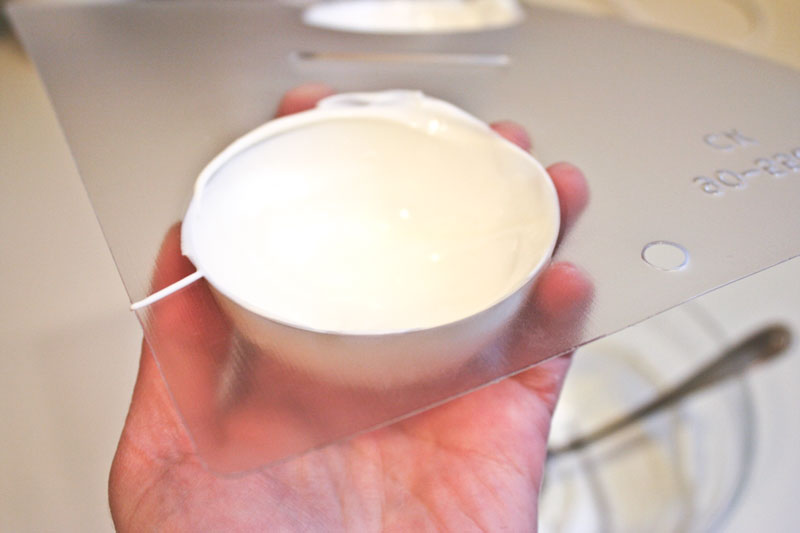
When the chocolate had hardened, I popped the two pieces out and marveled at how shiny and pretty they were.
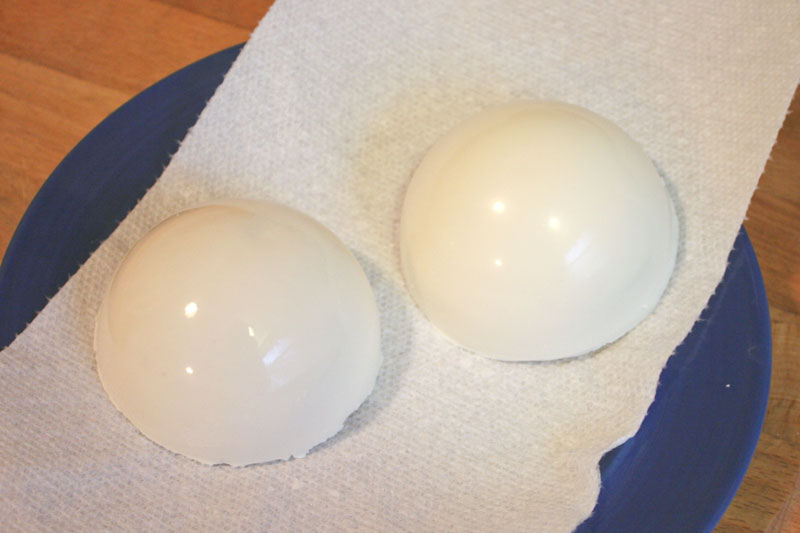
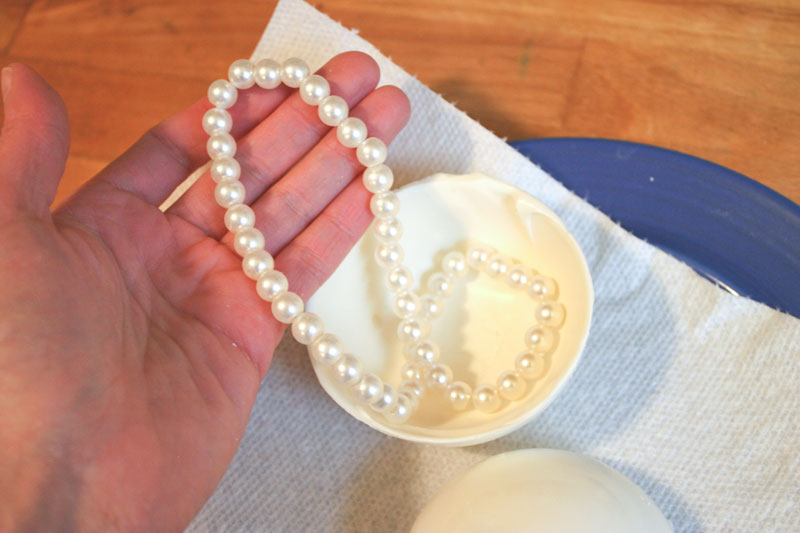
As a special surprise gift for Little Jo, I tucked an inexpensive pearl necklace into one half of the ball, knowing how delighted she would be if her oyster's pearl actually produced pearls she could wear.
Getting the two halves of the mold to stick together was actually a lot easier than you might think. I put a skillet on the stove on low heat and rested each half on it for just a few seconds, until the edges were melted. This also helped to smooth out any rough edges from my drips when I was pouring the molds.
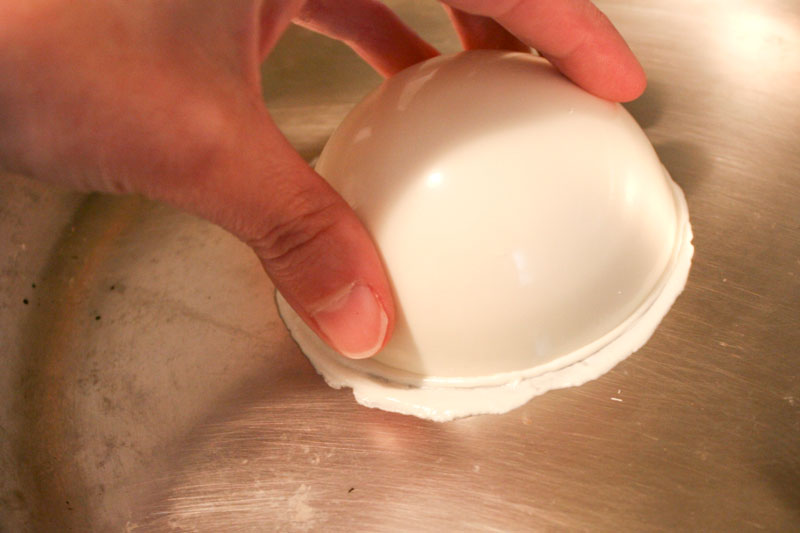
I stuck the two melted halves together and they were a perfect fit.
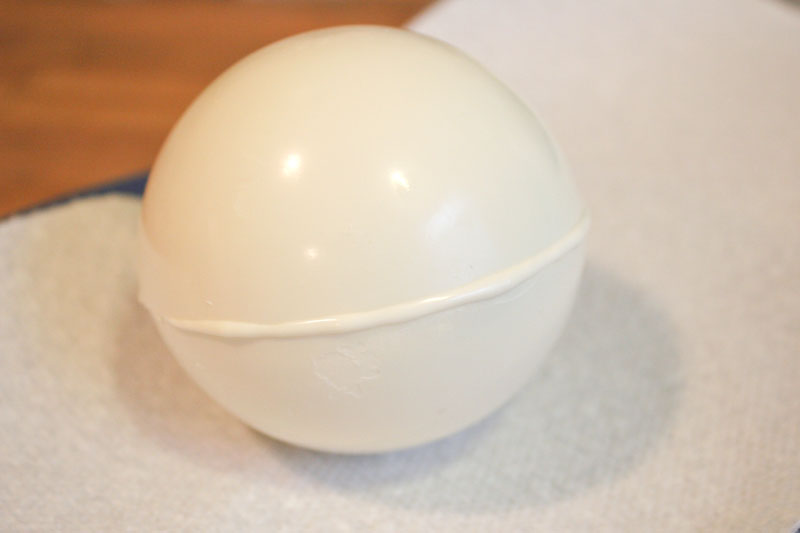
I used a paring knife to gently scrape away any excess while it was still warm, and the seam was hardly noticeable.
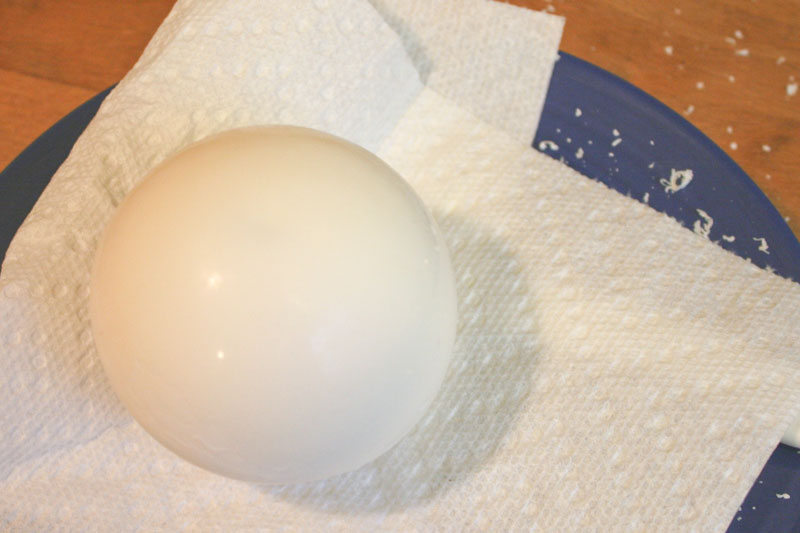
To really make the pearl look the part, I dusted it with some edible pearl dust. What a huge difference this made!
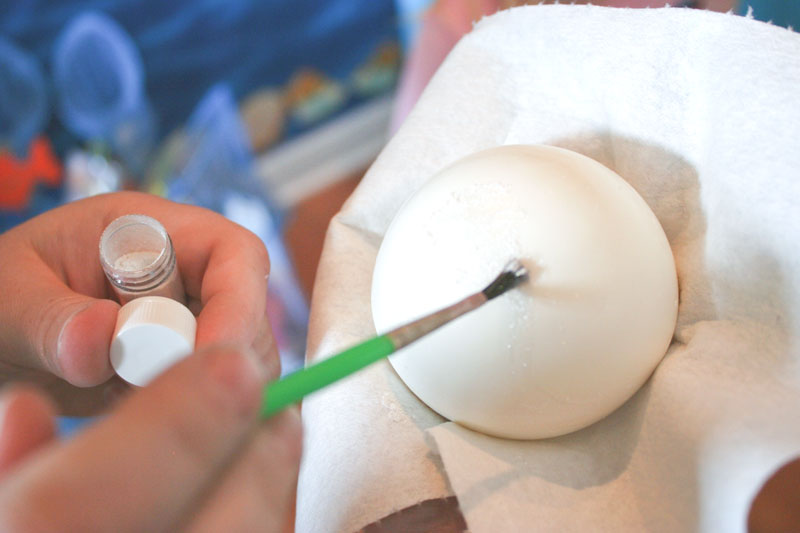
When I nestled the pearl in place in the middle of the shell, it was perfect.

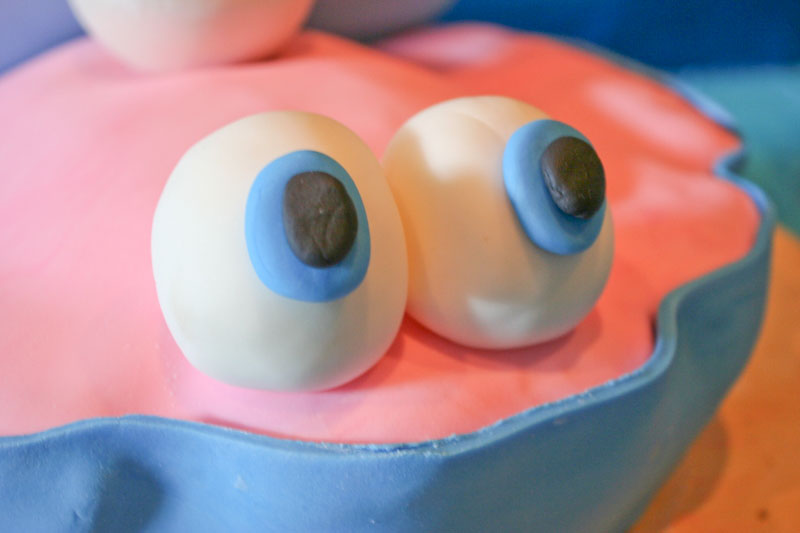
There was still one more thing that the cake needed in order to match the design on the napkin, and that was a pair of big, googly eyes. I rolled some white fondant into large ovals and dotted them with blue and black to create eyes. Then I perched them on the edge of the pink area of the oyster.
When it was party time, Jo and I added some brown sugar all around the cake to look like sand.
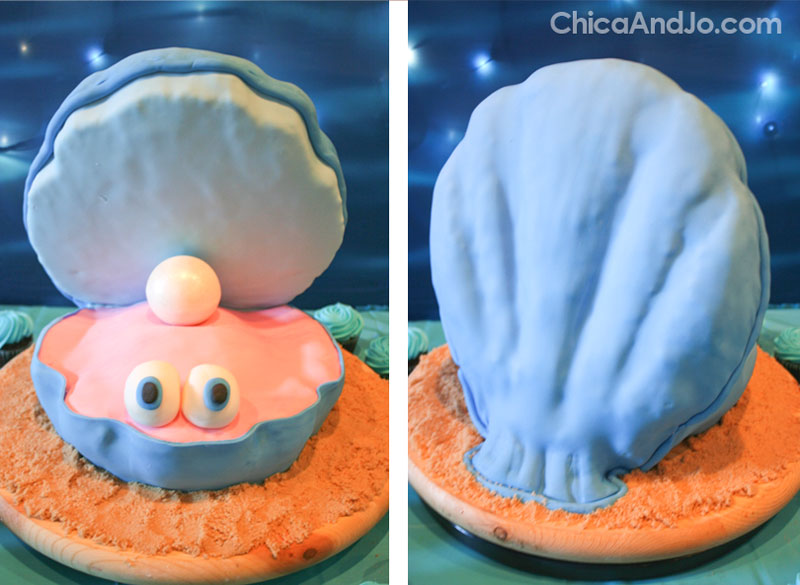
This was such a fun addition to Little Jo's "Under the Sea" birthday party, and she loved it — especially the secret surprise for her inside the chocolate pearl!


13 comments so far:
OMG! That is FINtastic!!!
Haha! Nice pun, Brenda. Thanks!
You have to love someone an awful lot to make something that complicated and CUTE!!!
Wow! This is so nice! I love the pearls inside.
That is awesome!
beautiful! Well done!
Just amazing! I love it!!!
Thanks, everyone!
Jackie -- and I must love YOU GUYS an awful lot to take pictures to share with you as well :)
TOTALLY AMAZING!!!!
This project reminded me that I had not made Rice Krispies treats in forever. I had forgotten how easy they were to make and irresistible to eat. Thanks!
Wanda, I totally agree. Remember that old commercial where the mom would come out of the kitchen looking exhausted with flour on her face, to make her family think she'd slaved over those treats all day? That was so great.
Amazing
thank you so much for sharing! Amazing!!