


Make Your Own Custom Photo Notepads

Mother's Day is this coming weekend and like a lot of people, I've been thinking up a few gift ideas. Most moms enjoy receiving pictures of their children and my mom does too, but she really loves pictures of her granddaughter! I decided to create a custom photo notepad for my mom so she would have a fun way to stay organized and be reminded of that sweet face.
To create your own custom photo notepad, of course you need to select one or more pictures to use. I chose to use the same photo for every page, but you could easily change it up and use lots of different pictures together on one notepad if you wish. Once you have your picture(s) selected, download our photo notepad template to create your pages.
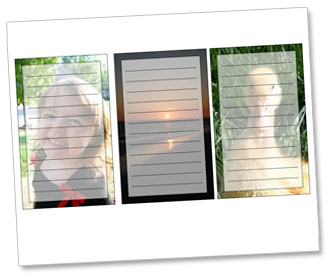
Follow the instructions in the template to update the default photos with your own, then print out as many sheets as you want to make your notepad. Each printed page has three sheets on it, so a good place to start would be 10 printed pages, which would give you 30 pages for your notepad.
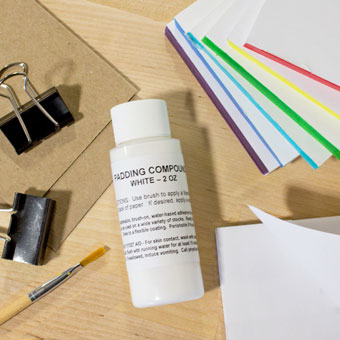
Use a paper trimmer or scissors to cut out the individual pages, then stack them up. Cut a piece of chipboard or cardboard to the same size, and put it on the bottom of the stack. This will give your notepad some stability.
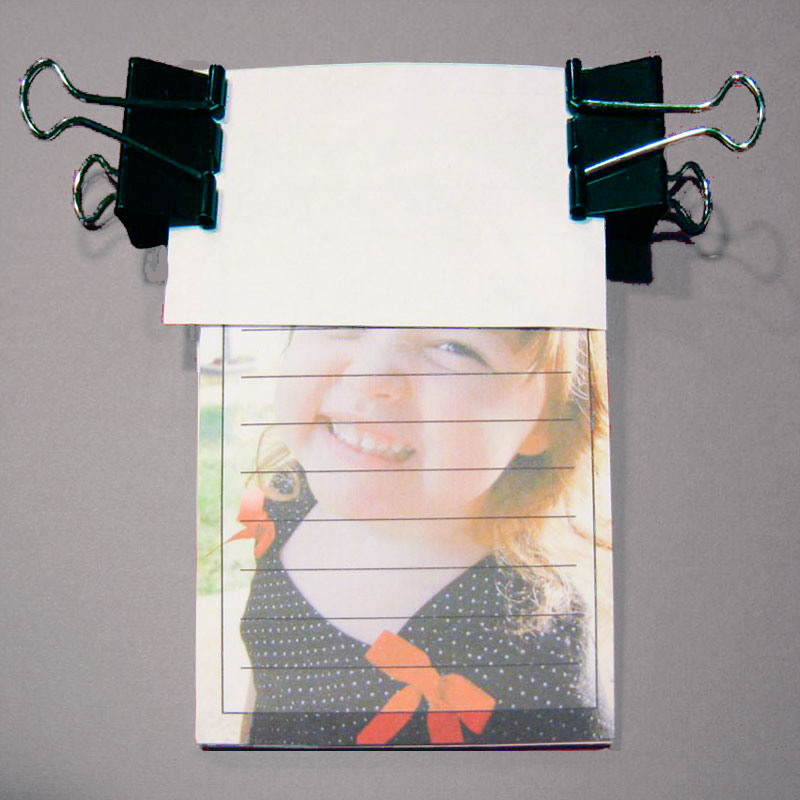
Following the steps in our notepad making tutorial, use some sturdy cardboard and binder clips to create a clamp to hold the end of the notepad together tightly.
Then use a craft brush to apply some of our padding compound to the end of the stack, as shown in our notepad tutorial.
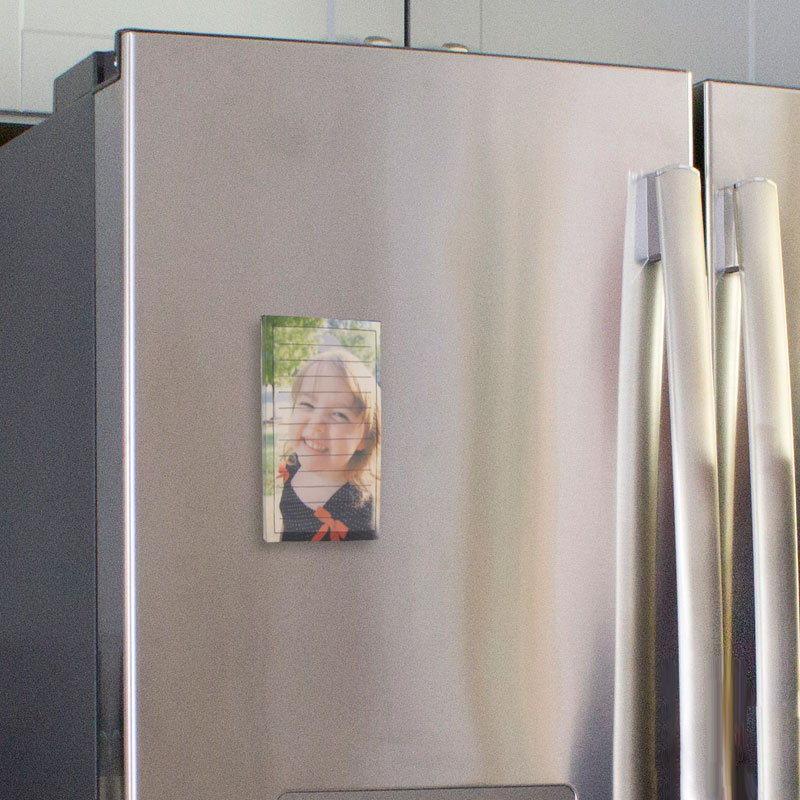
After your pad dries, remove the clamps and it is ready to be given as a gift. You can also add a magnetic strip to the back so that it can attach to the refrigerator.


30 comments so far:
This is such a wonderful idea. Thanks for posting this.
Wow, this is super creative, I love it!
Hi I just ordered your padding compound to make the custom picture notepads. Can you tell me what kind of paper you recommend printing the picture on? Thanks for your time. Neat project can't wait to make it!
Veronica, for this project, I used regular paper I use for every day printing. You can use nicer paper but it really isn't necessary. We'll have your padding compound in the mail tomorrow! Let us know if you have any other questions.
Thank you so much for making the template for this. I used this to make notepads of my kids to give to the grandmas in our life. It was so easy and really turned out beautiful.
Hello!
When I tried to change the picture the light bit in the centre to write on disappeared how do I get it back?
Hi Ellen. I'm not sure why you had that issue, but you can try hitting "undo" in Word until it gets back to how you want it, then try again. Or you can always just download a fresh copy of the template from our site :)
How do I make the photo lighter so you can write over it on the notepad? Or do I need to choose a photo with a lighter tone? There was a box to check, somewhere, for "make transparent" (I think) but I was not able to check that box.
Hi Carol. To make the picture appear lighter in our template, you actually need to make the overlaying text box less transparent. To do this, right click on the very edge of the text box and click on the "Format text box" menu item. On the "Colors and lines" tab, you'll see a slider bar labeled "Transparency". Our template has this set to 40%, but if you want a whiter text box, just reduce the transparency to a smaller number. Play around to get just the right number for your image.
Please let us know if this solution helps or not. Good luck!
I'm still not getting it... A Right click on the border gets me "format object." The "Text Box" tab is only dimensions. "Colors & Lines" has the "Semitransparent" box checked only if I choose a color, not "fill effects" and then a photo. No "transparency" slider bar or % in sight...
More on photo color density: I am getting the whole note paper photo in the same color density as the border, not faded like your sample templates. What am I doing wrong?
Hi Carol. I think the problem is that you're not right clicking in exactly the right spot. It's a delicate operation :) I've taken a few screenshots to show you what I mean. If you click on the actual photo border, where the arrow is pointing here, you will only get the "format object" option. But if you click inside the text box, where the arrow is pointing here, you will see that a dashed border appears around the text box. Right click on that dashed border, as shown here, and you should get the "format text box" option.
I'm not sure what is going on with your photo density, but hopefully if you get the transparency adjusted, that will fix it. Let me know.
Hi, what trimmer you use to make trimming of paper even. I can't do it
Hi k. Trimming the sheets all to the same size is challenging, but if you measure carefully, you should be able to get really close. I like using a good paper trimmer like this one.
Hi. Just found you guys by accident and am SOOO happy! I SHOULD be grocery shopping for dinner as we just got back from a trip to Dubai! Anyhow. This is the perfect gift for many occasions but for sure for two ladies that I know that are not that good of friends and are both having babies soon.
Thanks! You guys are DEFINITELY bookmarked!
So glad you found us, Alia. Crafting and reading blogs is definitely more fun than grocery shopping!
Someone recommended this tutorial to me as I do custom beach writings. I'm stocking up on pads for Mother's Day! Thanks!
I just found your website! LOVE IT!!!! I started making a custom notepad, but every time I downloaded one of my pictures, it cut off the right side of the picture. Am I doing something wrong? How can I keep this from happening?
Hi Wendy. Thanks for the compliments on the site, and we hope you continue to enjoy our project ideas :)
If you use our picture notepad template, then the photo you embed on the page would need to be the same proportions as the page in order for the whole thing to fit -- about 550 x 340 pixels. It sounds like you are using an image that is wider, so the sides are getting cut off. Try either cropping your photo or making the page size wider. Hope that helps!
Wow! I am a teacher and happened to stumble upon your website. We will be studying countries and cultures and we will be using the Amazing Race format. Your webpage gave us such great ideas and materials to use! I also love the notepads-They will surely be a holiday gift for the parents. Many Thanks!
So glad we could help you inspire your students. Patti. Hope you enjoy all our projects!
I had no probelm with changing the photo out, but when I printed it the notepad part is not printing as it shows it should. It is more white and looks like little "x"s all over it???
Adelle, I haven't seen that result before. Perhaps there's an issue with your printer or your computer's print settings?
Where do you get the cardboard for the backing or do you not use a cardboard backing? I will be ordering your compound glue!
Margaret, the best type of cardboard to use is chip board, but if you can't find it or want to be thrifty, you can find similar cardboard around your house. Try using the backing from old notebooks, or scavenge from folders, cereal boxes, or packing materials. Whenever I order postage stamps online, they always come in flat bags with the perfect piece of chipboard inside, and I save them up for notepads!
Chica, whenever I put the picture in the template it doubles the picture in the front and the back but it isn't lined up correctly. Any recommendations?
Krystal, my best advice is to double-check what version of Word you're using and be sure to carefully follow the correct directions in the document. If that doesn't help, let me know what version of Word you're using so I can test, and maybe I can provide better advice.
Chica, I'm using 2016. I'm right clicking the image, Format/Autoshape Picture, Fill Effects, and selecting the picture. It doubles like there is one image in the back and one in the front but don't align.
Krystal, I think you might be editing the white overlay text box, rather than the photo in the back. Make sure you left-click on the bright border area of the image first before right-clicking and going into the menu. You want to make sure that background image is highlighted. When you have the Fill Effects menu up, if you don't see the current image (girl, sunset, duck) already selected in there, then you aren't editing the right thing, so go back and click again. Let me know if that helps!
Thank you! I double clicked the bright border and was able to select it.