


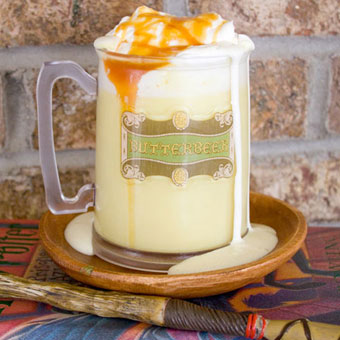
Butterbeer Dispenser Barrel

If you're planning a Harry Potter themed party you're probably already thinking of serving Butterbeer as a refreshment. We have shared our copycat cold Butterbeer recipe that's perfect for summer and our hot Butterbeer recipe that'll warm you up in the winter. But have you thought about how to serve those drinks? How about in a barrel!
DIY Butterbeer Barrel tutorial
We started with an ordinary plastic drink dispenser to serve cold Butterbeer, but since the Butterbeer of Harry Potter lore is traditionally served from a barrel, we created a cover for it. This cover transform it into an authentic-looking Butterbeer barrel, sure to be the highlight of the party. And I'm here to show you exactly how we did it.
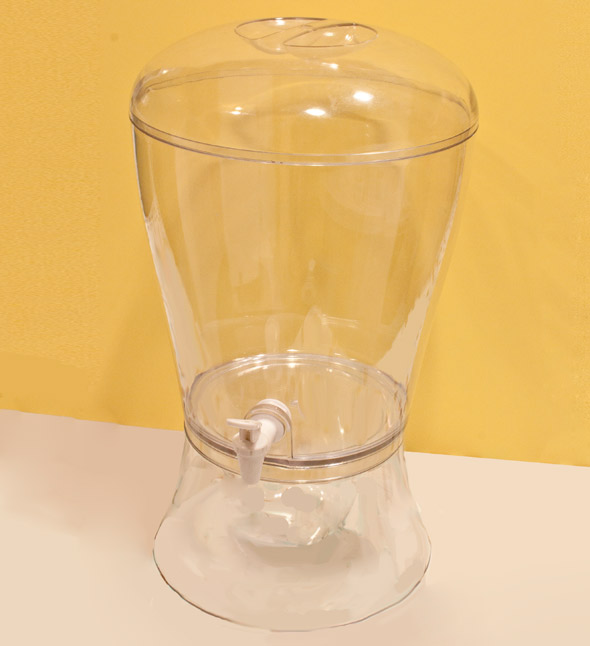
Start with a plastic drink dispenser
We knew Jo's giant plastic Creativeware beverage dispenser would be perfect for serving up the cold Butterbeer, but it's so boring and ordinary that we decided to make a cover for it.
Create the front (top) of the barrel
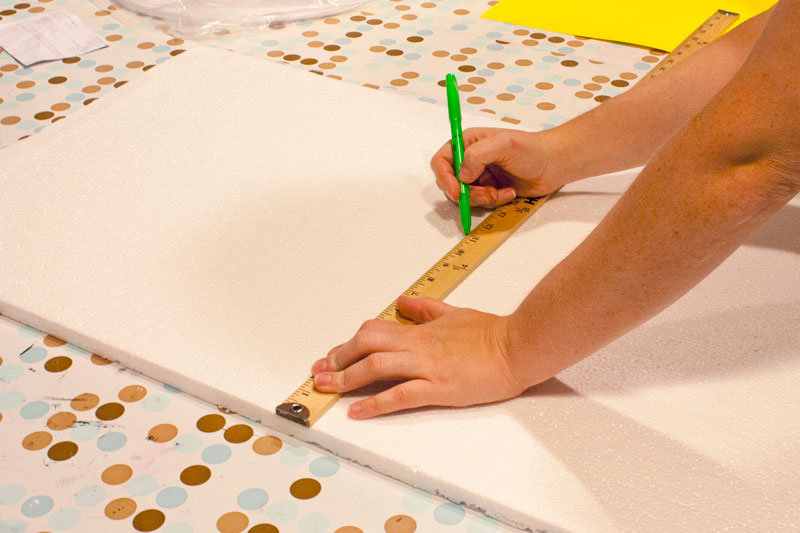
To create the start, get a piece of foam core board that's at least an inch or two taller and wider than your dispenser. Use a ruler and marker to draw a straight line down the middle.
(By the way, you may notice that I said to use foam core board but those pictures show a sheet of packing foam. Well, we started out with foam but realized it wasn't going to work. You'll see the difference later. Make sure you use foam core!)
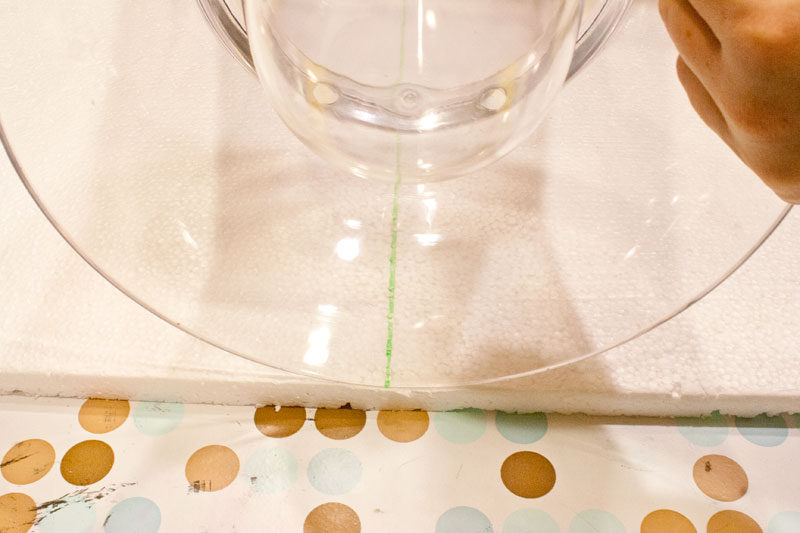
Lay your dispenser down on its back, centering it on the line you drew.
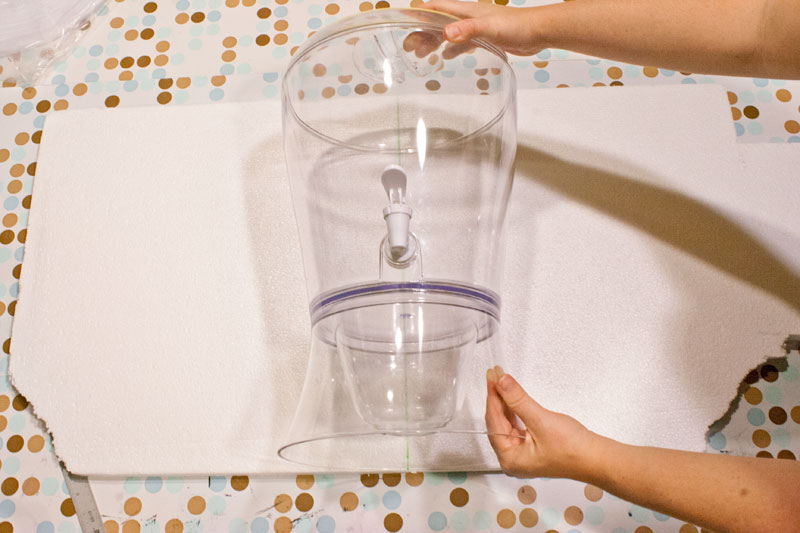
Make sure the bottom of the dispenser lines up exactly with the bottom of the foam core board.
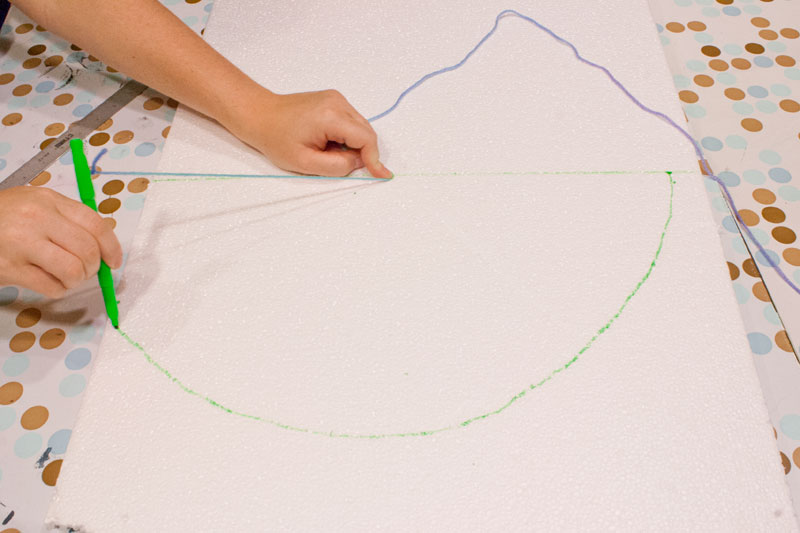
Use your marker to mark the height of the dispenser at the top of your board -- we'll call this the "top dot".
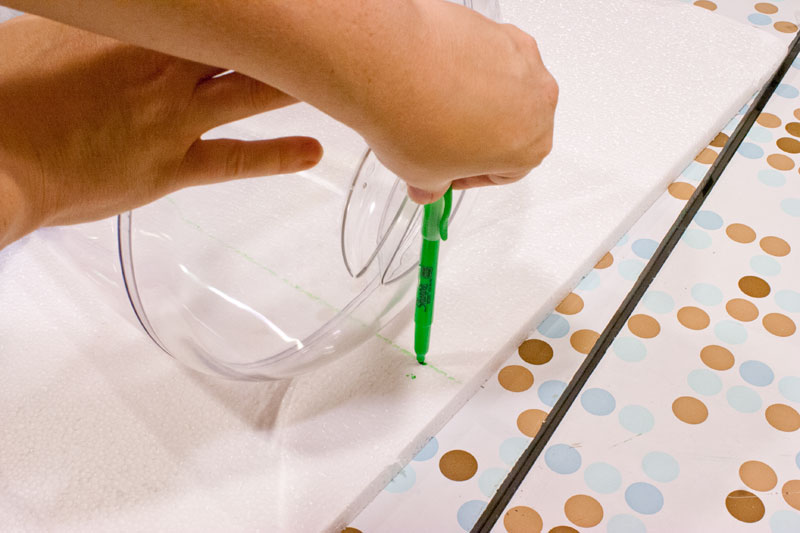
Then mark the width (on one side only) at the bottom - we'll call this the "bottom dot". In both cases, make sure you hold the marker straight up so that you get a proper measurement. (You'll notice that we used a skein of yarn to help prop the dispenser up and keep it from rolling.)

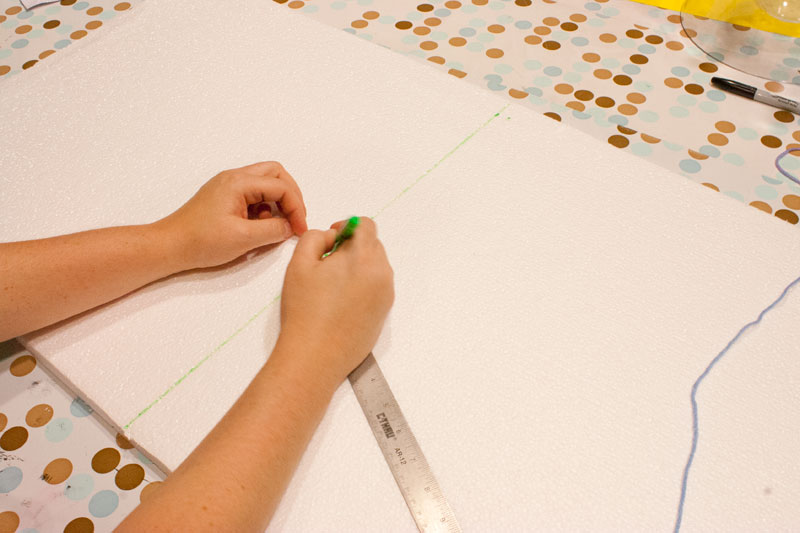
Remove the dispenser and get ready for the tricky geometry part. I'm sorry to make you do this, but it's necessary. Use a ruler to find the point on your center line that is exactly the same distance from the "top dot" as it is from the "bottom dot". To do this, just use your left index finger to mark a spot on the center line and measure how far it is from the two dots. If it's not the same, adjust until you find the magic spot.
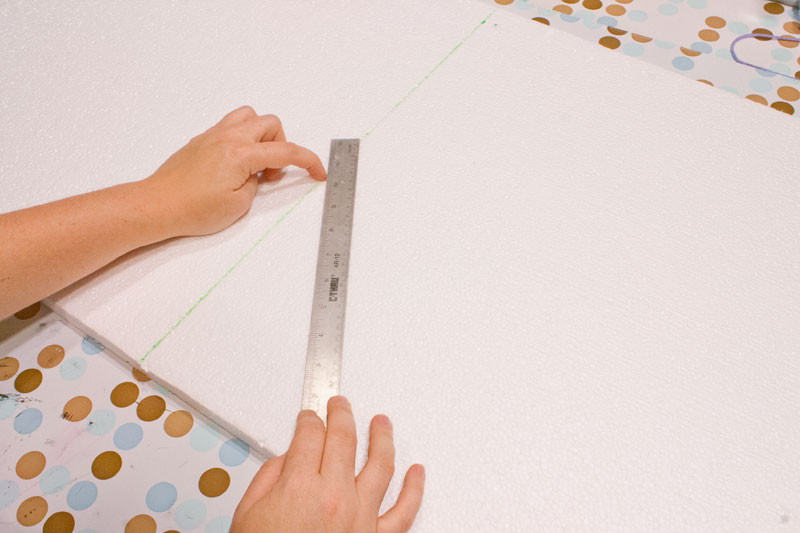
When you've got it, mark it with the marker so you don't lose it. We'll call this mark the "center dot".
Now take a piece of string or yarn and tie it to your marker. Line the marker up with the "top dot", pull the string tight, and hold the other end on the "center dot". Keeping the end of the string on the "center dot" and the string pulled tight, move the marker to draw a giant circle.
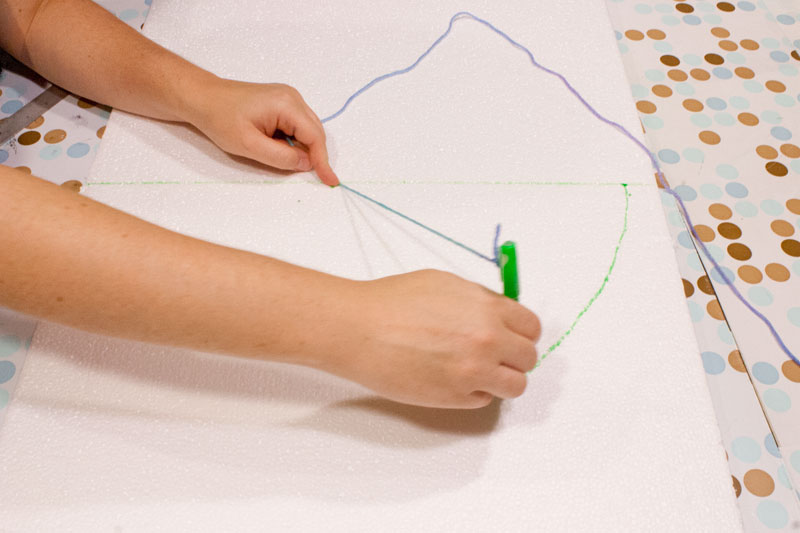
The marker should end up right on the "bottom dot" and you'll have a big half-circle drawn on the board.
Grab a craft knife and cut along the line to cut out the half circle.
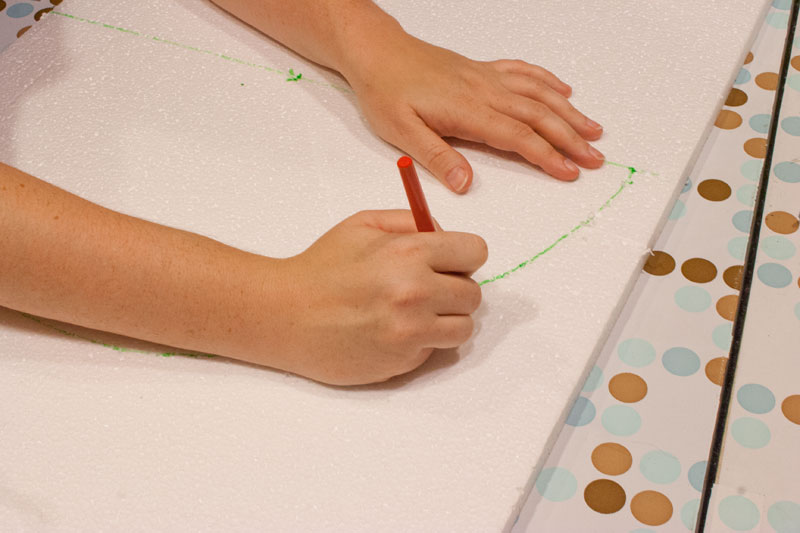
Take the piece you cut away and flip it over and line it up on the other side of your center line. Trace it and cut it out. This will ensure that both halves of your circle match.
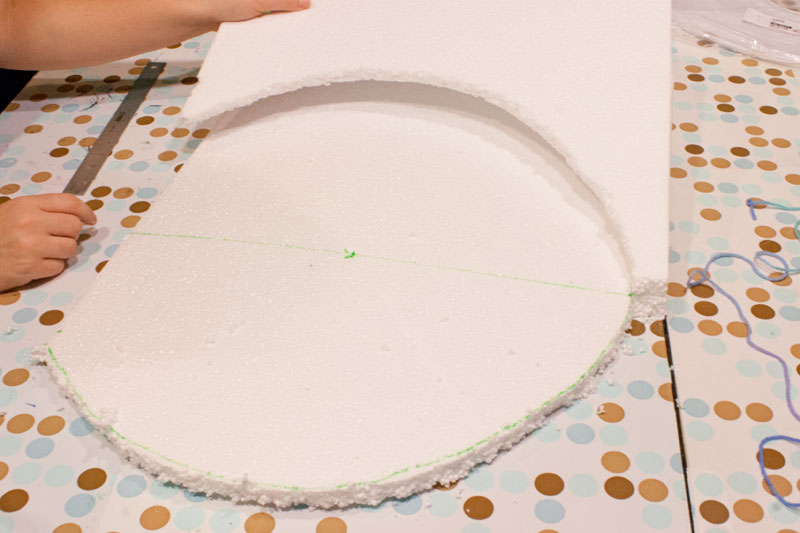
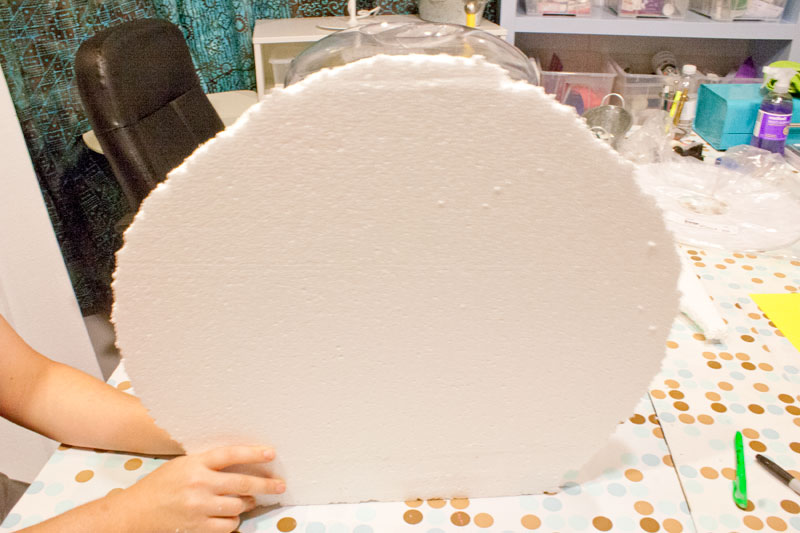
Hold the cut circle in front of the dispenser and make sure it's tall enough and wide enough to cover it completely. Don't be alarmed that it's not actually a whole circle and that the bottom is flat -- you actually need it to be this way in order for the bottom of the dispenser to fit in it.
(Don't forget that we started out using Styrofoam but switched to foam core later. The rough edges you see here are a big reason why we switched. Make sure you use foam core!)
Now you need to cut a hole out for the spigot, or else you won't be able to dispense the Butterbeer! Hold the circle in front of the spigot, lining it up on your center line, and use your marker to draw a rectangle indicating where you need to cut the board for the spigot to fit through.
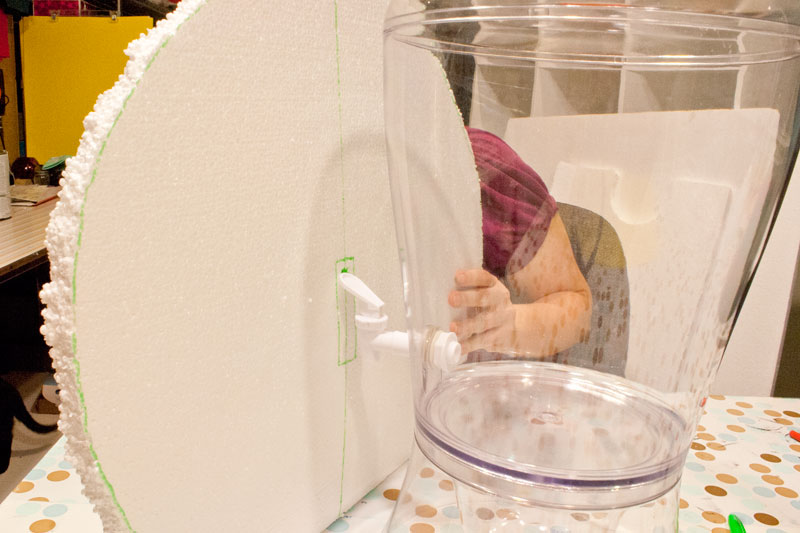
Cut it out and test the fit to make sure the spigot is usable through the hole.

This is when we realized that the sheet of foam we were using wasn't going to work. It made for rough edges, like I mentioned above, but the real problem is that the foam was way too thick. The spout on the dispenser wasn't long enough to work through the hole! Switching to the thinner 1/4" foam core did the trick. We didn't feel like taking all new photos, though, and thought this was a good opportunity to show you how sometimes you need to adjust on the fly anyway!

Create the back (bottom) of the barrel
Once you're happy with the fit of the front of your barrel, trace it onto another piece of foam core board and cut out a second circle, which will be the back of the barrel. Don't cut the spout hole in this one, though. While you're at it, go ahead and cut a few strips of foam core that are about 2" wide.

Paint the barrel rounds
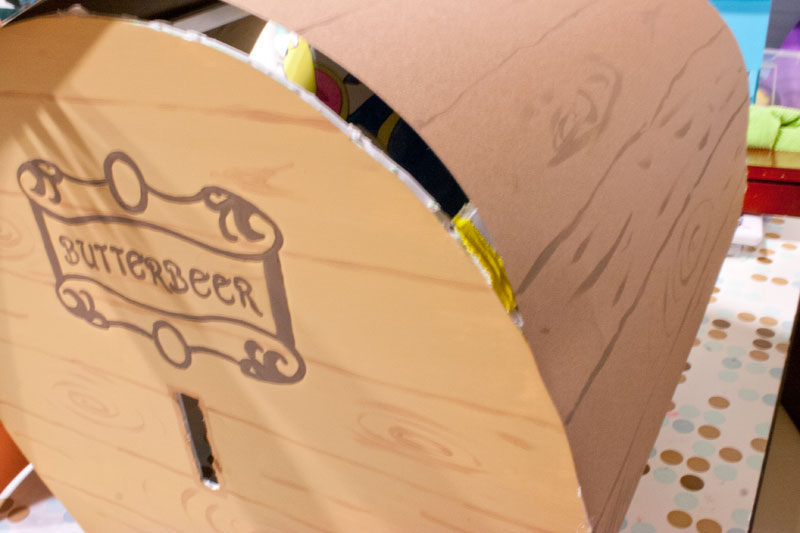
Next is the fun part. Paint your two barrel pieces with tan acrylic paint. Then use a slightly darker brown to draw in the wooden planks (horizontal lines) and add some wood grain. The wood grain is easier than you might think. Just quickly sketch in some oval swirls and some wiggles with the paint brush, and you've got it.
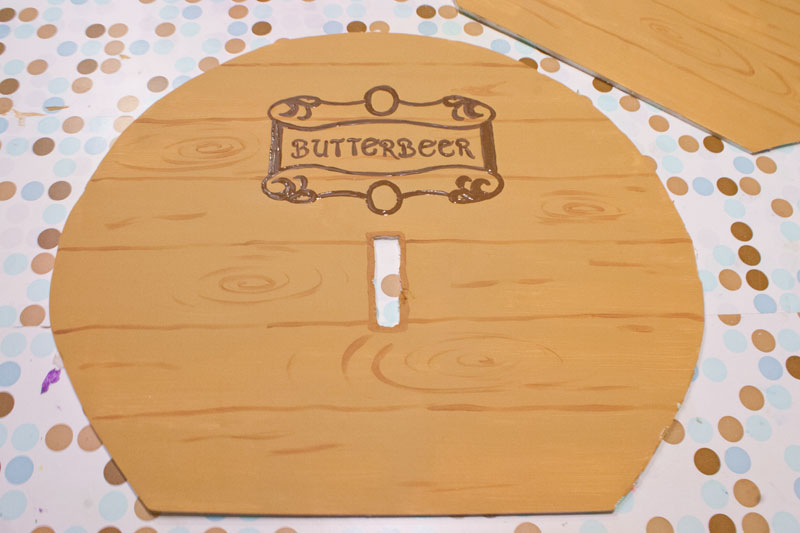
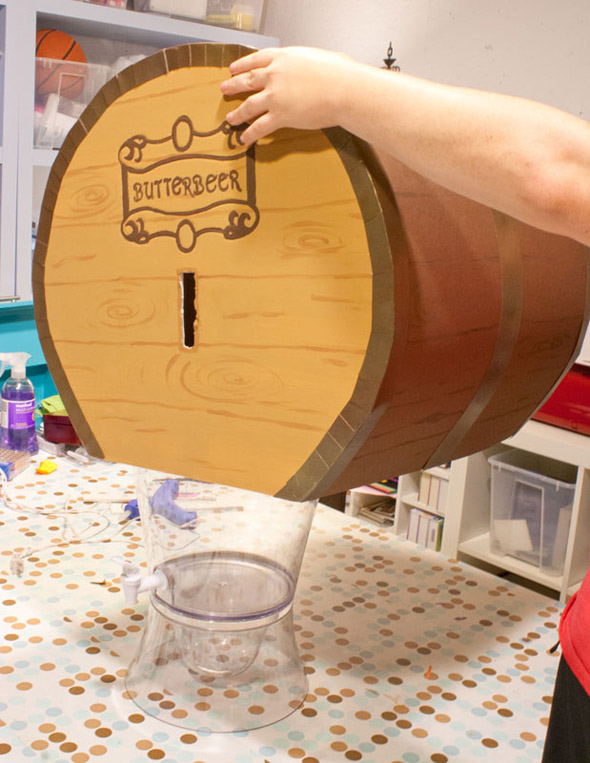
To make it clear what's inside, you may want to add a Butterbeer logo. I used our Butterbeer logo SVG to make a stencil and used that to decorate the front of the barrel.
Add the barrel sides
Now it's time to turn this thing into a barrel! (FYI, make sure you have a friend to help with the rest of this. Some of the steps are a lot easier with extra hands!)
To cover the sides of the barrel, you're going to need two or three pieces of brown poster board, depending on how big the barrel is. Grab those 2" strips of foam core you cut earlier and cut them 1/2" shorter than your poster board is wide (assuming you used 1/4" foam core).
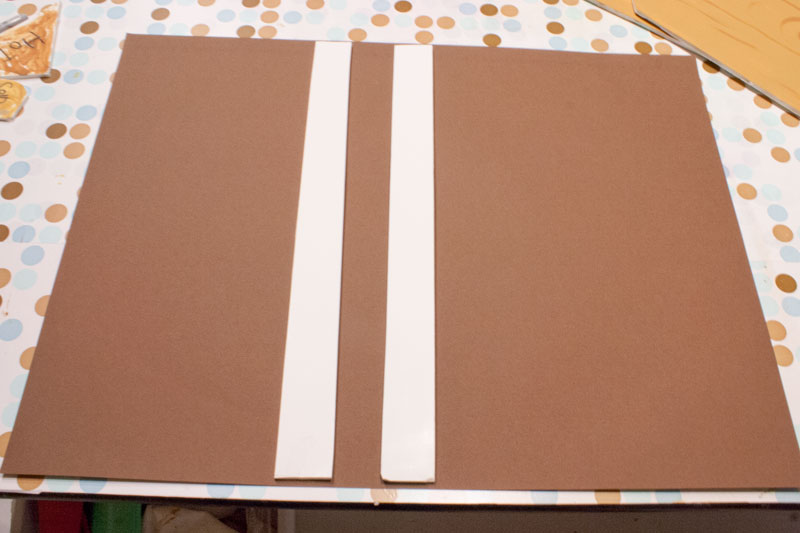
After cutting the strips to the right length, use duct tape to carefully attach them to the front and back of your barrel, creating a structure. Use as many strips as you feel are necessary. (I used four.)
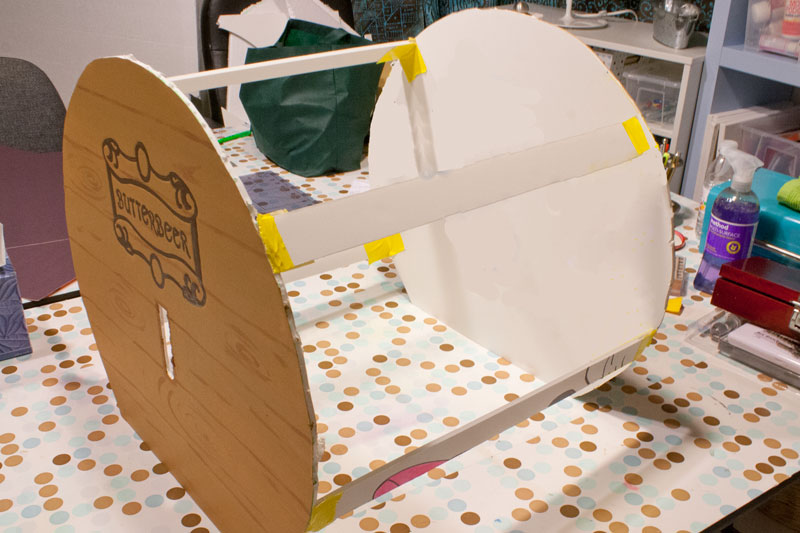
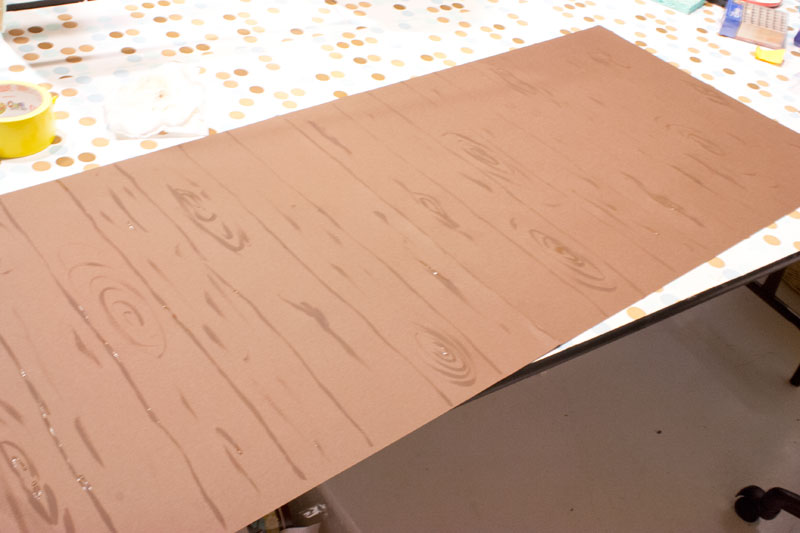
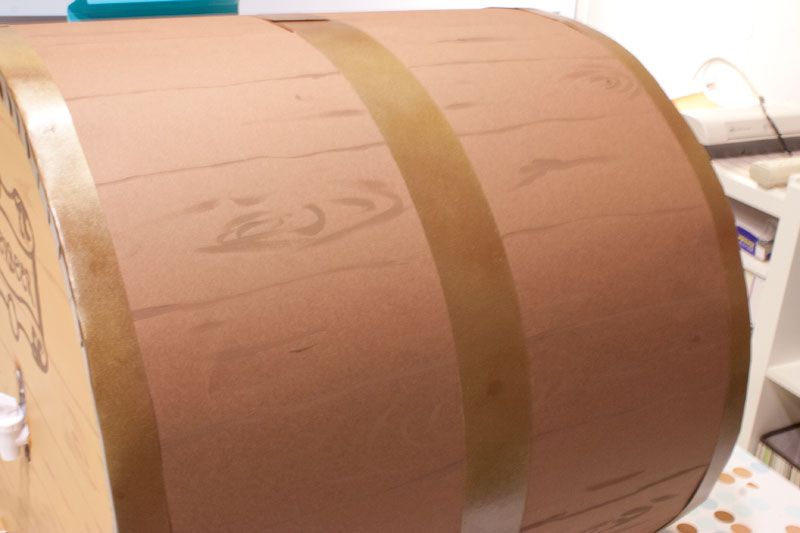
Next take the brown poster boards and tape them together into a long strip. Using some dark brown paint, add more wood texture lines and grain so that it looks like it's made of a series of planks.
Now wrap the long poster board around the frame, using a hot glue gun to attach to the ends of the barrel as you go, making sure to line it up carefully. This is where a crafting buddy REALLY comes in handy!
With the poster board in place, it's really starting to look like a barrel!
Add the strapping to finish it off
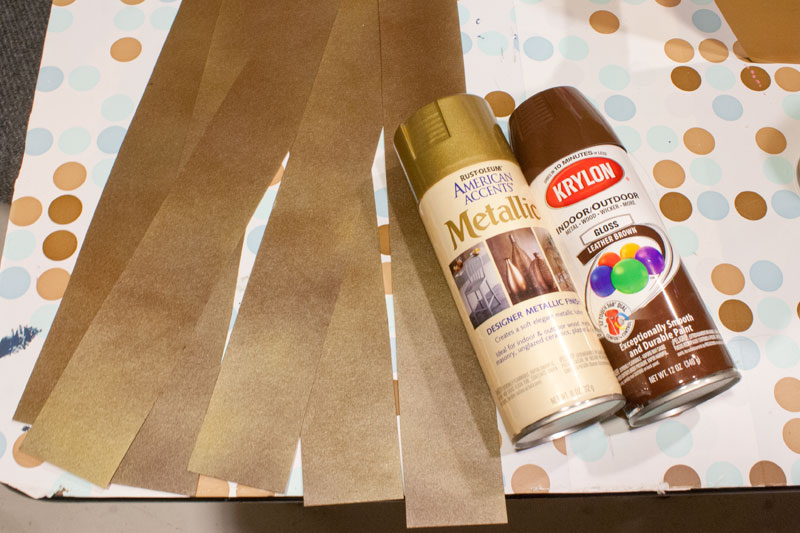
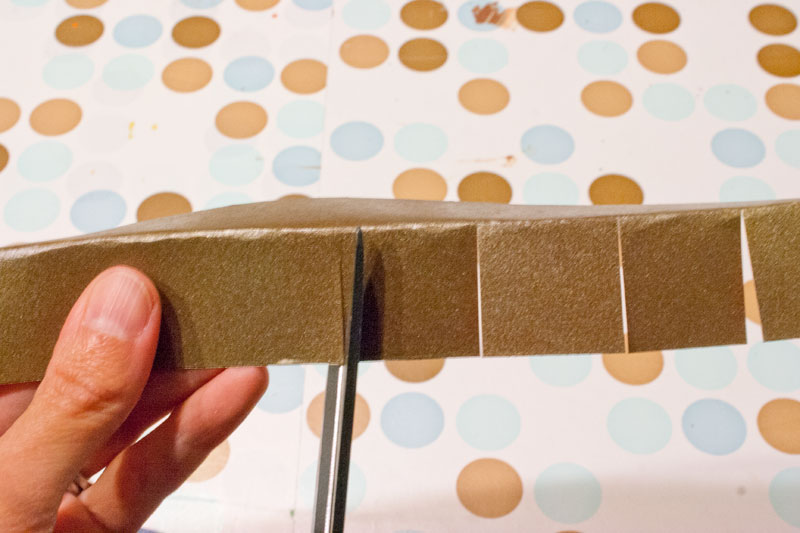
Now the barrel just needs some metal bands to make it look complete and to cover the gap on the edges. I cut some 3" wide strips of poster board (any dark color) and spray painted them with alternating blasts of leather brown and metallic gold spray paint. This will give you a really nice effect with just enough luster to look like metal.
Fold the strips in half lengthwise.

Take some scissors and snip one side of the folded strip every inch or so, creating little tabs. This will help curve the band around the ends of the barrel.
Use hot glue to attach the uncut side of a strip to one end of the barrel, letting the cut tabs hang loosely over the end.
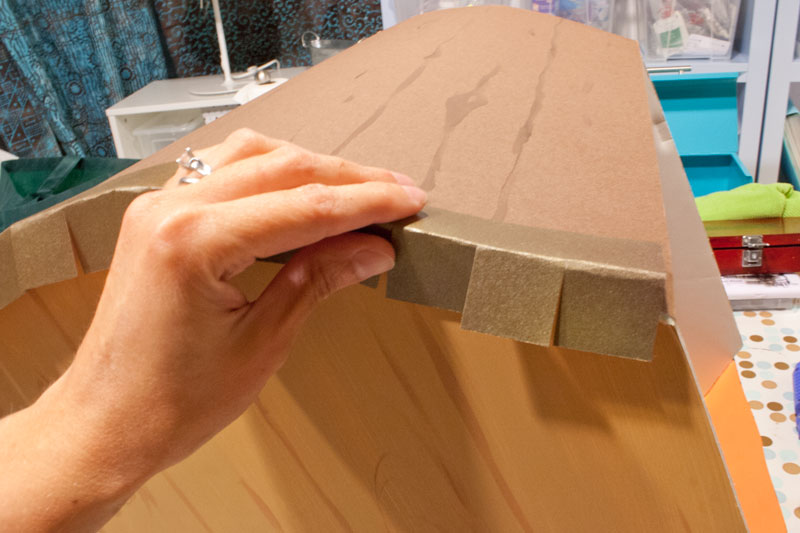
Then glue each tab down individually, allowing them to overlap as necessary to follow the curve.
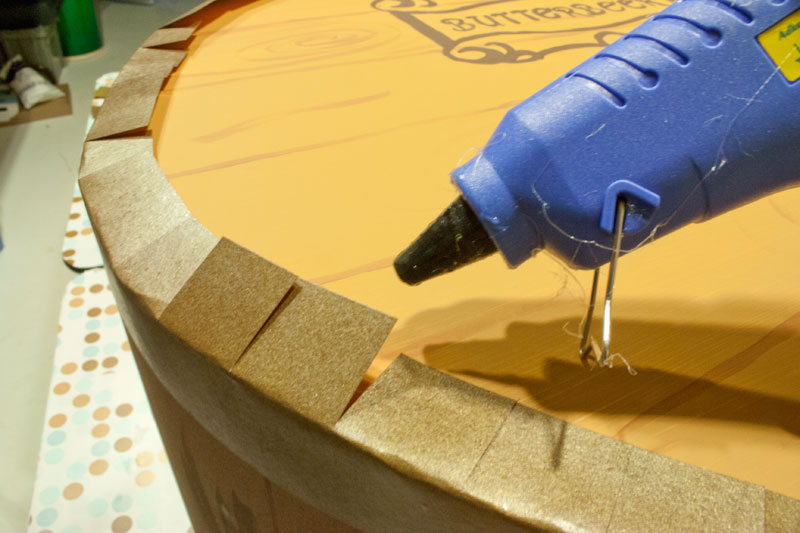
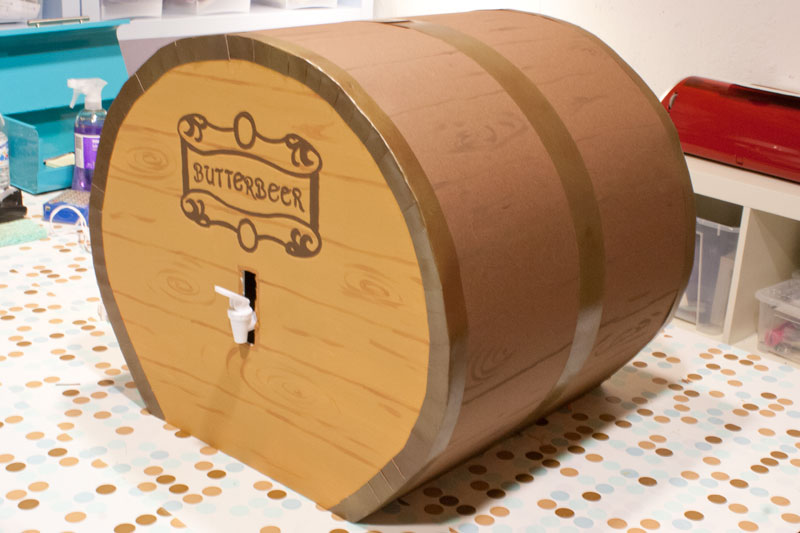
We think this makes an amazing finishing touch on the barrel.
Add the same trim on the other end of the barrel, and then add an unfolded band around the center of the barrel to finish the look.
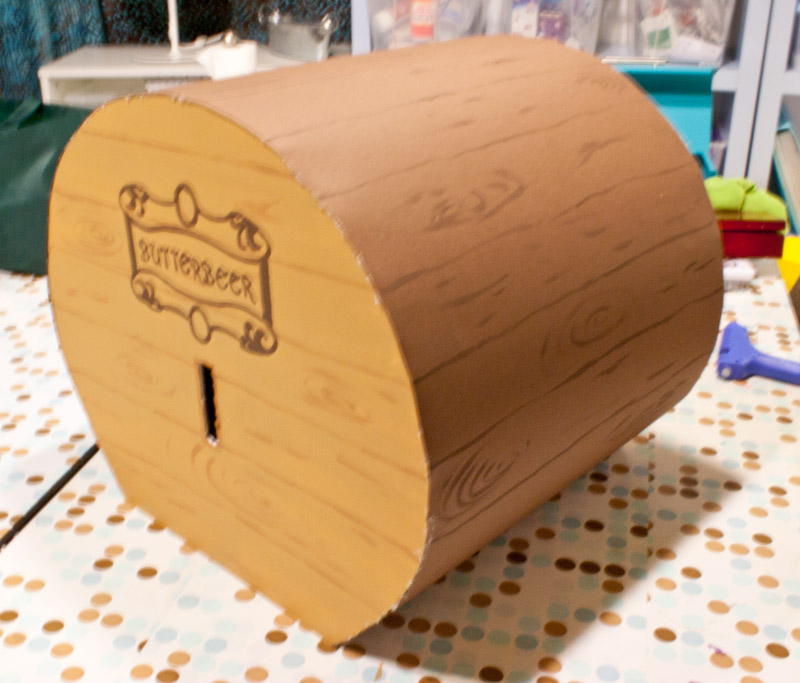
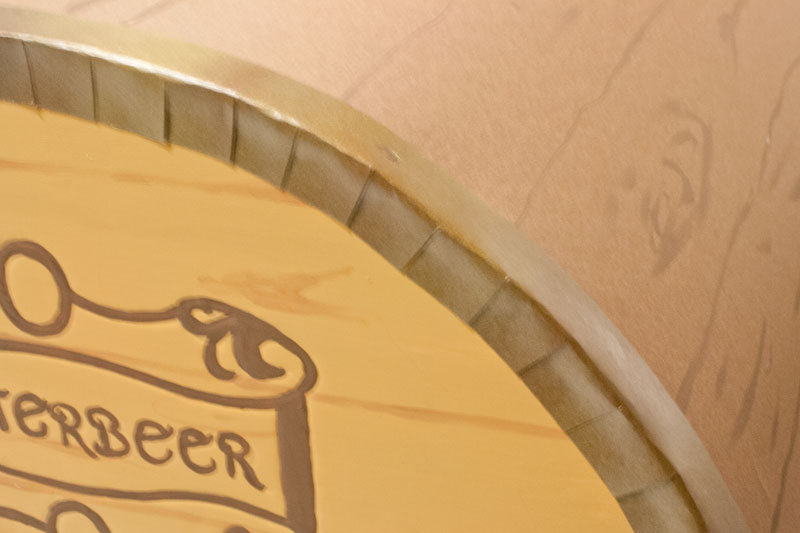
The finished barrel
And that's it! Just slip the barrel over the dispenser and pull the spigot through the hole in the front.
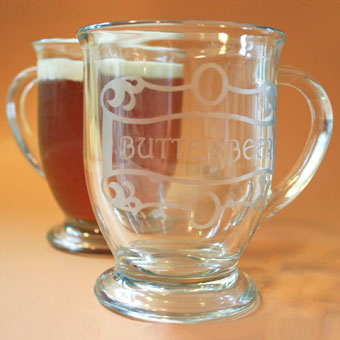
The finished barrel looks amazing with a couple of mugs of our cold Butterbeer next to it. We are so excited to use this this weekend!
similar projects
Butterbeer Recipe and DIY Butterbeer Mugs
Hot Butterbeer Recipe
DIY Bourbon Barrel Ring Serving Tray


20 comments so far:
Is there nothing you guys can't do? Thanks for sharing all these ideas. I'd be a pitiful gift giver and partier without you.
Aww... Thanks Baye!
I'm having a HP Christmas and this is just too amazing! We're going to have the kitchen area look like Snape's Potions class and will have the works lined up. I wish you guys had a recipe for Cauldron Cakes and Treacle Fudge.
Hallena, what a great idea! I want to come to your house for Christmas. I will let you know if we come up with any more HP recipes.
OMG this website is so great! I love the Butterbeer recipe and this barrel just tops it all off! I used it at my HP viewing party and my guests loved it! The pumpkin juice recipe is also exquisite! You guys rock!
We would love to see pictures of your barrel if you care to share them in our Flickr group or email them to us.
Silly Question, but for the dispenser contents, did you just buy large Liter bottles of cream soda and flavor it all at once and put it into the dispenser with ice? did you use frozen cream soda ice cubes? I love your barrel, It looks like so much fun and useful for other "beer" type beverages, like maybe root beer or Kombucha. Thanks for the Tute!
Metqua, if I remember right, we used 2-liters of cream soda and poured them into the dispenser and then added the flavoring and stirred gently. The soda was already cold, so I don't think we added any ice to it.
Can you convert your cold butterbeer recipe for serving 300 people?
Hi Cindy, I'll do my best to convert it for you. I hope my math is right!
For the soda part: the recipe calls for 2 tsp of flavoring for every 24 ounces of soda. If you want to use 2-liter bottles of soda, you'll need about 2 tbsp of flavoring for each 2-liter. You'll need to figure out how big your servings will be in order to determine how many 2-liters you'll need for 300 people. (For example, a 2-liter is about eight 8oz services or sixteen 4oz servings)
For the whipped cream topping: the recipe calls for 1/4 cup of cream and 1 tbsp of powdered sugar for each cup. For 300 servings, that would be around 4 or 5 gallons of cream and 18 cups of sugar.
WOW. amazing want to use this for a pirate theme party for my boys for punch!
What a great idea, Carla!
Just wondering what size foam board did you use. Mine is a 20 x 30 and my drink dispenser is 17" tall, but after I did the 1/2 circle I can tell that the foam board isn't as tall as my dispenser.
Sorry, Toni, but I don't recall the measurements of our foam core. You'll want to adjust yours to suit your dispenser, and make sure it's tall enough and wide enough to cover it. The "side dots" we talk about in the tutorial will help you adjust for the width of the dispenser as well.
I was measuring wrong. I thought both pieces were on one foam board. Funny thing is I had no problem making my markings and finding the center spot. I am having trouble with the string and marker I keep coming up with different markings. I believe I have the same dispenser as you, can you do me a favor and measure from the spigot opening to either side. My problem is I keep starting this project when I am tired.
I'm sorry, Toni, but we don't have the dispenser anymore to measure it for you :/
When taping the two brown poster boards together, do you over lap and tape it or just exactly next to each other? Did you use duck tape for this too?
Toni, you'll get a more sturdy seam if you overlap the brown poster boards before taping them together. We used double-sided tape between the overlapping pieces and packing tape on the back.
Thank you so much for the instructions. I am very happy with how my Barrel turned out. My friend was amazed to. We both agree that we stand in awe of Chica finishing the barrel by herself. Even with two people it was a struggle. I used the linked dispenser. The dimensions I used were a 10 inch radius for my foam core front and back. The sides of the barrel was made with a 20 inch wide by 54 inches long piece of brown mat board since I could not find brown poster board
Zazreil, congrats on finishing! I didn't do the whole thing myself... Jo was right there helping me out :)