


Pirate Party Favors

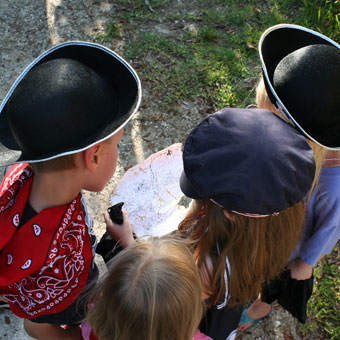
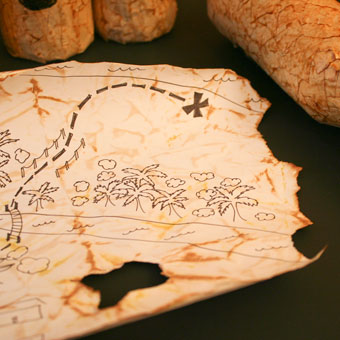
Jo and I are just about ready to head on our yearly family vacation to Sanibel, Florida, and while we are busy planning the packing and driving, dear Little Jo is busy coming up with activities for all the kids. Her best idea for the trip is to have a treasure hunt with a big X marking the spot of the buried treasure. Jo and I thought it was a great idea, and were on board right away.
My first task was to create some pirate-themed party favors for the kids to have during the hunt. We needed some pirate eye patches for them to wear, some "booty bags" for them to haul all their treasures, and some Jolly Roger flags to mark the locations of the various clues for the hunt.
We happen to be using these items for a treasure hunt, but they would be great DIY favors for a pirate-themed birthday party as well!
 I started with the booty bags. I used my drawstring bag tutorial to make bags out of shiny black satin. Make sure your fabric is iron-safe. (Some of the shiny fabrics will melt if you iron them!)
To decorate the bags, I created a skull and crossbones design.

I printed the template onto iron-on transfer sheets made for dark shirts. Make sure you buy the kind for DARK shirts or else they won't show up on the black bags! Then I used my fine-point Cutter Bee scissors cut out all the skull and crossbones, one for each booty bag. I can't help but think that these are awfully cute for skulls, wouldn't you say?


Then I followed the directions on the iron-on transfers to iron them onto the bags.


The kids are gonna love these!

Note that if you don't want to mess with iron-on transfers, you could also use the template I provided as a stencil. Just cut out the design and leave the background intact. Then use the stencil and some white fabric paint to paint the design onto the bag.
Next up were the eye patches. I made this super easy by designing a downloadable template that's ready to print. I used the same cute skull and crossbones design that I used on the bags.

After printing the template onto white cardstock, I used my Cutter Bee scissors to cut out the patches, and I used my Crop-a-Dile to make two tiny holes, one on each side of the patch.


I cut a piece of round elastic cord to a good length for fitting around a kid's head. I can't give you an exact measurement to use because it will vary depending on the stretchiness of your elastic. I slipped the end through one of the holes on the patch.


I carefully tied a double-knot and then trimmed off the excess.


After tying the other end of the cord in a knot on the other hole in the patch, it was good to go.

I really have a hard time looking at these and not saying "Arrrrr!"

Finally it was time to make the Jolly Roger flags. That charming skull and crossbones design is here again, and I have another template for you to download, too!

I printed the template onto regular paper and then used my paper trimmer to trim them down to size. I also cut some wooden dowel rods to 12" in length, one for each flag.


To attach the flag to the stick, I started with a long piece of packing tape, which I placed so that it covered about 1/2" of the front of the flag. I then trimmed the sides with scissors.


I put the tape over the dowel rod, making sure to line up the top of the flag with the end of the dowel. I used my hand to press the tape in place.


I flipped the flag over and pulled the tape tight, rolling the paper around the dowel just a bit as I went. I pressed hard to make sure the tape had good contact with the dowel and the paper.


We plan to put one of these flags at each clue location in our treasure hunt. I just love them to pieces!

Here are the pieces all together. I just know the kids are going to love this, and we haven't even gotten to the treasure hunt part yet!

There's plenty more pirate stuff coming from us as we work on the rest of the supplies for the treasure hunt, so stay tuned!


23 comments so far:
The link to the pirate flags is pulling up eye patches. Could you please correct the post? I'd love to have me some of dem pirate flags!
Stacey, thanks for pointing out the bad link. I fixed it and you should be all set. Enjoy!
Thank you for all the neat ideas! I am a teacher and this site was very helpful!
so excited about all these great ideas! i am going to use your eye patch print out as cupcake toppers!
embee, what a great idea!
i am going to use these ideas for my own B-day party! they are so good! i am sure both me and my parents will enjoy making all of this!
Thanks can't wait to try it!!! Would the templates work on Black paper w white Ink?
Rose, I've never heard of white ink. What kind of printer do you have?
Hi there, Just found your site while searching for ideas for my little mans 5th birthday. Thanks so much for the info and the awesome downloads. Its amazing people like you online that make our lives so much easier! Thanks again. Debbie (NZ)
Debbie, we're so glad we could help! Now that you've found us, we hope you continue to look around and try some of our many projects :)
I think i just found my new best site for my kids party.
Happy to hear it, Loreanne!
I just found your site up on our PC screen which my husband must have used to make pirate eye patches for a 'pin the eye patch on a pirate' at my son's 3rd birthday party yesterday!
We are not as organised as you so started the planning at 9pm the night before the party but you saved us!
Fantastic website ideas and clear instructions-thankyou!
Lucy (UK)
Thank you! Just found this site at the eleventh hour!
Life-saving!
OMG your template is awesome for the booty bags. I just finished 30 of the cutest jute/burlap Pirate Booty Gift Bags for my daughters 7th birthday which is scheduled aboard a real sailing ship and is schedule for this weekend. I would love to send you photos of the process and finished product. They are going to be a hit! Thank you for posting this template for free and giving a go by. Super awesome, our party is going to be amazing with the addition of the booty bags! Arrrrggghh! :)
So glad you enjoyed our party ideas, Wendy! We'd love to see your photos. You can email them to us at chicaandjo@chicaandjo.com
Thank you for posting this. It'll make my life so much easier for organising my sons fourth birthday party. Think I'll also be copying the lady back in 2011 who said she'd use the eye patches as cupcake toppers. Much love!
Chica & Jo - Thanks so much for these resources. I am printing using your eye patch template for our public library's celebration of "Talk Like a Pirate Day" Arrrr!
Will be using the skull and crossbones template at the public library where I coordinate crafts for the children 5 and under. Your design was the least scary looking skull I could find, so thanks for sharing mateys!!
Laura, we're glad we could help!
Wow, you Guys are filled up with great ideas! I love them. I've used your page for planning my sons 7th b-day party and to make it one to remember i've used your ideas. Thank you so much :)
BTW, your page has reached Denmark ;)
Pia, we will be reaching Denmark ourselves in July! We are going on a cruise that departs out of Copenhagen!
This is a life saver! thank you so much for sharing!!