


How to Make a Drawstring Bag

As I mentioned the other day in my hard candy jewels post, Jo and I have done a lot of projects for Little Jo's birthday party this year. While I'm still not ready to tell you the theme (but soon, I promise!), I would like to show you another one of those projects. Jo wanted to give each of the kids a goodie bag, so I whipped some up drawstring bags pretty quickly on the sewing machine. In keeping with the party's color scheme, the bags were hot pink with a teal lining.
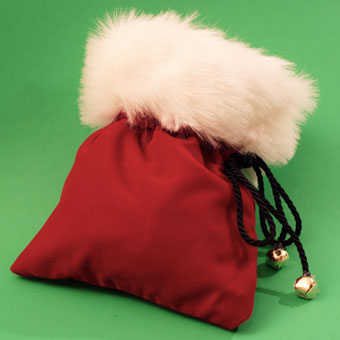
We've told you about drawstring bags before, such as the fur-lined velvet Santa bag we made, but since these goodie bags for the party were super simple, and the others had been more elaborate, I thought it was worth explaining the basic process again. So here's how you make a lined drawstring bag.
 First, figure out how big you want the finished bag to be, then use those measurements to determine how big to cut the fabric. Double the width of the bag and add one inch. Then add one inch to the height of the bag. In other words, for a 7"x9" finished bag, your fabric will be 15" wide (7x2=14; 14+1=15) and 10" tall (9+1=10). You'll need two pieces of fabric this size -- one for the outside of the bag and one for the lining. They can be the same color or different colors, as you wish.
For our bags, I cut a 15"x10" piece of hot pink satin fabric for the outside of the bag, and another 15"x10" piece of bright teal for the lining.
Start by placing the two pieces of fabric right sides together, and pin along the top (widest) edge. Sew a seam along the pinned edge.


Open the sewn piece up and place it face up on the table, with the lining half at the top. Fold it over from right to left, making sure the finished side of the fabric is on the inside.


Pin along the long left side and along the bottom, then use the sewing machine to sew along those two edges.


Now flip the bag inside out, revealing the finished side of the fabric.


Next you need to close up the bottom of the bag's lining, which was the teal side for me. Grab the open end with both hands and use your index finger to push the sides in about a half an inch. Push the cut ends down until you can't see them and pinch to hold in place.


Secure the pinched seam with a row of pins. Now you can do a slip-stitch to close the seam or -- since it's just the inside of the bag anyway -- just sew it closed with a quick row of stitches on the machine.


Now shove the lining down into the bag, pushing the seam you just sewed down to the bottom of the bag.


Next stabilize the top of the bag by pinning around the edge, making sure that the outer and inner layers of fabric are lined up nicely. Then, using the free-arm on your sewing machine, sew a row of stitches about one inch from the top of the bag.


Then sew a second row of stitches next to the first one. These stitches will form the channel for your drawstring. The spacing will depend on how wide your drawstring cord is. For my thin cord, I left a gap of about 1/4 inch, but for wider cords, you might want to go up to 1/2 inch.


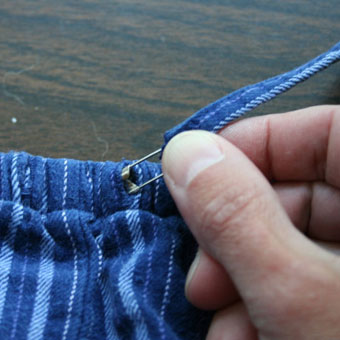
To open up the channel to allow the drawstring to enter, use a seam ripper to cut away at the thread right at the seam, making a hole just big enough to slip a safety pin into. Then put a small safety pin on the end of your drawstring cord.


Stick the safety pin into the hole and use it as a sort of handle to feed the drawstring all the way through the channel and out the other side.


Pull the cord through and even it out, cut to an appropriate length, and tie a knot in each end.


This is a simple drawstring bag that can be made with just about any fabric, in any color, to suit any occasion. You can easily vary the size, too!


similar projects
Santa's Velvet Drawstring Pouch
How to Make a Drawstring Backpack
How to Thread a Drawstring with a Safety Pin


70 comments so far:
Super cute! I'm going to have to try my hand at this project. I'm thinking reusable lunch sacks.
Iisha, making lunch sacks is a great idea.
Wonderful tutorial. I needed a quick gift bag and this was perfect! I had discussed with family easing out paper gift wrap this year at Christmas, these bags will fit the bill perfectly...thanks for posting!
Fantastic! Just what I've been looking for. Intelligible instructions, and best of all, excellent photos.
I'll be making small ones for elegant little pots of luxurious, all-natural botanical perfume cremes. So glad I found your site!
Cute bag... I made it in just no time from scrap material. Great pictures and wonderful instructions. Great gift idea. Thank you so much for sharing!
Marilu, we;re so glad you enjoyed our tutorial!
I just made two of these for my kids to put their shoulder rests in for violin. I tied a knot at the end of the drawstring, leaving a loop to slip the bag back through and around the handle of the violin case. Now, all they have to do is put the shoulder rest in and pull the bag shut and it hangs right on their case--perfect! I'm not much of a sewer, but this I can do! Now I'm starting to think of many more uses... This was fun, thanks.
Denise, what a creative idea! We would love to know what other ideas you have for using these bags. Thanks for visiting us!
Thanks for this! so easy to follow and exactly what I was looking for!I've made a nice little green satin bag to match my xmas ball gown. Thanks again :-)
this is so helpful!!!! OMG I wish I had found this months ago it is so quick and simple I have recommended you to all of my friends. I have just started making jewelry and these bags are perfect in organza or chiffon!!! thanks guys.
Naomi, that's a great idea to make a custom bag to match your gown. This would be a good idea for bridesmaids too!
Lisa, we're so glad you finally found us, and we welcome you and all your friends to our site! I'll bet cute little organza bags really improve your jewelry presentation to customers :)
Awesome tutorial, thanks so much! The pictures are perfect, very easy to follow. :) I'm making goodie bags for my son's birthday party.
I just put together a set of homemade rhythmic ribbon sticks today for my daughter and her friends to play with, and wanted to make individual drawstring bags to store each stick in (to hopefully avoid a tangled mess of ribbons). This seems to be exactly what I need. Now, I just need to figure out how to attach some kind of a loop, probably with Velcro on one end, on the inside to sort of "hang" the ribbon rather than let it all bunch up on the bottom of the bag or requiring my 5-year old (or more likely me) to wind the ribbon around the stick each and every time it is used. Thanks for a great idea.
Great concise and clear instruction. I needed to make some linen gift bags so thank you for taking the time to publish this tutorial.
I have no idea how to sew, and was looking for something very simple to start with. I am SO happy I found your site with pictures! and easy instructions. I will be going through it to find more ideas, but my friends and I play several card games with lots of dice and these would make perfect dice bags. Once I figure out more than the basic how-to-make-the-needle-go-up-and-down stuff I will give these a shot, lol. Thank you! Also: you guys are adorable.
Thank you so much! I need visuals to go along with written directions. I feel really lucky to have found your website.
Barbara, we're the lucky ones to have readers like you who love trying new things :)
Just finished making a little drawstring bag following your tutorial -- it turned out ADORABLE! Thank you for the clear directions! I have two more to make (these will be party favors on Sunday), and then I'll come back and leave the link to my blog post about this project. Thank you!!
Janay, so glad our tutorial was easy for you. Have a great party!
Hello again! Here is my blog post sharing pictures of the drawstring bags I made. Thanks again for the tutorial!!
Great job, Janay! Thanks for sharing your photos with us.
Hi, love the instructions very easy to follow. Is it possible to have a drawstring on both sides, if so how do you suggest it be done. I thought that I would just do the same by opening both side seams and running the drawstring one way and then doing the same in the opposite direction????? What do you think??
Hi Emily. If you are describing what I think you are, check out the instructions in our drawstring backpack tutorial. That has two drawstrings and I think it's what you're looking for.
This comes just in time..I just had a friend to ask to make small drawstring bags for a wedding..I love this cute and also easy way to make them...Thanks so much!!
This step by step instructions were super useful for me. I am currently making my pouch bags for my children's birthday party out of this guide. I'm so happy I was able to stumble into this. I saw a lot of crafts and projects here that I'm dying to try but I go to finish my pouches before the 16th of July. Oh i forgot to tell you, I do not have a sewing machine so I'm doing this manually. :)
Hi Chica..Love You...I made the drawstring pouches for a friends wedding and she was very much please..Thank you for the tutorial and keep the ideas coming...
This looks so easy! I'm going to give it a go and fill my bags with lavender pouches! Thanks :o)
This is so easy and cute!!! I made one for my civil war dress and I love it!! Can't wait to use it!! Thank you!
Just made one for a 3 year old to carry along art supplies to keep her busy from 20 year old sequined mermaid fabric, it looks magical. Great instructions.
Oh my gosh!! This is PERFECT!! I was looking for a way to make a bag for my tarot cards and this is beyond perfect!!!
Exactly the tutorial I was looking for. There were a few things I wasn't sure about before going ahead with my drawstring bag. This answered those questions. Thank you!
I told a friend of mine I would take on the task and make different size drawstring bags for her. Lining and outer fabric wasnt enough. I also lined the bah with a piece of felt so it would not be so flimsy. I had the idea in my head on how to sew them, but your instructions brought it to life. Thank you, for you!
Glad we could help, Angela. That's a neat idea to add felt to the lining to make it stiffer.
Just finished bag for my grandson's birthday gift from fabric I used for his baby quilt. Now he has a cute bag to store his little trains... your site was PERFECT! Thank you!
I'm about to make a personalized santa sack for my daughter using your excellent instructions. I'm not a very experienced seamstress but your tutorial is very easy to understand so hopefully it will be a success. Thank you!
So clear and concise! I made several for christmas bags! Perfect tutorial.
wanted you to know that my grandson (age 2) has as much if not more fun carrying his bag around everywhere he goes as playing with the train that the bag was designed for! I am now starting wine gift bags..thank yu again!
Maria, we're so glad to hear that he loves the bag so much!us :)
Thank you for showing me how to make this bag. I made a large one as a Christmas present bag, and it went pretty smoothly considering that not only am I poor at sewing, but I've actually been dangerous around a sewing machine! Much to my amazement, the bag came out really pretty! Thank you SO MUCH for sharing your talent!
Thank You so much for this wonderful tutorial of a quick and easy make that not only looks great but is also so fun to make! As well as perfect explanations, you have even put on photo`s.I very much appreciate the effort you have put into making sure people understand!And by the way, is the theme of the party underwater/something to do with mermaids?Or a sweet themed party with lots of pink things?It is what i think.....please tell the theme!!!!!
Eva, those are good guesses on the theme. These particular bags were for a Super Mario Brothers party featuring Princess Peach that Jo had for her daughter's birthday.
Good and simple instructions. This is a perfect bag for my homemade fabric hair curlers. I used the fabric which some of the curlers are made out of. Works and looks great!!!!
SUPER EASY! My first bag came out so good! I'm selling them to a local shop. Even the prototype is sellable. Thanks. Brilliant!
Thanks so much for putting up this tutorial! My kids needed some simple drawstring bags and I couldn't find them in any store, and I knew they needed to be lined but I just couldn't wrap my head around how to sew them up with liners in them. This was simple and easy to follow and now my kids have the bags they need!
Miranda, I'm so glad we could help. I had to think the lining process through a few times before figuring it out myself :)
I'm a beginner sewer and just made two of these, one for each of my older sons. This tutorial was easier than many I found that didn't include a liner! Thanks!
I wanted to make some simple bags with my new sewing machine to include in shoeboxes for Operation Christmas Child. I looked at several websites but then found yours. I've already made 4 bags and plan to make more with other leftover material - mainly dress material - with white poly cotton lining. My mum cannot believe that I'm lining the bags but with your method, I think it makes it easier rather than harder. Thank you!
Heather, we're so glad we were able to help you create nice bags for Operation Christmas Child!
omgosh!! i entered 'how to thread a drawstring bag' into google and came across this site! It's perfect!! If only me and my friend had thought of this sooner we would have saved at least two hours of head scratching, quite a few sacrificial 'um no not quite right- oh dear' prototypes ;. lol, and have more than five 'YES we did it!!!!!' un-strung 'draw-string bags :D thankyou soooo much for putting these wonderful and SO easy to follow photos up :D We are making bags for my crystal healing business and found the simple two piece bags easy enough but were having trouble with the lined bags (a must for protecting precious crystals and the dainty points some of them have).
We made ours slightly differantly however (lol and probably terribly wrong but somehow it works :) tho' the material has to be the same colour) by using one piece of material in a rectangle shape, folded in half(with non-print side facing us), sewing along all the seams but leaving a small 3 or 4 cm area un-sewed at the corner of one of the sides. we then pulled the material inside out, sewed up the space with a neat straight line,. rubbing the material together in the middle we seperate the two sides from each other and kind of like popping the top of a sock inwards we stuffed the top half of the resulting 'tube' of material inside the other half and then sewed a line a cm in from the top for the drawstring!!! We were so proud!!!!
Now thanks to you we know how to 'string' them!!! Thankyou!!! :) am now going to put together some bags like you have demonstrated. Again, Thanks!
Marcela, we're so glad your Google search led you here, and delighted that we were able to help you and your friend. If it makes you feel any better, I had plenty of "um no not quite right" moments myself when coming up with this technique. :) Sounds like you made a clever adaptation, too!
Thank you so much. Between the great pictures and the directions, this drawstring bag tutorial helped me to understand how to make the bags. Thanks again :)
What a simple but professional way to make a drawstring bag. It looks absolutely perfect inside and out when it is finished. Thank you!!
Thank you so much for the great EASY tutorial. I acutally used the same colors which happen to be my friends wedding colors, guess what, now she has a money bag for her big day tomorrow :) Thanks again!
Thank you for the tutorial!! Even me who is clueless to sewing can get these done. I am planning on having these made for my bridesmaids and myself :)I plan on doing a little decorating of the bags but thank you for the basic design!
Great tutorial. You made it so easy. I just made 7 of them of my young grandsons to keep their cars in. Outside is the same on all 7 and the lining is different on each one. Thanks so much for sharing.
Made my first bag this afternoon! Very easy to follow instructions and great pictures; even for a pretty beginner seamstress!! Thank!
Thank you for your tutorial! I just made a coin bag for my boyfriend as xmas gift. merry xmas to you :)
Thanks so much for this easy way of making a drawstring bag. I am making bread bags so that I can make bread and give them away as gifts!!
Great page! This helped me make drawstring purses for birthday presents. I customized them by using different fabric, pretty stitches, and embroidery on the fronts. Your tutorial was clear and easy to understand, thank you so much!
First class tutorial! Love the photos and clear instructions thank you. I always find photos easier to follow rather than instructions. Now making drawstring bags with felt bunnies on filled with foiled wrapped eggs for Easter.
Thank you so much for your easy direcctions. The pictures were great. I appreciate you sharing your talent and information!
I had been looking and looking around the interwebs for an easy tutorial for a drawstring bag when I came across yours. This could hardly be more simple; thank you!! I've made many dice bags for myself, my husband, and my fellow D&D (Dungeons and Dragons) players using your tutorial. Now, all of our dice, pencils, cards, and minis can stay together and safe in a custom bag!
Absolutely fab, I am a novice sewer and this tutorial was fab.. Thanks
Perfect tutorial for my boys santa sacks this year!!
Wasn't sure about lining... I am now!! Thanks so much!
Nice tutorial, just what I was looking for. Going to be mixing this and the drawstring backpack tutorial to make some small pouches for dice.
Thanks for the tutorial
I make a lot of bags, but this was so much easier than making the separate pieces and then joining them. Thanks so much!! I can't wait to try this. :)
I needed to make a tube, lined with vinyl, to carry balls for dogs in and I had no idea how to do it.
Thank you so much for a very helpful tutorial, it saved me a lot of grief and time. I have achieved what I wanted to and now know how to make some very pretty Christmas present purses into the bargain!
Needed a quick and easy way to make a bag for someone who can't sew a straight line to save my life for a school valentinestarts day bag probably could pull this off without doing a lining
These were the best instructions and pictures on you tube. Thank you sooo much. Do you run the draw string through the opening once or twice so it will pull together.Thank you.
I love this bag.
Sharon, thanks for the compliments! You will run the drawstring through the channel once, threading it into the hole, around the bag, and back out at the beginning. Hope that helps!