


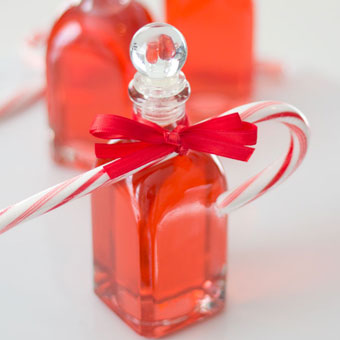
How to Make Hard Candy Jewels

Jo and I have been doing lots of projects over the last month or so for Little Jo's birthday party, and I want to show you one of the projects I did for part of the party decor. We found ourselves needing some round gems in just the right color of teal. If they could be edible, all the better. So I did some shopping and some research and came up with everything I needed to make hard candy jewels. And I gotta tell you, this turned out to be one of the most fun projects I've done in ages!
By the way, there was a lot of trial and error as I figured out just the right techniques for making hard candy, and I'll tell you about my mistakes at the end, but for now, here is the right way to do it!
Supplies needed to make hard candy
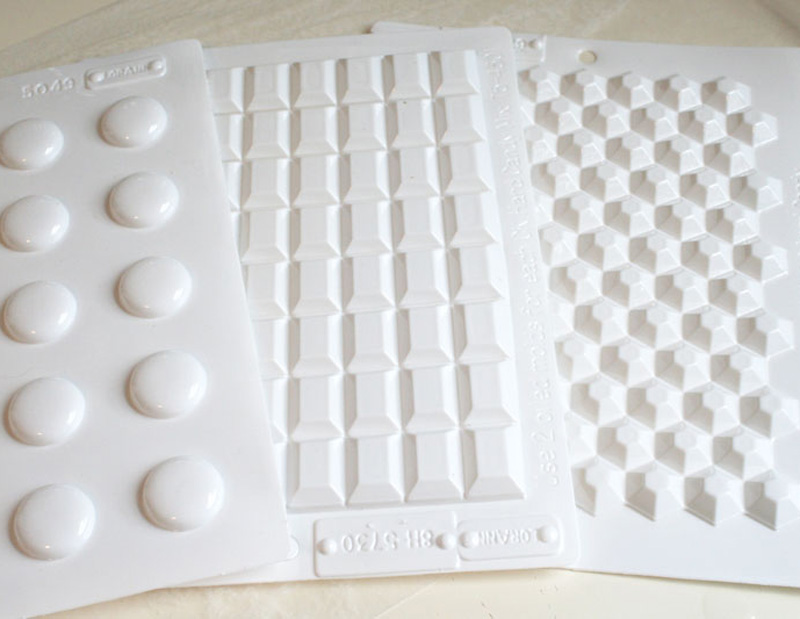
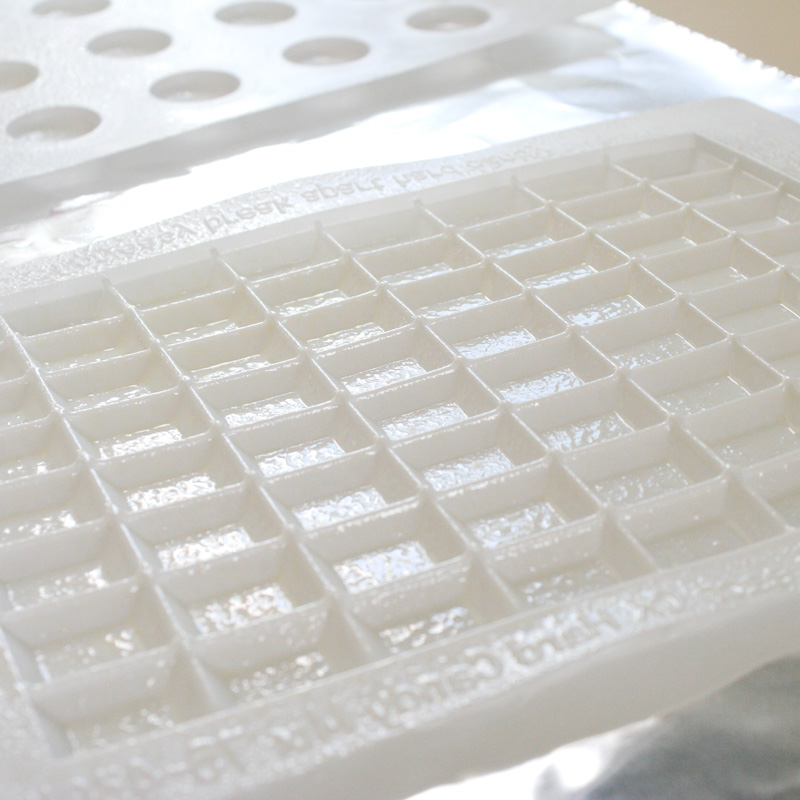
You'll need to pick up a couple of custom supplies for making hard candy. First, you'll need some hard candy molds, designed specifically for use with hard candy.
Do not use chocolate molds, cheap plastic, or anything that's not made to withstand the high temperature of the sugar syrup. It's worth it to buy proper hard candy molds.
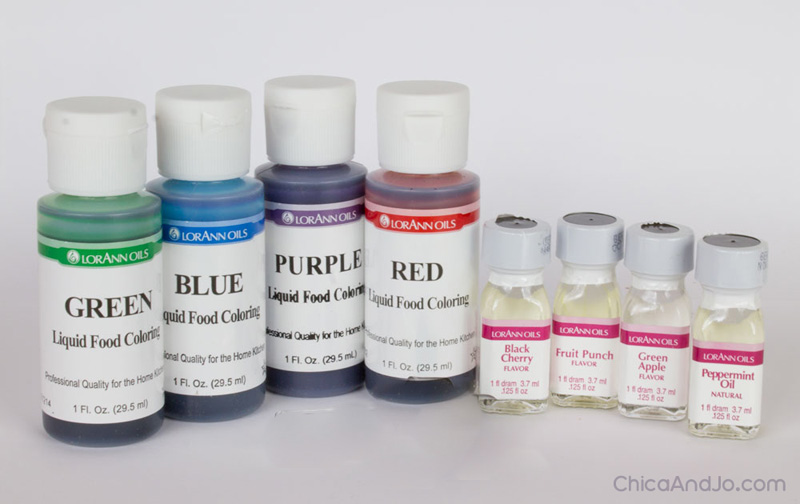
You'll also want some liquid food coloring that specifically states that it will work with hard candy. And if you want to flavor your candies, grab some hard candy flavoring oils too.
The rest of the items you'll need are quite simple: corn syrup, sugar, water, a pan, non-stick cooking spray, a candy thermometer, and a Pyrex 4-cup glass measuring cup.
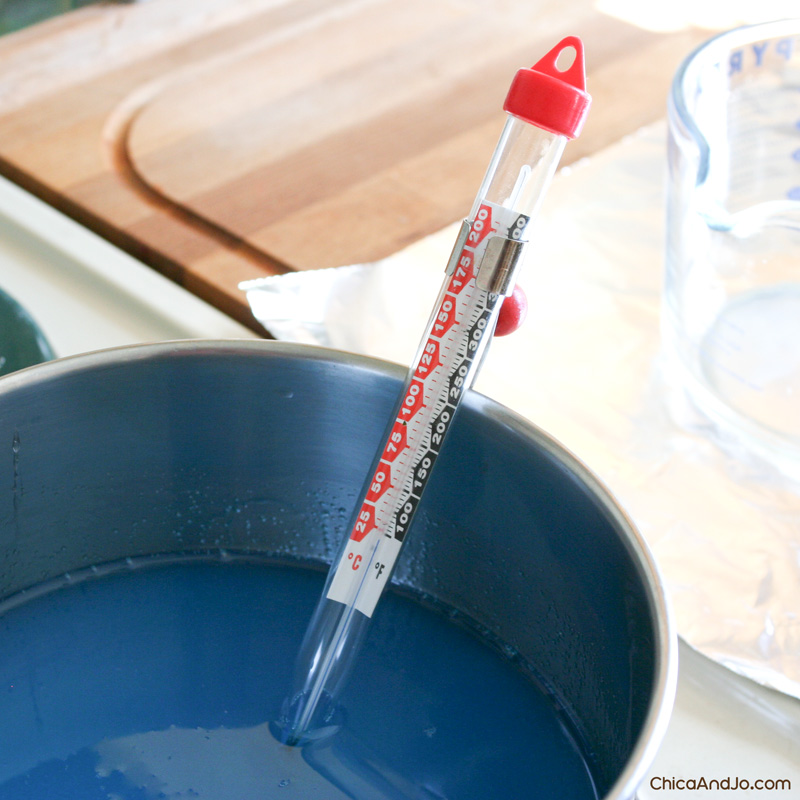
Calibrating your candy thermometer
The very first step to candy making, before you do anything else, is to calibrate your candy thermometer. You may not know that your thermometer can get "off" over time, especially the ones with the little paper gauge inside that can move. If your numbers are off, you'll never get the right temperature, and your candy might fail miserably.
Fortunately, it's very easy to calibrate your candy thermometer. Just bring a pot of water to a boil and put the thermometer inside. It should read 212 degrees F (at sea level, anyway). If it's higher or lower than that, then remember that difference and adjust your target temperature accordingly for this candy recipe. (For example: if your thermometer says 200 when the water is boiling, you're 12 degrees too low, and you should subtract 12 from your recipe's target temperature.)
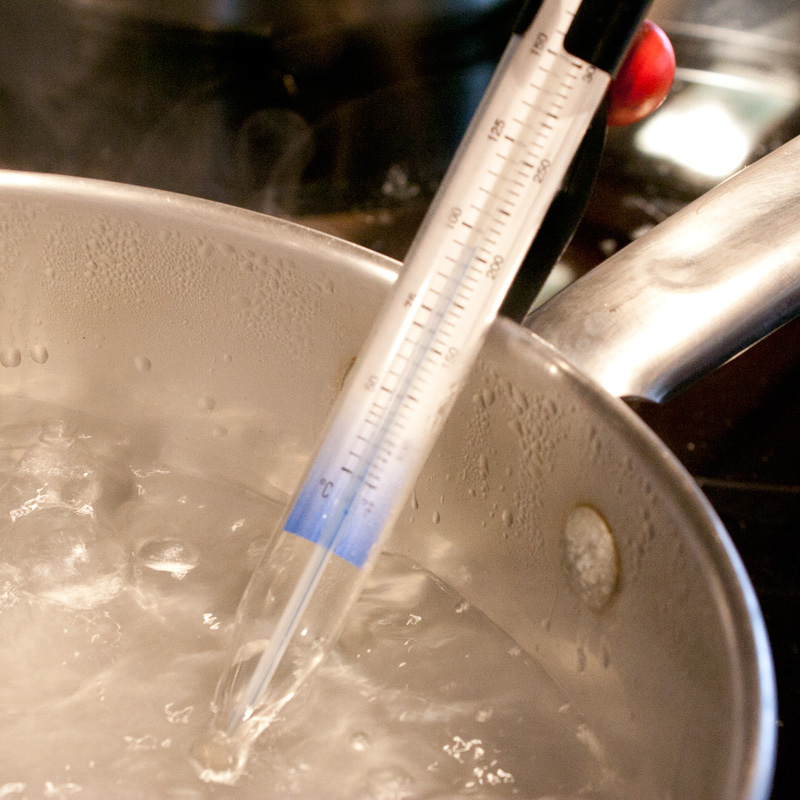
I urge you, please, do not skip this calibration step, because it can save you so much frustration. I learned this the hard way (as you'll see below) with candy that was overcooked and discolored!
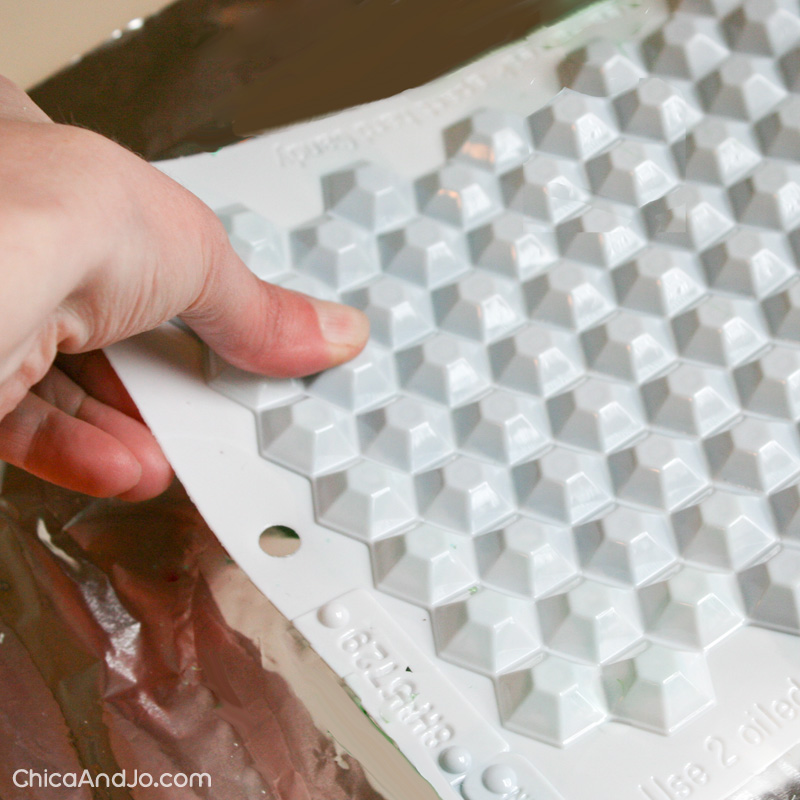
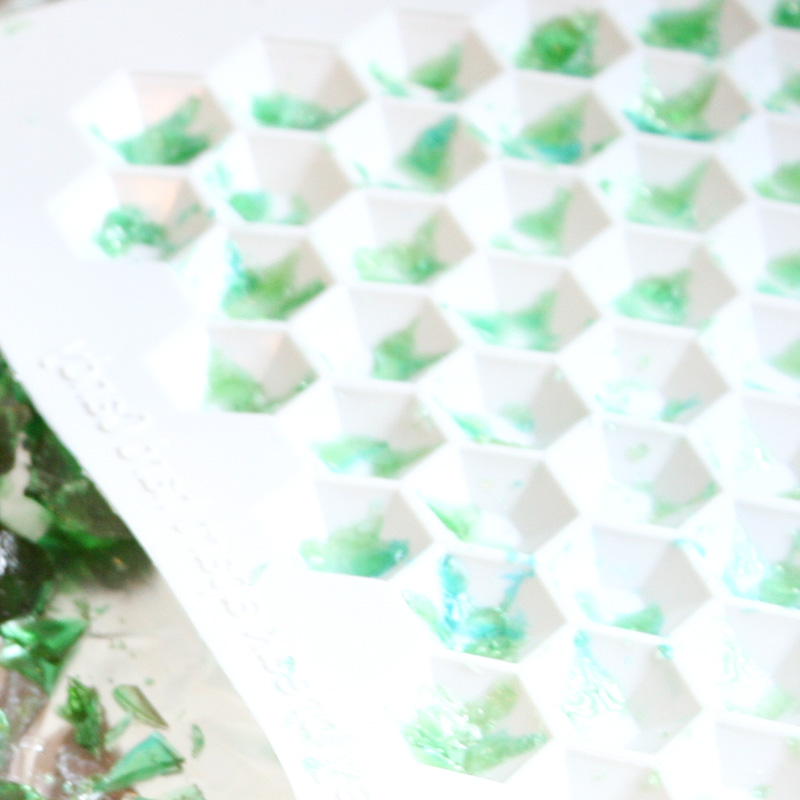
Preparing the hard candy molds
Once your thermometer is calibrated, then you need to spray the hard candy molds with non-stick cooking spray. I place my molds in the sink to keep from spraying my counters.
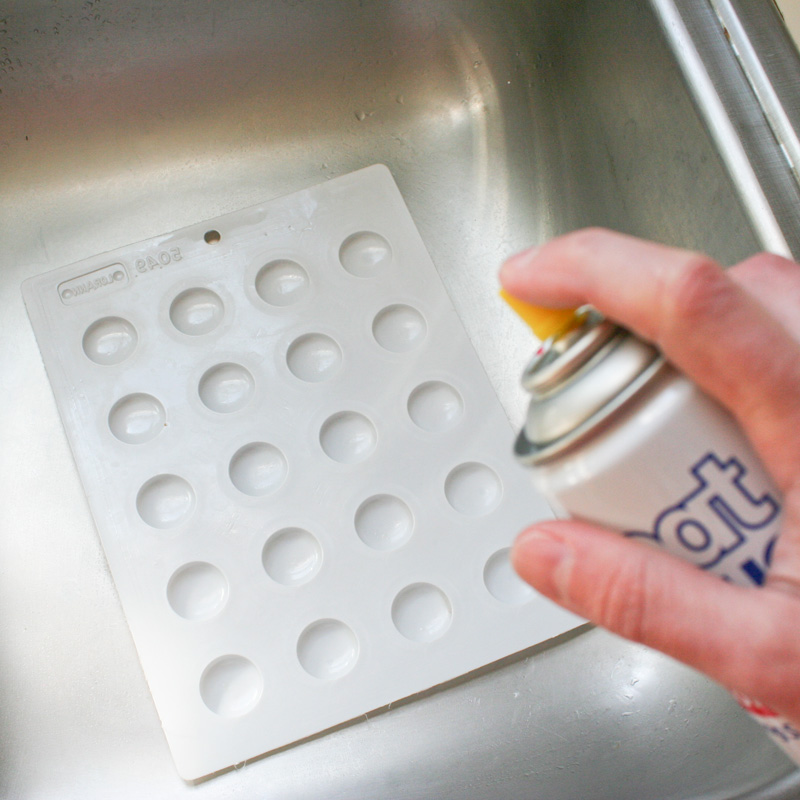
Don't be too stingy, but don't let it puddle, either.
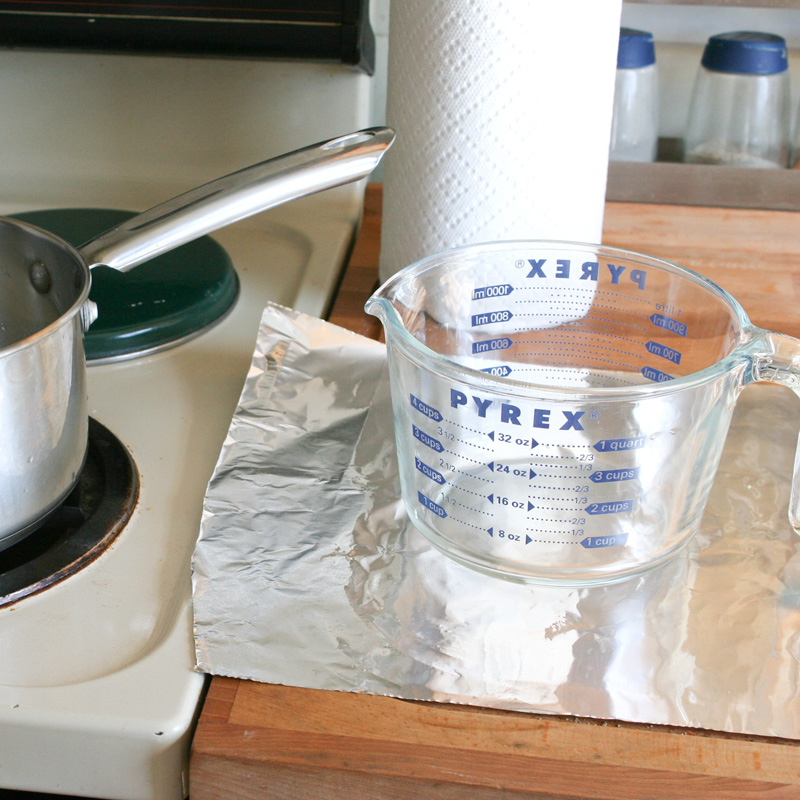
Preparing your work surface for candy making
Next, you want to cover your work area with aluminum foil. The candy won't stick to the foil, so it's a great surface to work on. Put a piece of aluminum foil on the counter next to your stove, making sure it's close enough to catch any candy drips later. Put the Pyrex measuring cup right on the foil.
Then put another big piece of foil on the counter and put your molds on top.
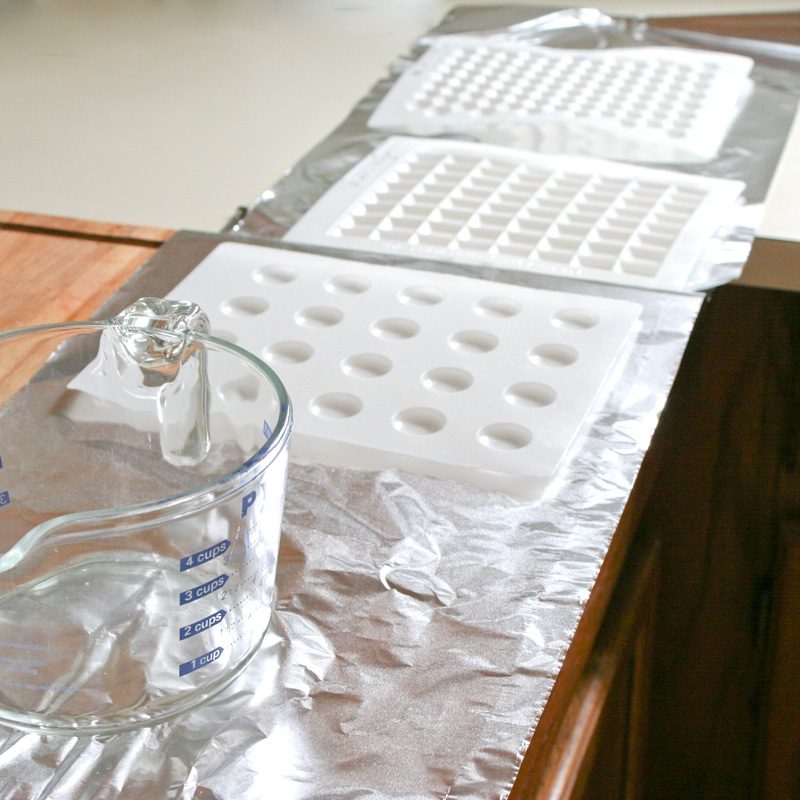
If you're going to use flavoring, put a clean spoon next to the Pyrex cup so it's ready.
Mixing the hard candy ingredients
Now go ahead and mix up your ingredients in the pan. You'll need:
- 2 cups granulated white sugar
- 2/3 cup light corn syrup
- 3/4 cup water
- hard candy food coloring as desired (I used 20 drops)
- 3/4 tsp (1 dram) of hard candy flavoring oils (optional, and to taste)
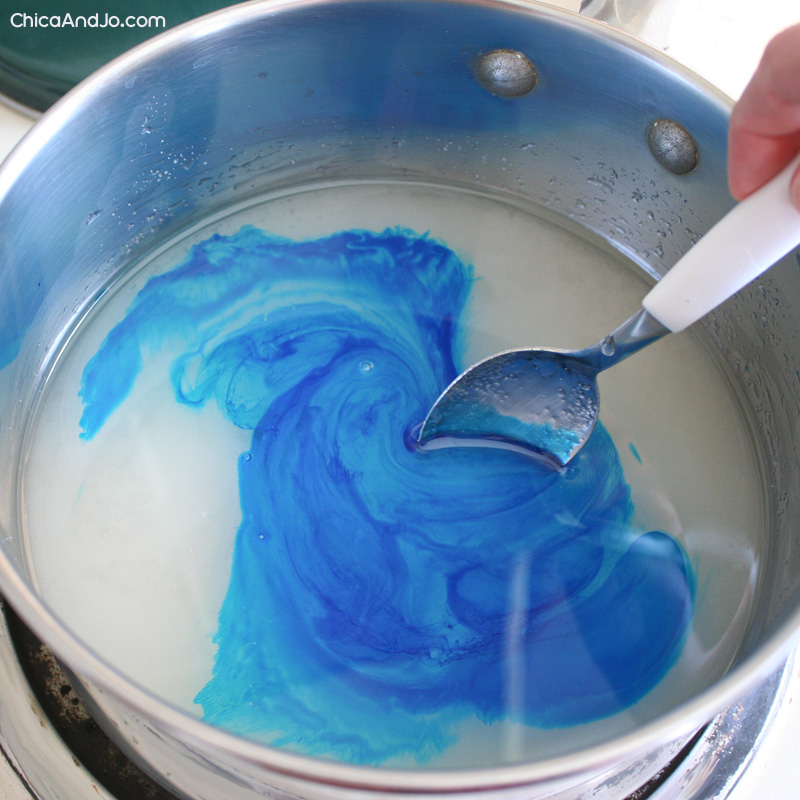
Stir together everything except the flavoring oil so that it is mixed well and the color is uniform. UPDATE - I recently read that adding the coloring too early in the cooking process can make your candy turn out sticky (because the acid in the coloring will invert the sucrose), so despite what these pictures show, you may want to wait and add the coloring at the last minute with the flavoring.
Then clip your candy thermometer to the pan, making sure it does not touch the bottom of the pan.
Cooking the hard candy syrup
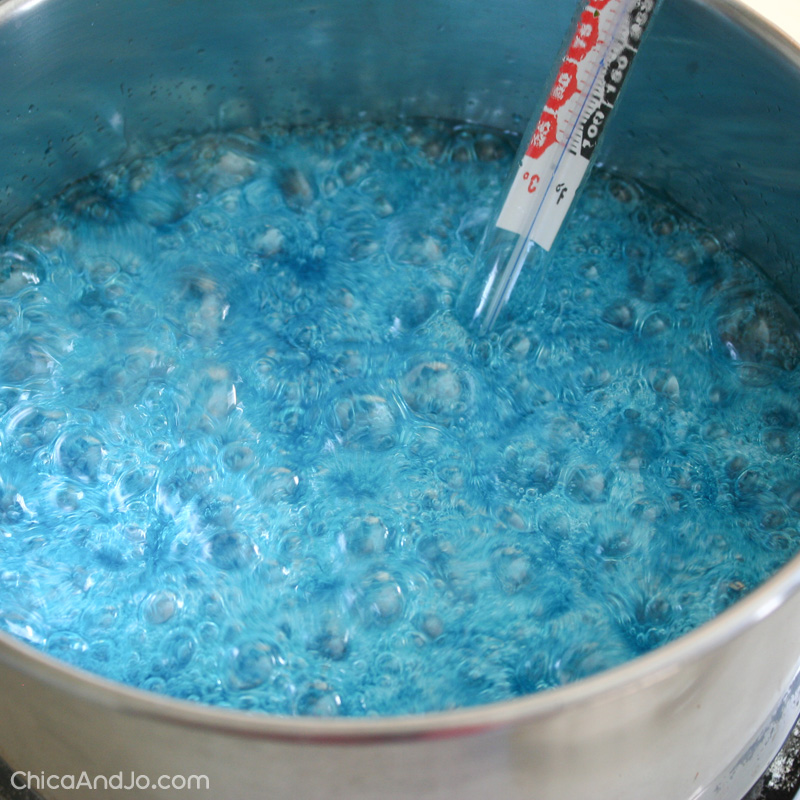
Okay, all set? Everything greased and covered and set up and ready to go? Turn the burner on high and get it going. By the way, do not leave this unattended. Stay put!
When the mixture first starts to boil, the temperature will rise to 212 really fast, and there will be lots of steam as the water boils away.

If your thermometer is anything like mine, it will be covered with condensation and hard to read. That's okay, though... and you'll see why in a sec...
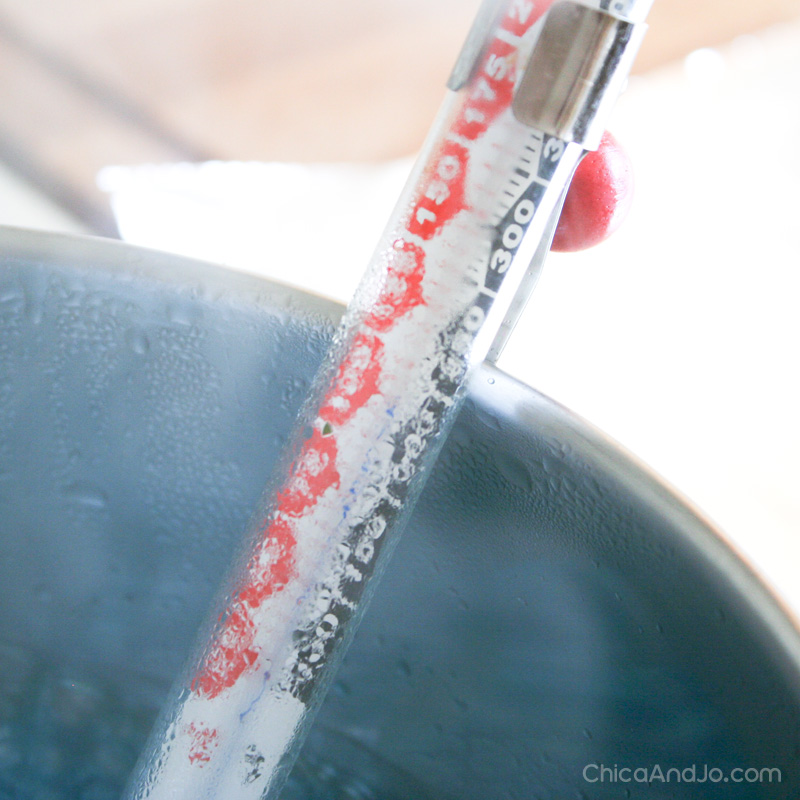
As it continues to boil, you'll see the the temperature rises much more slowly now. (Don't use that as an excuse to leave, though... please stay and watch it for your safety!)
You'll also notice that the steam dies down as the water goes away, and soon there is no steam at all. You'll also notice that your thermometer is suddenly dry and easy to read. Awesome!
Now this part is critical, so pay attention. Let the sugar boil to 300 degrees F but not a bit more! (I'll explain why at the end of this post). The minute you hit 300, take the thermometer out and set it on the foil (aren't you glad you had that ready?). Then immediately dump the boiling sugar into the Pyrex cup. We do this for two reasons. First, it's easier to pour from the spout. Second, we want to stop the cooking process, so we need to get that liquid out of that hot pan or else it will keep cooking.
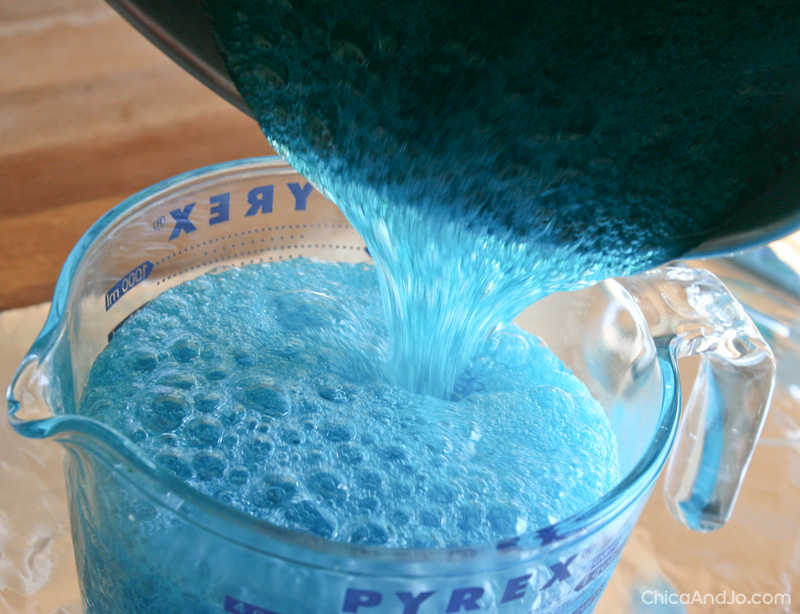
CAUTION: This sugar syrup is VERY hot, so make sure your measuring cup is made of something heat-proof like glass Pyrex. Make sure the container is not cold, or else you'll risk cracking it from the extreme temperature change. Also make sure it's at least the 4-cup size so that you have enough room for the bubbling liquid.
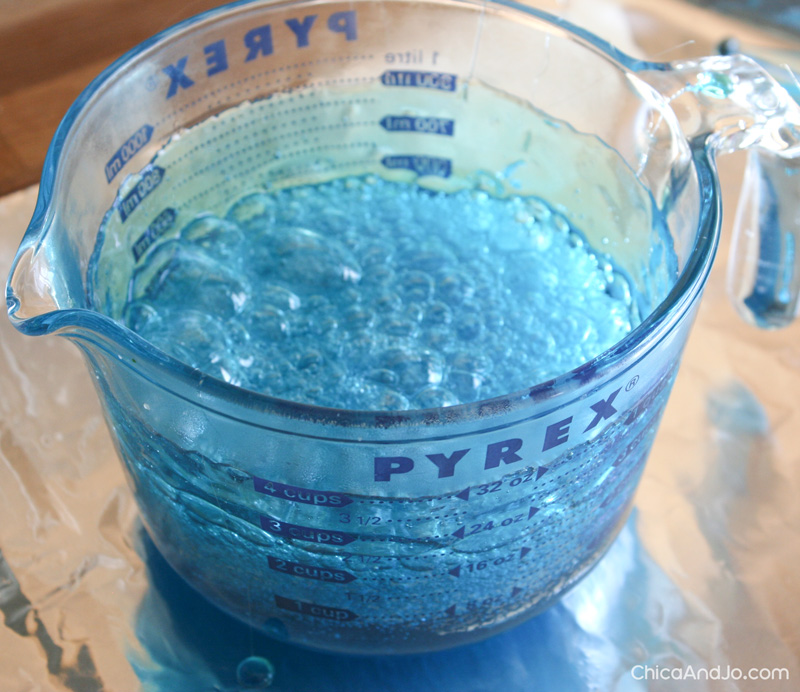
At this point, you can add your optional flavoring oil (and coloring, if you didn't add it already), and stir it in quickly (but carefully!) with the spoon you had ready.
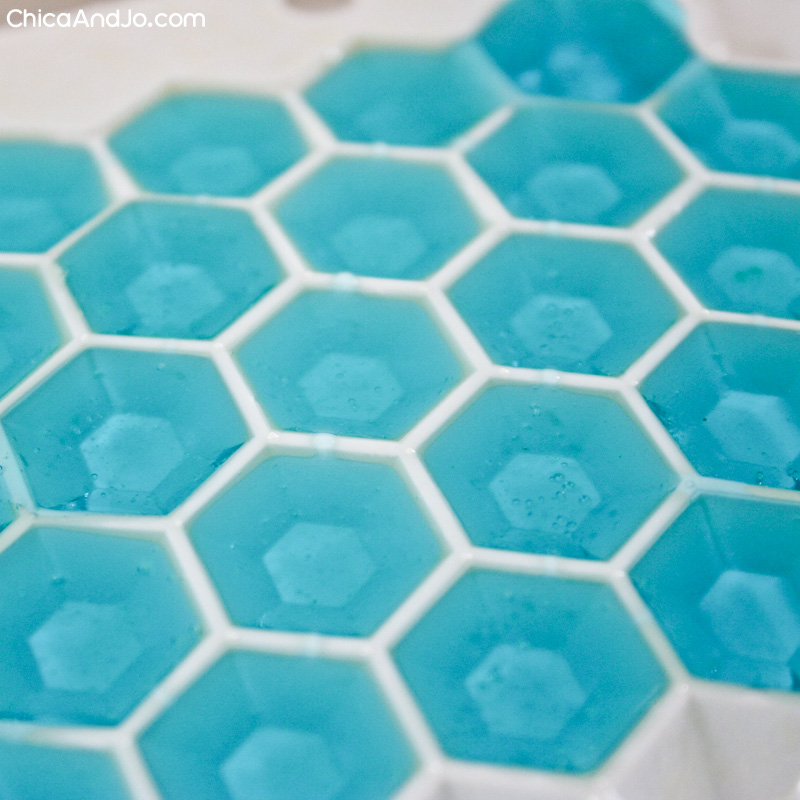
Pouring the candy syrup into molds
Now you've got to work pretty fast to pour the sugar into the molds before it hardens. You'll have a few minutes of working time, so don't trip over yourself to rush, but don't waste time either. The candy syrup will be very easy to pour for about 5 or 6 minutes, and then will start to thicken up. After 8 or 9 minutes, it'll be too thick to pour and you'll be done.
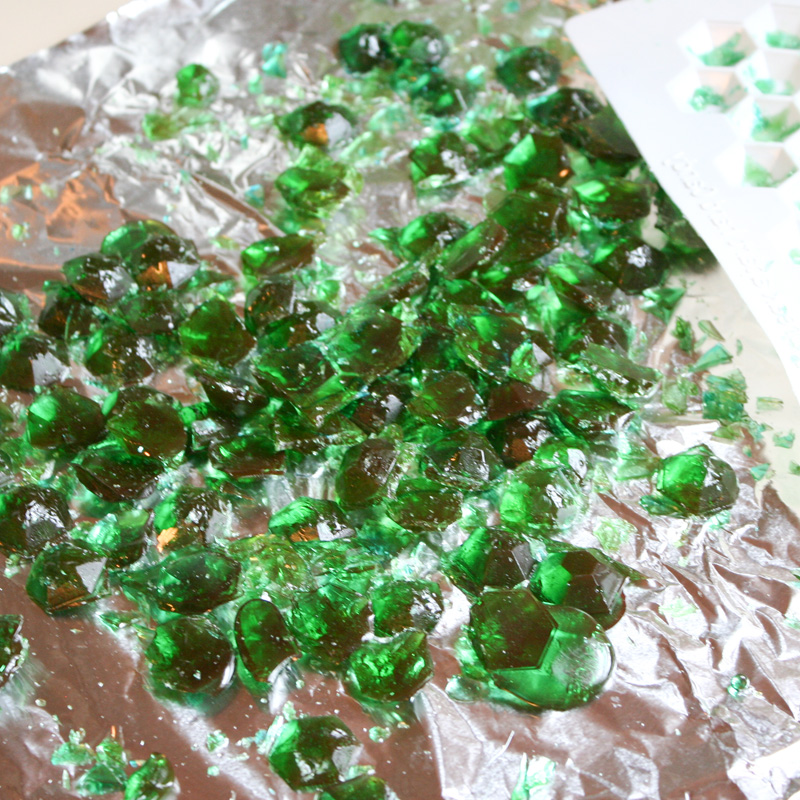
Just pour the sugar slowly and carefully into the molds, taking care not to overfill them.
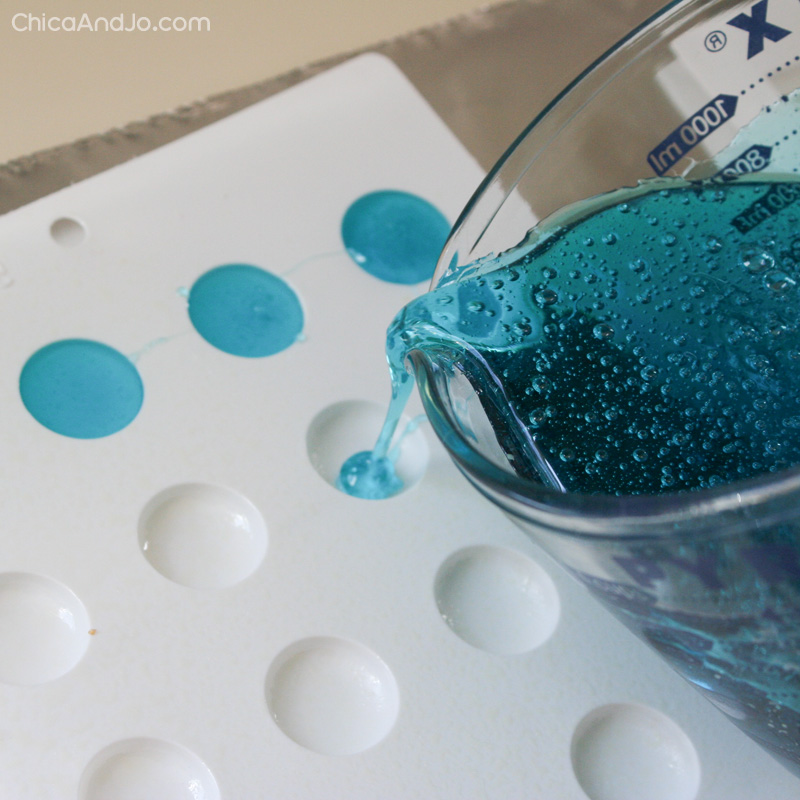
Small drizzles are okay (and pretty much unavoidable!) but do your absolute best to not leave huge puddles or large trails of sugar between the pieces. Once they harden, large drizzles will be nearly impossible to remove without damaging the candies.
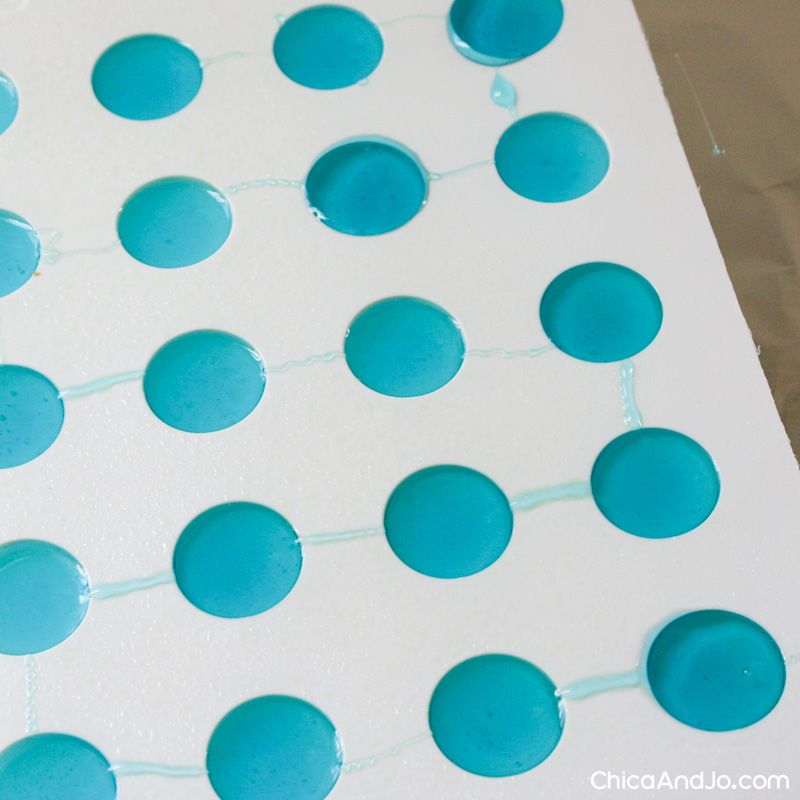
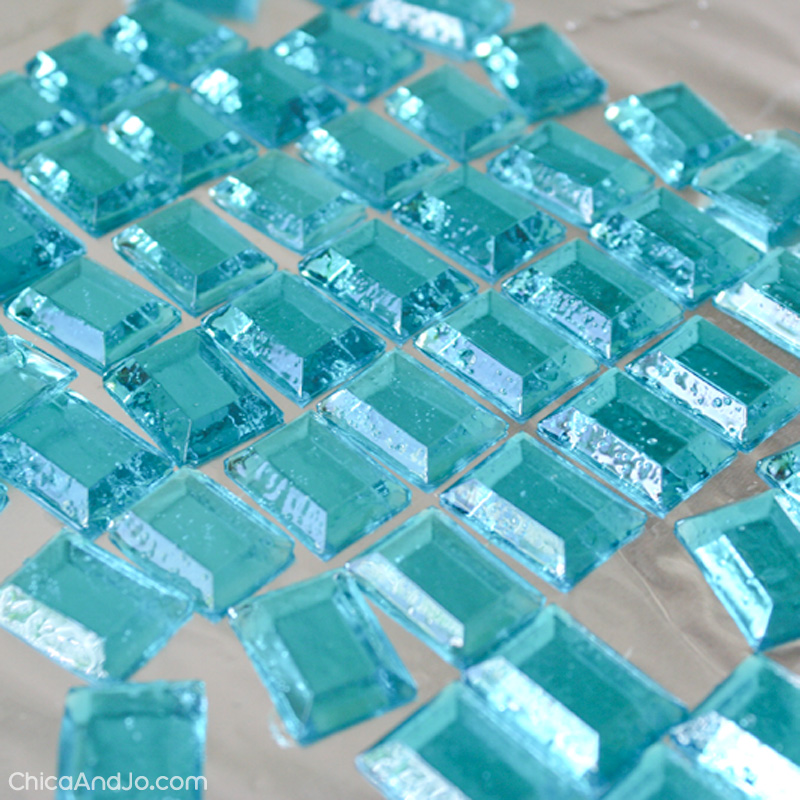
If you use the so-called "breakaway" molds (those with the pieces right up against each other), you need to be really careful not to overfill them. Despite what the name implies, the candy does not break easily along these lines. If you cover up those little white lines between each jewel, I can pretty much guarantee that they will shatter when you try to break them apart later. (See my results later in this post!)
Tips for hard candy cleanup
While you wait for the candy to set, let's talk about cleanup. That pan looks awful with the caked-on sugar, right? Fortunately, all you need to do is fill it up with water and let it sit a few hours. Go ahead and toss the thermometer and spoon inside, too. Don't even bother to scrub — it's not worth the effort! The sugar will all dissolve after a good soak.
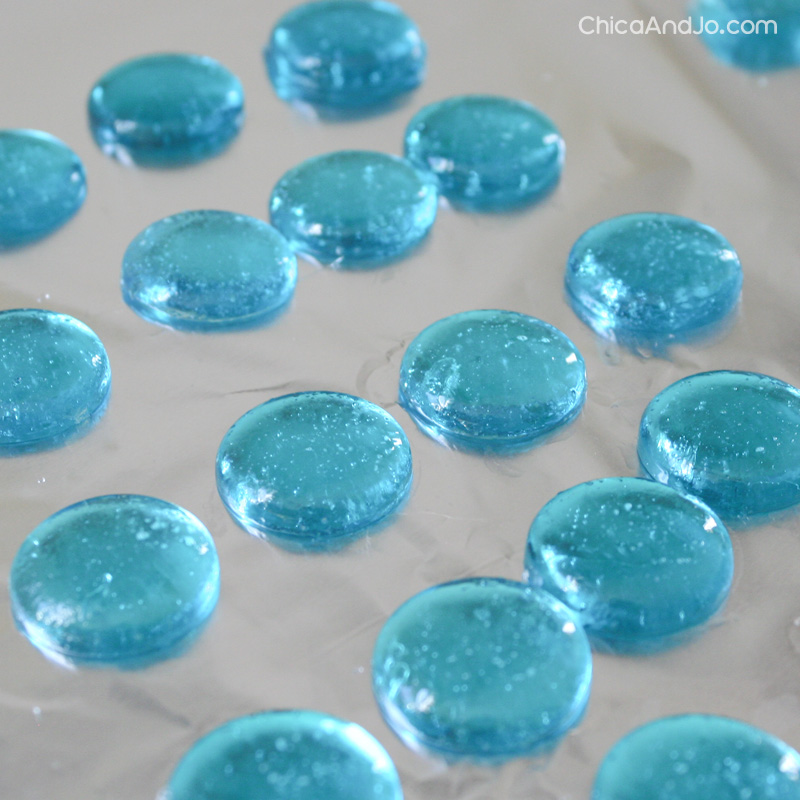
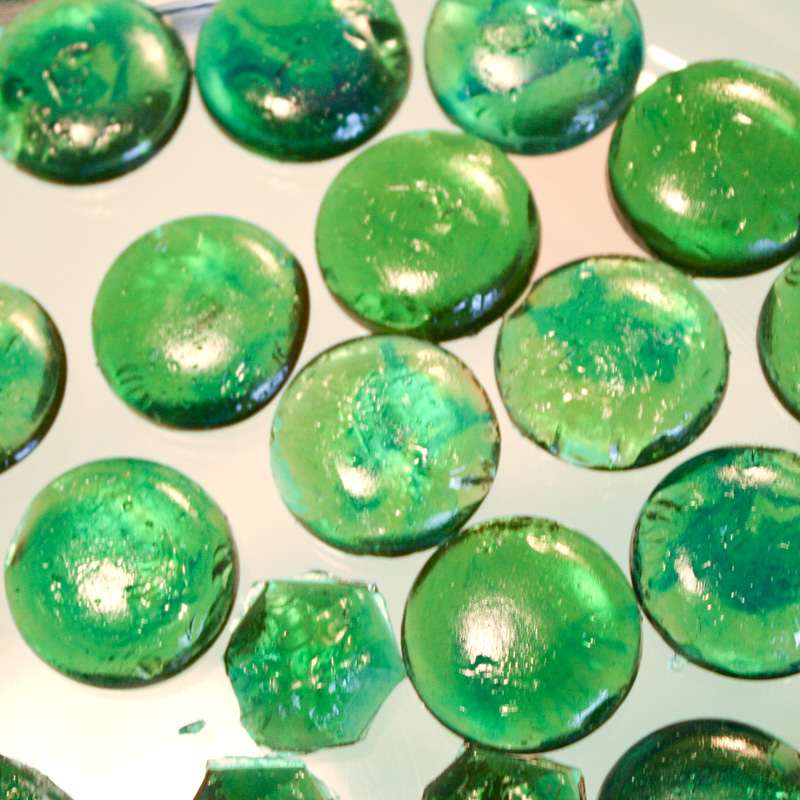
Removing candies from the molds
After five or ten minutes, your candies will be set. Just flip the mold over onto the foil and give it a gentle bend.
If you greased your mold well, the candies should pop right out.
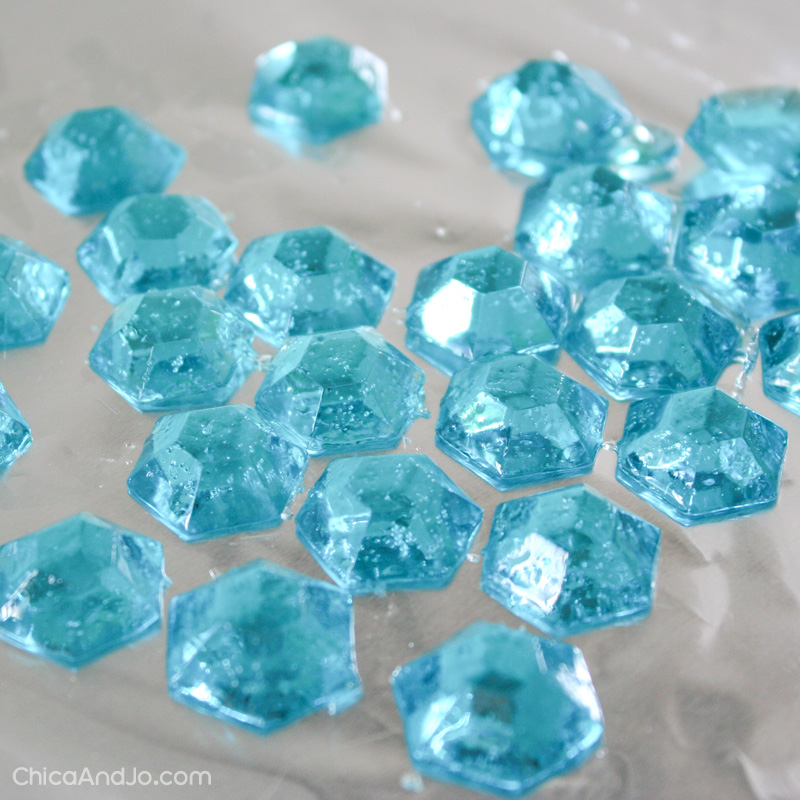
You made candy!
And that's it, your candy jewels are done! They will have a slight film of oil on them, which will help keep them from sticking together, but you can wipe that away with a paper towel if you want. As long as you store them in an air-tight container, they shouldn't stick at all.
Can you believe we made these hard candy jewels out of basically just sugar? They are so beautiful it's hard to believe.
IDEA: Use candy jewels to decorate a cake
By now you're probably wondering what I ended up using these candy jewels for. They were the decoration on the Princess Peach birthday cake that I made for Little Jo's Super Mario Brothers themed birthday party. Don't you think they're the perfect touch?

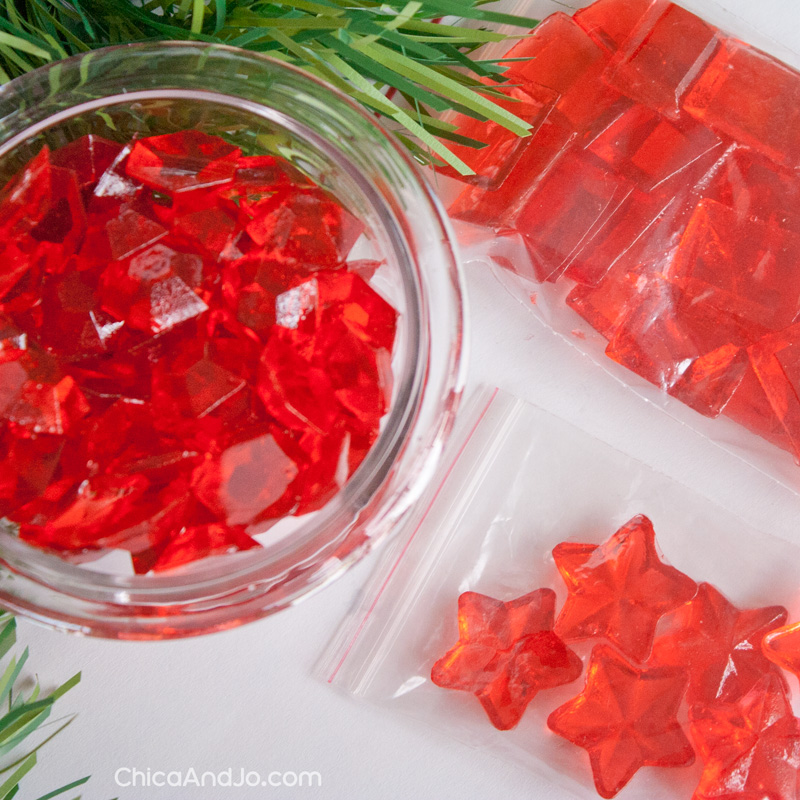
IDEA: Gift candy gifts at the holidays
I've also used this recipe to create cinnamon-flavored candies for Christmas, to give as little gifts to friends. I put some in bags and some in clear glass bowls, and they look so pretty.
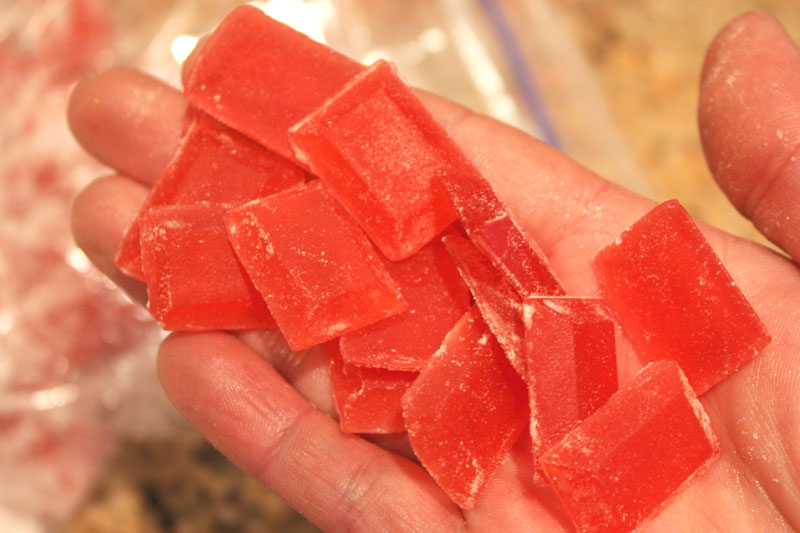
IDEA: Make frosted glass candies
The film of oil on the candies (leftover from the greased molds) should keep them from sticking together, but if you want to be extra sure your candies don't stick, you can toss them in a bag with a little bit of powdered sugar. Once you brush off the excess, you end up with candies that not only won't stick together, but that actually look like frosted glass!
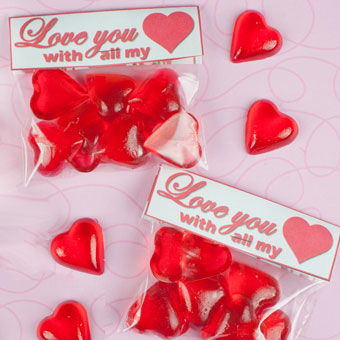
IDEA: Make candy hearts for Valentine's Day
I reached for this recipe again to make some heart-shaped candies for Valentine's Day. Be sure to check out my Valentine's Day heart shaped candy tutorial for more info, including our free downloadable bag tag. There's even a tip about making giant heart-shaped lollipops!

BONUS — Tips for making hard candy
Now that I've shown you how to make these candies the right way, let me share with you some lessons I learned while figuring it out. I hope seeing my mistakes will help you avoid them!
TIP #1 - Don't overfill the molds
Some hard candy molds are labeled as "breakaway" and you might think that you can just snap the candies apart when they are cool and everything will go great. That's what I thought, but turns out that is not the case at all. If you put too much candy in the molds, you'll end up with a huge slab of hard candy that breaks into every shape imaginable EXCEPT the one you were trying for!
When I tried breaking them apart on my first candy attempt, it was an absolute mess!
TIP #2 - Don't under-grease the molds
When I made my first batch of candy, I didn't have any non-stick cooking spray, so I tried to just wipe some oil onto the molds with a paper towel. The result was a film of oil that was no where near enough, and the candies stuck like crazy. Ugh! Make sure you grease your molds well.
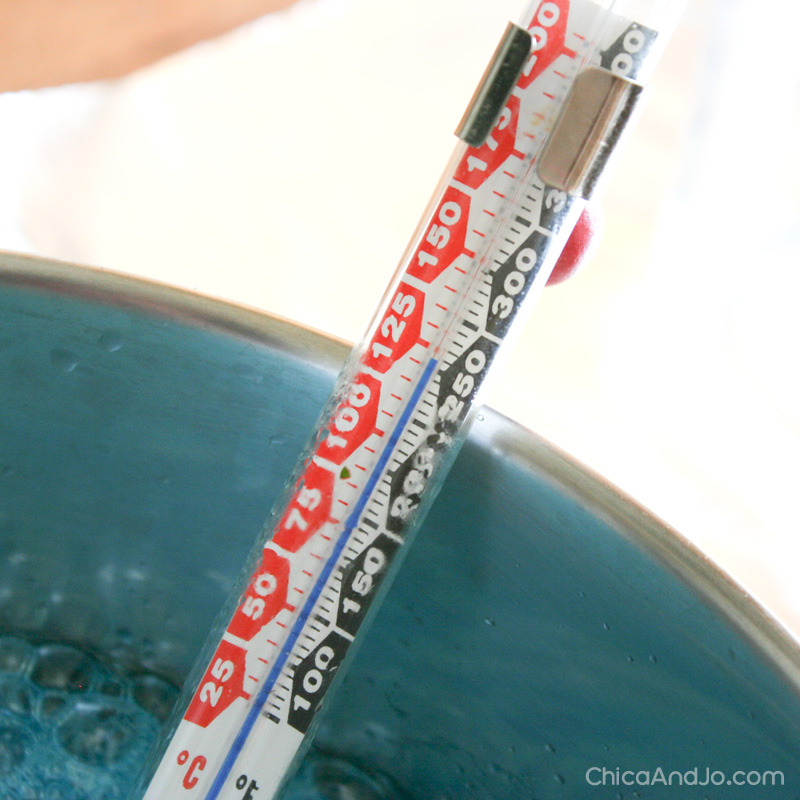
TIP #3 - Don't overheat the syrup
You can get decent candies with varying temperatures, but for decent and true COLOR, you need to be sure you don't heat past 300 degrees. Having an accurate candy thermometer is critical to the success of this candy, so please make sure you calibrate it using the instructions I mentioned at the start of this tutorial.
The first time I tried this candy, my thermometer was way off and I had no idea. My candy cooked way too long and the sugar started to caramelize. The syrup was yellowish by the time I added my blue food coloring, and the result was quite green! Then I tried again with a lower temperature, and it was still too much.
Then I finally figured out my thermometer was wrong, and when I adjusted for that, I hit the jackpot with true blue candies. Here's a picture of the three batches I made with the exact same amount of blue food coloring, but I let them cook to different temperatures. Can you believe the difference? If you want your colors true and bright, be sure your thermometer is accurate and don't cook it too long.
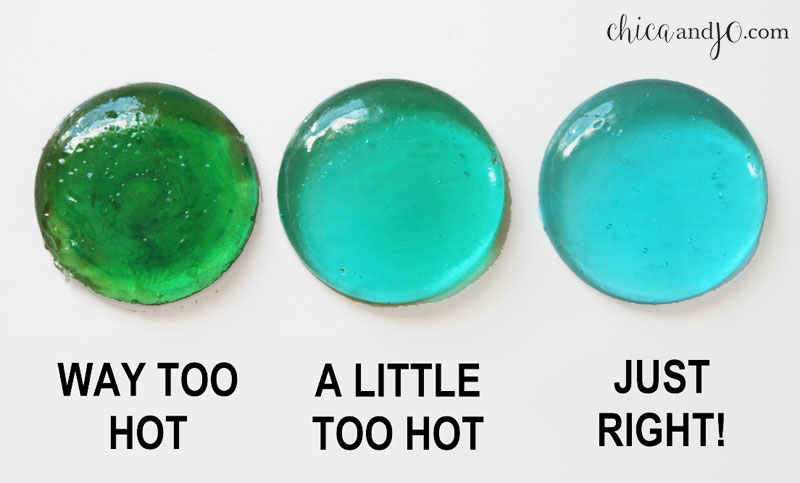
NOTE - Colors like red/orange/yellow are pretty easy, because a little extra caramelization won't mess it up, but if you're doing clear or blue candies, or you really want true colors with no golden tint, you might want to stop the temperature a little shy of 300 degrees. Stopping at 295 or 290 will keep your colors true, but you also run the risk of the candy not setting up hard enough. It's a very fine line, so you need to experiment to get the results you want.
TIP #4 - Have enough molds ready
There's nothing more frustrating with this project than having extra sugar syrup leftover with nowhere to put it. So make sure you pick up several hard candy molds. Three or four should work well for this recipe, depending on how big the cavities are. Make sure to prep all your molds so that you're ready for however far your syrup takes you.
TIP #5 - Don't leave the syrup in the pan
As I mentioned earlier, you need to dump the syrup into another container when it has reached the proper temperature. Otherwise, the hot pan will continue to cook the syrup and you'll go over the target temperature and it will start to turn yellow. If you don't believe a few degrees will make that much of a difference, take a look at this picture of my pan. After I had dumped it out and made my candies, I went back and looked and the small amount of sugar left in the pan started to turn yellow just from sitting there. Discoloration like that will ruin a batch of candies fast!

TIP #6 - Don't give up!
If these lessons teach you anything, it's that mistakes happen. I went through several iterations before getting it right, and found that temperature was the most important factor. Keep at it and you'll get there!
![]()
similar projects
Homemade Candy Cane Syrup Recipe
Gourmet Filled Chocolate Candy Bars
Valentine's Day Heart Shaped Candy


265 comments so far:
So very cool. Thanks for all your trial and tribulations on this project. I'm thinking a pirate themed birthday party is in store for my son next year and these would make great goodie bag treats.
These look so beautiful! And I LOVE LOVE LOVE that you showed that mistakes happen. Made me want to try this even more. :)
Sarah, I was heartbroken after my first attempt, when everything went wrong. It took me three times to get it right and I just had to share my goofs with you guys too, to hopefully save you from the same trouble. Glad you enjoyed it!
Hi, Just wondering now that the jewels are made and are lovely how do you attach to fondant ?Thanks for posting these instructions ...they are great !
Hi heather! I attached the jewels to the cake with simple white icing, used as a "glue". Make sure you use white, so that the color of the jewels will stay true (if you use something like pink or yellow, it will show through).
Great article for all the DIY Brides out there that are looking for alternative decorations for their wedding cakes. Thank you for the step by step instructions.
I am making a wedding cake with jewels and your website helped me more than any other site! thanks so much! I can't wait to start :)
I wish I had seen your tips beforehand... I did every one of your 'don'ts' just the other day. Thanks :D
These are really great instructions:) I wondered how long can you keep the candies before you should throw them away? I'd hate to make even half a recipe for only 5 candy jewels, to throw the rest away:(
Angie, because the hard candy is basically just made of sugar, it will not go bad, and will last for months or even longer. The only thing that I can think of that would damage the candies is too much moisture or heat, which would cause them to stick together.
Great advise. Thanks, now I am not afraid to try this. I seem to always try something new on an important project like a wedding cake. I will be using clear to make them look like diamonds for a wedding cake. I assume I only need to worry about the bubbles. Any more hints for that. thanks for the info.
Cyndi, I think clear candy jewels will look amazing on a cake! Just be very careful not to let the sugar overcook, or they will be more yellow than clear. As for air bubbles, that was never something I had a problem with, but if you do see them, you could probably poke them out with a toothpick while the candy is still very hot. That will slow down your pouring, though. We'd love to see the finished cake, so please come back and share a picture with us!
I want to make white hard candy...any suggestions on the brand/type of food color to use? Thank you.
Hi Karoline! I found some white food coloring that's suitable for hard candy. Check out this white food color by Lorann Gourmet.
Couldnt afford a glass slipper for a cinderella pillow cake i wanted to make so i googled and googled and am molding alum. foil around my 2yr olds dress shoe(making my own mold). Will update later on the glass slipper. Hope this works because i dont want to spend $40 for a cake topper that will only be used once.LOL
Wow, Angelia, what a challenge! We can't wait to hear how it comes out.
OMG! It worked! It is a bit yellow/amber but i think it is because of the thickness of the candy. After i made my "mold" i figured i would renforce it with packing tape(real good idea)! I did everything like you said. When i peeled the alum. foil back(3 hours later), i had a glass slipper. Thank you so much for the step by step instructions.
This sounds completely awesome! I want to try making star candies to decorate some cupcakes for Christmas! But i was wondering, what kind of food coloring should i use, or does any work? And for the flavoring, is there any specific brand? I have a bottle of Torani peppermind syrup i'd love to use, and works awesome for peppermint hot chocolate, but i don't know if it'll be suitable for a candy. Thanks so much!!!
Little Crow, that sounds like a fun idea! Because the food coloring is added during the cooking process, any moisture in it will evaporate out, so I think you could probably use any type of liquid food coloring without messing up the candy's consistency. Of course, food coloring created just for candy would work best!
Since the flavoring is added at the end, though, you need to use something really concentrated. If you introduce too much liquid into the candy, it will likely mess up the consistency and the candy won't harden properly. (And you don't want to add the flavoring while it's cooking, or the flavors will likely be ruined.) It really is best to use a candy flavoring oils that are highly concentrated, so that you only need to add a few drops. I suspect you'd have to add too much of the Torani syrup to get a good flavor out of it.
P.S. Have you seen our candy cane syrup recipe? When you run out of Torani, save some money and make your own :)
This has got to be the best tutorial ever! Thank you for documenting so throughly, esp. posting your errors! :) I just made a batch and I used regular food coloring. Also, since I only bought 1 mold I divided the recipe into 3rds. The corn syrup was a little tricky as 1/3 of 2/3 is .22 so a little less than 1/4 should do it.
Joyce, thanks for the update! Glad to hear that the regular food coloring worked.
I did some calculations and 1/3 of 2/3 of a cup is 3.5 tablespooons. Hopefully that will help you the next time you try cutting the recipe in thirds :)
Beautiful result, but I'm concerned about adding boiling liquid to a glass measuring cup. The Pyrex web site even warns against subjecting their products to sudden changes in temperature. There are quite a few stories on the web about exploding Pyrex, although there isn't a good way to authenticate them. Would you have an alternate suggestion on how to stop the cooking but still have a safe, desirable vessel for pouring the hot liquid?
Joanie, you could slowly bring the Pyrex up to temperature by filling it with warm then hot water from your tap, so the syrup isn't as much of a temperature shock. Just be sure you dry it thoroughly before adding the syrup.
Thanx so much for going step by step. I am going to be making a fashion birthday cake for my friend. And she really likes jewels. Thank you also for putting a link so i could by molds on amazon.com!!!
I am making a candy village display, and wanted to make a candy lake using this recipe. Will this work if I use just an aluminum cake pan and leave it in there? Or will it be too thick to cool correctly?
Rachel, a candy lake in a candy village sounds so awesome! Extra thickness won't matter when it comes to cooling, as long as you give it a little extra time. Using an aluminum cake pan is an interesting idea, but I see two potential issues. First, the pan will presumably be at least an inch or two tall, and the edges will show in your display. Second, the candy will look darker in the pan, which might dull the effect of the color. If you try the pan idea and don't love it, maybe try this instead: stack 2-3 large sheets of aluminum foil on the counter and let the candy cool in the pan until it's thick and just barely pourable. Then pour it directly onto the aluminum foil in a loose, lake-ish shape. When it cools, you can pull it right off the foil and put it in your display with a sheet of white paper cut to size underneath. The white will make the color of your water really pop!
Hope that helps, and we'd LOVE to see a photo of your finished candy village!
Well, I ended up pouring it into the aluminum cake pan, and just peeling that away once it cooled. Turned out great. Will send pics of the village when I put it up next week
Rachel, I'm glad to hear you were able to get it out of the pan! It must have been a disposable one. I thought you were going to use a real pan, which is why I was worried :) Glad it worked out, and can't wait to see pics.
I dont know what happend... Followed the directions on isomalt package but candy never got hard... even leftover is syrup is still syrup should I try to reheat it or start over using regular products and forget the isomalt? Help LOL
Hey Jennifer! Isomalt can be used to make hard candy, but it cooks totally differently than regular sugar. From what I've read online, Isomalt needs to cook to a much higher temperature in order to get hard. If you really want to use Isomalt, do some research and try experimenting to see if you can get good results. If you want to use our recipe, though, you'll need to use sugar. Hope that helps, and good luck with your next try!
Hi! Your pictures are great! I was going to buy some jewels for a cake I am doing but after reading your directions I am convinced I can do it myself! I am so excited! Thanks for helping me out!
I have tried and tried making butterfly wings for a wedding coming up in the summer. Am interested in trying out your method (I've been going at it without the corn syrup) but wonder 2 things: 1) how well does this cany recipe store? Is this something i can do well in advance? How to/where (freezer or ziploc) store? 2) I want to make multi-colored wings but still have them transparent, dots, stripes, etc. Any thoughts would be VERY appreciated. I'm plowing thru sugar and not getting this right. Glad I have time to practice!
Hi Connie. Butterfly wings sound like a lovely idea! The best tip I can give you for storing hard candy is to keep it in an airtight container. As long as they are kept dry, they should last for weeks or even months. To create multi-colored candy, perhaps you can make a few colors of candy and put drops/stripes of one down first and then pour another over the top to create the wing shape? Good luck and let us know how it goes!
I'm going to be trying to make the jewels with your recipe. The one question I have is that I'm going to be making the very tiny jewels 1/4". Do you have any suggestions for pouring into something that small? I'm a little concerned using a pyrex since the mold is so small.
Becky, those tiny jewels sound so sweet! I can't believe you found a mold that small. I agree that trying to pour the candy into something so small would be overkill. One idea I thought of would be to use a wooden skewer -- dip it into the candy and let it drip down into the mold. Hope that helps, and let us know how it comes out.
What do you recommend I could coat the gems with to make them look shiny. I made them for the first time today and they look a little dull.
Maria, a tiny bit of vegetable oil or cooking spray will make the gems look shiny and still be safe to eat.
I made candy jewels and they turned out great on the first time! I used Isomalt but am gonna try your recipe, I do have one question. Why did I have small bubbles in the jewels? How do I make them again without the bubbles? Thanks!
Melissa, I'm glad you had success with the Isomalt. I'm not sure what would lead to the bubbles, unless maybe it was from using Isomalt? I don't remember that being a problem when I made mine. Let us know if you have better luck with the sugar recipe.
I'm throwing my daughter a cake decorating birthday party on Saturday and thought these would be fantastic to give to the girls to put on their cakes! Each girl is getting her own 8x8 cake to pipe and decorate. I don't have a candy thermometer, would a meat thermometer do the job or does it get too hot for that?
Amber, that's a great idea! Any thermometer that can measure temperatures in the 250-300 degree range should work, so just check your meat thermometer and see if it has those measurements. I suspect it won't, simply because you would never cook meat to 300 degrees ;)
so I made some of these but they turned out a bit gooey. and were very difficult to get out of the molds. Do you think I just didn't get them to a high enough heat? I didn't want the candy to burn so I think I took it off too soon, but wanted your opinion. Thanks!
Cindy, it does sound like you didn't let the sugar cook to a high enough temperature. Sugar is very fickle, and just a few degrees can make a big difference. Fortunately, it doesn't cost much so mistakes aren't so bad :) Make sure your thermometer is accurate, too!
Ok...crazy question. How did you prevent the candy from sticking to your pyrex measuring cup? The thought of hard candy on glass did not cross my mind once and now I have TWO pyrex cups coated in hard candy and it isn't budging for the life of me! *lol*
Brooke, just fill the cups with water and let it sit overnight. The hard candy will dissolve into the water and you can just pour it away. Be patient... it will eventually dissolve!
I loved your tutorial and was wondering if there is a way that I can shape the candy for an online game themed cake or if you know of another recipe. The cake is going to be a computer and I need the monitor screen to be broken outwards so it looks like the character has broken the screen and is stepping through to the real world. Any suggestions would be a tremendous help.
Hi Robin. What a fun idea! If I had that challenge, here's what I would try: Assuming that you are making the rest of the computer and monitor out of cake, you just need candy for the glass on the monitor. I would try laying out some aluminum foil on a cutting board and crimp the edges so that it's the size you need for your screen, creating a mold. Make the edges as smooth as possible so that the candy doesn't get trapped in the wrinkles when you try to remove it later. Then use our recipe and pour the liquid candy into the aluminum foil, so that it's maybe about 1/4" thick. After it's cooled complete, you'll need to carefully break it. Try folding a towel a few times and put it on the counter, then put the candy on top. Put another towel over that, and then press down with the heel of your hand in the middle, gently, until the candy breaks. Hopefully you'll get a clean break with a manageable number of pieces that you can carefully place onto your cake. Hope that helps, and let us know how it goes!
WOW!! This worked perfectly! I've never in my life made hard candy (and i'm 56 here... ;/)
It worked so well, and your instructions were really well written... anyone could make this! My daughter's b'day party is tomorrow and I'm making her a fondant cake shaped like a jewelry box, with all kinds of jewelry in it, etc. These are going to be so beautiful! I made jewel shaped candies, and I can't wait to get that fondant cake finished with all these goodies on it.
Thank you, thank you, thank you!!!
Happy in Oklahoma,
Sheila aka Gammaw
Shelia, I'm so glad our tutorial helped you learn a new skill. Age is no limit when it comes to being crafty! :)
I tried hard candy this morning - first go ever! I had your instructions printed out and near me and followed step by step. They came out SOOO great! Could not be happier!! Well I could have added more flavour but they still taste great. If i sprayed too much oil could this create bubbles in the candy? I think i did that in a few. But I still am still super happy how well they came out ;)
Thank you!
Tia in Australia
Tia, I'm so happy to hear that you had a successful first attempt with our instructions. Isn't it amazing what sugar can do? I'm not sure what would cause bubbles to appear in the candy. I suppose it could be oil or it could be due to temperature. Perhaps I'll experiment a little the next time I make candy.
Thank you so much! My husband and I used this recipe to make hard sugar candy coral. It turned out beautiful! Thank you for your photos and detailed instructions! I hope to get some molds some time in the near future and try this again. Thanks again!
Coral sounds really interesting, Nicole! I've heard of doing that by pouring hot candy over ice. Is that how you did it? We'd love to see a photo if you have one to share :)
The best and simplest and most effective candy jewel recipe I have tried. Thanks so much for sharing. They are going on my sister's birthday cake tomorrow. TJ from Cairns, Australia :-)
Hi! I'm trying your recipe today, but I only have wilton gel colors. Will that work or do I need to purchase the traditional liquid food coloring from the grocery store?
Mark, I have no idea how gel colors would work in this case. My first instinct is that you would plop a glob of gel into the sugar and it would just sit there and not dissolve (I've tried similar before), so I think you should first try to thin it down with a few drops of water in a small bowl. The more watery it is, the better chance you have of it dissolving quickly in the sugar. I also have no idea if the chemical composition of the gel would interfere with the sugar or not, but I'm sure you'll let us know afterwards! :)
Thank you so much for publishing this information. My son is desperate for a Indiana Jones theme party, and since those toys are no longer super popular I am having a difficult time finding supplies that fit our theme. I purchased a 3D skull mold and plan to leave the candy clear (aka the crystal skull). Add that to some dirt cake and voila! He is soooo excited to help me make the candy skulls...Thanks a million for all the helpful hints!
I want to make so me of the edible gems but live in the uk where it seems to be very difficult to find light corn syrup = can I use golden syrup instead?
Norma, my research shows that golden syrup is very similar to corn syrup and can be used in general as a substitute. However, it has a decidedly caramel-like flavor and a golden color, and those qualities will definitely affect the taste and color of your candies. I don't know how well it would work for this recipe, but if you give it a try, please let us know how it comes out!
if you only have a few candy molds, can you reheat the left over mixture and make more
Lauri, I do not think the mixture would be usable if you reheated it. A better idea would be to try to make a half-batch so that you don't have much waste leftover.
OMG! I just made them. I can't believe they came out perfect the first time! I made gems for my daughter's best friend bridal shower cake. All the bridesmaid's dresses have rhinestones on them and her color is plum. I mixed up the food coloring in my water before I added it, to get as close to the dress color as possible. I will send pictures of the cake, after it is finished this weekend! A big thanks to y'all from Texas!
Ladies, just made a batch for a bachelorette party I am hosting, they turned out amazing! The clear ones are straight from the heat, no coloring, they are clear enough to look like diamonds when put on a white background so they could be used instead of isomalt. I used an old coffee can and bent it to make a poring spout instead of the pyrex, worked great, no mess, no clean up, just toss it when you are done.
Jeffrey, love the idea of using the old coffee can! Brilliant! I like things I don't have to clean up!
This is awesome!! How long in advance can you make them so they stay shiny? They are really pretty!!!
Delia, I kept the gems I made about two weeks before they were all used/eaten, and they stayed shiny with no problem. I don't know how long they would last, but I imagine it would be in the range of several months.
I made them. But they are so Sticky!!! What was wrong? Too much water?
Norma, if the candies are too sticky, you probably didn't cook the syrup to a high enough temperature. You can reduce the stickiness by coating them with powdered sugar, but they will become opaque and lose their shine. Try calibrating your candy thermometer to see if it is a little off. Good luck!
Hi Chica, I've try i did gave it a go and the candies are too sticky and melted away in less than 1/2 an hour. I'm just wondering what brand of liquid food coloring that's suitable for use with hard candy do you used is it oil base? I do really appreciate your response. Thank you very much :(
Mary, make sure that whatever coloring you use specifically says that it's suitable for hard candy. If your candies are too sticky, you probably didn't cook them to a high enough temperature. Make sure you have a good working thermometer :)
Hello Chica and Jo! Thanks so much for posting this great and easy to follow tutorial!! I plan to use these candy jewels for my grandparents 66th Wedding Anniversary cake. I have made my first and second batches and was wondering if you or the group had any tips on how to smoothen the rough edges from the jewels that come out of the breakaway moulds? (I have cut some of the edges off but sometimes they still look rough) Also any tips on how to pour/fill tiny tiny jewel moulds? (The jewels are probably about 1 cm x 1 cm). Thanks again! :D
flipballa23, I haven't really tried to smooth the edges before, but it seems like either water or heat would be the way to go. Maybe you could wipe the edges with a wet cotton swab, or maybe heat up a knife blade in a flame and then touch it to the edge? Neither of those ideas sounds very quick and easy, but they might work.
As for pouring into tiny molds... well... melted sugar is pretty drippy and stringy, so all I can suggest is to pour slowly and be patient!
I tried your recipe to make some sunglasses for a birthday cake. They looked really cool, but after a couple of days the glass started to melt...oops! Any ideas where I went wrong would be much appreciated. Thanks.
Glen, if the candy started out fine and then began to melt after a couple of days, I can only guess it was related to heat or humidity. It's best to store the candy in an airtight container in a cool place.
Why are my candy jewles melting they have been in the fridge?????
Liz, unless your room is super warm, the hard candy should be stable enough to stay hard without having to be refrigerated. In fact, the refrigerator will add humidity that will cause them to melt, so the fridge is generally not a good idea.
Hi, Love your posts. Has anyone ever tried using Crystal Light drink mix (dry from the pack)for the color and flavors? I am homebound right now and in a pinch for the color and flavoring. I plan to try it soon and will let you know how the red punch flavor works out...Donna
Donna, we've never tried that, but I am intrigued. Can't wait to hear how it comes out for you!
This tutorial is awesome. I love that you've listed your trial run and explained what went wrong, etc. I've been looking for an in-depth tutorial on candy gems so I can create them for my cakes.
I have yet to buy the moulds (yes, I'm British, lol) and the candy thermometer. Also, we don't have corn syrup here in the UK. The closest thing is Golden Syrup but it's not a clear syrup (google time). What could I sub this for? Or will it make a difference?
Lisa, my research shows that golden syrup is very similar to corn syrup and can be used in general as a substitute. However, it has a decidedly caramel-like flavor and a golden color, and those qualities will definitely affect the taste and color of your candies. I don't know how well it would work for this recipe, but if you give it a try, please let us know how it comes out!
Thank you, thank you! I made beautiful jewels last nite with your recipe. I had tried the "jolly rancher" recipe the night before and was so disappointed. Your recipe was perfect and all of your advice great! I tooka a chance and use Wilton paste colorings with the jewels, since I couldn't get to a large city to get the liquid color. I just mixed the color with the water before I put it in the pan. It worked great. Thanks again!!!!!!!
Mrshaert, I'm so glad you had such success! Thanks for the tip on the paste colorings, too.
My church is having a fun mystery dinner with a Gold Rush theme. I can't wait to try these for edible diamonds on the tables!
I am making an Indian lamp cake topper and used your instructions for the windows in my fondant lamp.. It worked PERFECTLY!! thanks!
Love these instructions! Worked like a charm every time! We made lots of batches in all different colors. Couldn't be easier, thanks so much!!!
Okay, let me just say this is awesome. I have been looking around for an all-in-one guide for days, one that tells me HOW to cook it, where to get the supplies and how to not screw up lol. I buy candy jewels from a lady on etsy, but they become so expensive between that and the shipping, I wanted to see if there was a better way and a cheaper way around this. I have made "barley" candy before (the kind you put on a baking sheet, freeze and then literally BREAK), but I wanted to try some of these little candy jewels because they are very uniform and they fit in your mouth without jabbing you lol.
I am going to use this recipe I think, and I am getting my flavored oils from LorAnn and I will take your advice about the molds. I did have one question though, assuming these are silicone, what do you think is better, metal or silicone? I see a lot of people on sites saying different things.
Kristi, we're so happy we were your all-in-one! I have never used metal molds. The molds I used are not silicone, but are a shiny and hard plastic that is still flexible. They are specifically designed for use with hot liquid sugar.
Hey guys thanks for the tutorial. Can I use gel food colors instead of water-based liquid colors? I've tried making these too, but I get tiny bubbles in mine, and I use regular sugar, not isomalt. I believe it's because I pour into molds too quickly... next time I'll try waiting till the bubbles settle before pouring.
Sahu, I haven't tried the gel colors for this, but check the product details (either on the packaging or their company website) and see if it says the gel can be used for hard candy.
Does this color stain your tongue/mouth? If not, do you know how i can make it stain?
Mars, I haven't seen it stain with just the few drops of coloring I've added, but if you add a LOT more coloring, you might be able to get the results you're looking for!
I made my first hard candy today, but being located in the UK I cannot get corn syrup so I just used sugar and water with blue food colouring, just need to make sure the syrup reaches the right temp, it worked really well
Thanks for sharing your results, Kelly. I'm sure our other readers in the UK who have mentioned issues with getting corn syrup will be grateful for the advice.
I'm using a small jewel mold...I used a dowel(I didn't have a skewer) to drop the sugar into the mold. It worked well, but I suggest doing a really small batch. I halfed this recipe and it started to get hard to pour. Question: I let my sugar go to 276. The first couple jewels were nice and clear but as I went the turned more brown. Any suggestions?
Kayla, I like the dowel idea for dropping the sugar in the mold... thanks for that tip! As for the color changing, the sugar is going to continue to cook for a few minutes after you take it off the heat, which is why I recommend pouring it out of the hot pan and into a cooler container like a Pyrex measuring cup. This will help stop the cooking process. Hope that helps!
Your ideas have been a fantastic addition to my childrens birthday parties. For my oldest daughter I made tiaras for all the girls that came to the party, and bags of flavored gemstones for them to take home. It was wonderful, something so simple made it so beautiful.
Tiffany, that sounds like a wonderfully fancy and inexpensive favor that I'm sure the girls cherished.
Just made these today as I have a cake this weekend that will have emeralds on it. I love that I had all supplies on hand and this really was so simple! Following your directions exactly they turned out perfectly! Thanks for sharing
Oh I love you! I love all your ideas, I love your candies and your tips! I tried many recipes and failed every single time (all people out ther said to stop cooking at 300 :-/) But tonight I tried to stop at 275 and... I got a batch of wonderfully glass-looking candies (rose flavoured) THANKS THANKS THANKS!!
A big hug from Italy
Anna
Chica, I have not tried this recipe yet, but I will soon. Several of your bloggers say they are from the U.K and can't find light corn syrup, there are many offers on ebay for Karo light corn syrup, also there is also The American Food Store in London which sells the same product. Have you heard of this brand in the states, and do you think it would be suitable?
Terr, I'm sure our UK readers will appreciate your tips. Karo is indeed the most popular brand of corn syrup in the US, and would work great in this recipe.
I was so excited to see your tutorial and I followed it to the T! However, my clear gems turned out yellow and my pink gems have an orange tint to it. I used a digital candy thermometer. Do you think a non-digital one would work better? They still taste good and should work for what I need (putting them on a cake and cupcakes) but they are more canary diamond than true diamond. :) I'm going to try isomalt next time, maybe that might work better.
Jennifer, the yellow tint comes from the sugar being cooked too long and starting to turn into caramel. It's very difficult to stop the cooking at exactly the right point -- when the sugar is cooked enough to form into hard candy, but not so cooked that it yellows. Maybe you can try a slightly lower temperature next time?
I just did this and it turned out amazing! I don't use corn products, so I subbed the corn syrup for Lyle's Golden Syrup. That might help the UK readers. I've also had good luck replacing half of the golden syrup with honey. It lends a more caramel taste to the finished candy, but it was still fantastic!
Allison, thanks for the tip! I imagine the caramel taste was a nice touch. Did it leave the candies a little yellower, too?
It did. They came out a nice stained glass yellow. I didn't add any food coloring to mine, so I'm not sure how that would be affected.
Allison, that's good to know. I think color would work fine as long as you use colors that yellow won't mess with, like yellow (of course!), orange, or green.
I have yet to make these. I commented previously. Just wanted to stop by and let you know that we can get corn syrup here in the UK. If anyone asks, just direct them to Waitrose (they'll have heard of it). It's expensive at £3.99 a bottle but worth it if we don't want yellow or golden coloured jewels as we'd get with the golden syrup made ones.
I made marshmallows with golden syrup and it stayed golden in liquid form until the whipping process so I'm 99% sure that these hard candies would be golden with golden syrup.
Hopefully that will help some UK folks.
To make perfect little circle, could you use a muffin tin and just pour enough to cover the bottom?
Michaela, that sounds like a great mold idea, but I'm not sure if the candy would release or not. It may depend on what your tin is made of. If you try it out, please let us know how it goes!
WOW! These turned out great! I used a mini muffin tin as a base and I made them huge hard candies! They are super easy and when I brought them to show off everyone was like "Oh my gosh! I bet those are amazing! I wish I were you!" Thanks so much!
First of all thank you for this instruction. I just tried this and it worked wonderfully for a fondant shoe I'm working on. I also poured them into chocolate molds and it didn't melt them at all.
Questions: How do you wash you pot and cup etc
Chantal, the best way to get the sugar out of the pot and cup is to just fill them with water and let them soak until the sugar dissolves.
first off, GREAT instructions. I found your website and the searched around for other tips and tricks but kept coming back to yours. however, my jewels did not turn out. I had molds very similar to yours. the only difference I had in the recipe was I cut it in half because i only had 3 molds and i knew a full batch would be way too much. I also added the flavor.
Everything went smoothly from mixing to the temp. of 275 and such. I switched the hot sugar mixture over to the pyrex and then began to pour (or attempt to) it was a thick liquid at first but after pouring one "diamond" and going onto the next the sugar soon began to harden. I decided to start pouring in another mold that was bigger and not so tedious...however by the time i was trying to pour the 4th diamond the mixture was stuck to the sides of my pyrex and the mixture coming out was a thick almost taffy consistence. i had a blob that would fall into the mold attached with a thick string leading to the pyrex. there was no pouring at this rate. I bent a spoon trying to get it out and nothing. it was warm so i just took a spoon and swirled it all over the aluminum so i didn't waste the product. I know time is a key factor but in less than 5 min the liquid had turned to solid. I just cant figure it out.I knew this would be a pain in the butt but it seemed something just wasn't right. i was hoping to make these for a party in a week but at this rate, i dont see it happening.
Jodi, in my experience, the syrup starts to thicken after 5 or 6 minutes and then really firms up after about 8 minutes. You need to move fast, and be ready to pour into the molds as soon as you have the sugar in the Pyrex. Have everything ready and go as quickly (but safely!) as you can. It's possible that you doing a half batch made it worse, because there wasn't as much syrup in the Pyrex and maybe that caused it to cool faster. I know you can't use a whole batch at once, but it might be worth trying to see if you get better results. I hope that helps!
i may give it another try but I hate to waste more money. If it hardens that fast how is it possible to even pour? After all I poured it into the pyrex and started pouring but after 2 jewels the mixture was already hardening in the pyrex and making "frozen waterfalls" trailing from the pyrex into the molds there not pouring at all. 2 jewels pourd then the mixture was like taffy. the portion may be the factor as we both agreed but if i was given even 2 more minutes i cant forsee myself getting even one sheet of molds filled before it became no longer pouring concistency. ugh.
Jodi, you should definitely have time to pour more than two before it hardens -- I've been able to fill two trays before noticing much thickening. I'm not sure what the problem could be or how else to help. Hard to know without being there.
ok, I will give it anothe try and see what happens. I know the batch was going down hill when I added the oil based flavoring because it started to thicken when I did that and then well...you know the rest. ill let you know.
Thank you so much for posting this recipe! I'm currently enrolled in Culinary school and I have to build a giant gingerbread structure for a baking class. I tried the recipe in the official book and the instructions were not very clear so it did not work. These were perfect and worked like a charm. I was so happy when my windows were hard and not soggy. Again, thank you =).
So glad we could help, Austin. We'd love to see a photo of your finished house if you want to share one with us!
Chica, we were wondering if we could get the jewels to stick on a fondant base with just a water/sugar mixture because we are going to keep most of the jewels clear for a diamond effect. We will also have buttercream leftover, could we possibly use that?
So glad we found your site, our first batch of sugar turned out bad, we used water and isomalt. It said to heat to 320 and then cool for 2 minutes, well we did that and it turned to rock LOL. So we kept trying to play with the sugar to see if we could get it to work with varying cooling times but it was just a mess.
We're going to try again tomorrow with your techniques and possibly a homemade sugar syrup, we shall see how it goes. THANKS!! :D
Ashley and Amanda, you could definitely use your leftover buttercream to attach the jewels. If you want them to appear as clear as possible, my recommendation would be to use an icing that's the same color as the fondant, so that it will look like the fondant is just showing through. You could try using a batch of candy syrup as "glue", but honestly that sounds like it would get quite messy :) Good luck and let us know how it goes!
Worked awesomely!!! Using organics, this would make great cough drops. Thanks so much!!!
I will be using this to make the crown and taira on my daughter's wedding cake in June. My only concern is the humidity. I will be in the middle of Louisiana. Humidity is often 90 to 100%. Any suggestions? Should I wait until the day of the wedding to add the jewels? I am sure the cake will be inside except the few minutes from the house to car, then car to reception.
Gina, the real danger with hard candies and humidity is that it will cause them to stick together. I don't think it will be an issue once they are on the cake, since they'll already be placed where you want them. However, it is an important day, so you might want to take every precaution possible ;)
i was wondering about the yield -- did you fill all three trays with this much syrup?
Ami, I filled all three trays with one batch of syrup, and had some left. It will depend on what types of molds you use, of course, but I can regularly fill 3 or 4 trays of candy from one batch. However, the syrup usually gets too hard to pour before I finish the fourth tray, so be sure to fill your favorite trays first!
I have not read every single post on this thread...but I will. Thank you SO much for your excellent instructions. QUESTION: How will these do if placed on buttercream instead of fondant? (my bride does NOT want fondant!) Will they ooze? Lose their shine? Go cloudy? Disintegrate? I really need to know...hard to believe it will really work, but I think I trust you :) Thanks....
Pat, I actually attached the gems to the cake I made using buttercream as the "glue", and they stuck fine and I didn't see any problems. If you are doing this for something as important as a wedding cake, though, I suggest you do a test run first. Frost one of your cake pans and stick some gems on it, and leave it at room temperature for a few days and see if anything goes wrong. Then you can be confident about your cake on the big day. I don't think the color would ever bleed, but if you happen to be planning dark-colored gems on white frosting, a test would be an especially good idea.
Awesome, thanks so much for such detailed directions. I'm definitely going to try these in the near future. I was looking for something different for an upcoming baby shower.
Thanks so much for sharing! I was having a really hard time trying to find green hard candy to melt down for a baby shower cake. Gonna make this and pour it onto a cookie sheet to make shards for kryptonite on a superman cake :)
Honey, honey, honey... I just had to come on and thank you from the bottom of my heart. This was my very first time trying making candy and using molds of any kind and on my first time I got it right with minimal mess. Although I did end up boiling my sugar mixture for too long I was doing clear gems so it came out this beautiful gold color that is going to fit perfectly with the color scheme of the cake that I'm putting them on. And I must mention that with all the searching I did online you are the only person that made these with actual sugar instead of isomalt. I appreciate that! And the cake you made with these is so pretty! I love it!
Angie Lu, your comments made my day! I'm thrilled to hear that you got it right the first time, and hope you continue to enjoy some of the other fun project ideas we have on the site :)
I did mine today and it doesn't become hard it's still gooey and sticky what did I do wrong I followed everything you said to do
Patricia, if your candy isn't setting up hard, it's probably not cooking to a high enough temperature. I recommend you calibrate your thermometer like I suggested above to be sure it's accurate.
Made candy ice cubes today with your recipe! Again, great success. I made a tray out of foil and poured the candy in it. Waited a while and used a pizza cutter to score it. Waited a while more and cut the cubes apart with scissors. I probably could have waited longer and broke them. But I was impatient. They turned out great. I did a slight blue tint, got a pretty light coke bottle color due to the yellowing, but on e blue background they will look great! Thanks again for sharing this with everyone! P.s. if anyone wants to try this, make sure and grease the foil, pizza cutter and scissors with Pam. Makes the job much easier.
Tried 1/2 the recipe and it's def. all about the temperature. I followed your excellent instructions and calibrated my thermometer first . I only had golden syrup to try it on and added blue colouring. First try, I went over 300 slightly and needless to say ended up with green candy and a burnt aftertaste lol. Second attempt was better though. Got a bluish teal colour and a better taste. Now I' m going to wait for my hard candy gem molds I just ordered to come and pick up some white syrup to try it again. Super great instructions - thank you very much. :-) A much cheaper alternative to the isomalt -
P.S. I did get a bluer result from some drippings off of my spoon that was taken out of pot at a lower temperature but that piece ended up going dull instead of staying shiny. I was using my turkey deep fryer thermometer but just ordered a proper candy thermometer and hoping for even better results next time. Thanks again.
Thanks for your comments, Stacey. As you saw, a few degrees can make a huge difference!
I made green jewels last night for a cake for the queen of the Irish Channel St. Patrick's Day Parade. The jewels came out perfect & look real!!! Thank you so much for sharing your recipe. It's perfect!
Thank you for posting this tutorial, it is very helpful!! I did 1/2 the recipe to test it out and it worked great. I cooked the sugar slightly over 300* since i read pots about others not cooking it enough. I used a little too much candy color so the gems were dark so I couldn't tell if it yellowed. My cake was covered in homemade buttercream and I attached the gems the night before. However when I woke up the next morning he gems we're extremely sticky, and they started to slide off!! Help, what happened?!?
Caren, hard candy is very sensitive to humidity. If you leave them out any length of time -- especially in a humid environment -- they will absorb water from the air and become sticky. A very wet buttercream will have a similar effect and the candy will absorb the liquid. sounds like that's what happened to yours. Unfortunately, there's not much you can do to prevent it except to wait and add the gems at the last minute if possible.
Thanks for your response Chica! My buttercream was wet when i placed on the jewels. I live in Long Beach, Ca about 11 miles from the coast, so that most likely affected the jewels as well. Since I live so close to the coast, could I make the jewels the night before and them not be sticky he next day? If so, how would I store them to prevent stickiness? Thanks!
Caren, if you keep the jewels in an air-tight bag or container, it will keep them from becoming sticky.
Thank you so much for all of the tips. I've tried the isomalt sticks and it was disastrous but now I'm ready to give it another go. I'm still wondering if anyone has tried luster dust on these? I'm concerned that the oil residue on the candy will make a mess of the dust? I need to make about 300 ruby red gems for a July wedding and they need to sparkle! :)
We are making a pirate cake for my daughter's pirate princess party. It was going to cost a fortune to buy the edible jewels so I decided to take it on. Your directions were perfect. Thanks for posting them! :)
I'm making a special cake with clear candy decorations for my sister and I have never been able to make candy right I always seemed to burn it. Thank you so much for that tip about calibrating the thermometer turns out water boils at 204 here, I just did a test run and I have a sheet of beautifully clear candy!
Thank you so much for putting your recipe online. It was so easy to follow. I am making a very non-traditional wedding cake mirrored to the bride's dress.... It should be amazing with the candied jewels.
I made some ruby red candy gems for a friends wedding cupcakes. I used the gel color ( red-red) that I use for frosting. I added the color to the bottom of the measuring cup and poured the hot sugar over it...stirred a bit and voila! The color was perfect! I bought some edible dust to dust them and keep them from being sticky. There are different types of " glitter" ...some are not edible, some are non- toxic and some are food grade. Usually the food grade glitters and dusts have a heat shrink seal AND a seal under the lid. They are also about twice as expensive as the non food grade. I pay $7 for a 1/2 oz jar. Thank you for posting this recipe! I tried the isomalt and that was nothing but a hot mess!
Michelle, thanks for the compliments and for the useful feedback and tips!
I'm making candy plates and I don't want to use powdered sugar to keep it from sticking. Checked everywhere on the web to find a edible sealer or something to preserve the plates till Christmas. What would you recommend I use as a sealant or a preservative?
Cindy, the biggest enemy to hard candy is moisture, which will make it sticky. The best thing to do is keep it in an air-tight container when not in use, to protect if from the humidity in the air. This was not intended to be a long-term decoration, so if you want to keep it out on display all the time, it's going to be tough. You might be able to coat it with a light layer of oil and keep the moisture at bay, but I'm not sure how well it would work.
I have made hard candy for years but never in a mold and want to try it this year. About how many molds will this recipe fill? I don't want to be under prepared.
Gina, the molds vary so much in how big the candies are that it's hard to say. For example, the mold I have that makes round candies doesn't take much sugar to fill, but the one that makes the rectangular emeralds holds quite a bit more. If I had to pick a number, I'd say you'll need anywhere from 3 to 5 molds, but that's just a guess. Hope that helps!
I am having trouble finding a place online that sells hard candy molds of all shapes. Any suggestions? Also, will colored flavor adjust the color of the product (I've never done this) and if so where is a good place to buy clear flavoring? Thank you
Brenna, you can find lots of hard candy molds and candy flavoring oils on Amazon. Yes, colored flavoring will affect the color of your candy. My niece and I made grape candy once and the oil was already purple and we didn't need to add any coloring to it at all. I'm not sure if you can find any flavor in clear oil or not, but LorAnn is a brand that we have used a lot and like quite well.
I was just on google looking where I could find jewel candies for the center of some Bow cookies I will be making to match a baby shower invitation ... but now, I am going to make them myself !! (thanks to you, ha ha) ... I will attempt this in a couple of weeks and let you know how it works out. Thank you for posting this, I am super excited to try this !!
Thank you so much for the tips! I found this on Pinterest and tried it tonight. My 4 year old has requested jewels on her 5th bday cake. I'm a DIY type so I had to give it a go. They turned out perfect. She has now requested a bunch more flavors. Good thing I have until May to practice some more. Any idea how long they will keep in an air tight container?
Jess, since the candies are basically just sugar and water, my thought is that they'll last for months in an airtight container.
Thank you for the detailed instructions and tips with pictures. It was super helpful. Although I didn't follow all of the instructions on my test batch a week ago (I was trying to make "ice" for a Frozen theamed cake and I just wanted to see how it went). The candy worked, but came out teal. Today I followed ALL of the instructions/tips: Checked my thermometer in boiling water before the using it in the candy (it was off), took it off the heat just a little shy of the temp, and poured into a pyrex measuring cup. The color came out a nice bright "icy" blue and will be perfect for the cake :) Thanks again!
Lisa, a faulty thermometer will get you every time! So glad you stuck with it and got the results you wanted. Thanks for sharing!
Love your article...the best I've read by far!! About how many pieces did you end up with, with this particular recipe? I'm trying make sure I have enough for a project I'm working on. Thank you in advance!
Mae, so glad you like our tutorial. The number of pieces will depend on the size of the individual molds you use. I filled about two and a half molds with the ones I used. Check out the pictures of the pieces dumped onto the foil at the end, because that shows a full batch of candies.
Hi! Thank you so much for this tutorial I couldn't have done this without your tips, the candy gems came out perfect!
Thanks so much for this detailed post ! I experimented the other day making blue sugar glass for a 'Frozen' birthday party. My sugar turned green. I'm going to watch my temperature much more carefully when I try it again today.
Have you tried drying it in sheets and trying to cut out shapes after it's cooled?
Deanna, the candy dries so hard that it will be pretty much impossible to cut into shapes after it's cooled. However, I did make large sheets of candy and break it into long shards to decorate a Frozen-themed birthday cake recently. Check out my Frozen candy cake topper post for details.
Thanks for the tips! I made some batches last Christmas, but the candy was a bit soft, so calibrating the thermometer was a tip that I needed! Another thing I did was added powdered Citric Acid to the powdered sugar coating, then you get sour candies!
I just made this for the first time and it was a success!! Beautiful clear blue icicles for my frozen cake. I added the colouring as soon as I took it off the heat and dumped into a different bowl, quickly mixing it was really bubbly but as soon as I poured it out it was crystal clear. Thanks for all of your tips!!
I make about 40-50 pounds of hard candy every year for Christmas gifts! I don't use food coloring and I make my own molds! To make the molds I put 2 pounds of powdered sugar in a large aluminum disposable pan and spread it out evenly. Then I use The bottom of a measuring spoon and press wells in the sugar making little dips or holes. In each pan I get about 45 wells to fill. I prepare 2 pans for one batch.
Tiffany, that's a great idea for making your own molds. Thanks for sharing!
I am wondering if you can help me please? We have made this twice now. The first time it was way too hot and went brown and burnt. The second time the temp is better but the candy is cloudy, not clear. Do you know what causes this? We have replaced the corn syrup with sugar and water. Thanks :)
Amy, please try calibrating your thermometer (see the how-to in the tutorial) to make sure you are cooking to the correct temperature. Also, the corn syrup is critical to this recipe -- do not replace it with sugar and water. Hope that helps!
Thanks Chica, we did calibrate the thermometer but don't have corn syrup available and google said I could swap it for sugar and water. Anyhoo, the kids loved the clouded "frozen" ice so phew!
Hi Chica :) loved the tutorial and tried making this tonight. I need to make blue, but it turned amber. My thermometer is off, I thought by 10 degrees and I took it off the heat at 290 and poured into pyrex. I noticed it had brown liquid floating at the top way before I took it off the heat which I skimmed off. Could it have been the Karo syrup? And, my Karo syrup is a little cloudy and light yellow. Is that normal? Never made candy before. Should I put the blue coloring in after it reaches 290? Thanks
Hi Bonnie! My experience shows that if it turns yellow, it's because it got too hot. Maybe try turning the heat setting on the burner down and cooking it more slowly at a lower temperature. As for the Karo, it should be almost clear -- not quite as clear as water, but certainly not yellow. Next time you're at the store, look at a fresh bottle and see if it compares to what you have at home. That could be what's causing your problem.
Im thinking about using this and pouring into ice cube molds for a beer bucket cake i am making this week. Do you think the molds will stand up to the heat or would it be better to pour the mixture onto a flat sheet then just break up with a hammer for a "crushed" ice look?
Mandy, that's a pretty clever idea for the cake! Unfortunately I have no idea what your molds can hold up to. If they are plastic, then no way. If they are silicone, there's a chance. If you still have the packaging, you could try looking it up to see the temperature range is. If all else fails, I do like the crushed ice idea, too!
I am making them now so i will let you know how it comes out!! Fingers crossed!! Thanks for this awesome tutorial!!
Hi, Chica. Have just read your super tutorial, thanks for sharing you knowledge :) I have one question: how do these candy gems behave when they contact fondant? Is it safe to put them together for a long time or is may it lead the fondant to flow or something like that? Thanks in advance for your answer. Regards from Spain :)
Nagera, I'm afraid I have no idea how the candy will react with fondant. Any results you can share with your fellow readers will be most appreciated.
Dear Chica, thank you for such a great candy tutorial! I will make a birthday cake soon (the theme is frozen) and I will use hard candy to decorate the cake. My cake will be covered with whipped cream. Therefore it definitely needs to be put in the refrigerator a few hours before the party. Would that destroy my hard candy decorations??? Is there any way to prevent this fail? Also, I want to make the hard candy a few days earlier. Is that a problem? What's the best way to store my hard candy before using it? Thank you in advance for your quick reply!!!
Anastasia, I'm not sure exactly what would work best for you, but my gut response would recommend that you keep the hard candy in an airtight, sealed container until the day of the party, then add it to the cake at the last minute, when you're ready to serve.
What are your thoughts on using silicone molds for this recipe?
Alexandra, I have not tried this with silicone molds, but I wouldn't recommend it. I worry about them holding up to the heat and about them being smooth enough for the candy to pop out perfectly. The tempered hard plastic molds work much better.
Hi there! Great tutorial! I'm making a frozen cake for my daughters birthday next week and I'm planning on making candy to put on the cake as shards of glass. I have a question. What flavouring did you use for the candy jewels and for the candy you put on the Frozen cake? Thanks again!
Andrea, you can use any flavoring you like, as long as it's clear (so it won't affect the color of the finished candy). For the Frozen cake topper, I didn't use any flavoring at all.
Hi, Every time i`ve tryed to make those amazing gem they becomes dark and ugly affter a short time . help please.
Tiana, if the candy is coming out dark, it's because the sugar is being heat up too fast or to too high a temperature. Make sure you calibrate your thermometer as described above, and turn down your burner.
Hello ladies, thank you very much for all your advice and hints. Prior to coming across your website I tried making these candy gems and couldn't work out how to pour accurately into the moulds. I ended up with the syrup hardening before I even spooned enough into the moulds. I am now looking forward to having another go, with more success this time round. Thanks again from down under.
Chica and Jo, Here's a great tip: If you have candy over the edges of your moulds, spray a dough scraper (metal) with non-stick cooking spray and drag over the top of each mould. (It works amazingly). Also, if you want your hard candy not break down from humidity, place a 1 ounce silica gel packet in your ziplock bag or plastic container. This also works wonders and you don't need powdered sugar to keep it from sticking. And lastly, if you cook the liquid 290- 295 degrees F to prevent the sugar from hardening, place the tray or moulds in the fridge for 30 mins. or until completely hardened.
Bridget, thanks so much for all the tips. I especially love the silica gel idea. I save those packets all the time.
This cake looks lovely! One question...I don't have a candy thermometer, do I need one or can I do it without? Thanks for your help :)
Freya, this recipe requires such exact temperatures that we really recommend you use a calibrated candy thermometer for best results. Perhaps a friend has one you can borrow?
Hiya again! I've just made it! It looks good, but the pan doesn't ;) Do I pour boiling water in and let it sit or cold?
Freya, boiling water might speed things up a little, but the best thing to do is just fill the pan with room temperature water and let it sit overnight. The sugar will all dissolve by morning.
Hi! Can you use the silicone molds or plastic molds made for jello.
Georgia Lynn, do not use plastic Jell-O molds, as they would surely melt. I have not tried silicone molds, but if the ones you have say how hot they can get, and it's within range of the candy, it might work. Hard candy molds really are the best though!
Thank you so much for sharing this...and the instructions were bang on! I made this for the ice castle as well....turned out PERFECT!!!
I'm going to try to make stained glass window cookies. The recipe calls for clear candies and I didn't really want the cookies to taste like jolly ranchers or life savers, so I thought about making my own candy, but I want multiple colors. Is it possible to add the color after you cook it or do you need to divide the recipe and make each color separately?
Bethany, you can definitely add the coloring at the end, but the trick will timing. The candy sets up fast, so if you want to separate it into multiple bowls and mixing several colors, you'll have to move really quickly! If you don't like the taste of Jolly Ranchers, you could always use lollipops or other hard candy that you do like.
After three tries (and a new candy thermometer), I finally have the beautiful gem candies like these. Note: coloring red -- have to adjust for the yellow/cook factor so they don't have too orange/coral a hue. Similar to the green/blue issue you described here. Thank you!!!
Megan, congrats for sticking with it long enough to get it right!
Trying this candy thing for the first time, since they are horribly expensive to buy and I need a bunch:)
Question, I have one mold and I know for certain, I'm going to need it several times, I know I am going to definitely run the risk of my liquid solidifying -any suggestions other than buying more of the $9.99 molds
Phelida, you definitely won't be able to re-use a single mold more than once for one batch of candy. If you don't want to buy additional molds, you could try cutting the recipe in half and make a smaller amount.
Hey, I live in the UK and its a little difficult to obtain moulds here but I have managed to locate a couple. I really want to make these for my daughters wedding as we offer a sweet when guests arrive. So I will try and make some but if I am successful, how long do they keep and how should I store them? I'll need 100's!
Kauser, the candies won't spoil for ages, perhaps indefinitely, because they are basically just sugar. The trick to long-term storage is keeping them dry. Store them at room temperature in an air-tight container and keep them out of humidity or harsh temperatures.
I know this is a pretty old post but I want to thank you so much for sharing. Do you remember how much candy this recipe made? Was it just enough for all three molds?
Patrice, judging by the measuring cup in the picture, it made about 2 cups of candy. I know it was enough to fill all three molds, but I don't remember if there was any left. If so, not much, or else I would have had to come up with something to do with it!
Hi! I love this recipe :-) I made this for the Ice castle on my daughters' Frozen themed birthday cake. This year is Cinderella! I finally go my hands on a 3d shoe mold. Except it's plastic :-( I'm not sure if this will melt or break the plastic? I was going to try to line both sides of the mold with aluminum foil - to hopefully ensure the candy comes out easily. and then try again without the aluminum foil. Can we generally use plastic chocolate molds for candy? thanks!
Jennifer, I would not put hot melted candy into any plastic mold that doesn't specifically say it's for hard candy. Typical plastic molds will melt from the high temperature.
Hi, I'm making a 40th anniversary (ruby) cake any suggestions on which red food coloring is the best?
Beverly, we've had great success with LorAnn Oils brand liquid food coloring. It's what we used on our hard candy hearts. Whichever coloring you decide to use, make sure the label specifically says it's okay to use with hard candy.
Greaat instruction! Side note though, rather than putting your hot candy thermometer on foil ut should be stored standing up. Many candy thermometers are ruined over time by laying them flat. Instead, keep a pitcher of water ready to stick your hot thermometer in! Makes clean up easier too!
Best tutorial I've ever read. So understandable. So easy to follow. My daughter is a baking and pastry chef and I can't wait to try this with her!! Thanks!!
I can't get my candy to turn blue. I put in blue food coloring and it turns green. Any ideas what I am doing wrong?
Anita, if the candy is turning green, it's because the syrup is getting too yellow during the cooking process. Check out my tips about calibrating your thermometer, not cooking too long, and dumping out of the pan ASAP. These will all help keep the sugar from caramelizing.
I've calibrated my thermometer and it's only a a few degrees under what it reads. I've also been cooking my sugar syrup on low to medium low, but still it turns yellow before it reaches 300 degrees. How long should cooking the syrup take? Is there a specific pot that is best used for candy making? What could I be doing wrong? Thanks.
Nic, it sounds like you're doing all the right things. Are you making sure to dump the sugar out of the pan as soon as it reaches temperature? Staying in that pan even 30 seconds longer will make it yellow.
My son has requested at drum set made out of cakes for his graduation/going away to boot camp party. How could I tell him no. I am struggling with how to do the cymbals. I am not a big fan of large fondant disks for cymbals. So I though I would try making them out of candy. Thank you so much for the aluminum foil mold idea. That just might work. Do you have any suggestions for making a 10" round disk of candy? Thanks!!
Jen, that's such an interesting idea! Perhaps you can find a round platter or plate with a gentle curvature and line it with foil, then use that as your mold to get a cymbal shape?
Hi! These looks very nice! I need a clear blue for Elsa's castle but the only things I get are yellow. :(
I tried to make it cook slower (low-medium) and the sugar burned before it get to 300 degrees. I'm sure I didn't over cooked it cause the sirup doesn't came hard when cooling (and I calibrated my thermometer as you said) .
How fast shall it cook? It took me one hour before it get to 250 degrees. Too slow maybe?
Julie, I'm sorry to see you're having such trouble. I've done a bit more research online and learned two things that may help. First, the yellow definitely comes from heating to too high of a temperature. Calibrating your thermometer is a great start, but make sure you don't get over 300 degrees. Carry-over heat can be brutal -- are you dumping the sugar out into another (heat-proof) container immediately? You can also try dipping the bottom of the hot pan into some cold water to cool it quickly. Perhaps try stopping at 295 degrees and see if you get better results. The second thing is that, contrary to what I said previously, it looks like you want to heat the sugar quickly, not slowly. Something about sucrose breaking down if heated too long. Try cooking on high and see if you get better results. If not, you may want to try working with Isomalt instead of sugar. Let me know how it goes!
Hi there! This is a great step by step tutorial!!! I was wondering if you have ever tried to pour into cookie molds? I have some really pretty snowflake molds that are metal.
Gloria, we haven't tried metal cookie molds. The metal should hold up okay with the high temperature, but I have no idea if the candy would come out easily or not. If you try it out, please let us know how it goes!
I am having a sleepover with my niece and we are making this recipe for the first time. I have 4 gem molds. Will that be enough? I also ordered a bunch of Luann oil flavors and colors! We are excited.
Buffalo Gal, four molds is probably plenty, although it will depend on how big the molds are and how deep the gem cavities are. Have fun and good luck!
Hello..I have a question..should I use silica packets when storing the candy gems? Mine become sticky in an air tight container... Your suggestions please.
Mary Lynn, silica gel packets are a great idea for helping to keep the candy dry in a sealed container.
Trying to make a special birthday cake for my granddaughter. Dates keep changing! Making candy gems, for the first time, Thank you for all the great INFO! My question is about storing the gyms until I'm actually ready to use them. I always find silicone packets in everything to keep them dry .Would it be possible to use the silicone packets in a container to keep the gems dry until ready to use?
Grammy, we haven't personally tried using silica gel packets to keep the candies dry, but it certainly sounds like a great solution!
I make Candy Shot Glasses from scratch and I use LorAnn Oils. I love several of your tips. I have had a problem with them having too many bubbles in them. I think putting them into another container as you said will stop that cooking process and help them to not continue to cook or stay too hot. I have wanting to make clear shot glasses and I haven't achieved that yet. Although I have not calibrated my thermometer. I'm going to try that too. I'm glad I found your tutorial because it is hard to find people who work with hard candy. I also love the aluminum foil idea. I have some silicone stemless wine glass shapes and I want to fold the candy onto them to shape them like the wine glasses, I think using the foil to spread the candy out and then shape it while it's still pliable will help. Thank you for all the suggestions and for the many readers who responded so I could learn even more. Angela
P.S. I use Silica packets in all my bags of Candy Shot Glasses when I wrap them up for decoration in a bag. I also use them while storing the candy in containers. They are awesome for use in storage of candy! Candy’s enemy is humidity and air.
I have made this candy for years, starting with my Mother, it became a family tradition. Mom has left this world ,but I still make it every year and send to my kids at Christmas. I don't use molds, but pour the candy into a marble slab. After cutting, breaking and cracking the candy i toss it in a small amount of powdered sugar and voila! We have what we call hard tack candy. This year I have made nearly 30 pounds of candy! My friend has helped for the 3rd year now, so we make for !her family and mine! We had 10 different flavors this year. My receipt says to add the color at 260*. Don't stir, the bubbling will distribute it well. Remove from heat at 300. When the bubbling stops, add the flavor, I use two 2-dram bottles for a single batch (your recipe) and 3-4 bottles for a double batch, depending on how strong I want it. My family looks forward to this every Christmas, and I love doing it for them!
Judy, thanks for sharing your story! Breaking it into pieces instead of using molds would certainly save a lot of time. :)
I've got an issue with candies I've been making, they have been going from amazinling clear and crystal like to cloudy and soft. Why is this? What am I doing wrong.
Oh easiest clean up for anything the sugar has touched is plenty of hot water, we keep a pot with boiling water at all times to dunk the items in and the cooked sugar just rolls off.
Also keep a bowl of cold water next to you, I keep my whisk and wooden spoon in it, the water causes the candy again to roll off :)
Chelle, I've never seen hard candy turn from clear to cloudy. I've searched the internet for advice or reasons, and can't seem to find any. So sorry I can't help troubleshoot it with you. But thanks for sharing your tips about cleanup!
You have some great tips. I once made 350 + red, cherry flavored hard candy lollipops in the shapes of firetrucks and fire hydrants for my firefighter son's graduation party. The only thing I would add is if you need to make multiple batches (and I certainly did) make sure you allow plenty of time. Each batch takes time plus time for the equipment to cool and then soak the sugar residue off.
What size pan did you use for this recipe? I'm worried about the candy boiling over but on the other hand using too large a pan makes it very difficult to get the thermometer in for a good reading...
Sara, I used a 3-quart pan for this.
I make hard candy every year at Christmas. Orange Hard Candy is my son's favorite...so I used your recipe today, it's a smaller batch than what I've made in the past. I'm excited because Michael's had their Christmas stuff 70% off...I was able to get 8 silicone molds for less than $15.00 today. My candy is cooling! Can't wait to try it! Thank you for the recipe. I see it was posted several years ago, but it still lives on! Merry Christmas!!
Stacy, we're so happy we could inspire you to make your classic family treat. What a great bargain you found, too!
Can the left over hardened candy be remelted and used again?
Jacqui, we have never tried to remelt the candy, but my instinct tells me that it would not work. If you try it, please let us know how it goes.
Hola ..el jarabe de maíz se puede reemplazar por glucosa? Y el termómetro puede ser de lis digitales que se usan para chocolates?
Hola Marcela. La glucosa no funcionará. Necesitas usar jarabe de maíz. Puede usar cualquier termómetro que funcione para temperaturas en el rango utilizado por la receta.
Thank you. Ive tried to buy Isomalt here in Australia and its outrageously $$$$$$$$. Even getting it from US the postage is outrageous. I haven't been able find how to make it diy anywhere then I found this page.. Now I can make EYE BALLS @@ for my cakes! THANK YOU THANK YOU THANK YOU..
Caroline, we're so glad we could help! We'd love to see your eyeball decorations.
Just a quick note to say —- BRAVA!! And — THANK YOU!!! Most awesome & helpful article ever. Gorgeous work as well!
The best part was your allowing us to witness your trip-ups and failures, so that we could learn from them as well. So often on the web, all we are allowed to see is ABSOLUTE PERFECTION. And the perfectly constructed recipe. Yours on the other hand was also beautifully perfect, but also included troubles we all very well may run into ourselves - thus saving us tons of time, aggravation, money, as well as the will to try again. You need to pat your shoulders & take a little bow! (For real, do it!! Lol ;)
Rachael, thanks so much for the kind words. We really strive to help people complete projects as best we can, so your comments mean a lot. Enjoy your candy making!
Chica I just wanted mention as a safety precaution for those concerned about pouring 300 degree liquid into a cool Pyrex 4 cup measuring cup and it exploding from the heat difference. One can put the Pyrex into the microwave for two minutes to warm it up a bit. This will ensure that the Pyrex is not too cool when molten sugar is poured into it, yet it will still be cool enough to allow the sugar syrup to cool down and not turn yellow from sitting in the pan.
Michael, thanks for the safety tip!
This worked perfectly but for some reason my flavors didn’t come out at ALL! I used the same brand and added more even the second time around. I have the super concentrate flavors and all I could taste was sugar :( Did you come across the same problem?
Lindsay, we're not sure why the flavoring wouldn't come through. I wonder if maybe that particular flavor might be weaker, or maybe the heat from the syrup dissipated it too quickly? You might try contacting the folks who made it to see if they have any advice.
Thank you so much for the recipe, pictures, and the what not to do. I made abstract bowls cake toppers and filled with meringues. My sugar melt did turn out a little yellow and will need to start testing earlier than 300 degrees to find that clear color you have achieved. I also has bubbles appear as I was pouring sugar melt, to get rid of the bubbles I took a kitchen torch to the sugar melt and the bubbles disappear. Do you think the cooking pot one uses could affect the color of the sugar melt? My pot is dark in color and what type of pot do you use, yours is lite in color.
Debbie, I'm not sure if the color of the cooking pan would make a difference or not. Perhaps your pan is allowing the sugar temperature to rise too quickly, which could be because of the material or thickness of the pan. Be sure you dump it into another container as soon as it reaches temperature so that it doesn't continue to cook in that hot pan.
Hi! I am trying to achieve the clear look for ice cubes and I have calibrated and recalibrate to no avail. My ice is still tinged yellow. I'm afraid if I pull it any sooner the sugar will not harden. Would it help to adjust temp to medium instead of med high and cook more slowly?
Cristen, I'm not sure if adjusting the cooking temp will help, but if you try it, please let us know how it goes.
I dabbled in making candy jewels a few years ago to make a stuffed chocolate dragon egg for my daughter for Easter one year. I found a chocolate shop online that sold chocolate baby dragons, and that's how it started. I decided to fill the hollow chocolate egg (I bought a mold and made the egg with melted chocolate chips if I remember correctly) with the baby dragon nestling in tiny candy jewels. I used jolly rancher candies that I ground to a powder in my coffee grinder and then put the powder in my oven-safe candy molds. It took a few trial runs to figure out how much sugar powder I need to put in my molds and how long to keep them in the oven so they wouldn't burn. The cast-offs did not go to waste. I simply reground them or ate them! Yum. Once I stuffed the chocolate egg with the dragon and his jewels I sealed it with melted chocolate and then made scales to cover it in marshmallow chocolate fondant. It turned out really well and my daughter was delighted.
I got the idea online about using powdered hard candy to make the jewels.
Thank you so much you were right on target. I finally finished the ice castle for my granddaughter frozen birthday cake. Can I refrigerate the hard candy decorated on the cake??
Antoinette, we're so glad to hear that this worked out for you. We have not tried refrigerating the candies before, so we can't comment on whether or not they'll be okay. Although my gut tells me that the moisture in the refrigerator might be bad for the candy, and could cause it to become sticky and/or bendy. If it were me, I would not refrigerate it. Maybe you can add the candy to the cake at the last minute before serving?
Will Winton Icing gel based food coloring work?
Amanda, we recommend using liquid coloring that's specifically suited for hard candy. Icing gel coloring will not dissolve properly quickly enough.
I love decorating cakes and learning new techniques. I only make cakes for my grandkids and the occasional friend's kids, so I don't have the opportunity to do a lot of cakes. I am making a Frozen cake for my granddaughter and love the look of the ice castle made with the hard candy. I was so afraid to try it but started ahead of time and figured the worse that would happen is I would end up using fondant instead.
Your instructions took most of the guesswork and fear out of trying this. I had so much fun and am pretty pleased with the results. Not perfect, but since this is for family and 4-year olds, I doubt anyone will even notice.
My biggest issue was with adding the food coloring. (I resolved other issued on my second batch) When I added the food coloring (liquid), it foamed up resulting in bubbles in the candy. The first batch I added the food coloring to the pan, which was a HUGE mistake because the candy stayed in the pan too long while I tried to mix it in, which resulted in a greener color. I could live with that but I made a second batch. I saw in someone's comment they added the food coloring to the glass container first and poured the sugar mixture on top of it. The results were definitely better, but the mixture still foamed up, creating bubbles in the candy. Way too many to fix with a toothpick. I'm thinking I used the wrong kind of food coloring. I used colors I had on hand (liquid) but the box they came in didn't specify they could be used for candy. Next time I will be sure to buy food coloring that specifically says good to use for candy.
I just have to say Big Thanks for your very detailed directions. And thank you to everyone who sends in their comments/questions and details their experiences. I'm so excited with the experience I am trying to come up with ideas to use this recipe again soon.
Debbie, thank you so much for sharing your story, and kudos for sticking with it and creating something wonderful for your grandkids! Yes, I think the type of food coloring you used was the problem. It has to be something that is meant for hard candy. The foaming was likely caused by the water in your food coloring reacting with the sugar (which had almost all the water boiled out by the time you added it). Let us know how the next batch goes!
Can I add malic acid or sour or liquid that is malic acid. Have you ever made them sour? And if so when would I add the sweet and sour liquid?
I have never tried this, so I don't have any advice to share. But if you do try it, come back and let us know how it goes!