


Make an iPad Cover

Like many of you out there, Jo and I love the portable function and all-around versatility of our iPads. Like any expensive device, though, we want to protect them with a cover. Rather than pay big bucks for one of the many available (and usually boring) iPad covers on the market, I decided to make my own custom iPad cover. The most important feature (besides looking cute, of course) is that the iPad case needs to also serve as a stand for when I want to watch videos. You might be surprised at just how easy this DIY iPad and tablet standing cover is to make.
Step 1: Determining your custom measurements
This tutorial was completed using an original series iPad (which measures approximately 9.5" long, 7.5" wide, and 0.5" thick) so the pictures show pieces that were cut to fit that model. There are many different models of iPads and other tablet devices, though, so your pieces may vary greatly in size depending on your device.
How do you know what your measurements should be? Well, lucky for you I created a handy measurement calculator that does all the math and figures out the measurements for you!
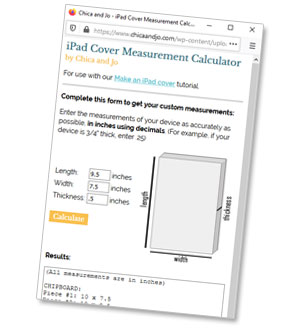
Just enter your device's measurements into this tool and hit the "Calculate" button, and it will determine for you the width and length of each piece of cardboard, fabric, and elastic needed for this project. Print the measurements out or write them down for easy reference later.
When filling out the form, be sure to puut all measurements in decimal form and be as accurate as you can. Your results will come back to you in decimal form too, but feel free to round each resulting calculation a bit to make the measurements easier to deal with (ex: 5.1 inches can be rounded to just 5), but keep in mind that too much rounding may cause your finished case to not fit the tablet.
Step 2: Gathering the supplies
To give your cover the stability it needs, you'll need some heavy chipboard for the inside of the case. Don't use regular corrugated cardboard from a shipping box, because it will crease too easily. Use something solid and sturdy. A great upcycled source for chipboard is the back of a heavy-duty notebook or the inside of a binder cover. You might also find that super thin plastic works well, if it's easy for you to cut.
You need to cut five pieces of chipboard using the measurements determined in the calculator. I will be referring to these as Piece #1 through Piece #5 later, so go ahead and mark each piece with its number so that you don't get them mixed up.

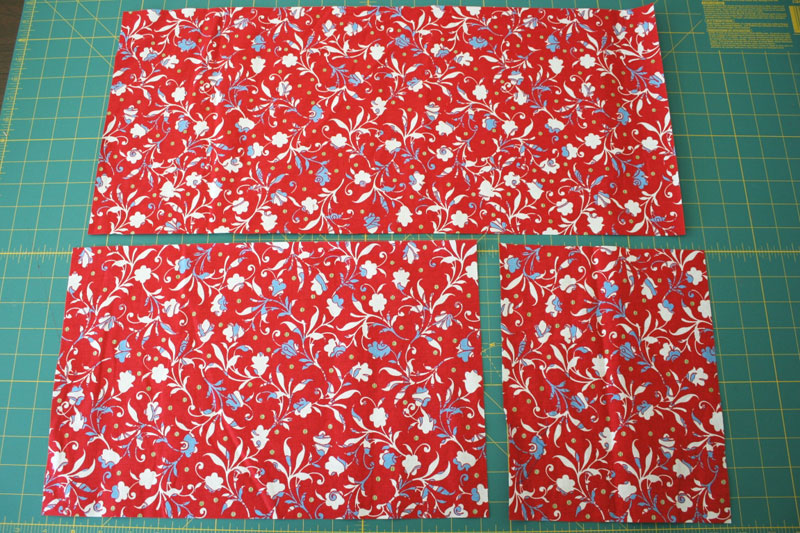
You'll also need about a half a yard of fabric, cut in three pieces using measurements from the calculator. This is where you get to have a lot of fun and choose something that really matches your personality!
Finally, you'll need some 1" wide elastic. This is the trickiest supply to find, because it's so hard to find colored elastic. If your fabric looks good with white or black, then you're in luck, because white and black elastic are readily available. I was actually very lucky (and amazed) to find a gorgeous teal elastic within a selection of new knit elastics by Dritz in our local Jo-Ann Fabric store. I don't see it for sale online yet, but keep an eye out. I've also seen quite a selection of colored fold-over elastic online and in Hobby Lobby stores, and that's a good option. Also keep in mind that you don't have to use 1" wide elastic, and can use something thinner if you find it in a color you like. I like the security of the wider elastic, though.
Cut four short pieces of elastic and one long piece, according to the measurements in the calculator.

Step 3: Sewing the cover
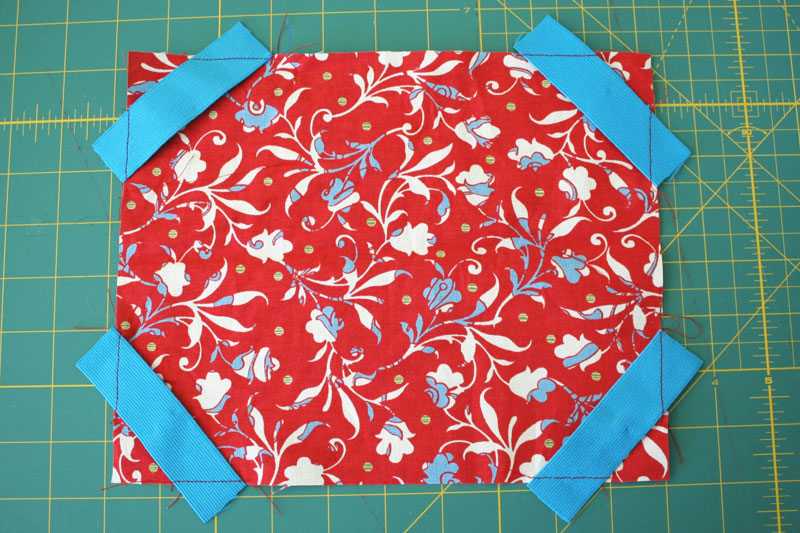
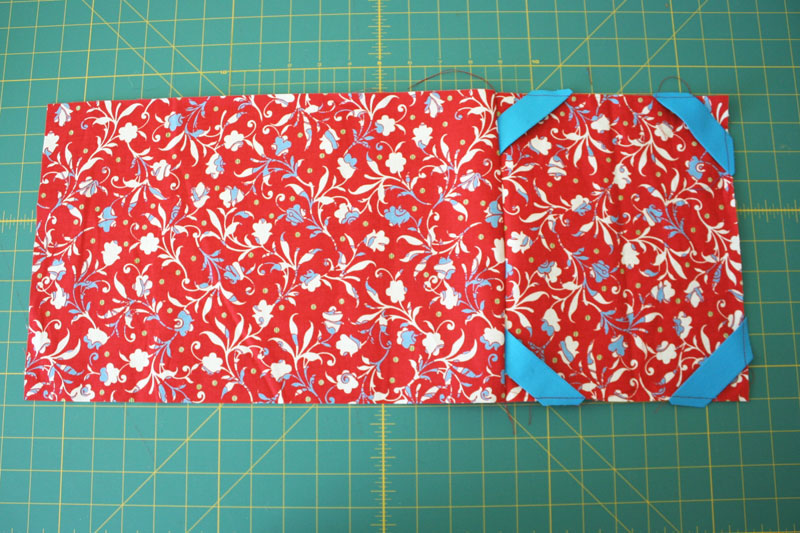
Okay, now that the supplies are straight, let's get started! Take the four shorter pieces of elastic and lay them on the corners of your smallest piece of fabric and pin them in place. Make sure that the ends of the elastic completely reach the sides of the fabric.
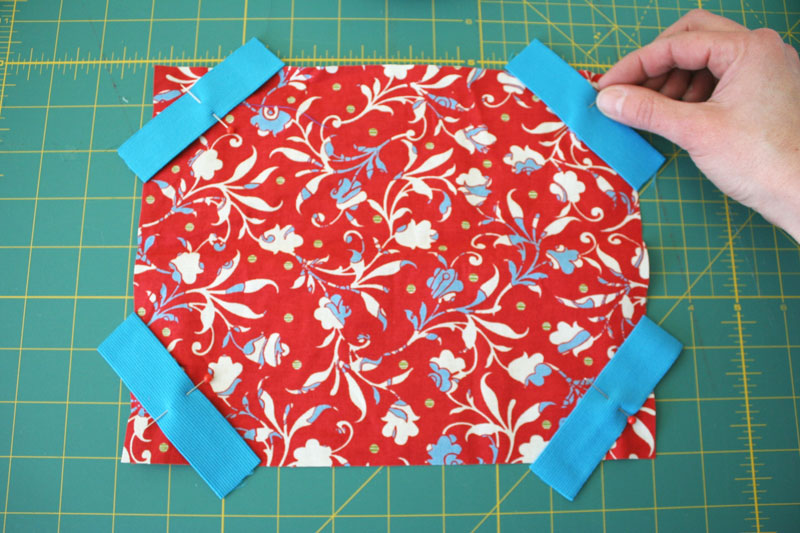
Then use your sewing machine to run a quick row of stitches on each end of the elastic, as close as possible to the edge of the fabric.
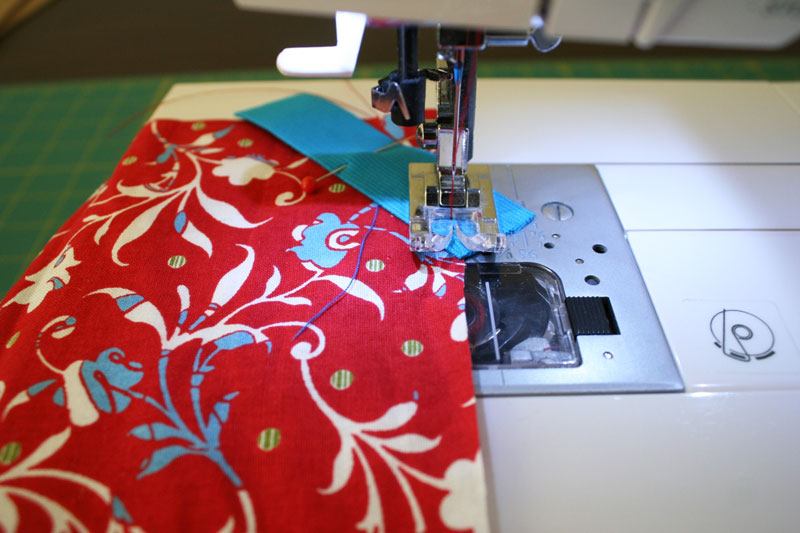
This will add extra security to the elastic straps and also keep them in place during the rest of the construction.
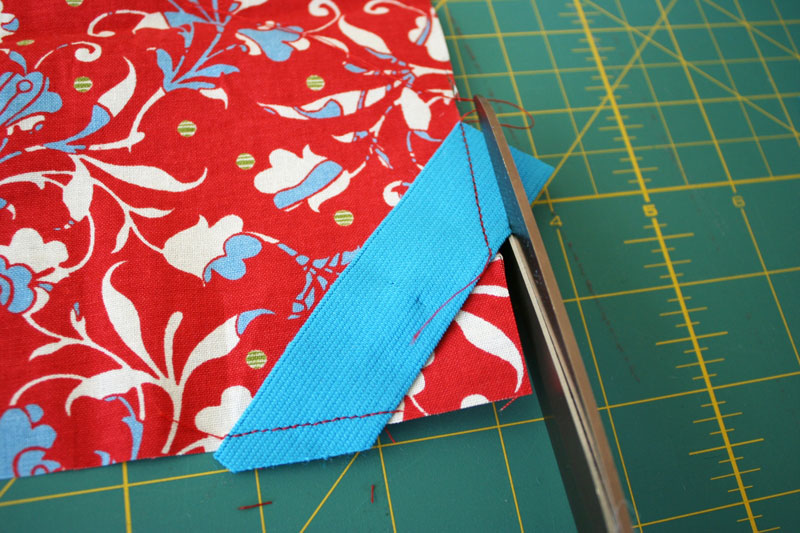
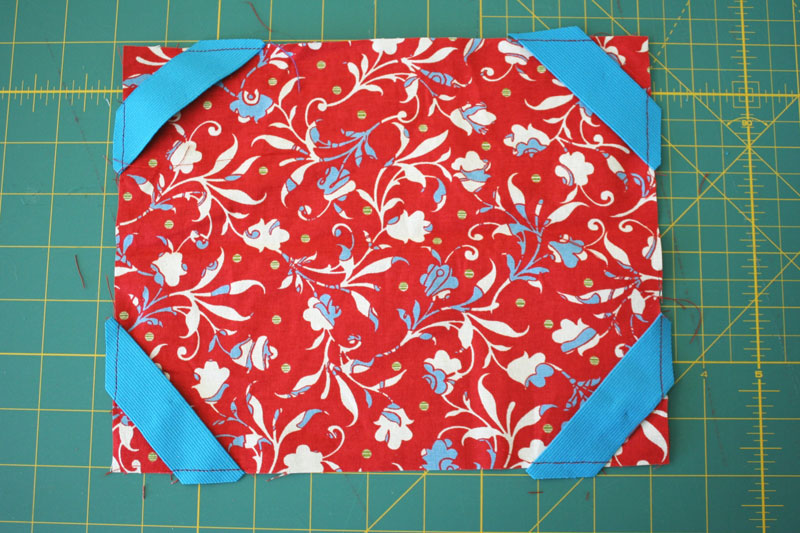
Use your scissors to trim off the excess corners of the elastic, taking care not to trim too closely.
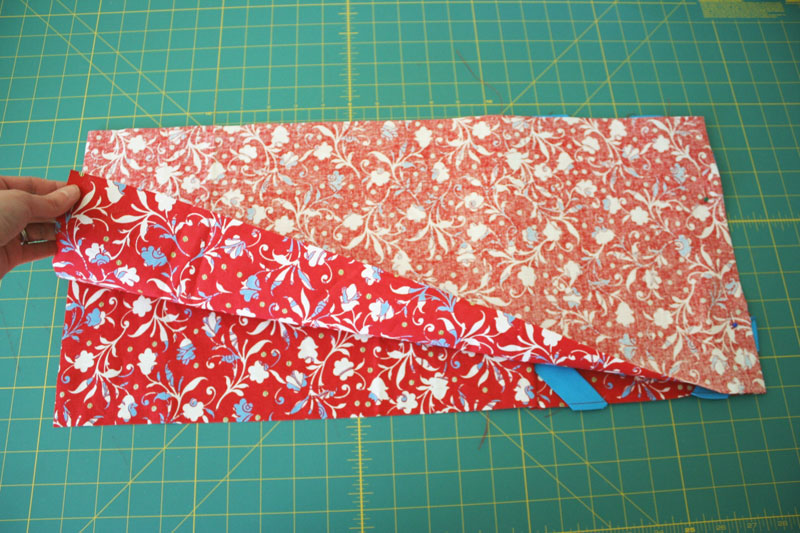
Lay the smallest piece of fabric on top of the middle piece of fabric, right sides together, and line the edges up all the way on the right side.
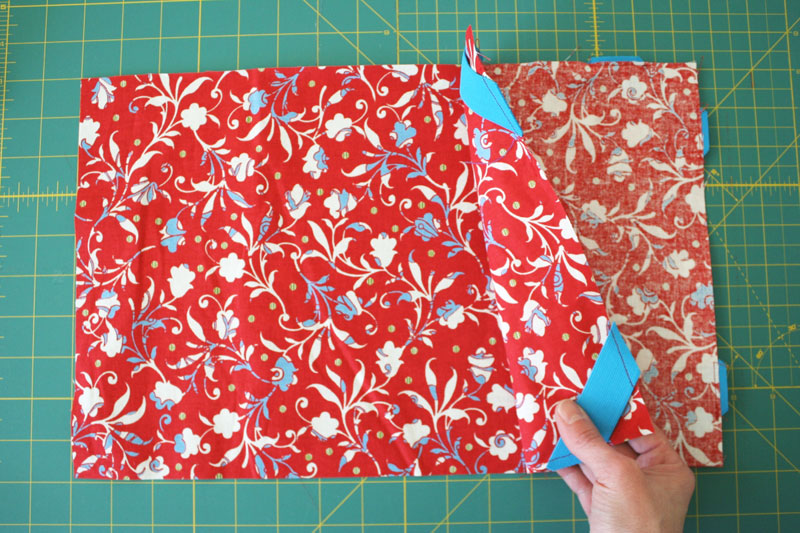
Using a 1/4" seam allowance, sew the pieces together on the right side, then open them up and lay them flat.
Place the largest piece of fabric face down on top of what you've got so far, and line it up on the right side again. Using a 1/4" seam allowance, sew the pieces together on the right side.
Use a ruler to measure 2 inches from the row of stitches and make a mark with a pen. Do this at both ends of the row of stitches.
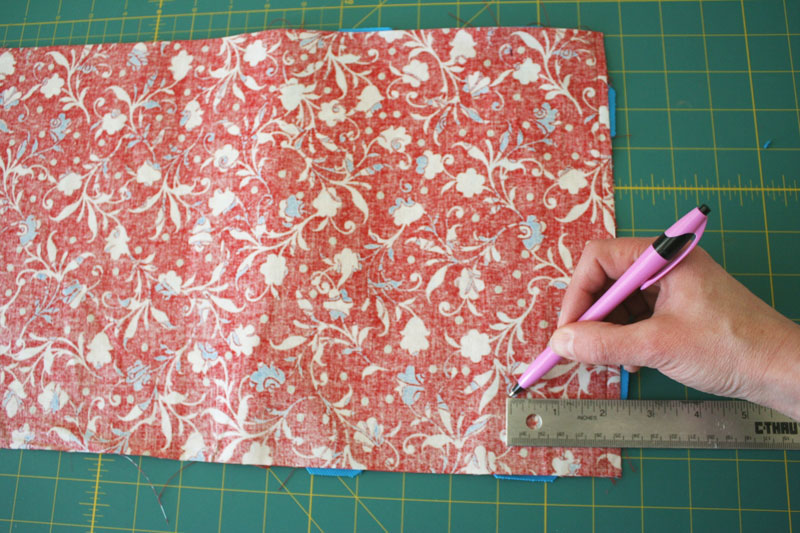
Slip the long piece of elastic in between the pieces of fabric, so that it sticks out the top and bottom. Line it up so that the elastic is centered on the marks you made, and pin in place.
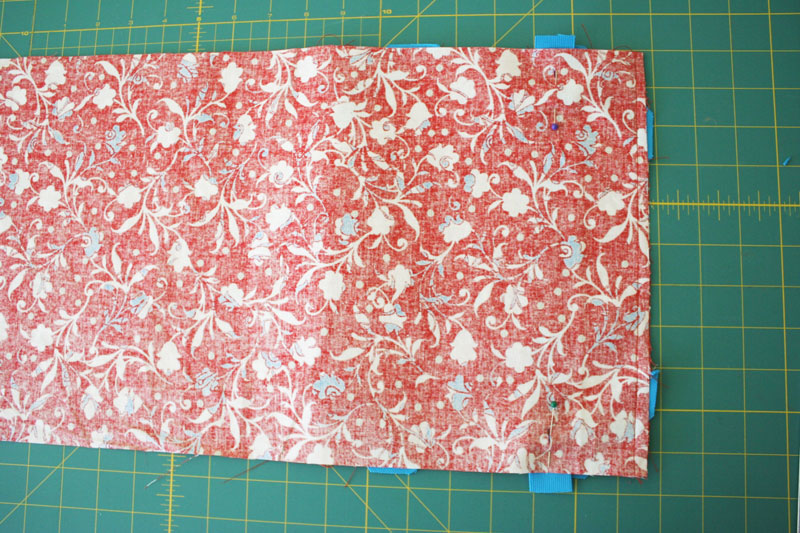
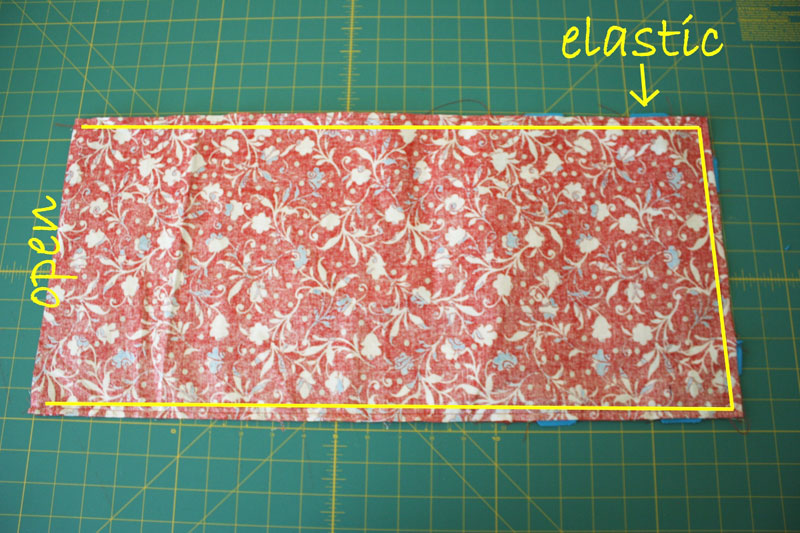
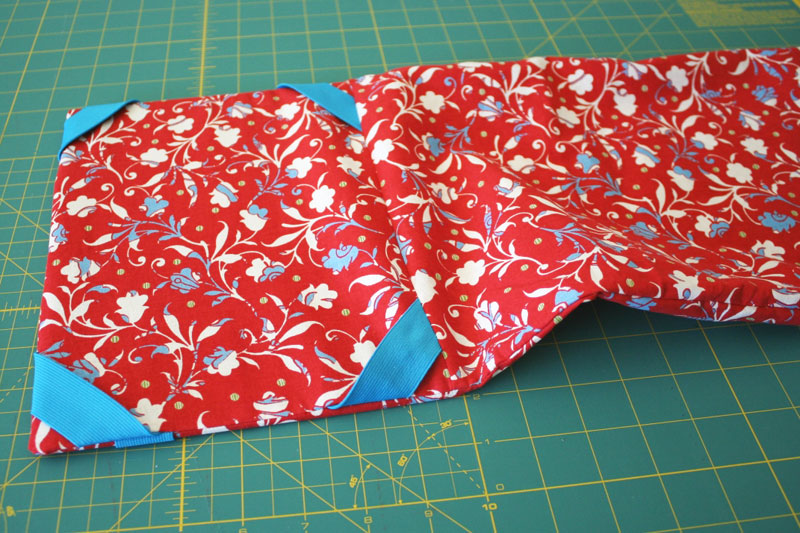
Now use your sewing machine to sew along the two long sides of the fabric. You should now have a rectangular "bag" that's only open on the left, and sewn on the other three sides. The diagram below shows in yellow where the sewing should be, and also where the elastic should be.
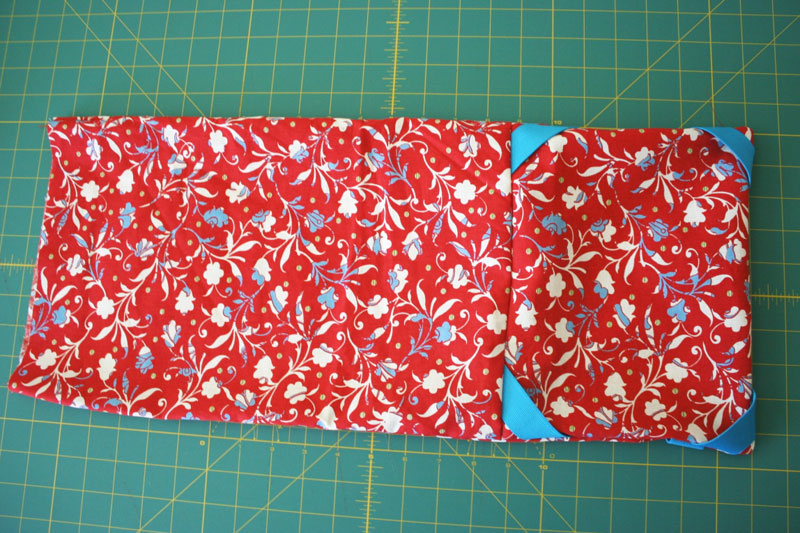
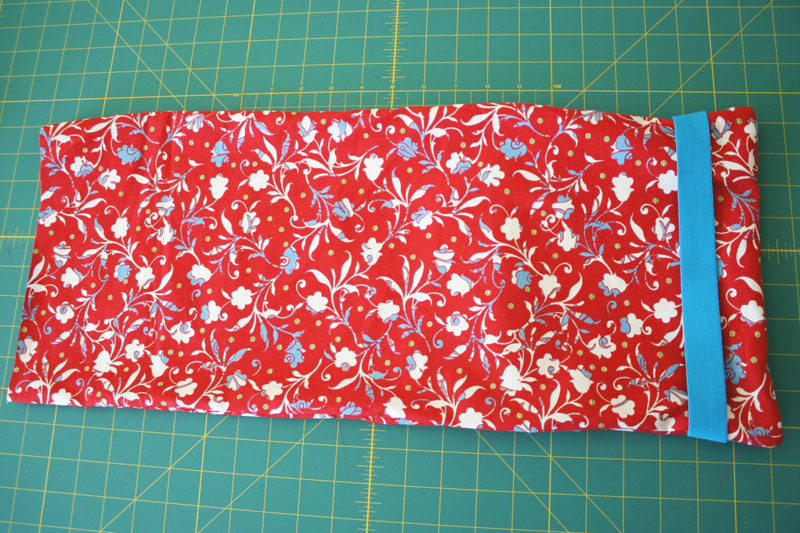
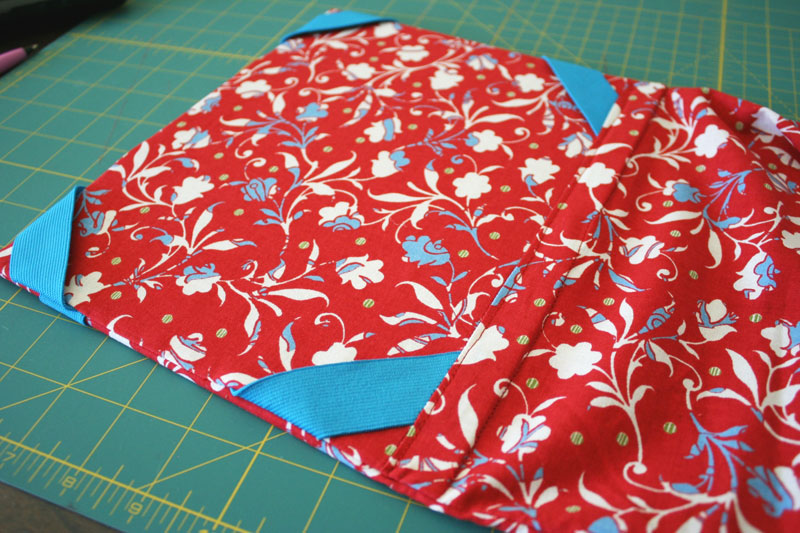
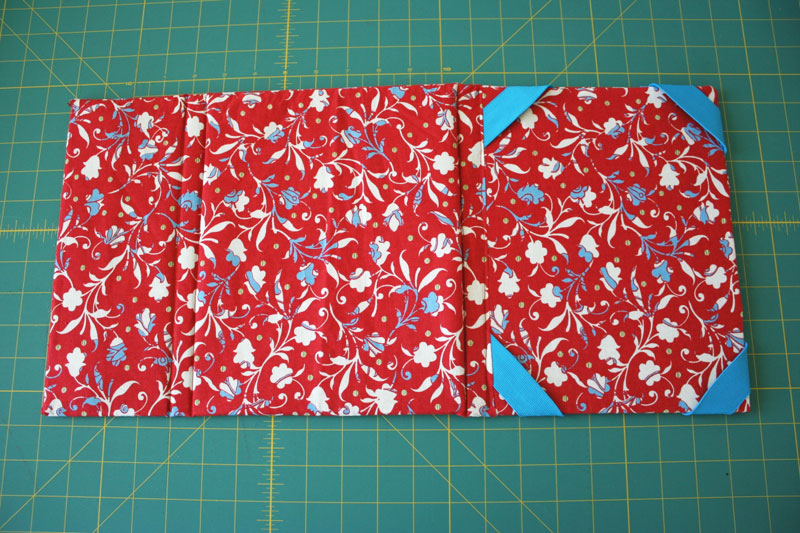
Flip the bag inside out and you should have a set of corner straps on the front side and and an elastic band on the back side.
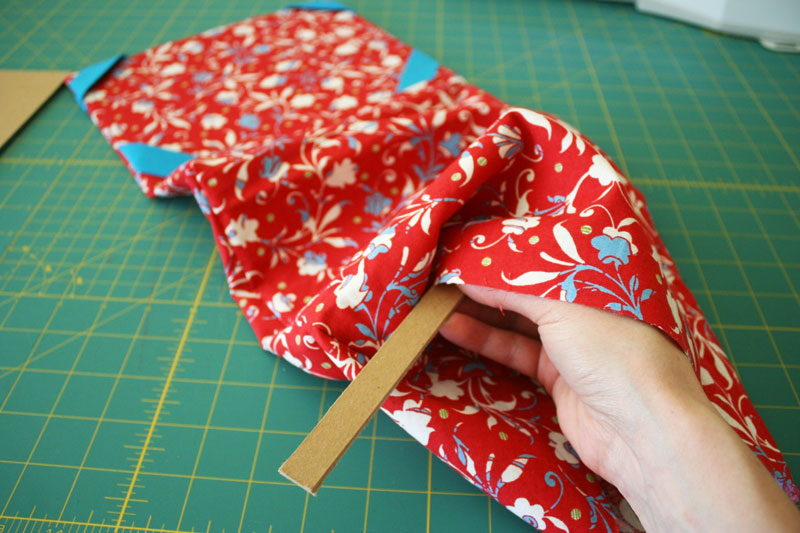
Take piece #1 of your chipboard and slip it inside the fabric, all the way down to the end.
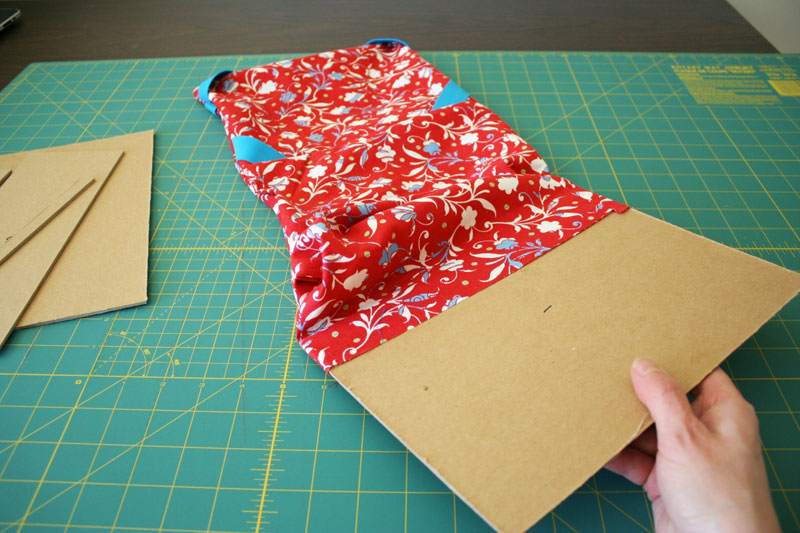
With the chipboard shoved down into the fabric as far as possible, and the fabric pulled taught, use your sewing machine to run a row of stitches along the edge of the chipboard, as close as you can get it without sewing through the chipboard (that's a good way to break a needle!)

Put chipboard piece #2 into the fabric next, and shove it all the way down in place.
Then run another row of stitches as close to it as you can to piece #2.
Continue with chipboard pieces #3 and #4, adding a row of stitches after each one.
Finally, put chipboard piece #5 in place, and you should have a couple inches of fabric left on the end.

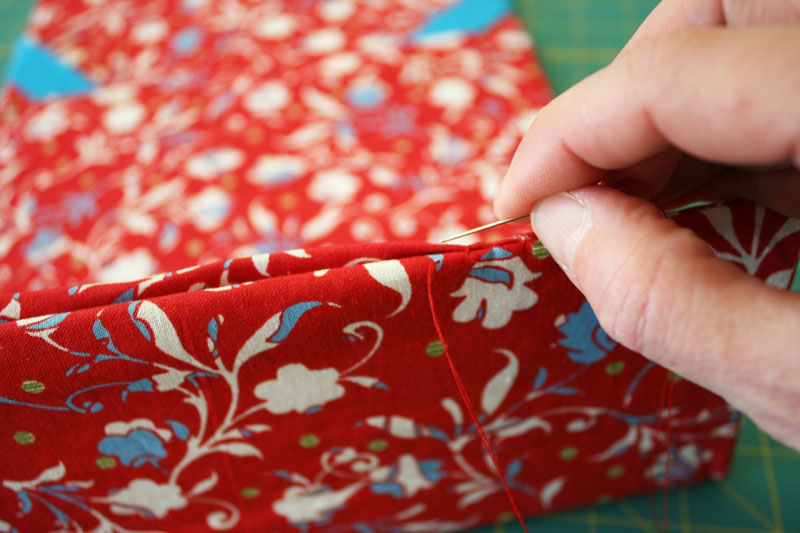
To close the end up, start by folding one side of the fabric down over the chipboard.
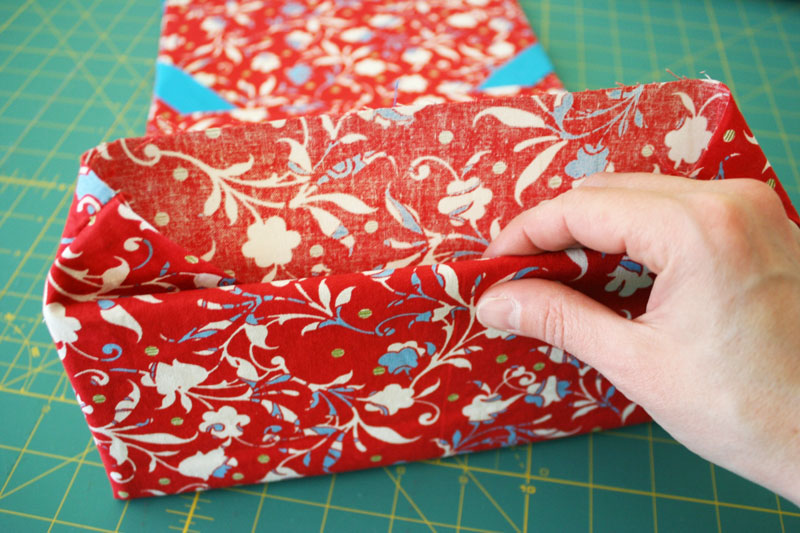
Then tuck the other side in on itself, to create a smooth and even fold.

Use a slip-stitch to close up the seam.
And just like that, you're done!
Step 4: Using your iPad cover
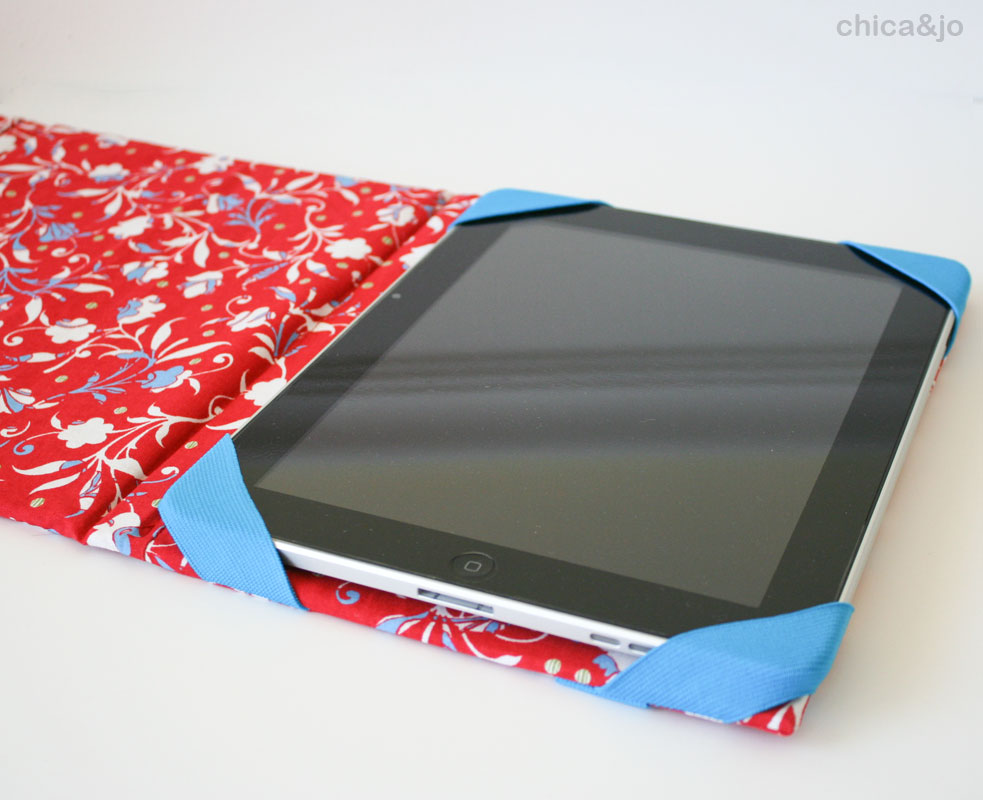
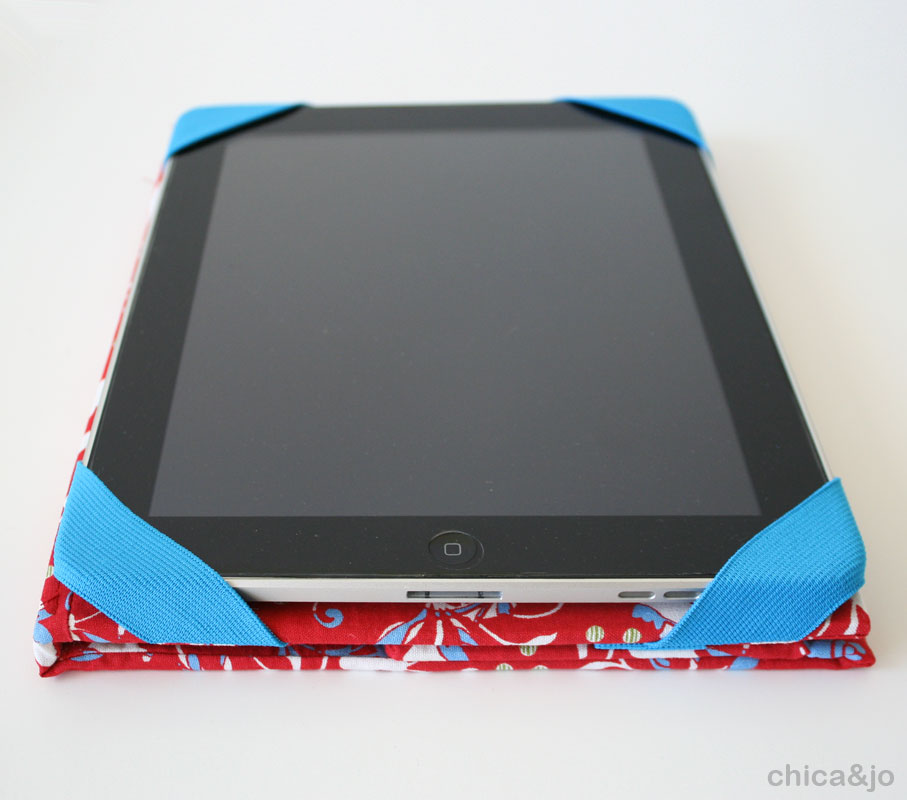
Just slip your iPad under the elastic corners and you're good to go.
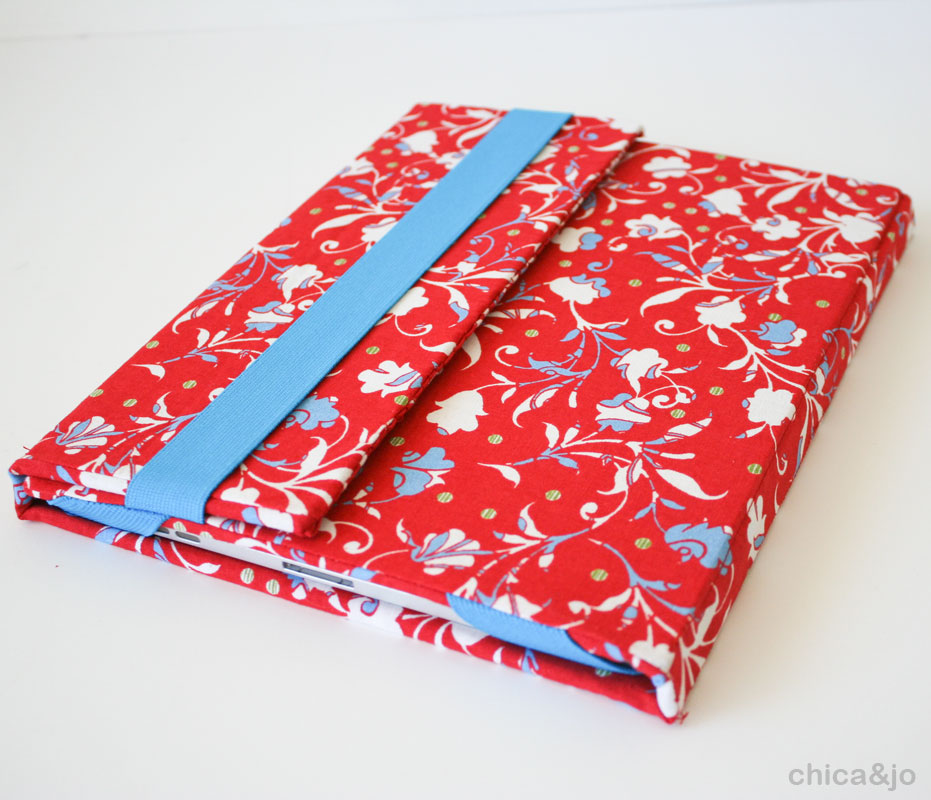
To close the case up, just pull the cover over top of the iPad, wrap it around, flip it over, and stick the flap under the elastic band on the back.
The cover is so snug and secure and makes it so easy to carry the iPad around in style.
And if you want to hold the iPad in your hands, the flaps fold up to create a slim and sleek case that is easy to hold.
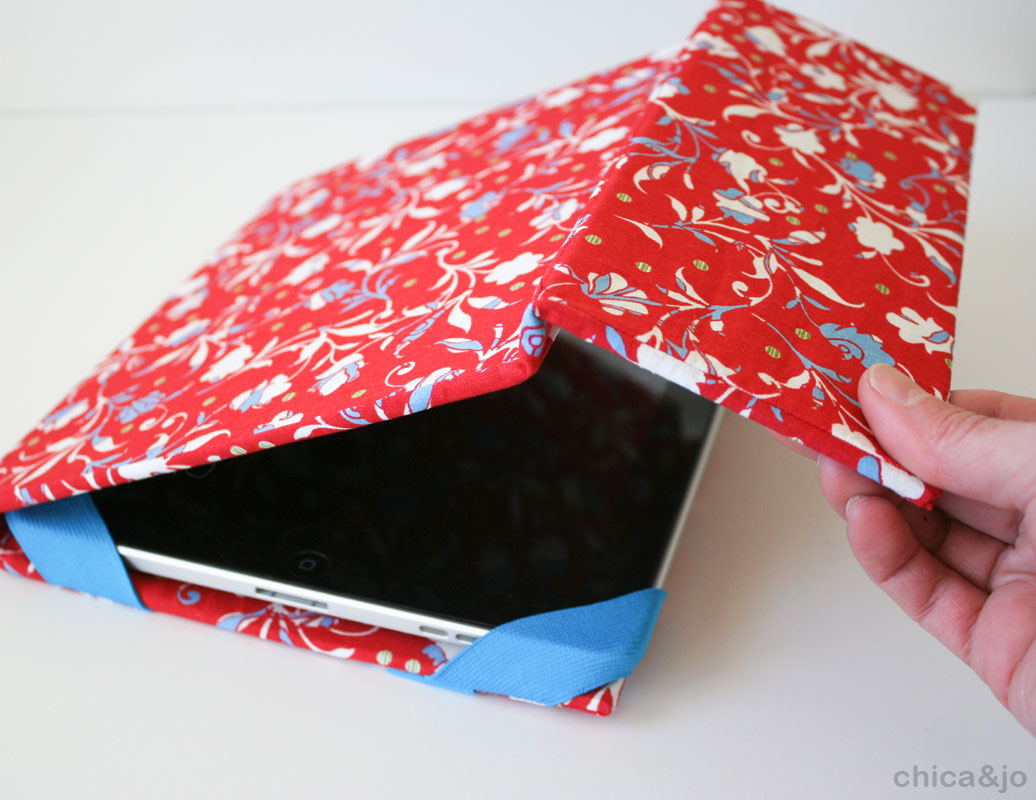
The best part, though, is that the stand lets you prop the iPad up for watching movies. Just open the case back up and fold the cover back on itself, and form a triangle with the flaps. I just love it!


127 comments so far:
What a grand idea! I really want an iPad, and being able to create my own, unique cover for it just adds to the fun. One question, from someone who does not/cannot sew: Can I make this with just the super Stitch Witchery? That's what I use for all my "sewing" (hemming mostly).
Jeanne, I don't think you would be able to do this with just Stitch Witchery, because you need to sew rows of stitches up close to each piece of cardboard as you fit them in place. I don't think you'd be able to mimic that with Stitch Witchery.
I just finished the iPad cover. Your directions were spot on! The next one will be even better. Making another one for a friend. Thanks for the fun rainy day project!
I love it! What do you use to cut the chipboard?
Sheri, I use a metal ruler and an craft knife to cut my chipboard, making sure to work on a surface that can handle scratches and cuts.
I made this tonight. Took very little time thanks to my rockin husband cutting out the board. I used mat board....the stuff they use to frame pictures. It works but I wish I could have found something a bit stiffer but no one around here knew what chipboard was. Any other suggestions? Anyhow. This came out really pretty and was very easy to make. Didn't take long and I'm pretty new to sewing. So not much experience required. Great tutorial. Thank you soooo much!!!
Mary, I'm so happy to hear that you had such success with this project! You can often find chipboard at an artist's supply store or a scrapbook store. Or you can use the board from the inside of an old binder.
I purchased the corrugated plastic sign material at a home improvement store for use in my covers. It works very well! It is lightweight and it also has the benefit of making the covers washable (spot clean or wash by hand in a sink) without falling apart like chipboard inserts! You will want to cut your fabric pieces slightly larger to allow for the small thickness increase. Another good idea is to spray the finished cover with scotchguard stain protector before using.
Summer, the plastic signs are a great idea. Thanks for sharing!
Last night I was buying an iPad for my boyfriend and I. But as I was perusing through the dull and limited covers I thought to myself, "didn't Chica and Jo do a tutorial on this?" Lo and behold came home and looked ur site up with my new iPad and indeed!!!!!thanku!!!!!! Now I got to go pick out a fabric :). My bf thinks I'm a dork for doing this stuff but hey. He is going to be impressed when I make my own cover :) I should make it pink so that he won't use the iPad as much hahaha
Jezzi, we're so glad you thought of us and we had the tutorial you needed. Enjoy your fun custom case, and I say you should go for the pink!
This is an amazing tutorial. I don't have an ipad yet, but if I make a case for it maybe the man will get the hint. LOL. I've seen quite a few of these on Etsy and was looking out for a free tutorial, and yours has really clear pictures and instructions.
Wow! Thank you. This is just what I need to make a cover for my friends son. He has a pandigital so I will do some measuring and tweaking. You can use a zipper foot to sew close to the chipboard. Might save a needle or two :)
LaPriel, that's a great idea to use the zipper foot. Thanks for sharing!
Ok, I made two different I pad patterns today. I really like this pattern! I had to cut my chip board a bit smaller to fit it. Use an old blade on your rotary cutter to cut the chip board. It is so much faster! It isn't necessary, but I think I might interface all my fabric pieces next time. I used quilting cotton. A bit heavier fabric will wear longer.
Thanks for the great pattern. Oh and the zipper foot worked great.
Thank you so much for the tut!! Clear directions and easy to follow :)
Thanks for offering this for free! I'm going to make this very soon. I have a thin plastic shell type case on my iPad. Do you think I need to make the cover a little bigger or is there enough room because of the elastic.
Crystal, if you want to make the case big enough to go over the plastic cover, you will probably need to adjust the measurements a little, depending on how big your case is. Measure the iPad with and without the case and if the difference is more than 1/4", add that difference to your piece measurements to be sure the finished case is big enough.
Thanks for this so much! I finished my altered version yesterday. I have a Samsung tablet that's smaller than an ipad and a little smaller than a kindle and it turned out GREAT!
Doing a craft show in two weeks, would love to be able to show off my new iPad case. However, the material I'm working with is not big enough to get all 3 pieces, could someone explain out of the 3 pieces which would be the "inside" and what would be the "outside" covers. Thanks!
Megan, the largest piece of fabric will end up being on the outside of the case. The two smaller pieces will make up the inside.
I just had to say thank you, Thank You, THANK YOU!!! I'm so excited I've been searching the internet for a week or so to find the ipad cover I want and I found it in yours. Thank you I'm going to make tomorrow. Many thanks again from Australia!
Trish, I'm so glad we could help! Hope you enjoy this project and let us know how it goes.
Thank you so much for posting this! I am going to do this with some super special woven wrap scrap material I just purchased and can't wait! Quick question... Have you ever tried adding a thin batting to the chipboard to make it a little more padded for the device? And if so, do you know how that changes the dimensions of the fabric you need to cut?
Sarah, we have not tried adding padding, but it seems like thin padding should fit fine with these measurements. However, it wouldn't hurt to add an extra quarter inch or so to be sure. Enjoy!
If you want the chip board to be more water resistant, you could coat it with spray sealer or polyurethane before you insert it into the fabric. And some Scotchguard(tm) could be used to protect the fabric before you install your device. Just a thought...
Great tutorial! Thanks for figuring out all the math for me! I just wanted to make a suggestion for those wanting to use the colored elastic, but not finding the best selection at their craft/fabric store. I went to Wal-mart and bought an 8-pack of elastic headbands for $3. They come in a ton of colors and are plenty long for this project! Hope this helps some of you!
This tutorial is awesome!! I was looking for ages for a tutorial like yours that not only protects the iPad but has a stand and opens up as well. I love your clear instructions and I love how easily it all came together!
Just finished about 10 minutes ago! I think it is so stinkin' cute! Used a pretty purple/green batik and for the sturdiness I cut out the inside of an old binder which did work great. The only thing I changed was I used 1/2 inch black elastic instead of 1 inch and also cut a scant 1/4 inch off the length of each of the binder boards. They were too thick to get in when cut to dimensions given. I love it and thank you for a great tutorial!
I just finished my ipad cover what a great pattern thank you so much. I quilted the outside fabric so had to cut the boards a little smaller but am so greatful for the pattern.
Thank you so much for this tutorial. I've made two and am working on a third. I'm thinking that I'd like the device in the middle instead of at the end. It seems it might be easier to open that way. I plan on trying that next. I love the idea of embroidering the owner's name on the cover. Very clever and creative.
I LOVE THIS!! away to go attempt it for my husbands ipad. thanks for the tutorial!! xx
Hi there, I just found this tutorial and whipped up a new cover for my iPad in under 2 hours! I cut up one of my old rotary cutting mats that had seen better days and used that instead of chipboard. I also used basting spray to attach some wadding off cuts to one side of the mat to add some extra padding!
Thanks for sharing this awesome tutorial!
Pollyanna, we love hearing about such resourcefulness. Great job!
Well, I did it! Took time & adjustments but finally finished the mini ipad. I used flannel for the middle piece (to prevent scratching) and then at the end had lots of fabric left over, so, I left the side open (w/velco)to store my earpiece and battery for when I'm traveling... now am ready to head to Taso,NM while my hsbd goes skiing.
Hey there Chica! This is such a cool project...I have two iPads (one is my husband's) that need this. It'll make it so much easier to use in bed--I look up stuff as I'm reading (maps, words, cultural practices, etc.).
I've got a question though: have you ever heard of any of these types of iPads overheating in a holder such as this? May sound dumb, but maybe they're making items like these better these days so that will not be a problem. Thanks a BUNCH for this tutorial.
KatieLynne, I have not heard of any instances of iPads overheating in cases like this, and considering that the device manufacturers themselves sell cases that cover a similar amount of the device, my thought is that overheating is not a potential problem.
Thanks for the tutorial, I made my cover yesterday and I love it! I like that it can be fully customized to my taste. I used jeans fabric and added a bowtie and some appliques. I had some trouble sewing everything, but that's because I don't use the sewing machine much. But the skewness here and there adds to the charm :D
I made 2 of these for my kids tablets. Thanks for the pattern and for the formula for working out the sizes as we don't have ipads. I am planning to make a cover for my iphone, but was wanted to have a magnet rather than elastic. I'm very new to crafty things (these were my first) and I have no idea about what to use as a magnet and metal for it to stick to. Do you have any suggestions for me?
Cara, we're so glad you liked our formula, and kudos for venturing out into new crafts! Before you make a phone case with a magnet in it, you might want to research whether or not having the magnet that close can cause damage or not. I did some quick Googling and can't find a definitive answer either way. If you do decide to go the magnet route, though, try asking at your local fabric store. The staff there may be able to point you to a nice magnet clasp that would work well.
If I add some soft batting to this project will I have to changed the dimensions and if so , by how much
Jackie, it's hard for me to answer that without trying it myself or knowing how thick your batting is, but my guess is that just making the fabric 1/4" to 1/2" wider would be enough. If you try it out, we'd love to hear about your results.
Can you replace the outside elastic with fabic?? or another type of material Thanks!!
Jackie, if you replace the outside elastic with fabric or something else non-stretchy, then you won't be able to stretch it over the flap to secure the case shut.
Thank you for taking the time to make this "great tutorial". I'm going to add a fleece piece of fabric to cover the screen so it doesn't get scratch.
Gotta say, your instructions were awesome and SUPER easy to follow. My only problems were with my own construction and sewing skills! lol However, it turned out great!! Thanks so much for sharing!
Rochelle, I'm so glad we were able to give you the guidance you needed to create your own cover. Congrats!
Hiya I live in the uk and was wondering what u used to cut your chipboard and does chipboard have another name? As all the pics I'm seeing of it is not what u have on here pls help. Tanks
Ayo, we cut our chipboard with either a paper trimmer or a craft knife and straightedge. I'm not sure if chipboard goes by other names in the UK or not, but you can use any stiff cardboard you can find, or even plastic if you can find some that seems like a good weight. We've had readers use the inside of a binder cover or the cover of an old book as the material, too, which works very well.
Thank you for the tutorial! I made this with 3 changes gleaned from the comments section. Instead of chipboard, an old warped self-healing cutting mat was cut up for the stiff interior. An added pocket on the inside will hold a lense cleaning cloth for the screen. Finally, the fabric size was increased by 1/4 inches and cotton batting was sewn onto the wrong side of the fabric. Don't forget to grade your seams when you do this.
Sally, I'm glad you enjoyed this project. And thanks to all our other readers who have left such helpful comments for you to glean from :)
Wonderful pattern! Easy to follow. I made mine in 2 hours. I altered it down for a kindle fire because I use mine horizontally. The only thing I found I had to do different was switch #1 and #3 (could be my sewing also). Thank you for taking the time to figure this out and make the pattern free!
I just made one of these for my mother in-law for mother's day. It turned out great. I used my zipper foot to sew as close to the edge as possible and I think that helped a lot.
Chica, has anyone tried to use the mesh type plastic that normally is used to weave yarn or embroidery thru. PlastIc canvas I think it is called? Love the tutorial. Thanks so much for sharing
Cheryl, I haven't heard of anyone trying that, but it sounds like it could work. If you try it, let us know how it comes out!
I bought a tablet this weekend and wanted to make a cover for it. Wasn't sure I would be able to make a stand but would settle for a cover. I came across your tutorial and modified the measurements for my tablet. I'm so excited how perfect this came out. Thank you for posting this tutorial. I got exactly what I wanted, a cover and a stand. I love it!!
Thanks for the tutorial! I just made covers for both of my boys. They each have iPad2s and the covers came out just fine. I'm sure they will love them for Christmas.
Thankyou so much for the pattern and wonderful directions. My IPAD cover had seen better days so I found your tutorial and made one for myself but the chip board I got from the craft store was thin so I ordered some from Amazon and made a cover for my daughter and grandson and they both love them. Also I used interfacing to make them a little more tough for kids
This was a great tutorial. I added interfacing and a light batting. It went together really well. Thank you! I want to make another one and incorporate a quilt block.
Pam, I love the idea of incorporating a quilt block!
oh wow I can not tell you how pleased I am to have found this tutorial ..... I have a ipad cover which I hate but haven't been able to find one that I like ..... And now I can make my own ...... THANK YOU THANK YOU THANK YOU xxxxxxx I love how you have done it all step by step ...AWESOME ....... Thank you so much xxxxxx
Tina, thanks so much for the nice comments! Hope you really enjoy your new cover :)
I love this!!! My question is this: Could I use plastic canvas instead of the clipboard?
Sharon, that sounds like it just might work!
Thanks a lot for this tutorial. I've juste made one for the Samsung Tab for my classroom, I will make another one, it's easy. Good explanations ! I will show it on my blog later.
Your instructions are so good! Clear and easy to follow. I am going to make one for myself and for my husband. Thanks for taking the time!
Merci pour ces explications qui sont très bien faites.
Very good instructions. I modified the sizes a little for ipad air 2. Also I put another row of stitching after the last piece of cardboard and folded only the last 1/2 inch inside and sew over by machine so it makes a stopper since I made it with heavy fabric (kind of ultrasuede) Merci beaucoup!
I have a 8" tablet. I adjusted your measurements and used a pretty dish cloth to make my tablet case. A good tip is to use a zipper foot attachment on your seeing machine when stitching in between the chip boards.
I made this today for my iPad Air. Only had to make a couple adjustments and I used plastic instead of chipboard also added Velcro as well as the elastic for closing and a grommet positioned for the camera lens. Will definitly make more. Thinking of a heavy foam craft sheet instead of the plastic.
I made my first cover a couple years ago. Decided it was time for a new one. Just finished using plastic from a flexible binder and a jeans skirt from Goodwill. Love it!
This are THE best pattern/instructions I have come across to date in regards to making this item, but I will have to adjust the measurements accordingly for my 7 inch tablet. I'm going to use plastic art canvas, and I love the idea of using a zipper foot for sewing between each piece of chipboard/plastic. Thank you for your time in uploading the pattern and instructions.
I plan to adapt the size of this cover for my Kindle Fire, which I bought new last Christmas. I wanted the cover to be washable, so am looking at replacing the chip board with plastic canvas. Would that work?
LadyD, that sounds like a good alternative, but I've never tried it so I can't say for sure!
If you need another color of elastic, just use coordinating fabric and cover the elastic!!?
This is a fantastic tutorial, exceptionally clear and helpful. Thnak you very much. :)
Thank you so much for this tutorial. It was easy to follow and I am delighted with the end result!
Just accomplished my first one from your pattern. Love it and will be making another for sure. Thanks for the tutorial!
Merci beaucoup pour ce tutoriel. Il est parfait. Je l’aimeeeeeee fort.
I just made this for my tablet using your formula and its perfect. Thank you
I just made one for my husband too and I used a kids hard paged book instead of a binder. Just a durable but much lighter weight
Leslie, you're very resourceful! Great job.
I am making kits for two covers so my 6 year old granddaughter can help me make them. I mentioned I might make a cover and she said "Oh I want to make a cover Grammy". She is just learning to sew with me so this should be a good project. Thank you.
Laurel, we're thrilled to hear our idea led to you helping your granddaughter learn to sew. Have fun!
With the difficulty locating coordinating colored elastic, could you alternatively use s soft knit and make a casing for some plain elastic? I was thinking of recycling fabric from a t-shirt.
Terri, that sounds like it could work! Let us know how it goes.
I've been meaning to do a cover for ages and finally got it done yesterday. I used Mylar crafting plastic (2 layers) for the stiffener - it's enough to make it stand up but means it's washable. I used black elastic but threaded it through the tube on the front just to hold it a bit tighter, and made 4 x 4" squares for the corners and tucked the elastic in side along the long edge, machined one edge then stretched it a bit and did the other. It's a bit tricky then stitching it to the rectangle as it needs to be kept taut, and again when sewing front to back. If I did another one I'd make them a tad smaller. But I'm very pleased - I used Makower's fabric 'Walkabout' as I want to take it out and about.
Corinne, we're glad to hear you finally got it done! Sounds like you came up with some clever tips, too. Thanks for sharing.
I made one for my daughter who does sales at Ivan Smith. She needed to have her tablet handy at all times while dealing with customers along with a calculator and business cards. Close to the top I added side tabs to attach a thin adjustable crossbody strap and an elastic topped back pocket for her calculator and misc. with a smaller pocket on top for her business cards. Using hot pink fabric I embroidered her name on the front in black and found some beantiful black with silver elastic to use from Hobby Lobby. She loved it. She never had to remove it while using it.
Lovely lovey pattern, really easy to follow! I added some pockets and a zipper myself, but thank you so much!!
I am getting ready to make my third one of these. I have worn out the other two. But, I can't find the directions for a vertical stand instead of the horizontal. Do you still have the link available? I am sewing challenged and am not sure I can adjust it on my own. By the way I love it and have gotten so many comments and compliments on it.
Tammie, we're glad you love this pattern enough to make several. To convert it to a vertical instead of horizontal stand, just reverse the measurements in the formula and instructions. For example, instead of saying your tablet is 9x5, say it's 5x9. I believe that will work out just right for ya!
Thank you so much for the detailed tutorial! I have been looking for one for ages! This is the perfect activity for me while in corona lock down. Thank you so much for sharing. Can't wait to get it done! Thanks again!
Thanks for a detailed guide. I need to confirm an idea....can I use very thin thermopore (foaming sheet) sheet as front cover to make it shock proof? Many thanks in advance.
Afsh, I'm not sure what thermopore is, but you can certainly try this with any materials you like. Let us know how it goes!
Mañana voy a tomar tu tutorial para mi tablet!!! Gracias parece facíl!!!!!
Graciela, de nada! Espero que disfrutes esta proyecto.
Thank you so so much for the iPad case tutorial. I made one this morning. The instructions were really clear. I am so pleased with it. Many thanks
Just finished the cover on my way to a second one. Thanks
My new IPad should arrive tomorrow and I will be making this next weekend.
Chica,I’m getting ready to make the I-Pad cover.What did you do for speaker opening and the camera lens opening?I love the pattern.
Delores, I opted not to account for the speaker or camera lens. For my use, the most important part was propping it up for viewing. Check out the comments from other readers... some of them addressed your question with their ideas.
Hi Chica, Love this tutorial. I am about to start making these for Christmas and I was wondering if you had any ideas for istalling a camera lens opening in the case.?
Marg, maybe you could use a grommet or a buttonhole, or just cut an area and hem the edges? Check out the comments from other readers... some of them addressed your question with their ideas.
Thank you for this tutorial. I made one for my tablet and am about to make one for a Kindle. I quilted the 2 layers of fabric to Warm & Natural batting, which did not affect the dimension at all. I used the corrugated plastic method which worked out great. Because of the batting, I had to reduce the width of the plastic pieces by 1/2 inch. I also added a pocket for the cord, just for fun.
For this round, I will use a Velcro closure instead of elastic, just for fun.
Very cool idea. Thank you again.
Can i use hair elastic headbands or ponytail holders instead of elastic?
Kivia, we haven't tried either, but suspect that ponytail holders will be too tight or rounded to work well. We've heard from folks in the past who have used elastic headbands with success, so give that a try!
Could I use oilcloth for this iPad cover?
Thanks so much for this awesome tutorial!
Marie, I have never worked with oilcloth, so I can't advise you on how easy it would be to use for this particular project. If you try it out, let us know how it goes!
Me gustó mucho tu proyecto, ya lo hice y me quedó genial! Gracias muy claras tus instrucciones.
Fantastic instructions, awesome calculator (thank you!) and beautiful end product for my son. Love it. Huge thank you!
How do you cut the chip board.
Eleanor, you can cut the chip board with a paper trimmer or with a utility knife and ruler.
It would be nice if I could print it without the ads.
Katie, all our tutorials are optimized for printing, with extra things like ads, comments, and sidebars removed so that your printed version is as clean as possible. Give it a try, we think you'll be quite pleased!
Great tutorial, thank you so much! I'm trying to convert the stand into a vertical one for a kobo libra h20 but am getting confused with the reversed measurements you mentioned using. Do you also reverse the measurements for the fabric as well as the woodchip? Does that then mean it won't open like a book but will instead open from the top?
I also had a question about the measurements themselves- is the first number the length and the second the width? I know the convention but I don't want to reverse the numbers incorrectly and cut my printed fabric wrong so thought I would check. Thanks again for being so generous with your tutorial!
Blue, we're glad you like this tutorial, and are happy to try to help with your questions. To explain the length and width, take a look at the "handy measurement calculator" linked to within in the post. In that pop-up window, there's a picture of a sample tablet, with the length, width, and thickness labeled. The "hinge" of your cover will be along the "length" side.
While this image shows the length as being the longer measurement, it doesn't have to be. If you want the hinge on the shorter side of your tablet (so that it props up vertically), just enter your shorter dimension as the "length" and the longer dimension as the "width". Hope that helps!
Love it! Great directions and the pictures helped so much. I used old election signs…..think corrugated plastic. I had to cut 1/2 inch smaller on the width but I think it’s because it’s thicker than chip board. Very sturdy tho and works great. Thank you!
Paula, that's a very resourceful solution! Thanks for sharing.
Wow, great instruction and glad I do not need to figure the measurements.
How thick is the chipboard? Also, I have some scrap plexiglass about 1/4 inch do you think this will work?
Debbie, you're welcome! The chipboard is pretty thin... almost immeasurably thin, but thick enough to have some stability. Something that is 1/4" thick would be way too thick, so I would not recommend using the scrap plexiglass you have. If you need ideas for material, try a couple layers of cardboard from a cereal box or the back of a notepad.
Heartfelt thanks for your step by step instructions. Easy to follow and fun to make. I’m new to this but had a great time choosing the fabric and putting it all together. I used a walking foot to sew the project and for the insert I used foam board. Little bit thicker than the chipboard but light to use and if the needle hits it sews right through without breaking. I’m so keen to try one for my husband and one for my sister.
Mari B, we're so happy to hear you enjoyed this project! We'd love to see your finished covers, so please tag @chicaandjo if you share them on social media.
I’m in love with this cover.
Your directions were so clear and easy to follow, I could start the project with confidence. One thing I added the second time making - double sided interfacing to the longest piece, the outside of the cover. Once everything was sewn, I ironed the interfacing to the chipboard. It gives a clean look.
Sharon, thank you so very much! Love your idea too.
E' bellissimo! Grazie! Proprio quello che stavo cercando. Lo faro' sicuramente.
Lydia, prego!