


Candlelight Luminaria Centerpieces for Your Wedding

During wedding season, brides and grooms everywhere are looking for easy and inexpensive ways to personalize their events with handmade touches. To help with that effort, I've come up with a really neat luminaria idea that's super easy to make. And thanks to inexpensive supplies from the dollar store, they can cost less than $5 each to make. Chic and elegant, these candle-lit centerpieces can be personalized with the bride and groom's name and/or photo, and are sure to be the talk of the reception.
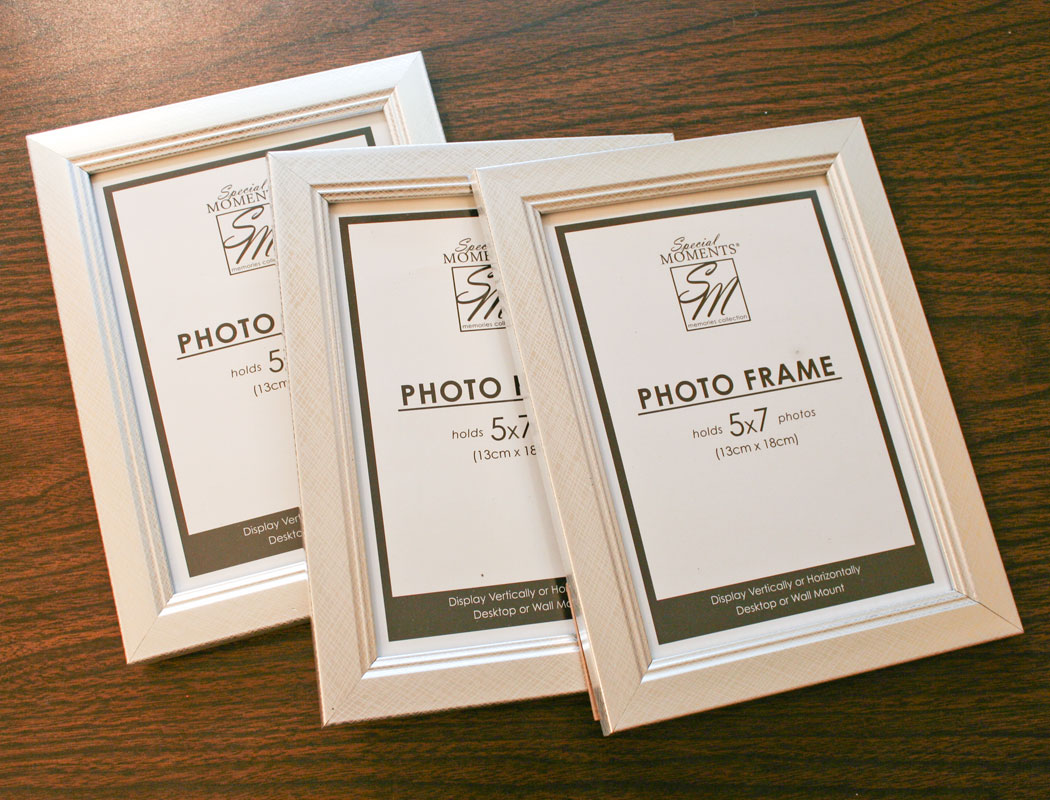
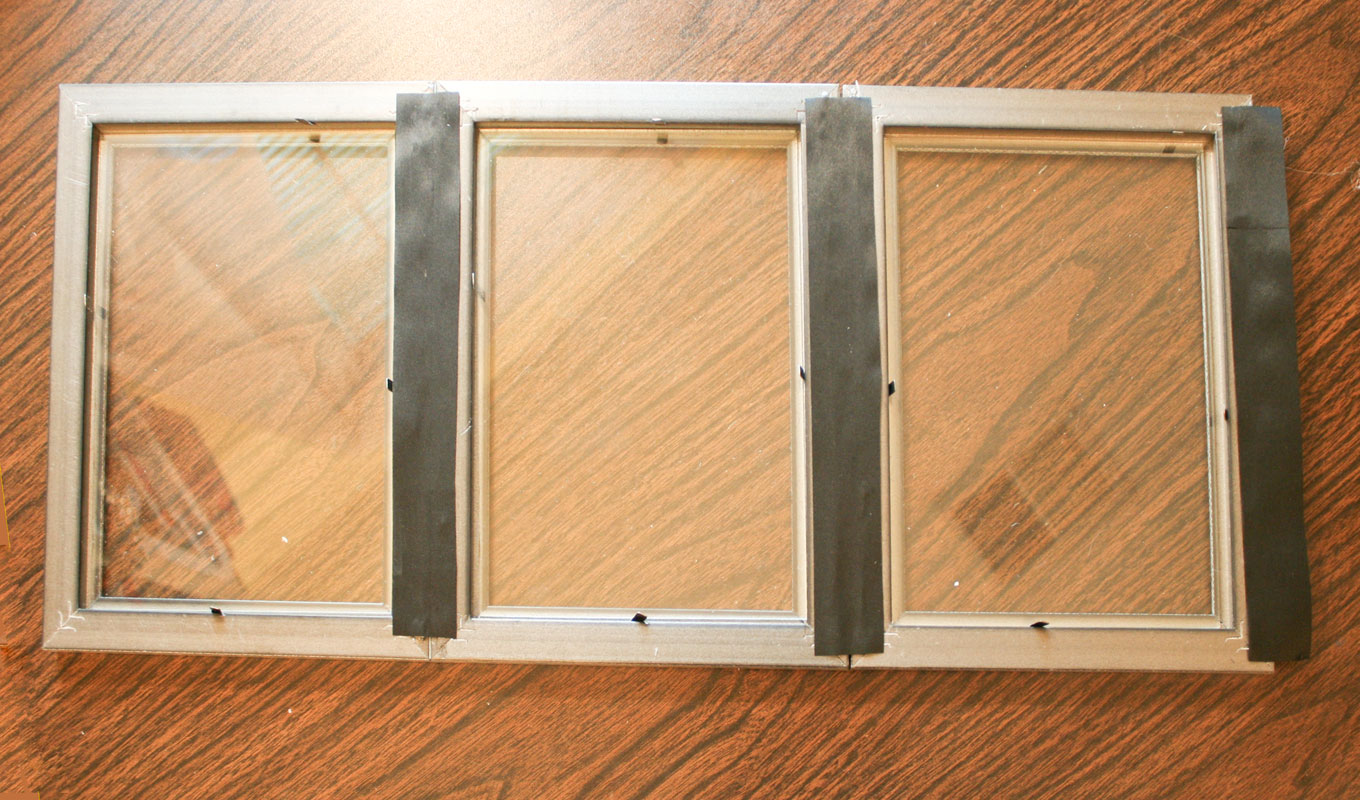
Start with three 5"x7" frames in a color to match your wedding decor. The best source for these is your local dollar store, where you can often pick up simple frames for one dollar each.
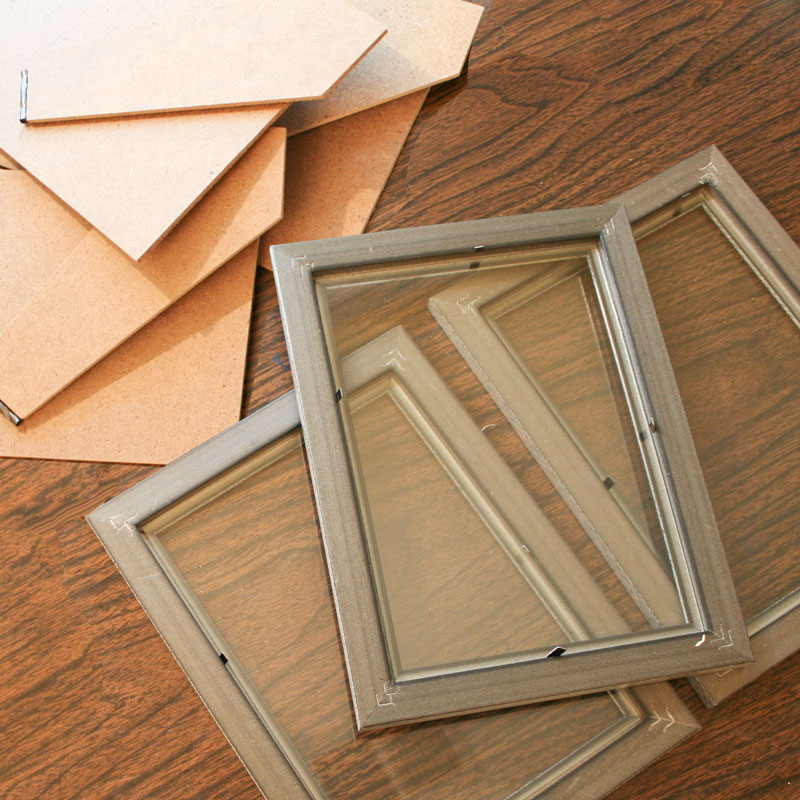
Remove the backing from each frame and discard. (Or stash them away in case you want to disassemble the luminarias later and turn them back into frames.)
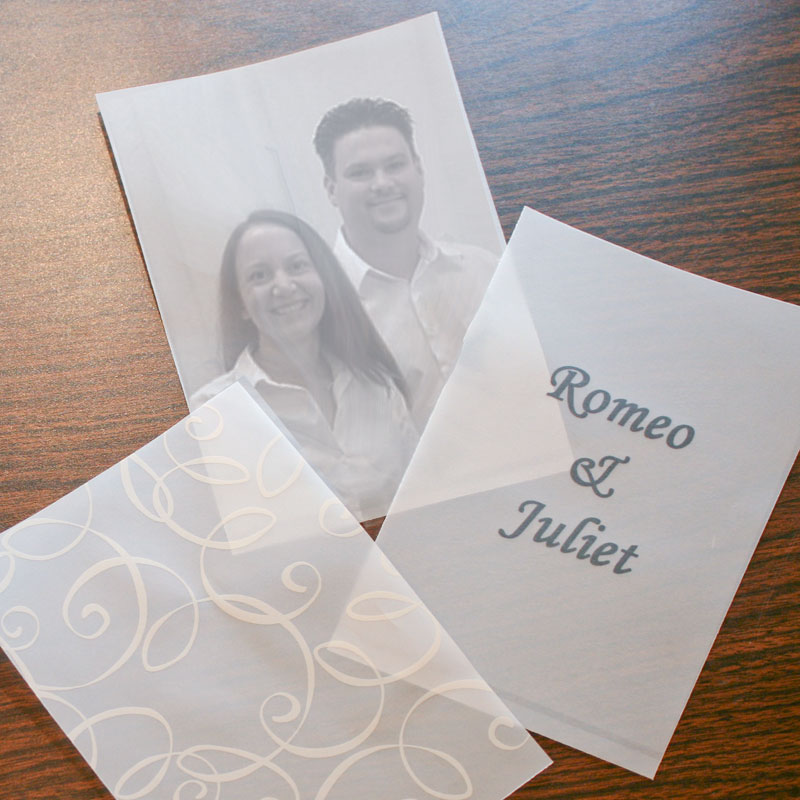
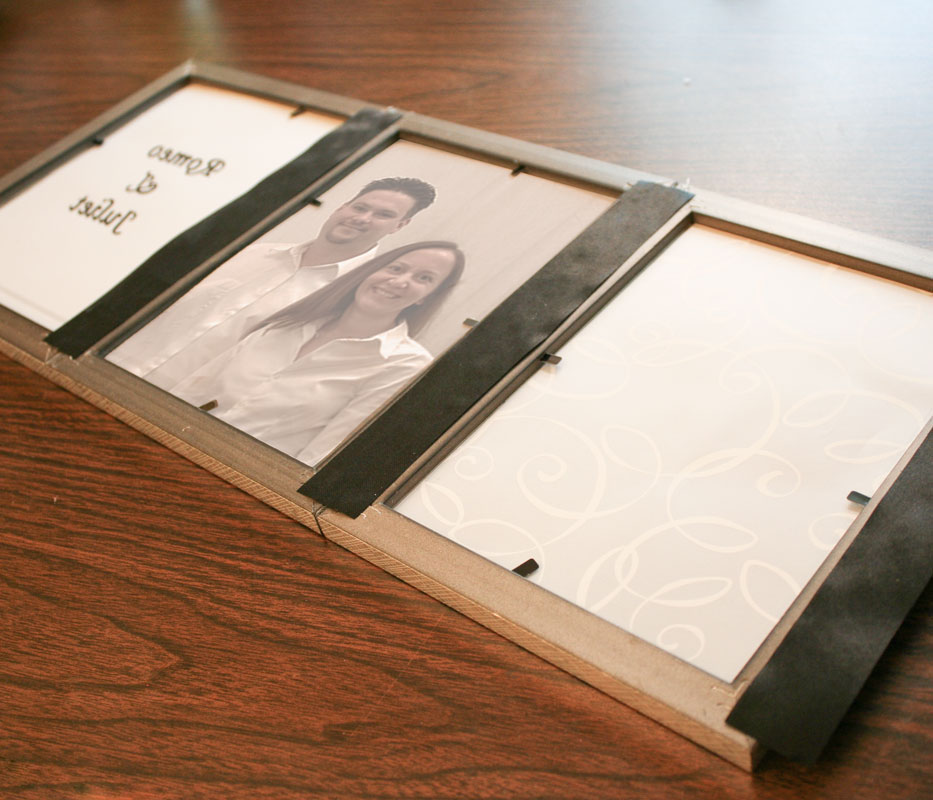
You will need a 5" x 7" piece of translucent vellum paper to fill each frame. You can use regular white vellum or printed vellum from the craft stores. For a really personal touch, you can even print a design onto the vellum. Here are some ideas:
- a photo of the bride and groom
- the bride and groom's name
- the date of the wedding
- a special message from the couple to the guests
- the table number
- a special poem or saying
- an image depicting the theme of the wedding
- the couple's special song
If you print on the vellum, you'll get the best results if the printing is on the back of the vellum, so that it shows through softly when backlit. To do this, just print the design in REVERSE on the vellum, and put the paper in the frame so that the printed side is on the inside.
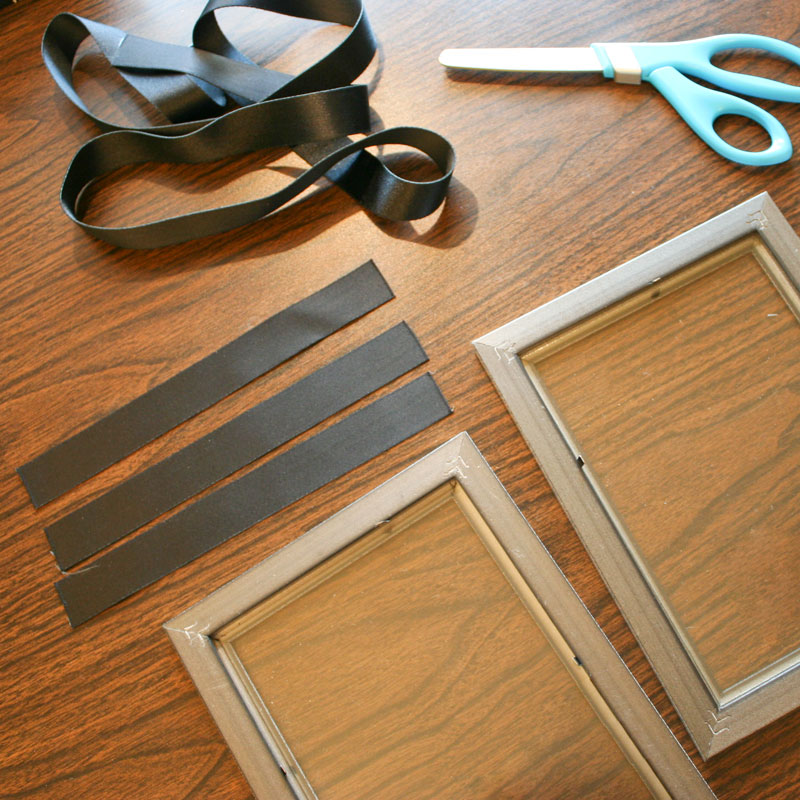
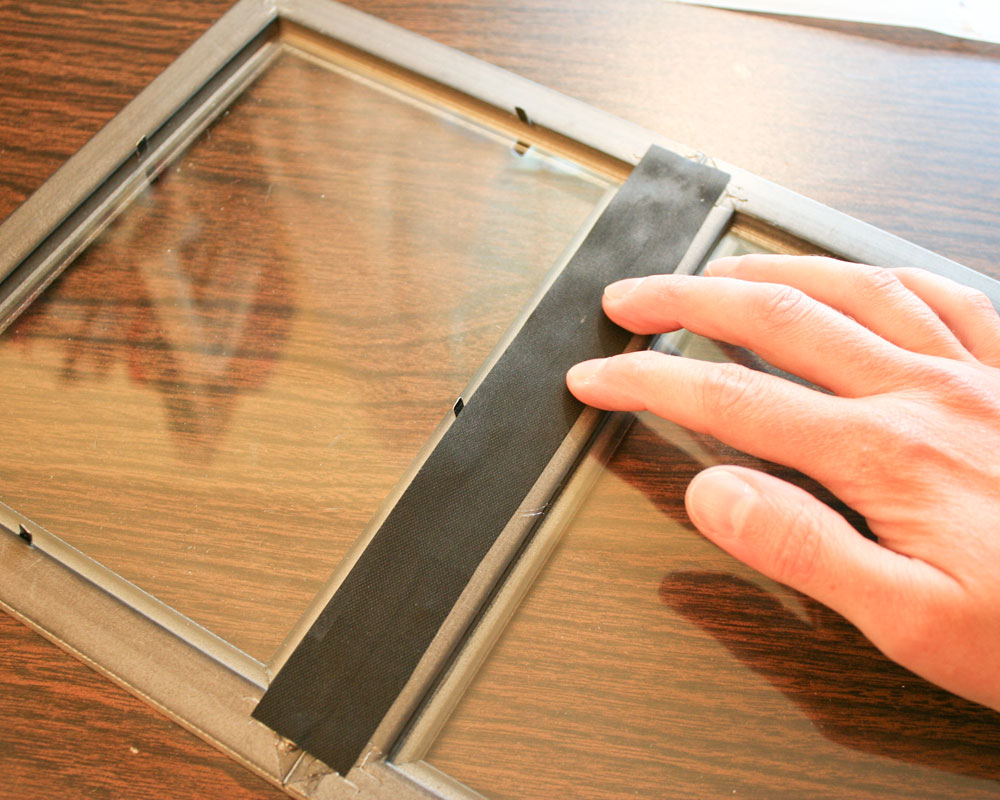
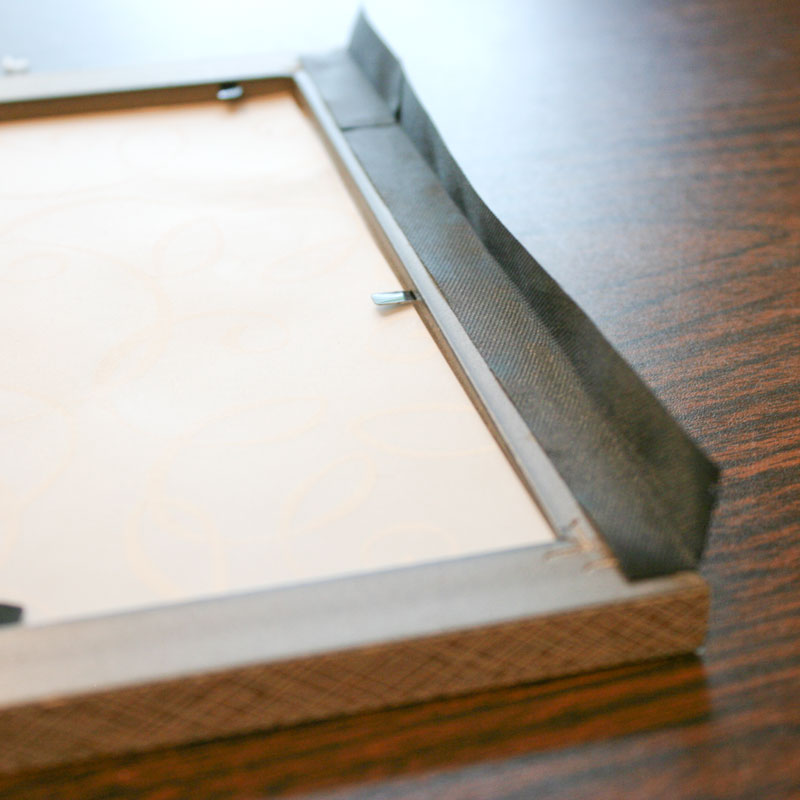
Now take some wide ribbon (approx 3/4" to 1" wide) and cut three pieces of it that are about 1 inch shorter than your frame is tall. Choose a ribbon made of a very thin/lightweight material so that it folds easily. Don't use fancy, thick satin or grosgrain ribbon, because it won't be easy to work with.
Line up two of the frames very close together, and use a hot glue gun to apply a bead of glue near the edge of each frame. (Hint: do not use a low-temp gun, or else the glue will probably set before you finish. A high-temp glue gun will work much better.)
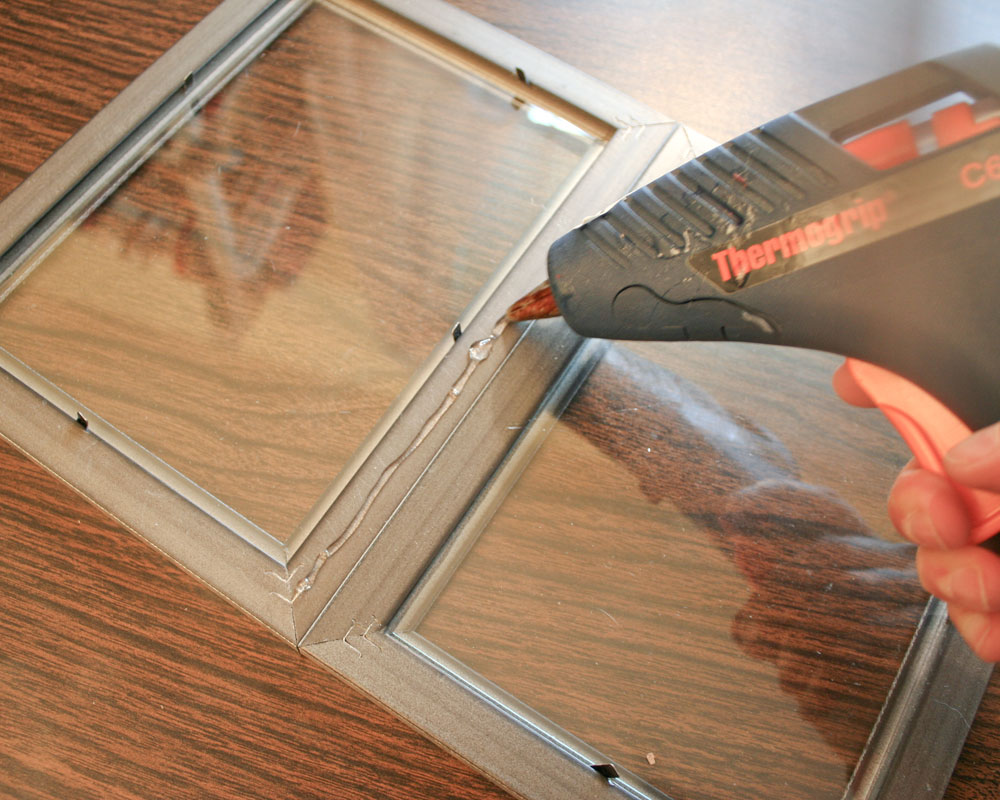
Very quickly put a piece of ribbon down over the glue and press it into place.
Once cool, lift the frame up and test to be sure that the ribbon hinge is working as you expect it to.
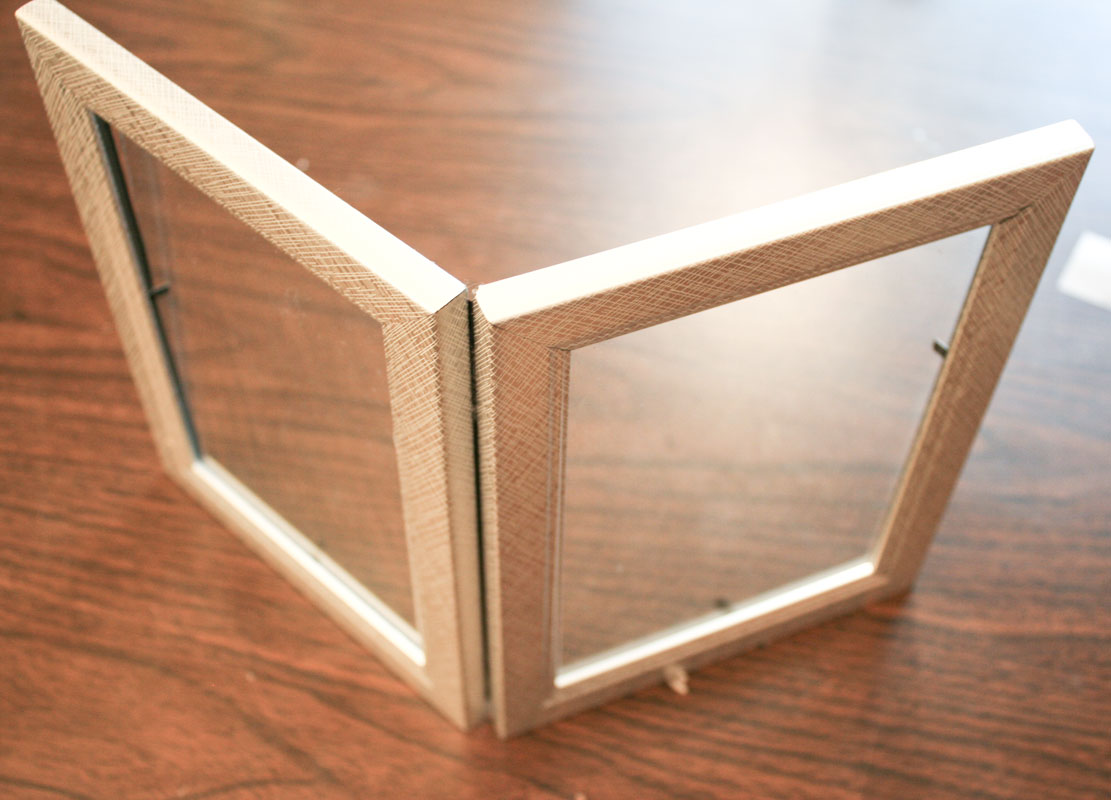
Repeat the process, joining the third frame to the second one.
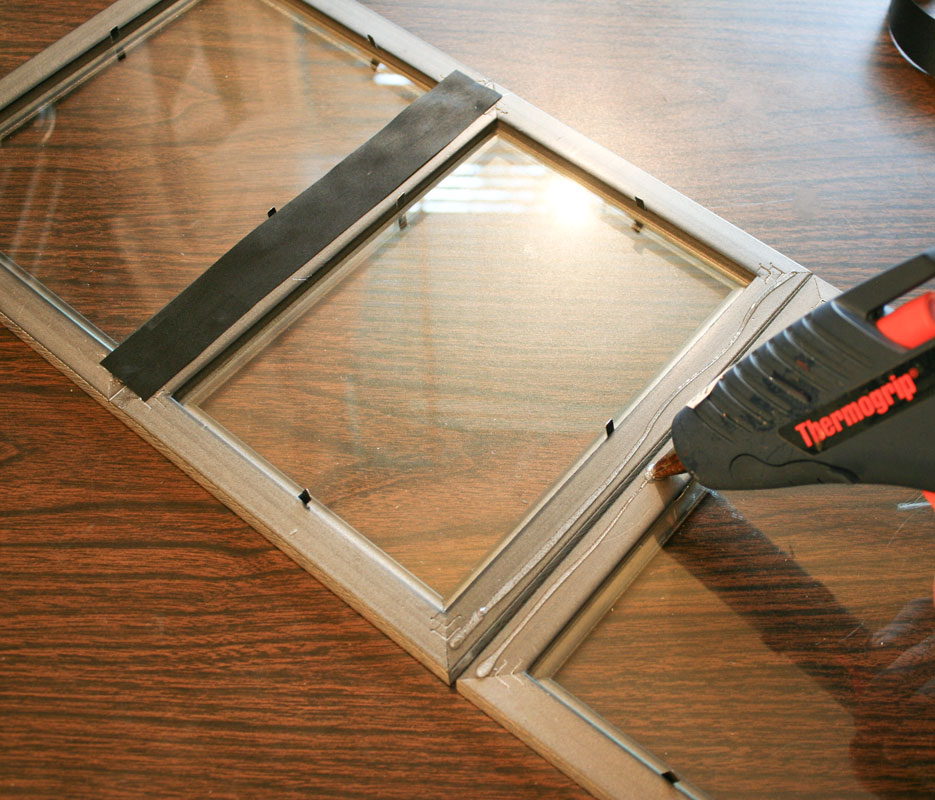
Then add one more piece of ribbon to the outside edge of the third frame, but make sure that you leave half of it hanging over the edge. This will become your last hinge in a few minutes when we join the frames together in a triangle.
With your ribbons attached, go ahead and put the vellum sheets into the frames and secure with the frame clips or with small pieces of tape.
Now fold the last piece of ribbon up, making a crease. If the crease won't hold, and it's a fabric ribbon, you might want to press the crease with a warm iron. (Note - Do not use an iron on plastic-based ribbon, and do not touch the frame with the iron, or else you might damage the surface.)
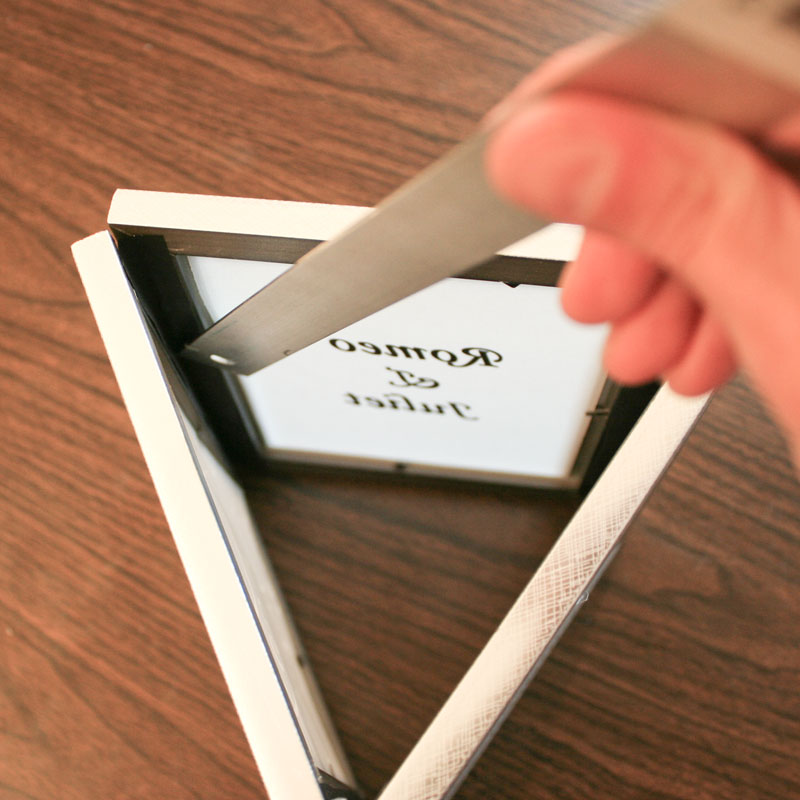
Stand the frames up and bring the two ends together, making sure that your creased ribbon will meet the other end of the first frame. Use your hot glue gun to add a bead of glue down the inside of the first frame.
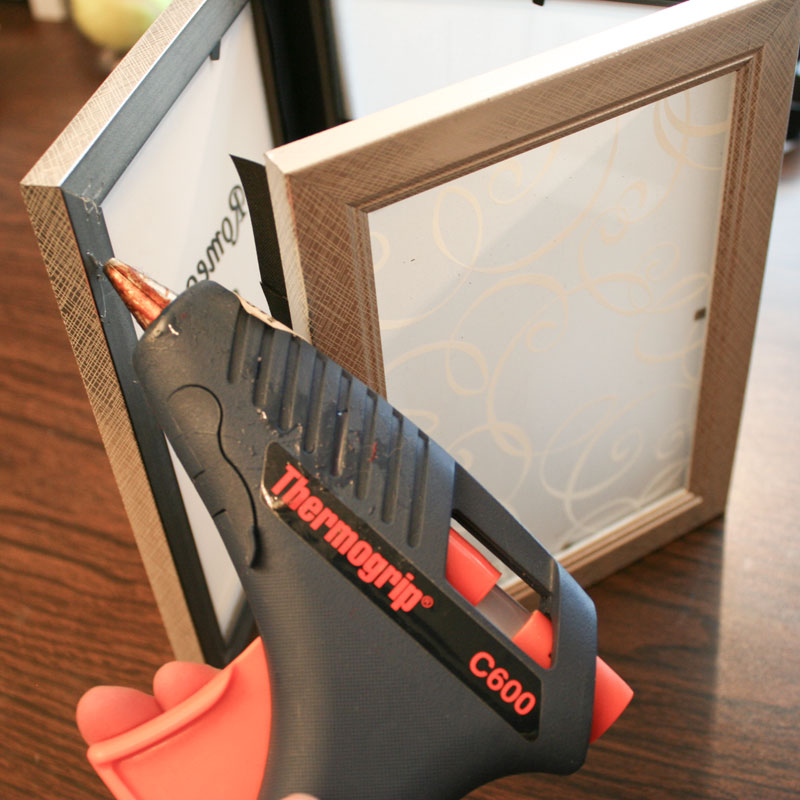
Push the ends of the frames together, creating that final third hinge. Use a metal ruler to poke and press the ribbon down into the glue.
To use the luminaria, just place it over a battery-operated flickering LED candles and set it on the table.
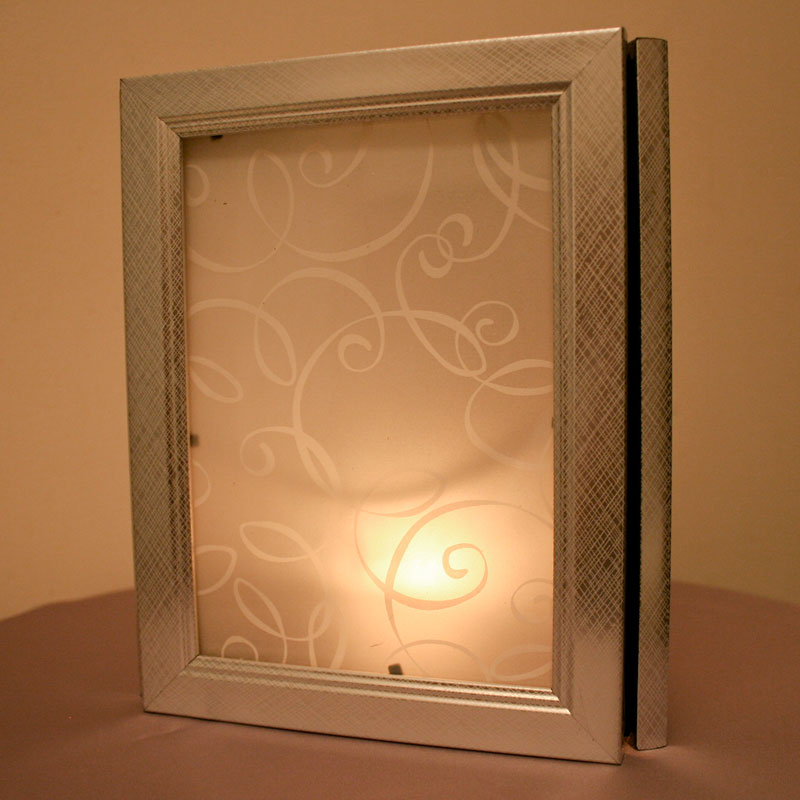
The flickering light from the candle will light up your vellum and the photo or other designs will softly show through beautifully.
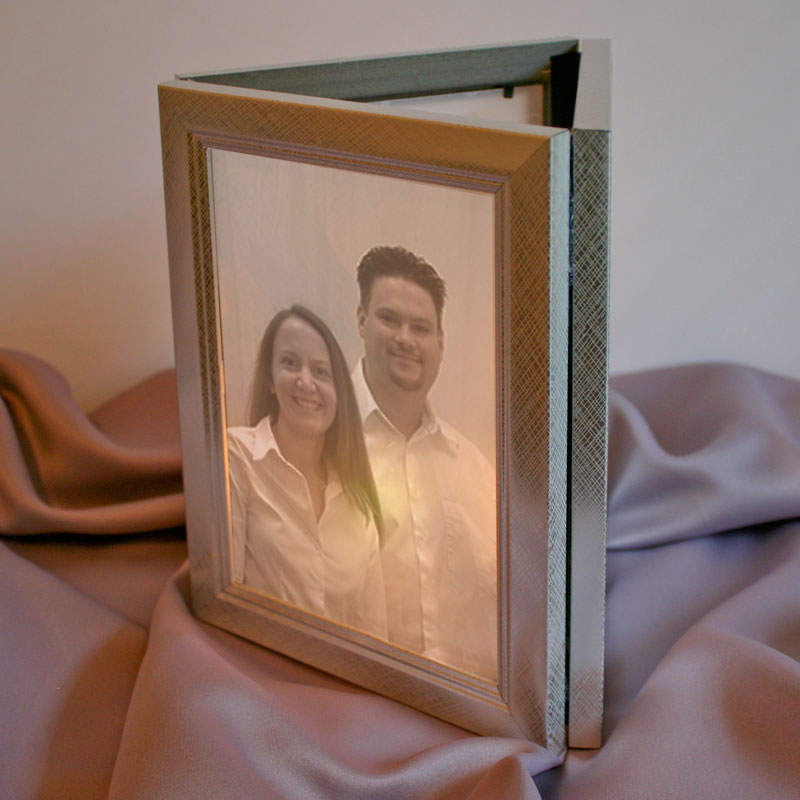
This will give a gorgeous effect to your table centerpiece, especially during special moments when the room's lighting is dim.

similar projects
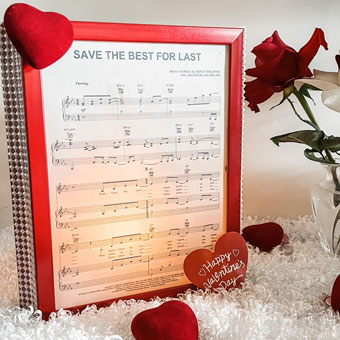
Sheet Music Candlelight Luminaria Valentine's Decor
Ribbon Wands with Bells for a Wedding Send-off

Champagne Wedding Centerpiece with Lights and Roses


35 comments so far:
These are fabulous, thanks so much!
Awesome!! And it's a dollar store craft. :) I will definitely link to this! :)
I really like these, I would love one just to have sitting on a shelf.
These are just beautiful!!! I wish I had some friends getting married because this is a CHEAP and easy way to make a darling centerpiece. I will keep this in mind if I hear of any one else getting married.
Thanks everyone!
Julie, you can use these for more than just weddings. As Shanon suggested, they can look pretty on a shelf, and they would make a great table centerpiece for any big holiday dinner, like Thanksgiving or Christmas!
I needed to create centerpieces which had little weight due to the need to carry them in my suitcase from AZ to Pennsylvania for my in-laws 50th Anniversary. I used the same idea, but substituted mat boards for the frames, sandwiching the vellum between two identical (back-to-back) mat boards (gold on one side, black on the inside), and used black masking tape for the 'hinge'. I waited until I arrived in Pennsylvania to adhere the final side (each luminaria was 5 sided). They were a big hit and represented both sides of the family well. Fortunately I had a LOT of old photos to choose from.
What a great idea, Angie. Mat boards would certainly be a lot easier to carry in luggage. I bet it was a joy for your in-laws and their guests to see all the photos over their 50 years together. Thanks for sharing with us!
I am doing this project, but when I printed my saying on the vellum paper in reverse some of the letters ended up backwards. Can you tell me how to do this?
Hi Amy. I suggest printing the design onto the back of the paper, in reverse (the letters will be backwards). Then flip the paper over and let the design show through, and it will appear in right order.
I can't find frames with frame clips. I tried tape but it doesn't hold the glass in firmly. Where did you get your frames?
Vanessa, I got my frames at the local "one dollar" store, where everything costs $1. If you can't find frames with clips, perhaps you can use hot glue to hold the glass in place?
I absolutely love these. I wanted to know if clear package tape would work as the hinge. The frames I have are clear and have words around the border such as its all about love, always and forever, etc. Could I use clear packing tape as the hinge or no? Please let me know someone!!
Liza, we're so glad you love this idea! Clear frames sound very pretty, and I think clear packing tape would work quite well to hold them together. My only concern would be once the candle is lit, if it generates enough heat to make the tape peel off or not. I suggest assembling one luminaria and light a candle inside and let it burn all the way, and see if the tape is affected or not. Then you'll know if it will work! Please let us know what you find out.
Hi Chica I have this concern too is there anyother way I can assemble the frames together? Please let me know. I have already purchased the frames but I'm having trouble coming up with an idea to put the frames together. What other ideas do you have that I can use with these picture frames? I have also considered just standing two picture frames back to back and using this as the center piece. Maybe spreading petals along the table and scattering tea lights along the table. Please let me know as soon as you can.
Hi Liza. Have you considered using a ribbon anyway, even if it will show? Perhaps a white or black ribbon (or even one in your wedding colors) would look nice, even if it shows through the clear frame? Or perhaps you could find some sheets of clear plastic (like acetate, transparency film, or even heavyweight page protectors) and then cut that into strips to basically make your own clear "ribbon". That might work to attach the frames just like in the tutorial.
And I just thought of something... if you use battery-operated tea lights instead of real candles, they won't get warm at all and your original packing tape idea should work fine.
If those techniques don't work, I like your idea of just using a few frames on the table, with petals and candles scattered around.
I used black electrical tape on black frames. It worked quite well!
Debbi, what a fantastic idea to use the tape like that. I bet it would also work well with the duct tape that comes in an array of colors now! We would love to see your finished project if you care to email us a picture.
Hello,
I was given this idea by a relative and want to use these for a rehearsal dinner centerpiece. My relative used tri-fold HINGED picture frames. Doing so seems to avoid having to glue the frames together. Now that I see yours, I think perhaps the gaps will let out too much light?
I like the idea behind avoiding the glue step, Karen, but I tend to agree with your thoughts about the gaps letting out too much light. It would depend on how big the hinges are, I think. Also, most tri-fold hinged frames I've seen have one hinge that goes in one direction, and the other folds the other way... I'm not sure you would be be able to fold them both backwards so that the ends meet. Know what I mean?
We are trying to make these for an event.
Any suggestions for keeping the vellum flat on the glass?
Kat, if you use tiny pieces of tape around the edges of the vellum, it should hold it flat against the glass.
Thanks! What type of tape would you suggest?
Regular household tape ought to do the trick!
I am trying these for my wedding centerpieces. I would love to use photos in one of the frames, but when I print the photos, they come out very dark. I've converted them to Sepia and Black and White and it doesn't seem to help. Any suggestions???
Diann, try printing the photo in draft mode. There should be an option for it in your printer settings.
Great idea! Looking into these for centerpieces at my wedding. What could be a good idea to makes bottom piece to keep the flame less candle inside if the frames were to be picked up??
Kris, maybe you could cut a triangle of cardboard and use hot glue to attach it to the bottom? How heavy the flameless candle is will determine how sturdy the bottom needs to be. If you try it out, let us know how it goes!
What is the purpose of the vellum paper?
Paula, the translucent quality of the vellum is great for having a printed design but also allowing the light to shine softly through.
What weight of vellum paper did you use? I see 67 lb. at Office Depot but also saw 17 lb. on Amazon.
Sorry, Liz, I don't remember what weight we used. Shouldn't make much of a difference, though, as long as you can print on it okay.
I absolutely love this idea however I am having a hard time printing more than 1 image on the vellum paper. There doesnt seem to be mucb help on the internet. I was trying to print 3 4x6 photos on 1 sheet of paper. Please help!
Nikki, that's a computer issue that's really hard to help with remotely. It depends on what software you are using to print. You might need to create a collage using something like Photoshop, or your computer might have something built in to let you print multiple images on a page. Your best bet would be to have a computer-savvy friend come take a look at your options and give you a hand.
Do you think this will work with just two frames? They will be displayed at a wedding on a shelf. No one will be able to see third picture
Kim, you would get a very similar effect with just two frames, but I have two reservations. First, they would be more likely to tip over if bumped, so make SURE you use a battery-operated candle and not an open flame. Second, the amount of light that shows through the frame might be diminished without that third back piece to hold in the light. If you want to save money on the third frame, maybe you could just use a piece of foamcore instead?