


How to Make a Drawstring Backpack

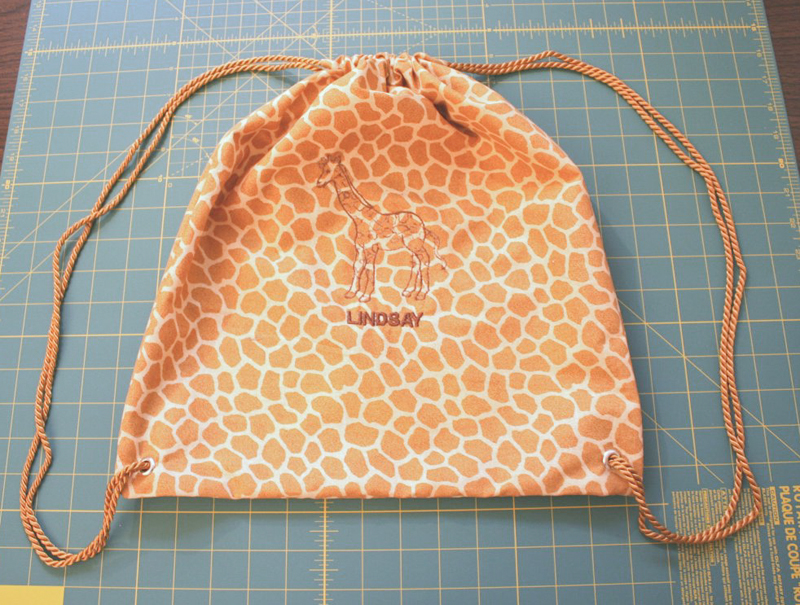
For Jo's daughter's recent zoo-themed birthday party, she gathered together all kinds of fun zoo-themed toys, snacks, and water for the kids. Rather than using ordinary plastic treat bags that would get thrown away after the party, I made the kids some drawstring backpacks that they could enjoy long after the party was over. They turned out so cute, and were really easy to make, too!
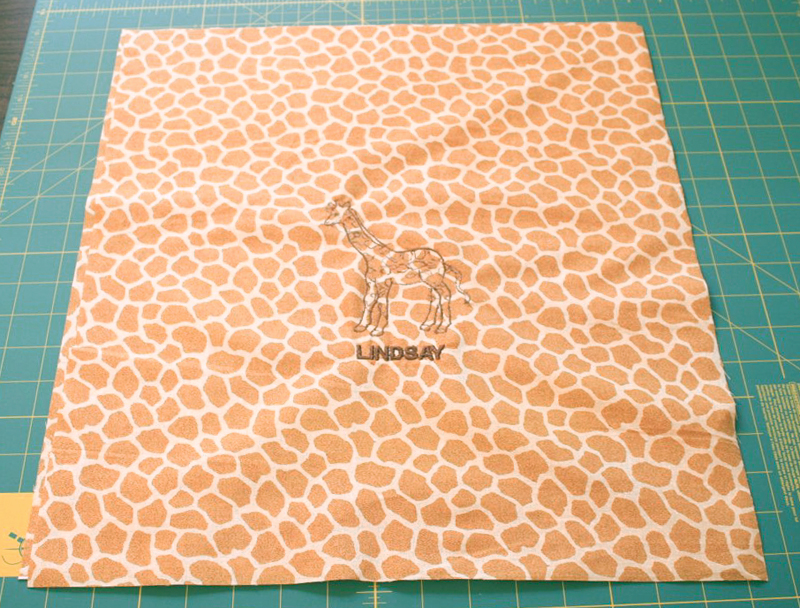
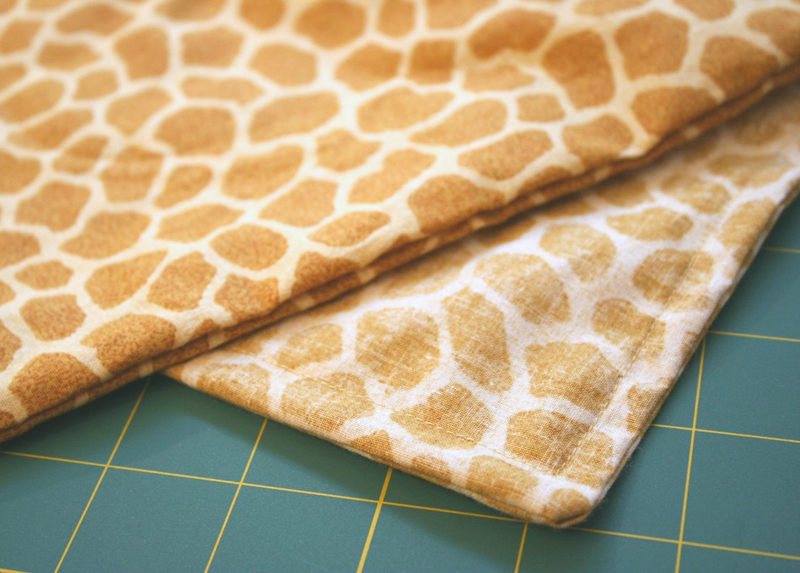
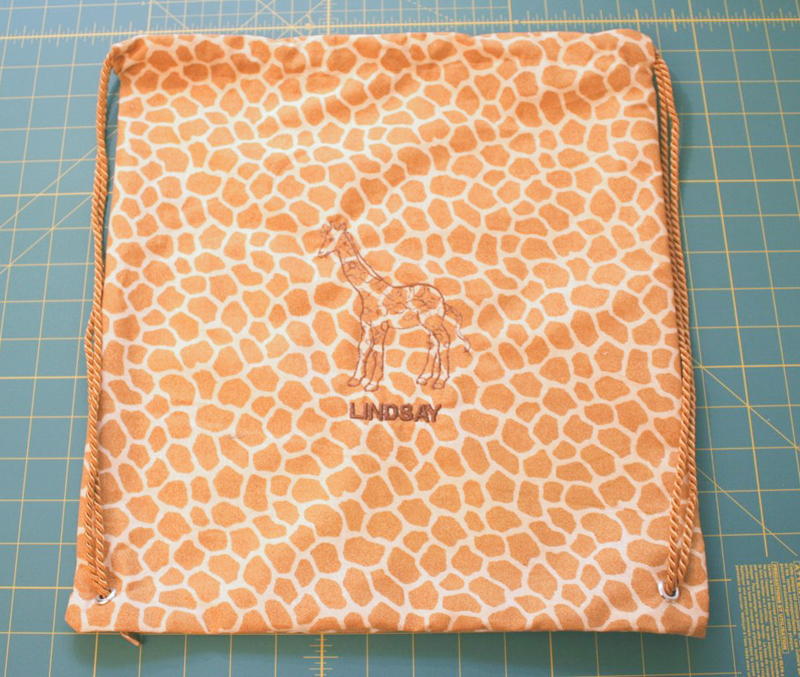
Of course you can make these bags with just about any fabric and any design, but to keep with the party's zoo theme, I used a fun giraffe print fabric and embroidered them with a picture of a giraffe and the kids' names. For the drawstrings, I used a pretty gold braid, although ribbon or just about any cord would've worked, too. To make one bag, you'll need two 16" x 18" pieces of fabric and two pieces of cord or ribbon that are each 2 yards long (so that's 4 yards total).
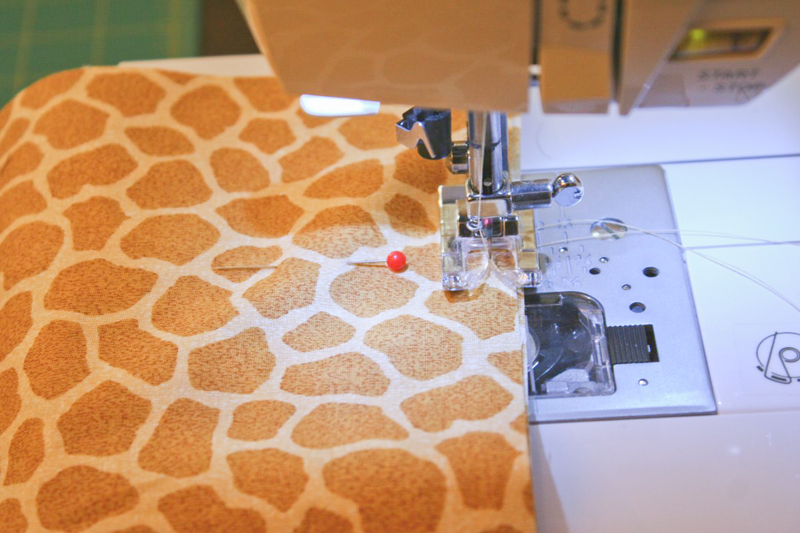
Put your two pieces of fabric together, wrong sides touching, so that the 16" sides are across the top and bottom and the 18" sides are on the left and right. Measure down three inches from the top right corner and mark the spot with a pin. Do the same on the top left corner. These pins will tell you where to start and stop your sewing, since we don't want to sew the very top three inches of either side.

Now start at one of the pins and sew along the two sides and bottom of the fabric, leaving the top (and the top three inches of each side) open.
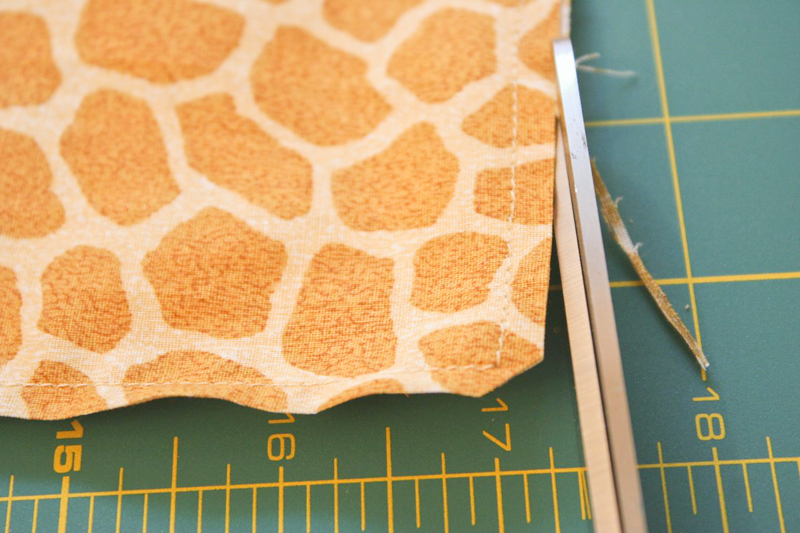
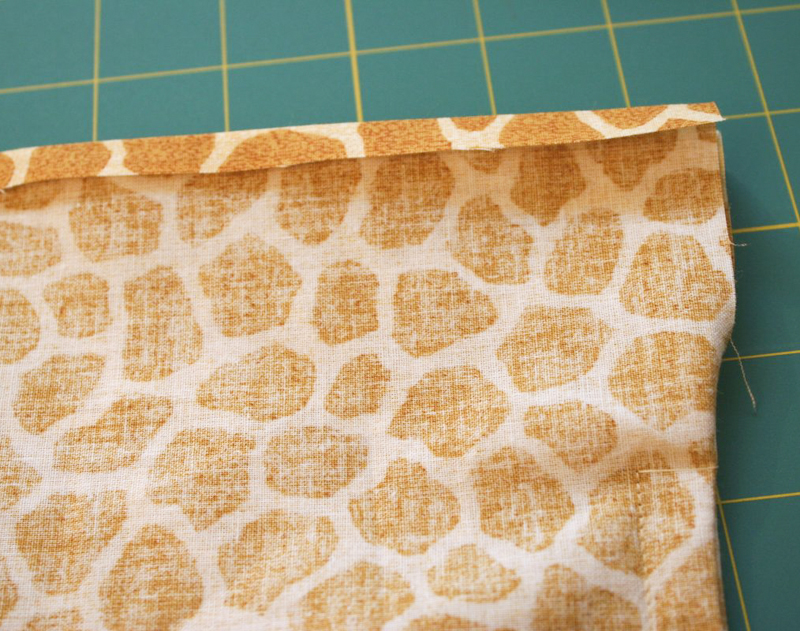
When you're done, trim the seam as close as you can (without risking cutting the stitches!) with a pair of scissors.
Turn the bag inside out, then sew again along the same three sides. Be sure that you sew in far enough to encase the edges from the first seam, which are now inside the bag. The reason for this double-sewing is to create a "french seam", which completely hides any frayed edges and gives you a pretty seam, inside and out.
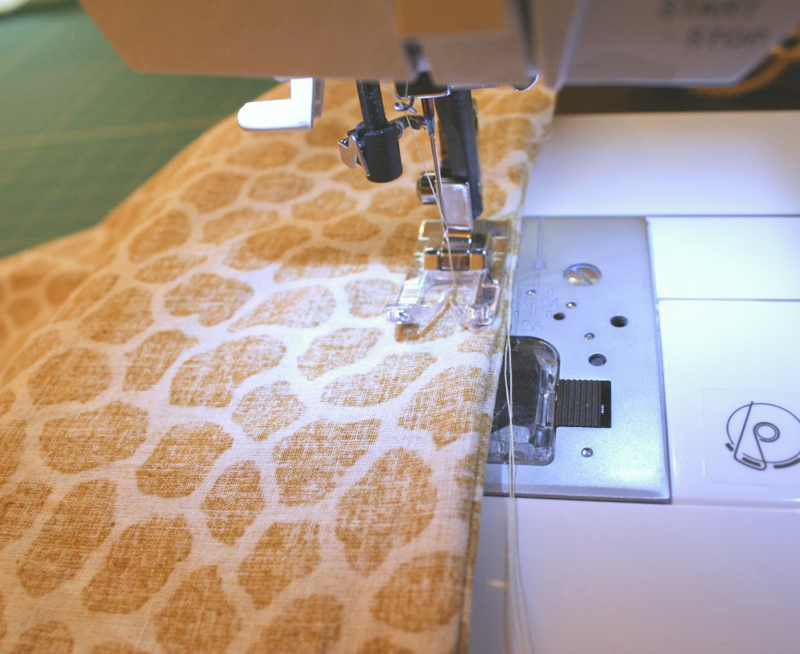
I love the clean look this gives. When you're done, turn your bag right side out again and you'll see what I mean.
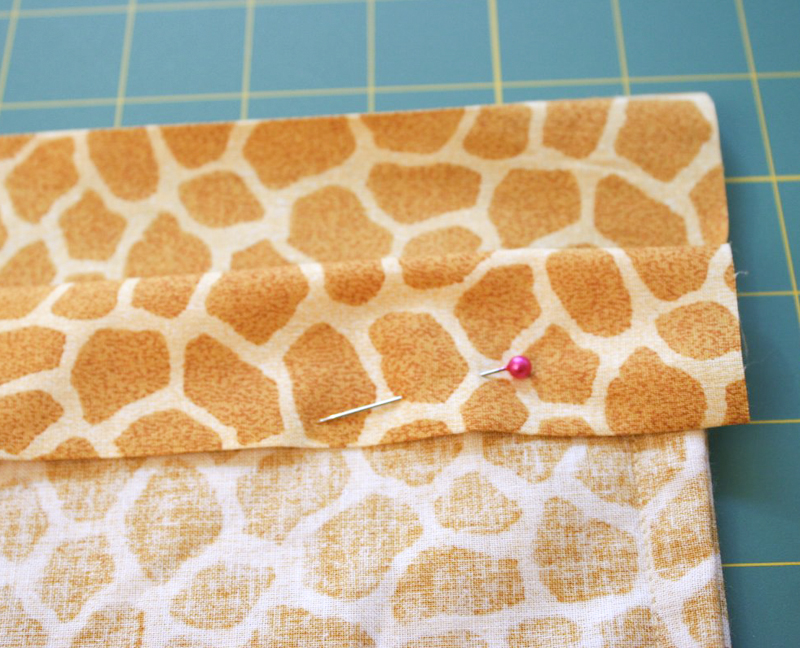
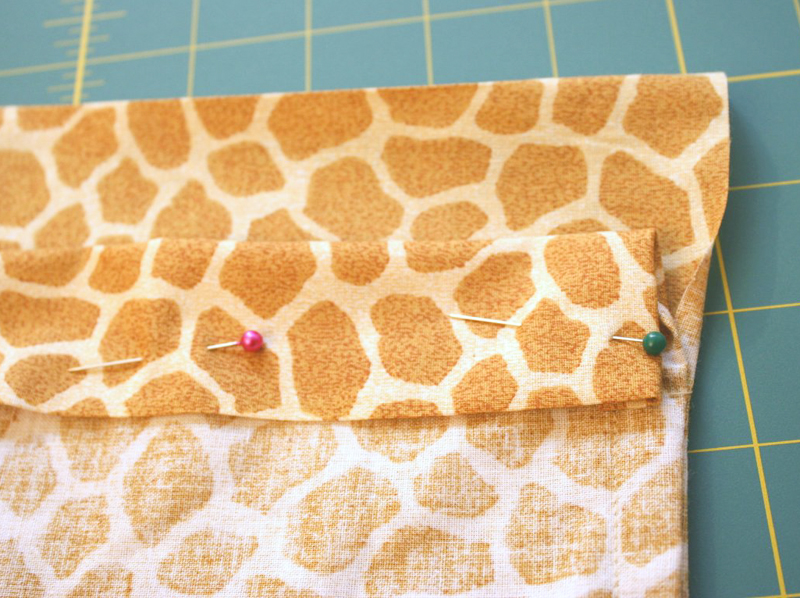
Now we need to sew the top of the bag into a pocket that will hold the cords. Turn the bag inside out and fold down the very top edge about 3/8". If you've got the time, go ahead and iron this fold flat -- it will make the next step MUCH easier for you, trust me.
Then fold the top down again so that the ironed edge comes down to where the stitches start on the side (remember our 3" mark with the pin?). Pin in place. See how this is making a nice pocket for the cord?
Then fold the sides of the flap in so that the fabric edges aren't showing and pin them in place. Do this step for the front and back of the bag. As you do this, be sure that you don't pin the front of the bag to the back of the bag -- just pin the flaps in place to make a pocket. The bag should still open with the pins in.
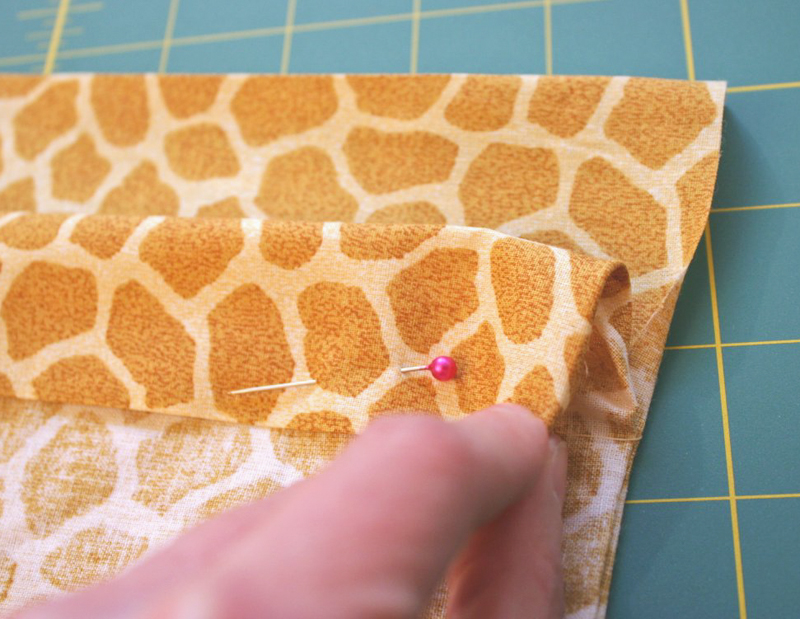
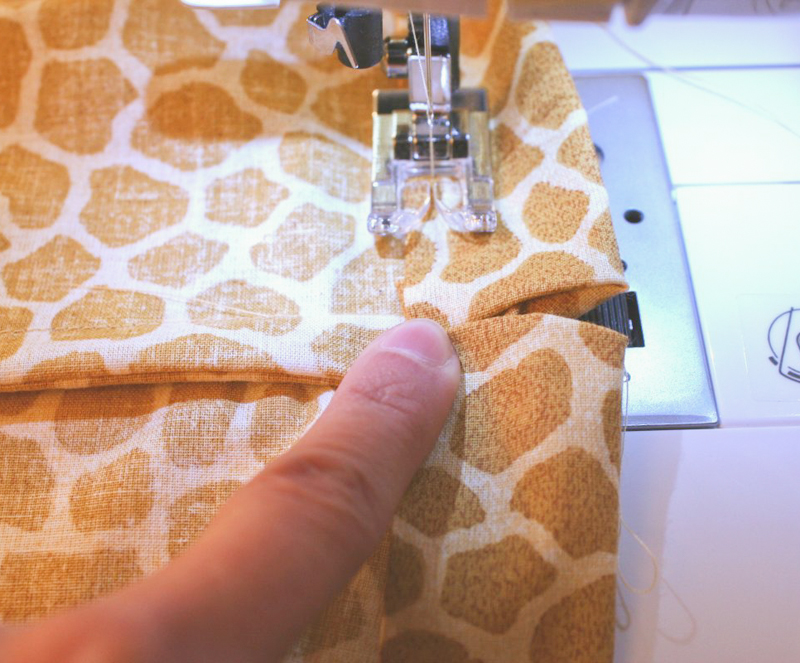
Now take the bag to the sewing machine and sew along the edge of the flap, where the pins are. When you get to the opening on either side, keep sewing straight and do not make any attempt to sew the openings closed. You need that gap on each side of the bag for the cords to go in and out of later.
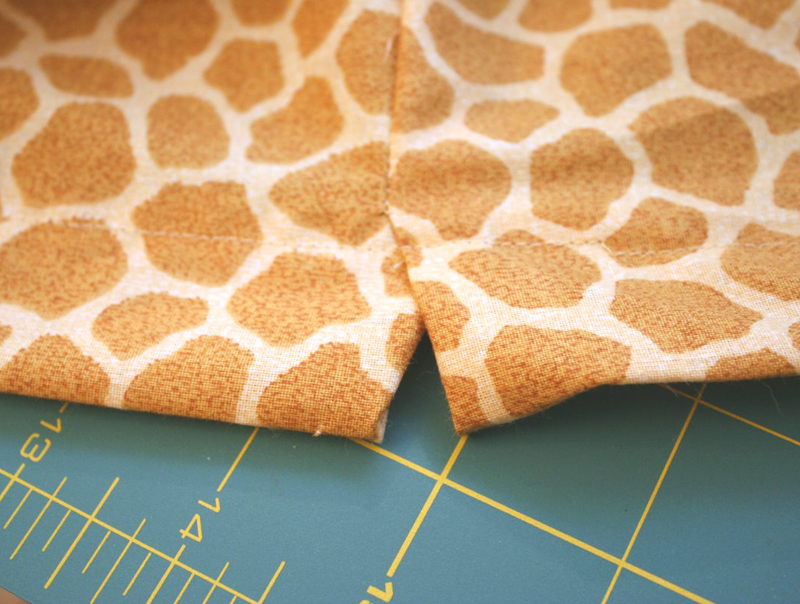
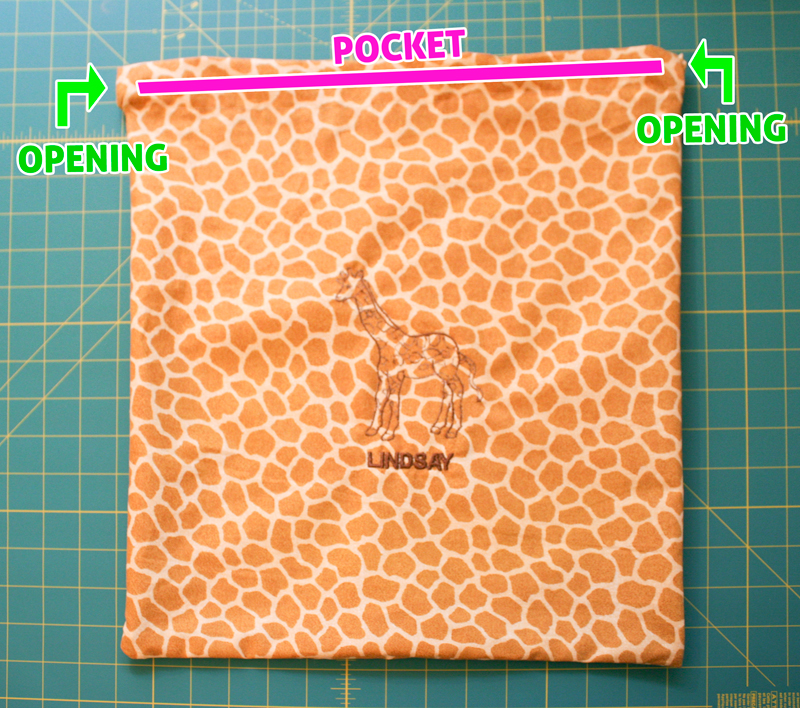
You should now have a bag with a pocket along the top edges, and openings on either side.
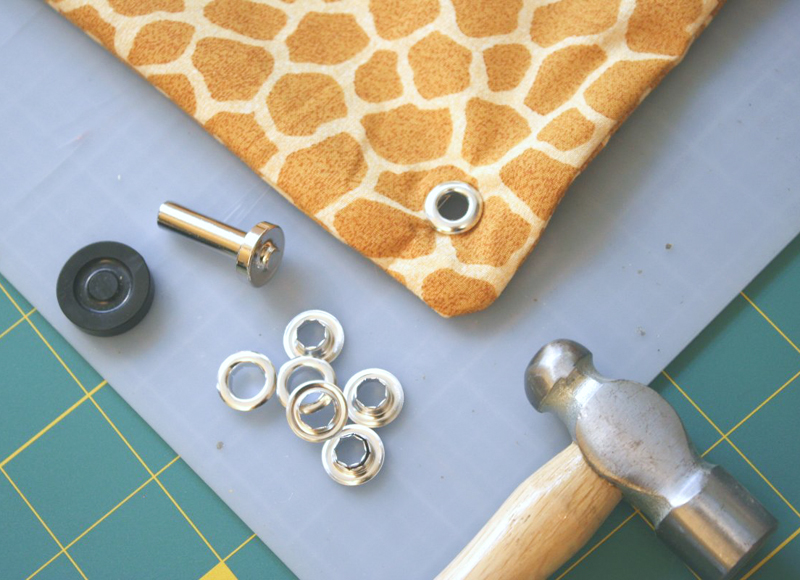
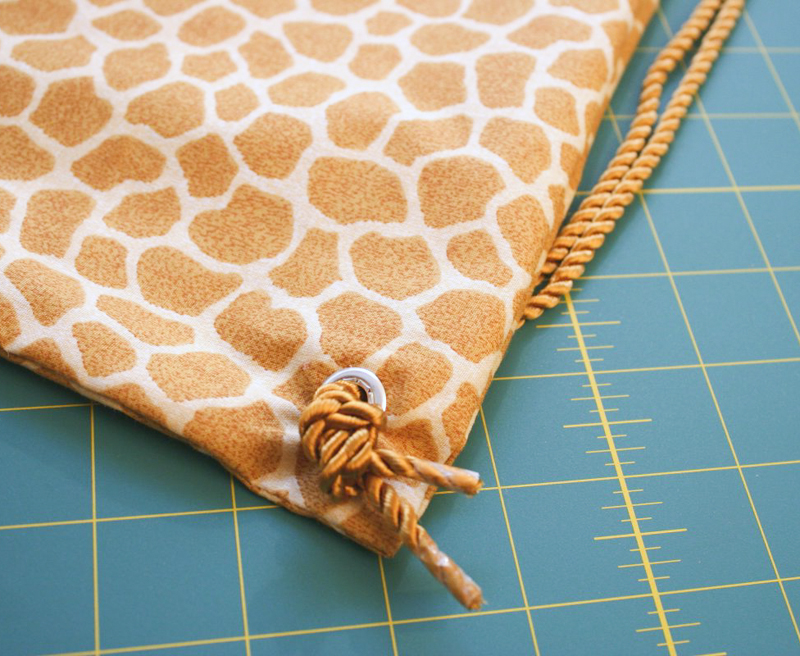
Turn the bag right side out and lay it flat on the table. Using your favorite grommets and setting tool, put a grommet into each of the two bottom corners of the bag.

Cut two 2-yd-long pieces of your cord. Take one of them and put a safety pin into the end of it. Insert the pin into the opening on the right side of the bag, into the pocket on the front of the bag. Using my technique for threading a drawstring, use the safety pin as a guide to push the cord through the front pocket until it comes out the opening on the left.
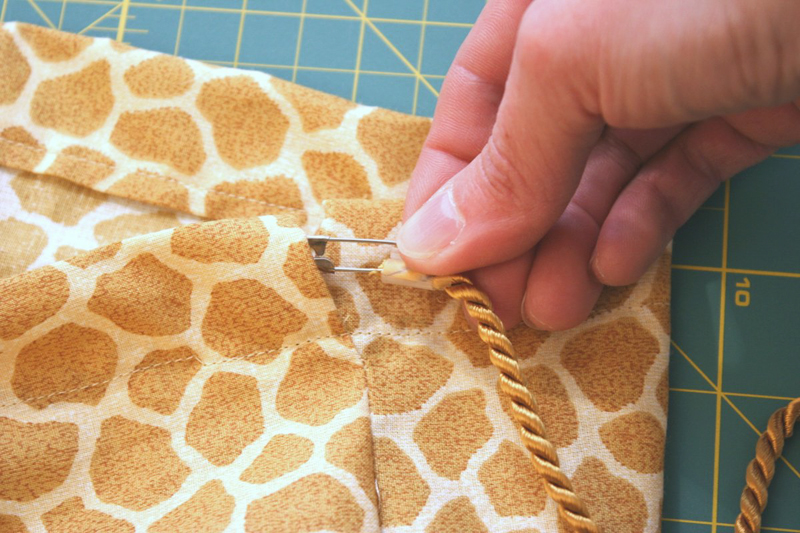
When the cord comes out the left side, feed it right back through the other opening on the left, in the pocket on the back of the bag, and push it through until it comes back out the opening on the right side of the bag. The cord should have made a loop around the whole top of the bag and both ends should be hanging out the opening on the right. Remove the safety pin from the end of the cord.
Now take the other cord and put the safety pin into the end. Mirror the technique you just did, this time starting on the opening on the left side of the bag. Push the cord through the pocket on the front of the bag, from left to right, until it comes out the opening on the right. Then feed it right back into the opening and this time go through the pocket on the back of the bag, ending up back at the opening on the left. Both ends of this second cord should come out the hole on the left now.
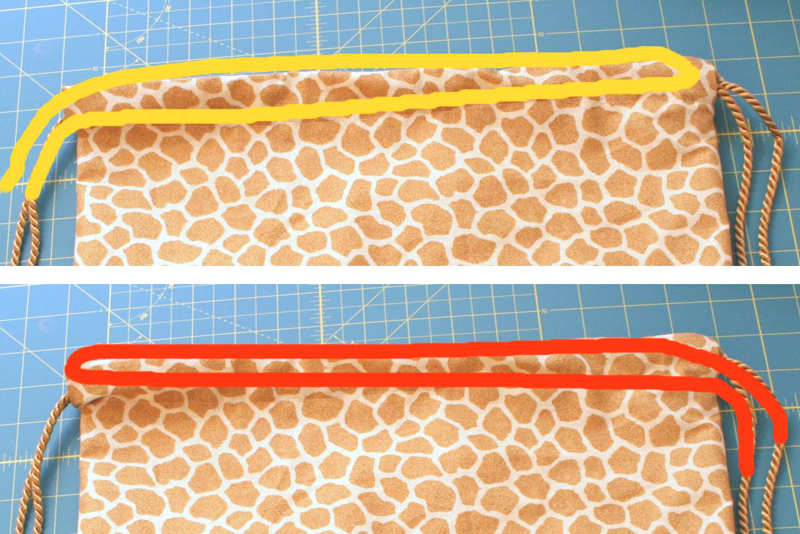
Here's a diagram showing how the two cords (indicated in red and yellow) are positioned in the pocket.
Take the two ends of the cord that are coming out of the right opening and line them up nice and straight, and push them through the grommet in the lower right corner.

Tie the ends in a knot on the back and trim any excess.
Repeat with the cord on the left, pushing it through the grommet on the lower left corner, and tying a knot on the back.
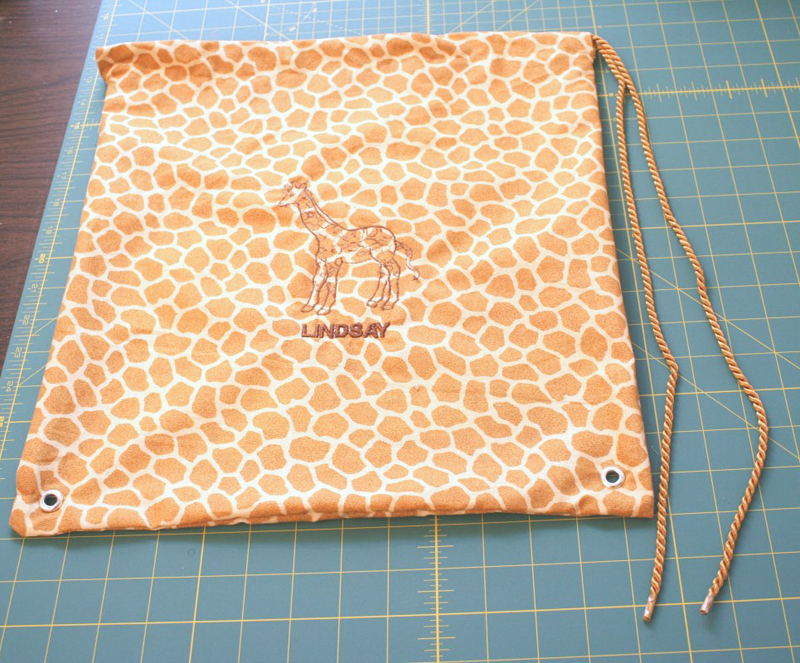
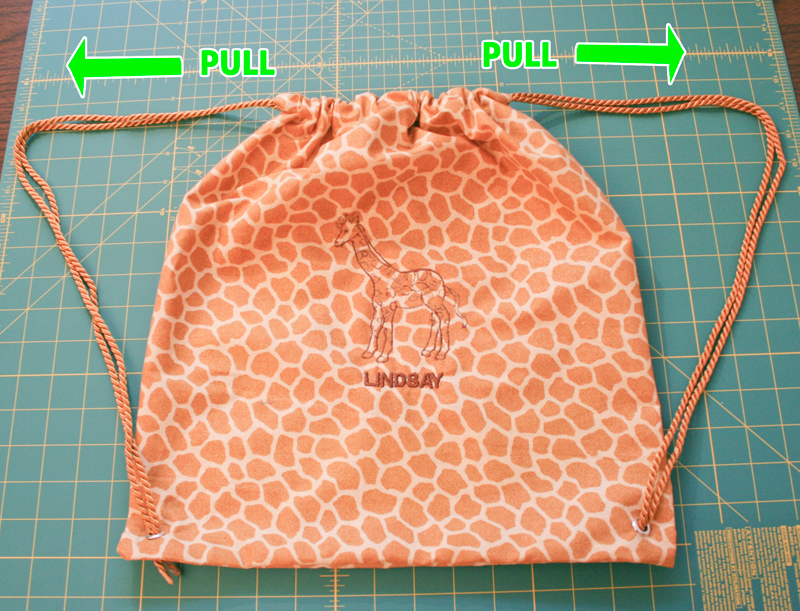
And now the bag is done! All you have to do to close the bag is pull on the two cords. Because we doubled them up in the pocket, a simple pull will automatically gather up the top of the bag and close it with minimal effort. So cool!
similar projects
How to Make a Drawstring Bag
Santa's Velvet Drawstring Pouch
How to Thread a Drawstring with a Safety Pin


108 comments so far:
very cool!
Aww cute! I'll be linking.
Great idea,....Cute bag.
This tutorial is amazing. You provide so much detail in your instructions that it looks impossible to mess up. I will give it a whirl. THANKs!
Thanks so much, Kathy! We try to make the tutorials as complete as possible :)
We'd love to see your finished project. Feel free to add a picture to our Flickr pool!
Anybody know where a good place to buy the cords at a reasonable price?
Paulene, I used one of the Hancock Fabric coupons to buy cord. Do you have that store near you?
I made two matching drawstring bags for my sister's twin boys and a little blanket out of the same fabric for her new baby boy because they are moving away. Now they have little bags for goodies on the airplane. Thanks for the tutorial.
You're very welcome, jen. The bags and matching blanket are very sweet. We'd love to see a photo, if you want to post one to our Flickr group!
I bought the cord for this project at a hardware store and it was only 10 cents per foot. I also bought the grommets at a hardware store. Since i was making 8 bags total i needed a lot of both. I walked out of the hardware store under $10. Much cheaper than a craft store.
Great tip, Mishael. Thanks for sharing!
I just finished making seven of these as Christmas presents for my Sunday School class. I think they turned out really cute. Because these kids are 6 years olds, I made the bags a little smaller -- 16x14 inches -- with shorter straps.
The detailed instructions were very helpful and easy to follow. One thing I discovered was that I needed to make a little clip in the selvage right above the side seams in order to get the flaps to lie down. Because of the French seams, I couldn't just fold the fabric in.
Hi Lisa! I'm so glad you found our tutorial easy to follow and that it helped you make bags for your students. I'm sure they will love them! We'd love to see a photo of your bags if you want to share it with us via e-mail or in our Flickr group.
Thanks so much for laying it out so well and understandable. I don't have any experience sewing but I would really like to make a bag like this. Do you think that this would be too difficult for a new person to do? Also, how much of a time commitment does a project like this require?
Thanks
Hi Danny! Thanks for your nice comments. I think this would be a great project for a new sewer to try. I would say that the trickiest part is the cord pocket at the top, so if you can totally understand my directions for that, then I say go for it! I would say it should take about an hour for a beginner and as short as 20 minutes for an experienced sewer to complete. Please let us know what you come up with... we'd love to see!
Thank so much!
IM planning my kids Birthday in 4/10/2010. it going to be a dora and Diego ADventure birthday and I will do dora and diego back pack.
Thank to you it going to be more easy for me.
What a wonderful idea, Lillian. We'd love to see your finished backpacks!
I am wanting to make a bag with the plastic slider on the drawstring. Do you know what those are called and where I can find them? Thanks
Hi Heather. I think you might be talking about a "cord lock". You pinch them to let the cord move, then release to lock it in place. If that's what you mean, you can find them here on Amazon.
I've been going through ALL of your articles in your site. I LOVE this place. Such wonderful, creative ideas!!
Question though; if I didn't want to use a grommet what else can I do with the drawstring? I saw a girl make a draw string completely out of an old t-shirt, including the dtrawstring. she didn't use any eyelet either but made a slit on the side and sewed it on on the inside
Hi Mina. I'm so glad you are enjoying our site! The idea you suggested about sewing the end of the cord onto the corner of the bag (instead of using a grommet) sounds like it would work fine, as long as your cord isn't too thick to sew easily. Good luck and let us know how it comes out :)
Was there a reason for the grommet instead of a small buttonhole?
Hi Lulu. I like grommets over buttonholes for this project because they are a little sturdier and are easier to add -- many folks (like Jo!) don't know how to sew buttonholes. However, it sounds like a buttonhole is a good option worth considering, so if you try it out, let us know how it goes!
I just made one and it looks great! Thank you so much for putting it up!
Thanks for letting us know, Maria. So glad you enjoyed the project! If you'd like to show us your creation, you can post a photo in our Flickr group.
I wanted to make a heavy duty drawstring backpack and found your site. The instructions were easy to follow. Went and got the goods. Used suede with UV resistant polyester thread and brass grommets that won’t rust. Sewing through the folded layers where the cord went through was a challenge but sewing the sides was fine. I used a single piece of fabric eliminating the need to sew the bottom and added a 45 sew on the lower corners to eliminate the fabric from pulling against the grommets. Put the cord in and was done inside two hours! Cool site…keep it going!
Steve, thanks so much for sharing your project results with us. I really love your idea to sew the 45-degree rows of stitching around the grommets... what a great way to reinforce the corners!
Fellow readers, Steve has sent us a picture of his finished backpack to include in our Flickr group. You can see his creation here!
That is such a helpful resource which you are providing and you give it away at no cost. I like seeing web-sites that understand the value of delivering a valuable resource for free. I genuinely enjoyed reading through your post ;) Many thanks!
Thanks Emmett! We hope to count you among our dedicated readers now :)
Wow! I've made two now. The second definitely looks better than the first. Thanks, you make it so easy. I've added some lettering to mine and now looking to add some beads. Thanks again.
Veronica, that sounds awesome! We'd love to see a photo of your bags if you want to add it to our Flickr group
So easy! Great instructions. The only things I would do different is use a heavier material (I used a leftover quilting cotton for a test run) and I think I'd make it a bit bigger, maybe cut it 20" by 24", because it came out smaller than I thought it would. I will definitely be making more of these! I might try a canvas-like material or denim or maybe a nylon. Thanks for a great idea! Going to try to make the Kindle cover (although for my nook) now!
Colleen, thanks for sharing your experience with us. We would love to see pictures of your projects if you would add them to our Flikr group.
hey I am having a Dora party for my 3 yr old daughter on the 19th of sept.......I loved ur drawstring bag idea and am getting 40 of them customized in our factory with each kids name printed.....I am also gonna roll a Dora picture to colour rolled up as a map in each of them
I just got done making the bags for 8 of my grandkids and they just love them .My grandsons play soccer and I made them with soccer ball fabric ,they can`t wait to take them to their next game . Thanks for this great project.
Martha, what a great idea! We would love to see pictures of the bags if you want to email them to us!
thank you so much for this pattern. i have already made 6 backpacks and it was very easy.
That's so great to hear, Marina! We'd love to see a pic if you want to e-mail one to us :)
I am new to the sewing scene and I found your website and decided to make a bag to sell to help raise money for a mission trip. I made one as a trial and had no problem at all. It was great except at the end I realized I forgot to put loops for the cord (seeing as I dont have a grommet). Oops. Anyway, other than that it is perfect. Thanks so much!!!
So glad to hear of your success, Sydney. Have a great trip!
Please let me know where can i buy the drawstring? I went to many stores and coudnt find a good and cheaper one..please help me
Zian, you can use any thin ribbon or cording you like. Try checking fabric stores and craft stores. The twisted cording like what I used on these backpacks will most likely be found in the upholstery section of a fabric store. Hope that helps!
These are such a neat idea. I've decided to make some to put in the shoeboxes that I'm doing for Operation Christmas Child. I'm curious to know what size grommet's to use??
What a nice idea, Michelle! The grommet size will depend somewhat on the size of the cord you use. For example, if your cord is thin, you won't want a very large grommet hole, or else you'll have to make a huge knot to keep the cord from slipping through. Hope that helps!
Wow! This is awesome! Thanks for posting this... This is easier than other guides... Thanks again! :D
I used a freebie bag until the seams fell apart - now it's time to make my own! Your pattern is perfect. The unique thing about the freebie - that I'd like to recreate - is a zipper pocket on the outside. It really helps to keep smaller things separate. The full width zipper is about 5 inches from the top and opens to a pocket the same size as the rest of the bag. Wish me luck! (I'll try and upload a photo when I'm done.)
A zipper would be great. We would love to see the finished product!
This was a lovely bag to make. I just bought a sewing machine and this was my first project. I have never used a sewing machine before, and was very pleased to find such a lovely thing to start off with. I did it in an afternoon (took my sweet time!) and was extremely pleased with myself. Your instructions were very clear and I could follow them easily. I particularly liked the French seam.
I am also looking forward to the picture of DavidaTN's bag with a zip. Would love to try it too...
Thank you!
Fabstarfish, congratulations on your new sewing machine! We're tickled pink that our drawstring bag was your first project, and that the tutorial was easy for you to follow. Hopefully we got you off on the right foot with a sewing hobby!
Hi! Thanks for the instructions.
One question. What are the measurements of the finished bag? Is it large enough to fit a regular sized spiral notebook?
Thanks!
Tammy, the finished bags I made are 14" wide and 16" tall, but you could use this same technique to make any size. This size should be plenty big enough to hold a regular spiral notebook.
Thank you for the suggestion of getting the cord and Grommets at the hardware store. I just looked on the Home Depot web site and the prices are very good.
Thanks for the tip.
KIm
I'm glad I found this website because I wanted to make backpacks as party favors as well put wasn't sure if was going to be easy or not. Also love the animal print because my sons 1st bday party will be held at the zoo as well :)
Jennyanne, glad we could simplify this for ya. Enjoy the project and the party!
I am a new sewer, and I thought I followed the directions, but on the website the cords draw from the 18 inch side of the bag. I had my 18 inch sides to the left and right as I thought the directions said to do, but my bag is wider than it is tall. I think I goofed? I obviously don't know how to read patterns. Other than that, it turned out fine so I will just have to make another one and turn my pieces in the right direction. Lesson learned.
Charlene, I'm glad you were able to complete this project, even as a new sewer! Don't worry about the sizes being off... you can make the bag any size you want. Nobody has to know what you intended to do :)
Thanks for your feedback, as a new sewer (age 65) its fun to learn, even if it takes a couple of times. I have a question. After I sew the sides and bottom of the backpack, when I trim the fabric, should I trim it all the way up next to the 3 inches that are not sewn or stop there? Thanks for any help you may lend.
Charlene
Thanks for the tip on the Sewing 101 video series. I've watched of few of them and there are lessons to be learned there! If I can bug you one more time with my backpack, how do I finish the edges that the cord goes through? I didn't see anything about that and I'm thinking the edges will fray. Thanks again.
Charlene
All i can say is "i'm so glad i found you"..lol you are a big help and i love your ideas..Looking for a patter for an easy fannie pack to put my dogs treats in..
Charlene, I just tucked the edges under for the cord channel. There's no sure-fire way to keep them from fraying without making the project much more complicated. Just try to tuck the edges in and it ought to be okay. Good luck!
Thank you, Chica. Your clearly illustrated directions solved a perplexing problem my wife Margarita asked me to help her with!:o))) B~D
Always glad to contribute to marital harmony, Bill!
This was an awesome pattern! Thank you so much. I have made 5 as gifts so far. I was always unsure about the whole French seam thing. Your directions made it super easy. Thank you again.
So glad we could help you out, Dee! If you want to share a photo of your bags in our Flickr group, we'd love to see it.
Phew! Turned out really great and cute ^v^
Making it took me about 3 hours because i only sew it by hand...sure it was a bit tiring but i still love it! Never in my life that would find a site that has steps and would be really easy to follow..but now i did!
Thank you, chica 'n jo..'cause of you guys i got an A...a big fat A!!thank you!!!~~~
That's awesome, Michelle! We hope you continue to explore our projects and have fun creating.
Thank you for the detailed instructions. I moved my laptop next to my sewing machine and followed step by step.. So next question, have you done one with a pocket or insert? At my daughter's middle school, they can only use 'string back packs'. I'd love to learn how to add a pocket to store her ipod, etc.
Just finished making 2 of these as Pom Pom bags for my 7 & 8 year old cheerleader daughters. Very easy and I did not do the French Seam because of time constraints but as since the monogramming is on the back anyway looking like a hot mess, figured some ragged seams wouldn't matter. Also, if I make any more, I am going to get the nylon/polypropelene rope at Home Depot instead of rope from the fabric store, it's only 22 cents a foot instead of 66 cents. I uploaded a pic to the Flickr site too!
Jessica, the bags look adorable! Here's a link to them on Flickr so others can see. Thanks so much for sharing that picture. Great tip about the rope, too!
Several people mentioned not using a grommet for the drawstring. How would that be done easily? I am a beginner.
Hey, I made this bag and I was almost done, but had to go to the store to buy grommets and cord. But the cord is 12in. short of 4 yards. (6in. short each side) Can I still do this project with my predicament?
Thanks so much for the directions -- I followed them exactly and the backpack came out awesome! I really didn't want to invest in a grommet tool, but in the end, between coupons and sales, I was able to get one at JoAnn's very reasonably and now I have something to make those curtains I've been wanting to make for a while with. I do like the suggestion of using rope from the hardware store, and I'll definitely check that out, because the drawstring can get pricey, depending on where you buy it. Someone said Dollar General has drawstring, so I'll be looking there as well. Thanks again! (Boy, I wish I had that embroidery machine.)
Milady, we're glad you enjoyed this project. Now get out there and use that grommet tool for something fun :)
Jorjy, it's hard for me to say for sure, depending on your measurements, but you will probably be okay with the shorter cords. I think the worst that can happen is that when the bag is completely open, there won't be much slack in the sides. If you're unsure, though, perhaps you can return the cord and buy longer pieces elsewhere? Some of our readers have suggested the hardware store as a good place to buy inexpensive rope that works well.
How big were your grommets. There are all sizes.
Michelle, you should use whatever grommet size works best with your cording. The grommets should be just big enough for the cord to slide through easily, but small enough so that a knot in the cord at the end won't slip through. The holes in the grommets I used were about 1/3" inch across.
I was just wondering what size cord did you use?
Michelle, I don't remember exactly what size cording I used, but looking back at the pictures which show it setting on a 1" grid cutting mat, I would guess that the cord is a little less than 1/4" wide. Hope that helps!
Made two of these for my girls to take to Disney this fall...quick and simple and oh so beautiful! Thanks for the WONDERFUL instructions!
I found 54 inch bright and neon colored shoe strings. I ordered some on line for $0.88 cents a pair with free shipping. I used two different strings on each back, these shoe strings are wider than normal and work wonderful.
Luci, I love that idea! Where did you find shoelaces at such a great price?
HI. I am a VERY inexperienced sewer, but this seems like it would be fairly straightforward to make due to your very clear instructions. I am intending on making this for my little boy as he needs a bag of spare clothes at nursery and I think that this would be perfect. I do have a quick question though: I would quite like to have a handle on the bag as I have to hang it on a peg at nursery, do you think that this is possible on this bag? If so what is the best way to do this? Thank you for any tips! Fingers crossed this goes well!
Hi Pip. I'm happy to hear that our tutorial has made this project approachable for a beginner sewer like yourself. It seems like you could just hang the bag by the straps without a problem, but if you want to add a small handle sized for the peg, I would just cut a length of ribbon about 4-6" long, bend it into a curved shape, and sew the two ends to the inside of the bag, near the top but below the drawstring channel. When you pull the strings tight, the little ribbon loop will stick out of the middle of the top, and you can hang the bag on that. Hope that helps!
Hi Chica
Many thanks for your suggestion; I will apply that to my bag. I am intending on making it this weekend.
Have fun, Pip, and let us know how it goes!
Hi, any suggestions on the kind of fabric to use for the bag? Me and my hubby are planning to DIY the loot bags to be given on our baby's first birthday.
Thanks in advance!
Joanne, the beauty of DIY is you can use any fabric you like! I would avoid anything too thin or thick, as either might give you trouble. For a baby's first birthday, a soft flannel might be nice, or a pretty cotton print.
thanks a lot,its very beautifulllllllll!!!! ;)
Thank you again, great gift for grandchildren sleep overs, I need one for my car. Nice :). !!!!!,
What size grommets did you use for the drawstring backpack tutorial?
Thank you
Mimi
Mimi, you will want to choose a grommet size that works with the thickness of cord that you use. For example, if your cord is thin, you won’t want a very large grommet hole, or else you’ll have to make a huge knot to keep the cord from slipping through. Hope that helps!
If I needed to make ten of these how much fabric is needed? I'm having a hard time figuring it out -_- thanks in advance!!
Mason, the amount of fabric you'll need to make 10 bags this size will depend on the width of the fabric you buy. The best advice I can give is to pick out your fabric then ask the store personnel who cut it off the bolt to help you determine how much you'll need for 10 pieces that are 16" x 18".
Thanks chica!! Just started making them and instead of embroidery I'm using fabric markers and making my own cute design!! Also using paracord instead of rope because it gives it more of a 'safari' feel (:
Tutorial is very precise. Wanted to make something that was not a tote bag for my young grandson. This is perfect. Thank you very much for sharing!
How do you keep the cord from unraveling? Just tie a knot and let it fray? I see you have scotch tape on the ends in the picture. Is there any other technique? Thanks!
Joanne, you could also try soaking the ends of the cord with fabric glue to seal them up, or possibly dab some hot glue on it (although I suspect that would get messy fast). Hope that helps!
Joanne, burn the ends of the cord with a lighter (or matches or whatever fire source you have handy). It'll melt it just enough to stop the fraying. An iron might work but I've never tried one.
Thanks alot this has been very helpful
Thanks!!!! I just needed to know how to restring a bag (our dog loves to eat those strings) and your drawing of the re-stringing was perfect :)))
Michelle, so happy we could come to the rescue!
Hi! I would like to know if there are "Front view and a Back view" of this. Like it inlcudes the dimensions and units (e.g. inches, cm) Would like to look forward to making this! ^_^
Lovely, both sides look the same, so there's no need to worry about a front or back. As for measurements, you can make your bag whatever size you want, but for mine, I used two 16" x 18" pieces of fabric and two pieces of cord or ribbon that are each 2 yards long.
I love the bag and everything about the bag. I am doing some with Ankara fabric and am selling it here in Ghana. Thank you.
I have a few questions: 1) when trimming the seam to make the French seam, should I also trim the top 3" that are not sewn? 2) do you clip the seam at the 3" mark to make it easier to fold the edges in? (I did that, but now I can see the inside of my French seam). 3)After ironing down the top edge 3/8" and folding it down to the 3" mark, my cord pocket is 2-1/4"; yours looks smaller, more like 1-1/4". What should it be, approximately? Thank you.
Susan, it has been quite a while since I made this bag, but I'll do my best to answer your questions! 1) Looking at this picture, I believe I did trim the 3" portion as well. 2) I did not 3) When you fold the 3" portion down, make sure you only fold it halfway, so that the edge of the fabric is lined up with that original pin. It sounds like you folded the entire 3" piece down, past the pin? I'd say your pocket should be in the 1-1/4" to 1-1/2" range. Hope that helps!
I'm new to sewing and wanted to try making something for my niece and nephew (4 and 6) after making tons of tote bags and bowl cozies. I decided to try drawstring backpacks so my niece could bring her favorite doll with her wherever she went and my nephew had a place to keep his iPad when he was forced to put it down while out and about (he's autistic). I'd only worked on very simple projects that didn't require anything other than a sewing machine, so using grommets and drawstrings was a nice change. I ended up using 4 pieces of fabric and added a liner to the inside of the bag. I trimmed the interior fabric down about 2.5" from the top of the outer bag so it would tuck just under the drawstring channel when it was sewn down. My niece's bag turned out so good that I decided to make one for myself!
Kalihia, congratulations for going outside your comfort zone and trying a new pattern! We're so proud of you :)