


Ribbon-embellished Blankets

Ever notice how you can give a baby a stuffed toy and the first thing he does is go straight to the soft, ribbon tag? Tags are fascinating to babies and they love to play with them and put them in their mouths. So why not make a blanket with lots of ribbons on it, so that the baby can focus on what she loves most? It's easier to do that you might think.
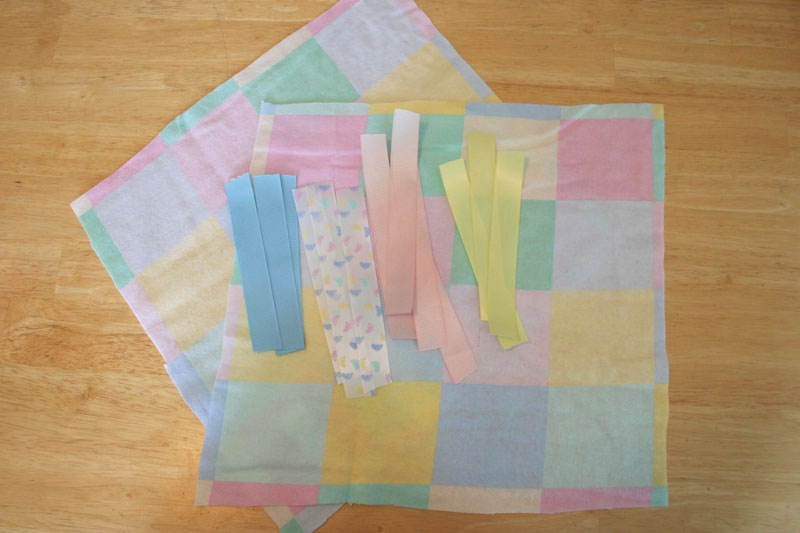
The material for your blanket should be something soft and baby-friendly. My favorite materials to use for this are microfleece and flannel, because they are super soft and thin enough to sew easily. You could use regular fleece too, but be ready for a battle with your sewing machine when you get to the part where you're sewing several thick layers of fleece and your thread wants to break!
For the ribbons, you can use any ribbon you like, as long as it's made of fabric and baby-friendly. I prefer satin and grosgrain ribbons. You can use just one color or mix and match the patterns of ribbon for the effect you want. My favorite ribbon width to use is 3/4", but you can use variations. This is a great way to use up extra bits of ribbon leftover from scrapbooking!
You'll also need some straight pins, thread, a sewing machine, and scissors for this project.
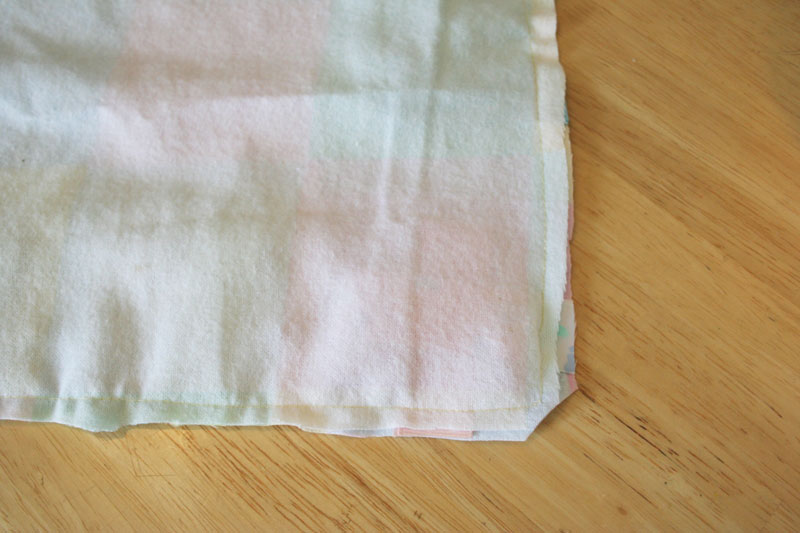
Figure out how big you want your blanket to be and cut two layers of fabric 1" bigger than that. In other words, for a 12" blanket, cut two pieces of fabric 13"x13" (Fig 1). That will give you a seam allowance of 1/2" on each side.
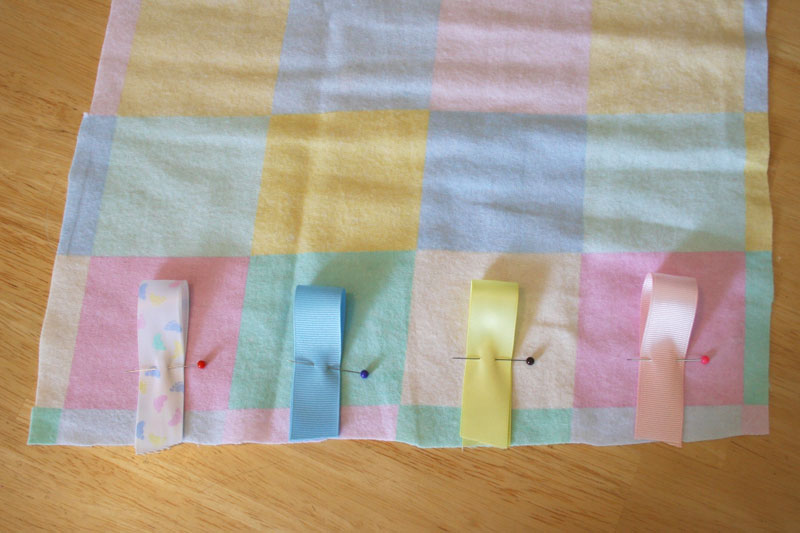
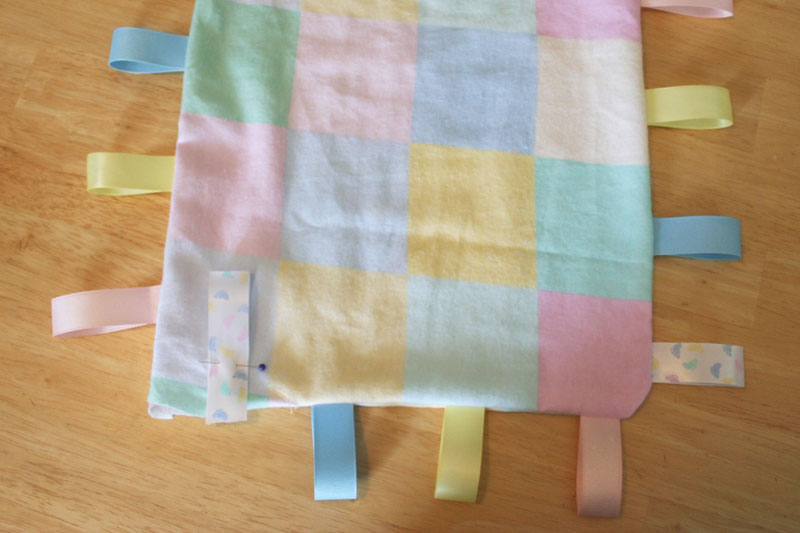
Cut the ribbons into 6" lengths. You'll need to put one ribbon about every 2 inches along each side of the blanket. For a 12" blanket, I use 4 ribbons on each side (16 total).
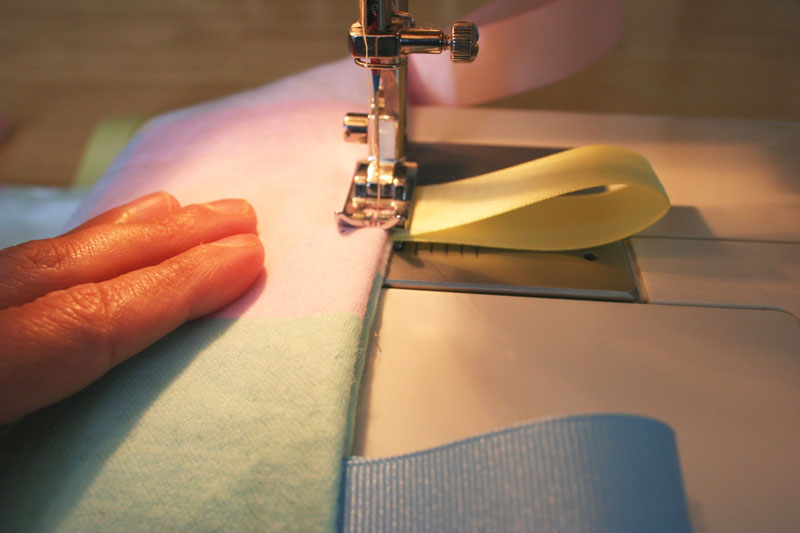
Lay one piece of material face up on the table. Take a ribbon and fold it in half and pin it on top of the fabric so that the folded edge is towards the middle and the two cut ends are touching the end of the fabric. (This may seem wrong, but we're building this blanket inside out, and it'll all work out when we flip it later.) Be sure to put the pin at least an inch away from the edge of the fabric so that it won't get in the way of your sewing.
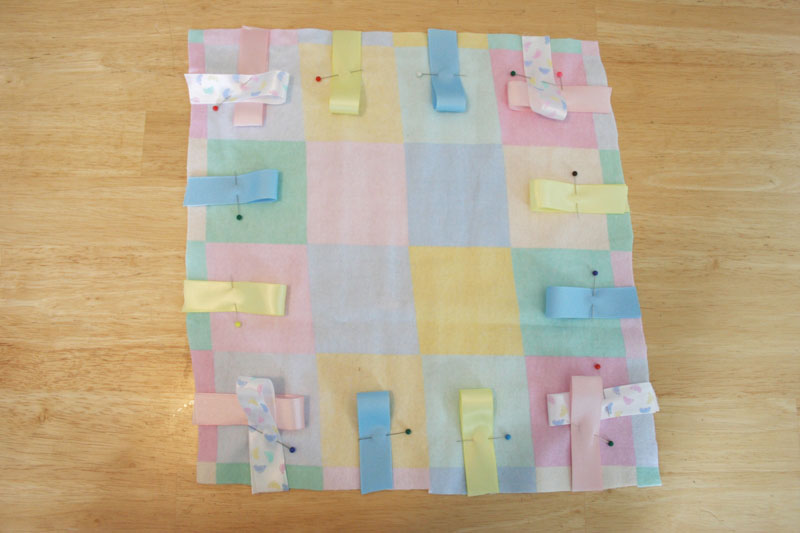
Keep pinning ribbons along one side, spacing them about 2 inches apart. Now do the same thing for the other three sides. When you get to the corners and find that two ribbons overlap, don't worry; just pin them down together.
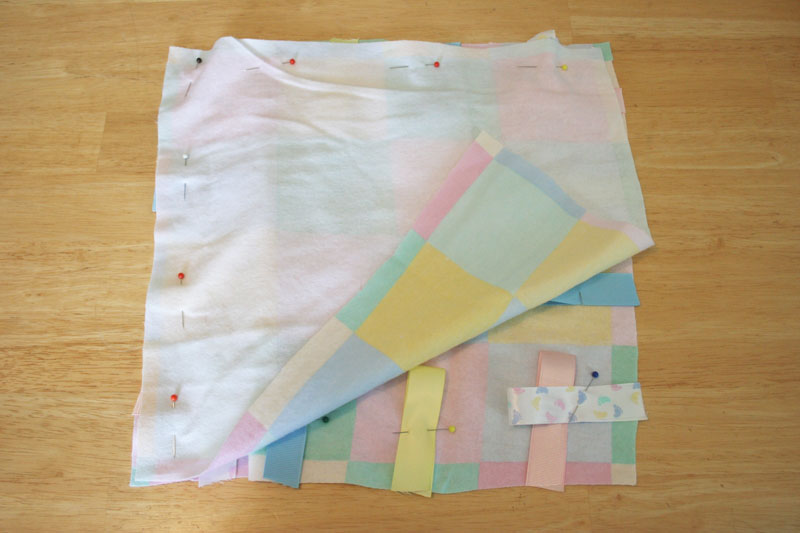
Now lay the other piece of fabric face down on top of your pinned piece, aligning the edges. Secure with a few more pins. Take this to the sewing machine and sew around all four sides, about 1/2" in from the edge, making sure you catch both ends of each ribbon as you go. However, be sure not to sew ALL the way around -- leave a gap of about 2 inches open -- so that you can flip the blanket inside out.
When you're done, take your scissors and snip the point of fabric off of each corner, but be careful that you don't cut the stitches. This will keep your corners from being too bulky when you flip it.
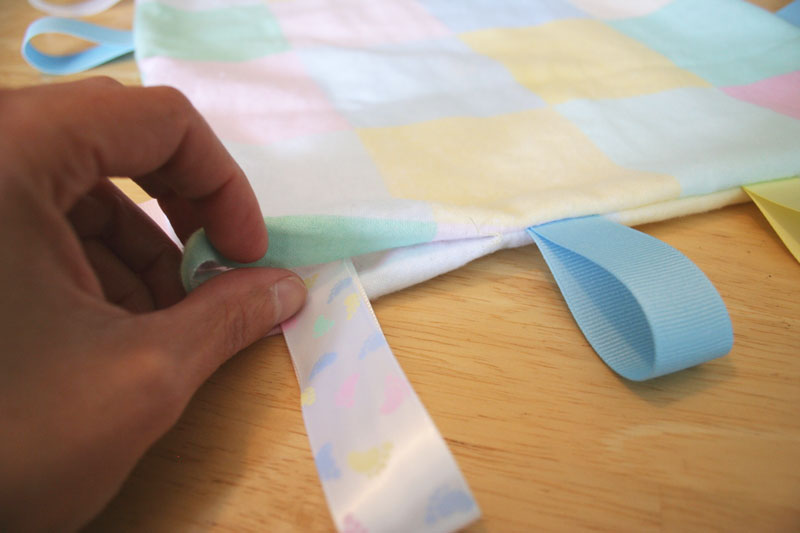
Carefully turn the blanket inside out by pushing it through the little gap you left in the stitching. Be very careful, because there are lots of sharp pins inside! You can remove all of the pins as you see them. You'll notice that the one ribbon that was next to the stitching gap is still loose, because you didn't sew it down.
Remove the pin from this ribbon, too. Fold the edges of fabric along the gap inwards and tuck the ends of the loose ribbon inside.
Pin it in place, being sure to go through all layers of the fabric.
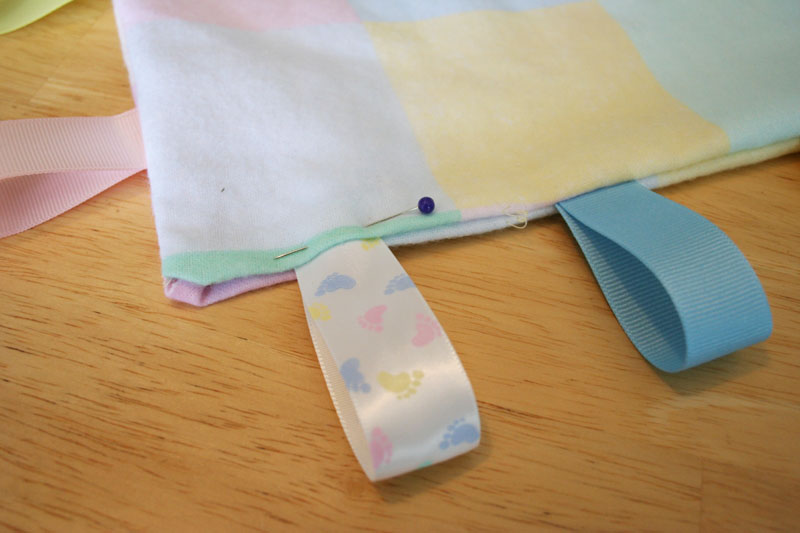
Now one more trip to the sewing machine. This time, you'll want to sew as close to the edge of the fabric as possible, and all the way around. This row of stitches will serve several purposes: it will close the gap you left for flipping, it will secure that last loose ribbon in place, it will add extra strength to the stitches holding the ribbons in place, it will help keep the blanket flat, and it will look pretty!
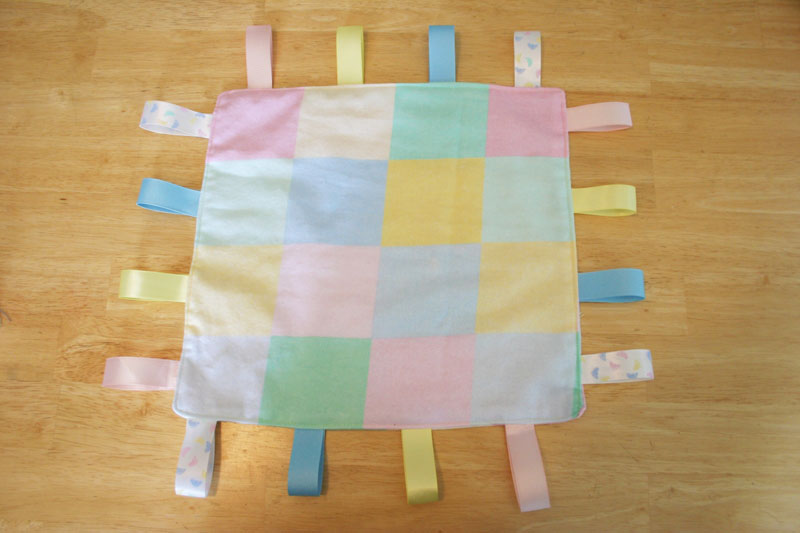
And now you're done!
similar projects
Make Ribbon Embellished Hair Elastic Bows
DIY Easy-Sew Baby Burp Cloths
Make Coasters from Curling Ribbon


57 comments so far:
THANK YOU very much for the details, and especially the picture!
do you know where we can buy the ribbons for the taggie blanket? Do you have to make them individually? Thanks
Monica, you can use any fabric (not plastic) ribbon you like, but I think satin ribbon works best. There are plenty of patterns to choose from at the craft store, fabric store, or even Walmart. You can buy it by the spool or by the yard. I suggest getting 3/4" wide ribbon and cut it into 6" lengths.
I'm super glad that I came across this site- my 7 month old eats the tags/cords on everything- hopefully this will deter him from those- now that he'll have his own tags to chew!
I made one of these. I actually pinned the tags in place on the flannel, I did a basting stitch to keep them in place, then I layered and sewed the 2 layers together, this kept me from having to use all of the pins on loose ribbons when sewing.
I just made one for my daughter. its the second time i have used the sewing machine and it came out great! thanks alot!! :)
I just made my daughter one, she won't let go of the other one we got for her, so i can wash it. So I decide to make one. It's the 1st time I have sewn anything since High School 15 years ago. Thank you for the simple instructions. Now I will making them more for baby gifts. Also I work at a Daycare Center, and you have tons of cool ideas on your website. Keep up the good work. God Bless!
Mindy, I'm so happy that we got you sewing again, and thanks for the kind words about our site! The blankets are so fun and easy to make and do make great gifts :)
I made a few of these.. roughly 10" x 10" (not counting the ribbons) I used two totally different textured fabrics. One side with a print and the other with either fleece or fluffy/soft or even satin. I also cut a piece of plastic bag (poke holes in it to avoid suffocation!!) and i sew it on the same side as the ribbons are on. when you turn it inside out the plastic is on the inside and it makes a crinkly sound, which babies love! IMPORTANT: Never leave your child unattended with these toys! Never let them play with these while on their tummy unless supervised, and make sure the ribbon loops are small enough so their hands cannot get in and get stuck.
Linda, those sound great! The crinkly plastic is a very cool idea. (Thanks also for the safety warnings. You can never be too careful!)
I have made three of these ribbon blankets now. I made two for baby shower gifts and then someone saw them and ordered one from me.
I had everyone that came to my daughter's baby shower bring a piece of ribbon in a plastic bag with their name on it. I had enough ribbons for 2 blankets and typed the list of names and ribbons on a piece of cute paper for her to look at later.
I decided to do this for my son, and I swear someone was listening... The next day I got an email from my favorite craft store, and all of the stuff I needed (fleece, ribbons, everything!) was 52% off!!! hehe So, I'm working on his. One idea that I came up with (as I was wandering the store...)--I got a "micro-fur" fabric, has a very short, extremely cuddly pile to it, but it's not "fake fur" tacky--I didn't think I'd be able to get it back to sew, he loved it! I put regular fleece on one side, and the micro-fur on the other, with the tags on the edges. I may never get to wash it, he won't let it go! Thanks for the instructions!
Tiffany, that's such great luck! I'm glad your little one gave the fabric up long enough for you to turn it into a blankie that he still loves. Great job!
Thanks so much for these instructions. I just learned how to sew and this was so simple with your directions. THank you so much. I have a wonderful tag blanket that I made for my niece. I'm looking forward to making the burp cloths next! Thank you!!
HI -- great directions. However, I found that 6" lengths of ribbon were too long. Then reduced to 5".... still too long and "scraggly" looking -- plus I was concerned that a baby could choke on ribbons that length. Finally pared down to 4" cut length folded in half, leaving 1-1/2" sticking out of the blankie. PERFECT! Looks better, safer for baby, and uses less ribbon!
Vicki, thanks for the tip. I'm glad you were able to tweak the directions to make them work for you!
If I want to make a 12x12 taggie I cut the fabric 13x13, but what size would I cut my fabric if I wanted to do one side with a nine patch?
Hi Katherine. You can make the finished blanket be any size you like, so don't let that 12"x12" guideline hold you back. However, if you that's the size you want to aim for, and you want to make a nine-patch quilted side with 1/2" seam allowances, I'd recommend cutting the nine squares at 5" x 5" each. Once the nine pieces are sewn together, you'll have a block that's 13" square. Cut the backing the same size, and once you sew the front and back together, your finished blanket should come in right around 12". Good luck and let us know how it goes!
I'm expecting two grandbabies in the next few months. Learned about taggie blankets while standing in line in a fabric store during a fleece sale. So cool. I've made several and plan to make burp cloths with matching taggie blankets. I know this "grandma thing" will be so much fun.
Mary, congratulations on your coming grandbabies! Sounds like you're off to a great "grandma" start with the blankets and burp cloths. You saw our burp cloth tutorial, right?
I have made a blanket like yours as a gift without finding yours website, cutting the ribbon to 5.5 inches but have felt worried as only stitched once, so have now made another one first zig zagging the ends of ribbon to one piece of fleece and then has been stitched twice like yours. A friend has said that she is still worried about babies choking on these tags there is 2.25 inches protruding. Any comments welcome
Marion, I think the ribbon length is a judgement call that every parent/sewer will have to make. They need to be short enough to be safe but long enough to be fun for the child. Maybe some of our other readers will have thoughts on the subject?
I made one taggie blanket with both sides made from flannel. That one turned out great. My second blanket I used flannel on one side and soft & comfy fabric on the other side. I had a heck of a time with this fabric! No matter how perfect I cut my 13 inch square the fabric kept stretching bigger. I started over and still this happened. This fabric is $12.99 a yard! What am I doing wrong? Is there any other ideas for a soft textured fabric that I could use instead?
Katherine, that must be so frustrating! I wonder if the problem is due to the fact that you are using two different fabrics? Maybe they are not moving well together, and one is stretching while the other isn't. If that's the case, maybe you could try using LOTS of pins to secure the pieces together, or possibly even baste them together with needle and thread to keep them secure before sewing with the machine. Or maybe make both sides be the soft fabric?
Chica, that sounds like it might be the problem. I never thought about the fact that my flannel wasn't moving but the soft & comfy fabric was. I just pulled it all apart and will try adding lots of pins this time. I'll let you know how it turns out. By the way... aren't most of the taggie blankets that everyone is making made with two different kinds of fabrics? I thought if I was going to make these to sell or give as gifts they would look more expense with two different kinds of fabric.
Maybe the two-fabric styles you're seeing are actually the same type of fabric, but just two different colors? Or maybe they really are two different kinds, but they are more similar than yours? I'm not sure :/
My bottom fabric is flannel. The top fabric is called soft & comfy. It's a soft fabric that has raised dots on it. This fabric is like what you see some of the regular baby blankets made out of in the department stores. Do you know what kind of fabric I'm talking about? They only come in solid colors and usually have a raised design on them.
I did some searching and found Soft & Comfy online. It looks quite similar to the Minky fabric that I've seen before. Unfortunately, I don't have any experience sewing with either one, but hopefully you'll be able to work around the issue by pinning or basting. Good luck!
THANK YOU sooo much for this... found your website, looked at the instuctions, went out shopping with my son so he could pick some fabric, laid him down for a nap and got to work. I'm finished after only about half hour, and i love it! this will be for his second birthday, and i plan on making a few more for upcoming baby showers!! once again thank you. i plan on visiting your site frequently for more crafting ideas!!
After being a bit bored at home with my baby, I purchased a sewing machine today having never used one in my life before. Thanks to your great instructions in half an hour I now have a wonderful tag comforter that I made myself! I mixed it up a little by using soft patterned cotton fabric on one side and minki on the other and it is just fabulous. I can't wait to try some other projects now! Thank you!!!
Oh my goodness!!! I just made this project and it is absolutely adorable! The directions were very easy to follow and the pictures helped so much. Thank you, Chica, for sharing this project - I can't wait to make them for all of my friends!
Katy, that's so awesome to hear! I'm glad you liked the project. :)
I am about to make some of these now. I decided to buy a package of receiving cloths to make the blanket. I like to use them because they are cheap, easy to use and thin.
Bailey, using the receiving cloths to make the taggie blankets is a great idea!
Hi! I am a tween who loves sewing and this is perfect since my cousin is having a baby boy. It is so easy! I love all of these ideas, So creative!
Maggie, I'm so glad to hear that you're crafting at a young age and excited about this project.
Another new project on the front burner! I'm planning to make tons of these for our Church Christmas Craft Fair in November. One question though - I've seen these made exactly like these, then the tags are "heat sealed". Could you please tell me what this is? Thanks so much.
Hi Rachel! You know how some ribbons will fray if you leave a cut edge exposed? Well you can seal the edge by CAREFULLY holding it very close to a candle flame, so that the heat of the flame causes the fibers to melt ever so slightly and bond together. This is what is meant by "heat sealed" and should only be necessary if you leave the ends of the ribbon hanging out of the blanket. If you fold them into a loop and tuck the ends inside like we show in our tutorial, you won't need to worry about sealing them at all.
Good luck with your craft fair, and we would love to see photos of your tons of finished blankets!
These are cute, but I'd worry about the little ones getting a finger twisted in the loop of the ribbon. If I were making one, I think I'd stitch a line down the center of each ribbon to seal the opening.
Wow this stuff is amazing!! I am a stay at home mom with lots of time on my hands! I find it really hard to sleep while my son naps during the day and I was looking for activities to try out! This is the perfect idea! Lots of babies were born this year in my family (including my almost 3 month old son) so I was thinking what a great idea this would be for those babies (and maybe even the toddlers)as Christmas gifts!
I think I am going to go hunting for supplies tomorrow morning! Oh I can't wait! You have no idea how excited I am (sorry if I'm coming off as strange)..lol. Just the thought of having something to do until my son wakes up makes me happy :) Thank you so much for this! Can't wait to start!
Thank you so very much for this! I made my son a Halloween tag blanket with black corduroy on one side and silky green polyester on the other and Halloween tags all around! It is adorable & I had no problems with your instructions ( I did however have a problem filling up my bobbin LOL ) ! My son loves these blankets so much, I plan to make more!
Thank you for the instructions! I can sew minimally so need help! :) I used the bumpy minky fabric on one side and it was hard to work with. I used lots of pins and held it taut as I sewed. I made sure to place the ribbons on my other more stable fabric though as I pinned them in. The taggie did not come out as aligned as I would have wanted but the baby will know no different! ;) I am making this more for the tactile aspect than the pretty aspect anyhow.
Wonderful instructions! I made my 1st one tonight. I messed it up a little on the corner where that last ribbon is though. One question...are you supposed to wash this after it's completed and before use??
Rachel, congrats on making your first blanket :) Since these are headed straight for a baby's mouth, I suggest making sure the fabric is nice and clean. You can either wash the fabric before you sew, or wash the whole thing afterwards.
My 1 year old is attached to his taggie and we have lost. I have been to every store in my hometown and noone has them so I decided to make him a few. The instructions and pictures are wonderful thank you so much. You are a life saver and I am sure Ryan will thank you as well!
Thank you so much for posting the instructions and great photos to go with them. This is very helpful! My husband and I will soon be traveling to China to adopt our son and I want to make some of these for him (for the plane ride home!) and also a bunch to donate to the orphanage. These little taggies will be a big hit I am sure and will be great for encouraging sensory and motor skills. THANK YOU!! :o)
Marianne, that's a wonderful idea. Have a safe trip and congratulations on the addition to your family!
love these. i make mine 8x8. i also put a teether on one of the ribbons. it still washes great.
cheers, found some people online that make these , i asked if they do custom pieces, haven't had a response so decided to make it myself... seems pretty straight forward to me :)
Thank you so much for your tutorial. This was my first sewing project and you made it very easy & fun! I have a long way to go with my sewing but I'm off to a good start thanks to you :)
Hi! I've found that using no snag velcro strips in place of one or two tags is handy in attaching a small toy or two to the blanket! It folds over just like the ribbon but has dual purpose! I have a few babies recently born in my circle of friends so I've been working on churning these things out! Thanks for the easy to follow instructions!
Ashley of "Film in the Fridge" showed a Tag Blanket today, so I went strolling around the internet, looking at many directions. Yours are the best and your pictures are so helpful! I'll be making some tomorrow! Thanks very much.
I just finished my first Taggie thanks to your AWESOME instructions (and free even!). I am an avid sewer and your instructions were better than some patterns I have paid close to $20 for!
I made my first biological nephew's taggie out of a flannel Chicago Bears fabric (Dad is a fan) and then a poly/cotton blend with footballs all over it for the back - I went ahead and added a quilt batting to give it a little more substance (luckily my machine loves thick things so I had no issues). I sewed the famous Bears C with the word Bears under it on the front so the batting doesn't shift after washing and drying.
Marchelle, thanks for the high compliments on our tutorials and patterns. I am a huge Bears fan, so I absolutely love your blanket!
Thanks for the good instructions! I made one in the shape of a butterfly.
I just made my first taggie blanket! It was fun to do! I plan on making more! Lots of babies being born from our church! Great gifts! Thank you for the pattern and instructions. Very easy to follow!