


How to Make a "Magic" Folding Photo Cube

Have you ever seen those little desktop photo cubes that fold and unfold to reveal more and more pictures on each side? They are made of wooden blocks with photos on them, and they are mesmerizing to play with, forever opening to reveal new photos on each side.
These folding photo cubes make wonderful gifts for just about any occasion — birthdays, anniversaries, Mother's Day, and more — and make especially nice gifts for people who are hard to shop for. Besides that, they're just plain fun!
These photo cubes are not very difficult to make, as long as you know the steps to follow. The instructions I've found online are lacking a lot, so I've taken some common tips for making these and added a lot of extra hints and instructions to come up with this detailed tutorial for making your own folding photo cube.
Magic folding photo cube video tutorial
Here's a full video tutorial for those of you who like to see a live demonstration of how to make a photo cube.
If you can't see the video above, you can view it directly on YouTube.
Magic folding photo cube step-by-step photos
And for those of you who prefer photos and text, I've documented it here with steps and photos! Keep reading to learn how to make your own DIY flipper photo cube.
After you've read our tutorial, you may realize you'd like written instructions that you can take with you to your craft table. So we've created a print-ready PDF with all the instructions and photos in an easy-to-read format. Just download, print, and create!
INSTANT DOWNLOAD -
PURCHASE NOW!
"Magic" Folding Photo Cube Instructions — $2.99
from here immediately after your purchase is complete*.
Have questions? Email us at chicaandjo@chicaandjo.com
* Files may be downloaded a maximum of 5 times.
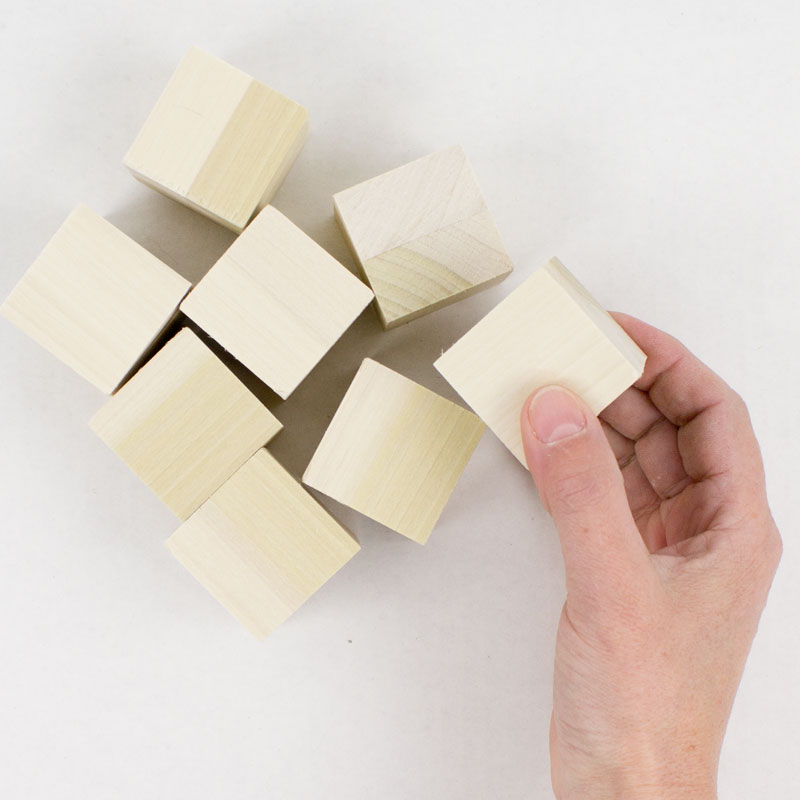
Step 1: Gather your materials
The first thing you'll need to build this photo cube is eight 1.5" wooden blocks. If your blocks are rough, you may need to sand them lightly to be sure there aren't any splintered edges.
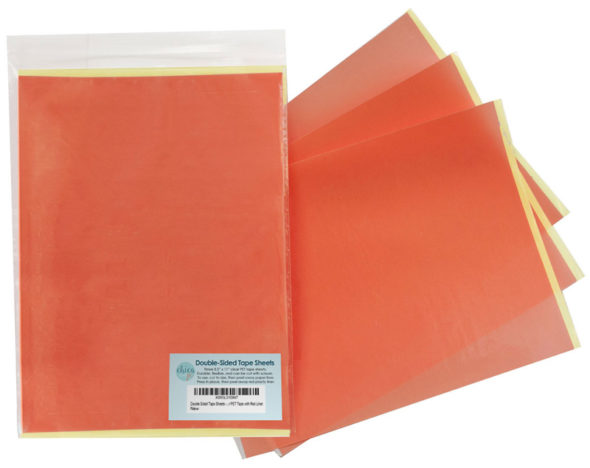
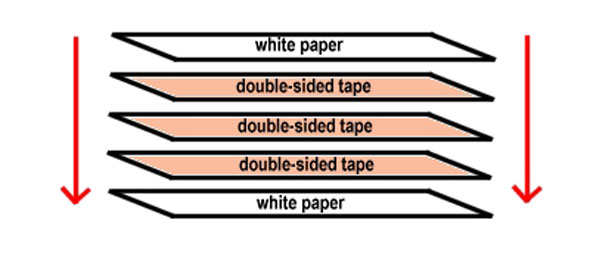
You're also going to need some really strong double-sided adhesive to attach your photos to the blocks, and it's super important to choose the right kind. This adhesive will end up serving as hinges between blocks, too, so it needs to be durable and tough. I highly recommend using sheets of what's often called "red liner tape".
We actually sell the perfect double-sided tape sheets in our Amazon store. This stuff is made up of a thin sheet of plastic that's coated on both sides with a strong adhesive. It's super sticky, VERY durable, and thick and flexible enough to make perfect hinges between your blocks that won't ever tear. You'll need two 8.5" x 11" sheets of this tape to handle all ten of your photos.
Step 2: Print your photos
You will need eight 3"x3" pictures and two 3"x6" pictures for this project. Depending on your available software, you can edit/crop these photos to size before printing, or you can print them larger and then cut them down to size with scissors.
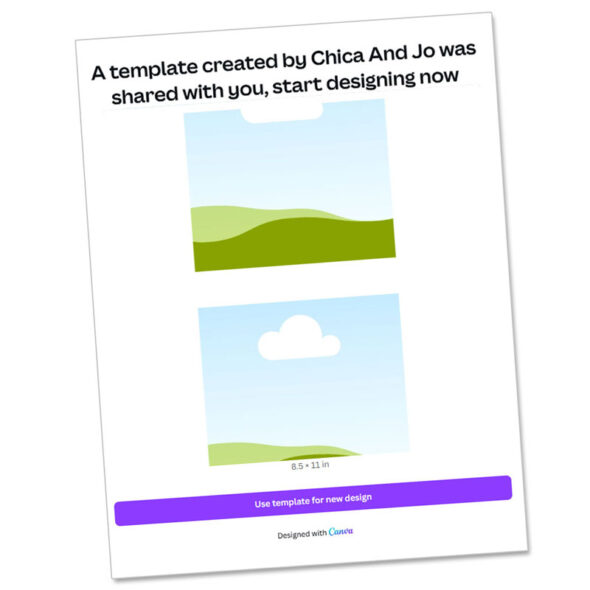
If you need help with sizing and cropping your photos, we have designed a Canva template that makes it super easy. This template works on desktop or mobile versions of Canva and will help you create exactly the images you need for this photo cube.
INSTANT DOWNLOAD -
PURCHASE NOW!
Canva Template for Photo Cube Images (1.5" blocks) — $2.99
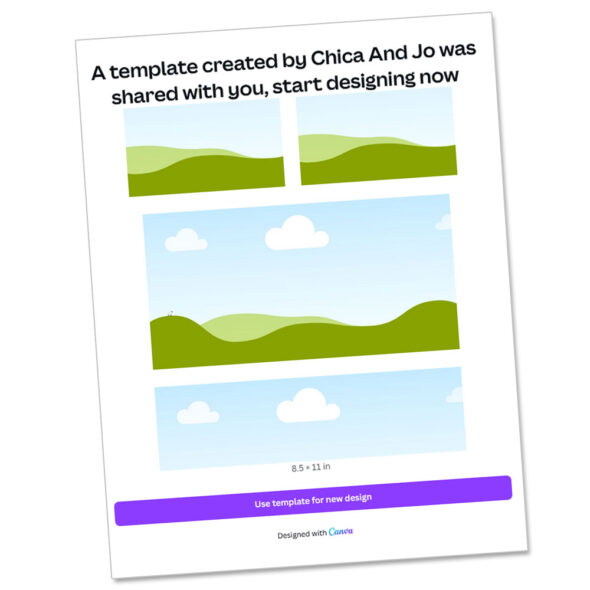
Canva Template for Photo Cube Images (2" blocks) — $2.99
from here immediately after your purchase is complete*.
Have questions? Email us at chicaandjo@chicaandjo.com
* Files may be downloaded a maximum of 5 times.
Print (or copy) your photos onto regular printer paper, NOT on photo paper. (Photo paper is too thick to bend easily and won't work for this project.) Laser printers will give better color than an inkjet, and will provide the best smudge-resistant results.
Step 3: Prep your photos
Once you have your photos printed, you can go ahead and apply the double-sided tape. Peel off the yellow liner from the tape sheet...
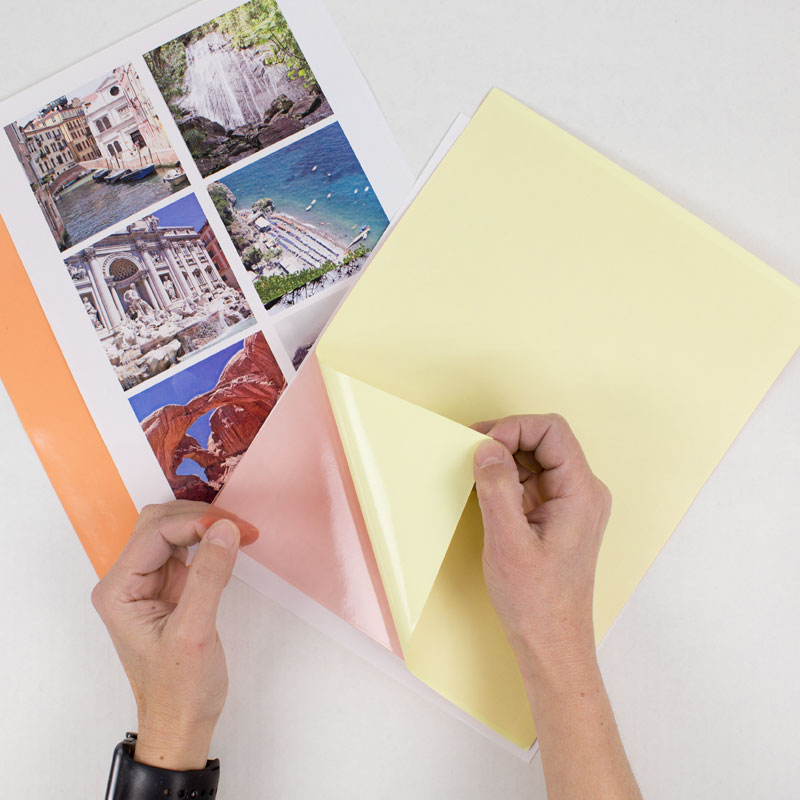
...and apply the tape to the back of the printed photos. Leave the red liner in place for now — you'll remove that later on when it's time to apply the photos to the blocks.
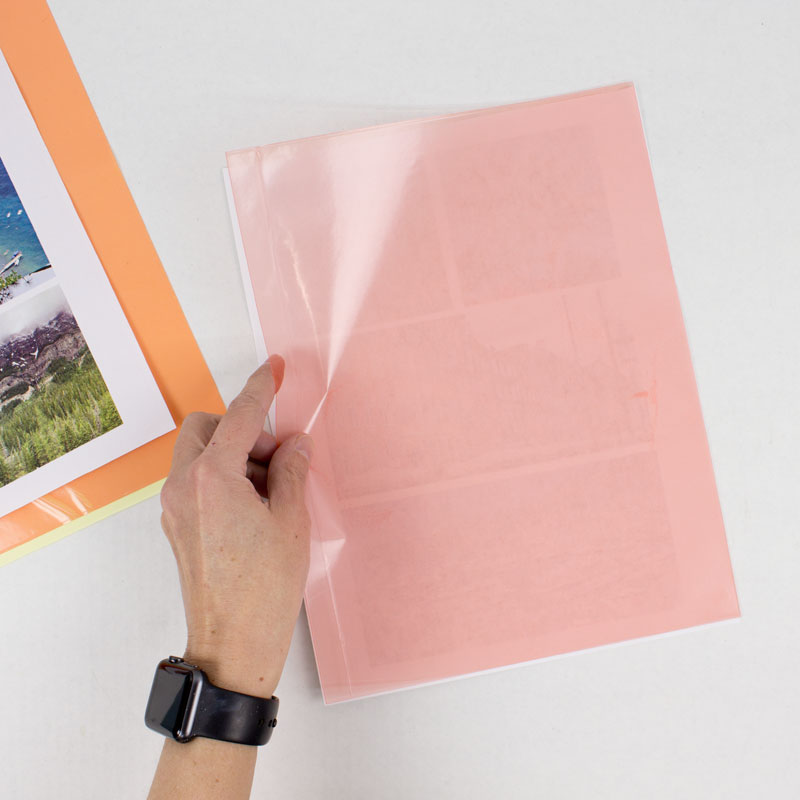
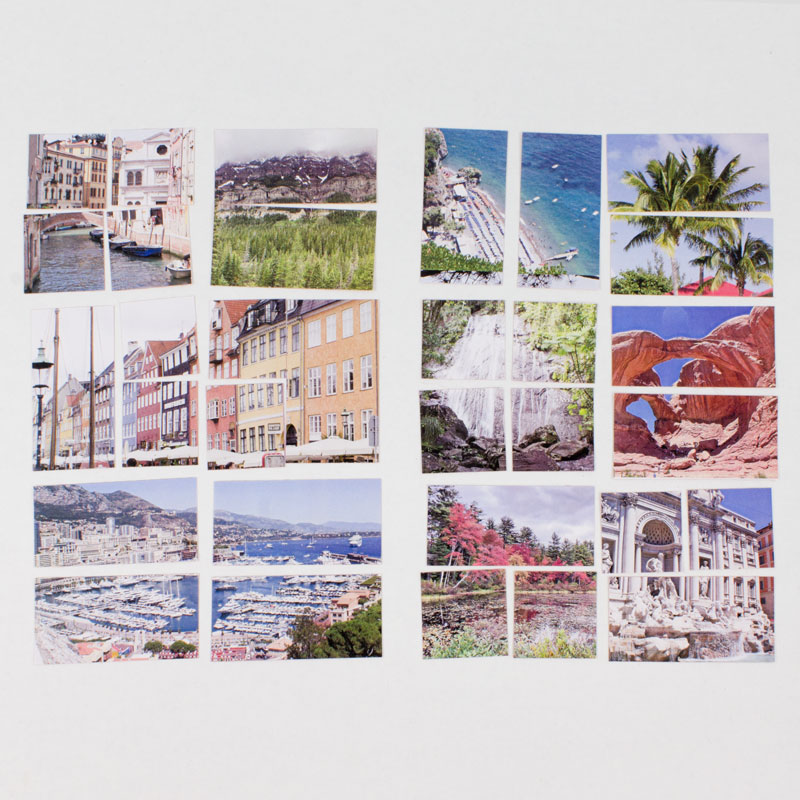
Then you're ready to cut the photos to size. Use a paper trimmer to get nice straight cuts. To ensure you get good coverage across your blocks, it's a good idea to cut the photos just a tiny bit larger (about 1/16" of an inch) than the 3"x6" and 3"x6" measurements.
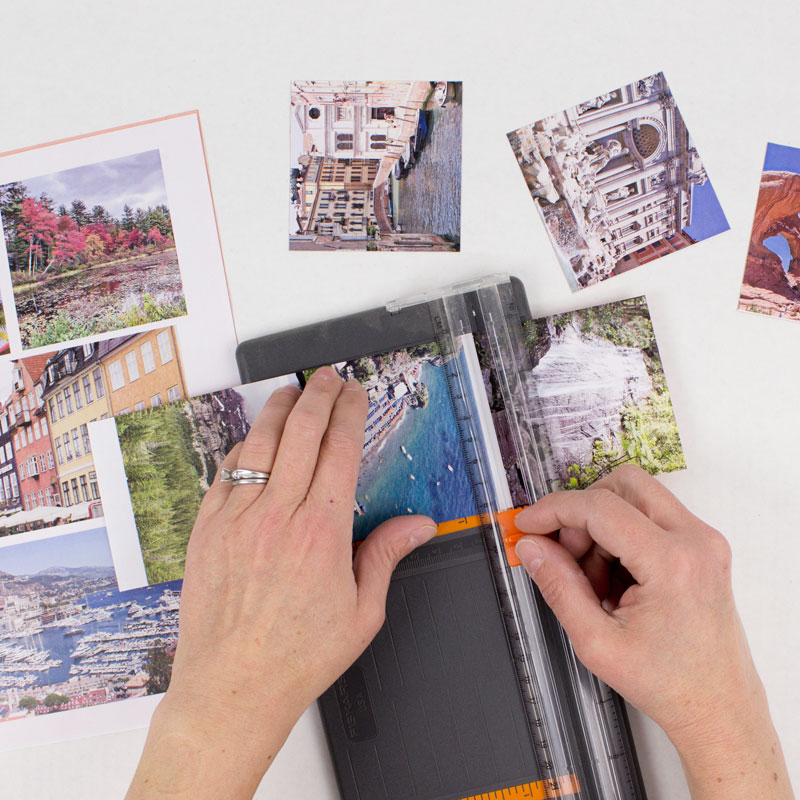
Step 4: Cut your photos into pieces
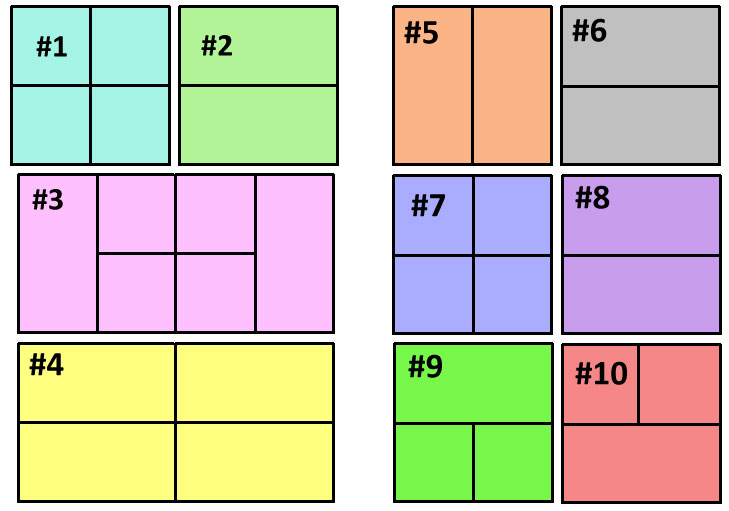
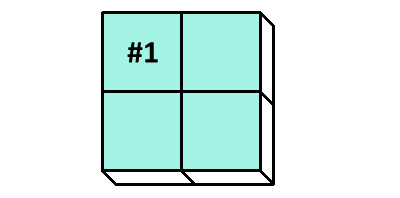
Now let's take a look at the layout we're aiming for with these photos. They are each going to need to be cut in different ways, depending on their size. This diagram shows how each of the 10 photos will need to be cut.
Lay your photos out so that all the 3x3 and 3x6 photos match this diagram exactly.
For the rest of these instructions, I will refer to the photos by their numbers in this diagram. Make sure you keep your photos laid out until you use them, so you remember which is which. You might also want to print a copy of the diagram out for reference, and you can write a description of each photo next to the number for reference.
Following the diagram, use a paper trimmer or scissors to cut each photo into squares/rectangles as indicated. For example, cut picture #1 into four squares, #2 into two rectangles, etc. Take care and keep track of the photos after you've cut them, so they don't get mixed up!
TIP: Since your photos are actually a little larger than the finished size, cut them from the center, rather than just measuring 1.5" from one side. This will keep the extra paper on all sides, instead of just one or two.
Step 5: Make a spacer
In a few of the assembly steps to follow, you're going to need a spacer to help keep the blocks slightly separated when adding the photos. This extra space will help the hinges work the best. This spacer is easy to make with scraps of tape and paper you already have.
Start with three pieces of the double-sided tape sheets that are about 3" long and 1/2" wide. Peel both liners off of each piece and stick the three of them together. Then cover the remaining two sticky sides with scraps of the same paper you printed the photos on.
Trim the whole thing if needed to get rid of overhanging edges. What you're created is a spacer that's just a bit thicker than two layers of photos will be on your cubes. Just hang on to this for now. You'll need it when we begin assembly.

Step 6: Assemble the cube
With your photos all cut into the right pieces, you're finally ready to start assembling the cube!
Photo #1
Start by lining 4 wooden blocks up into a square on the table. Then take the four squares of photo #1 and stick each one to one of the cubes, as seen in the diagram below.
Set these four blocks aside for the moment.
Photo #2
Take the other four wooden blocks and line them up into a square, to get ready to apply photo #2. You're going to end up putting one rectangle across the top two blocks and then another across the bottom... But wait! We need our spacer!
Let's think about this for a minute. Later on, when our blocks are all covered in photos, the blocks are going to be a little thicker than they are now, right? If we stick a photo across two blocks without accounting for that space first, then later there won't be room for the photos when we add them. Our spacer helps us adjust for that easily.
Slide your spacer strip between the blocks, so that the two on the left are slightly separated from the two on the right.
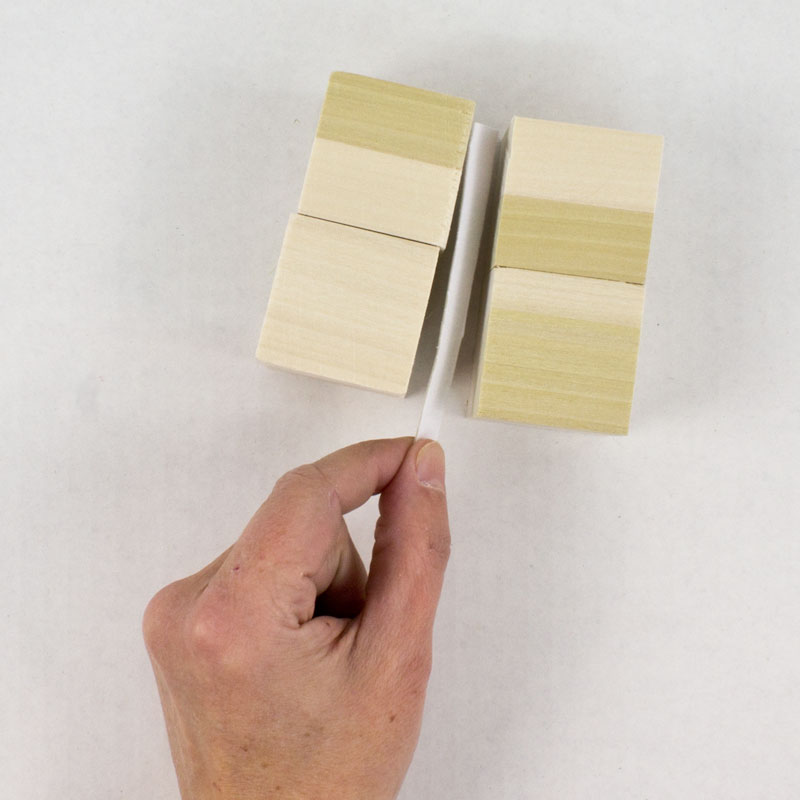
Then stick the two rectangles of photo #2 to the blocks as shown.

As you try to make your photo reach across the two blocks AND the space, you'll realize why I suggested cutting the photos a tiny bit larger than 3 inches. That extra size will really come in handy for spans like this!
Photo #3
Turn the set of four blocks with photo #1 on them over so that the image is face down on the table, like this:

Take the four blocks with photo #2 on them and place them on top of the four you just flipped, like this:

Now it's time for our first tricky fold. Put your hands on the left and right side of your cube, grabbing 4 blocks with each. Lift the sides up so that the top (photo #2) folds in on itself, as seen below, with the pivot being the red line in the diagram. The result will be all eight blocks laying in a rectangle.

Apply the pieces of photo #3 to the tops of the eight blocks, taking care to use the spacer whenever covering a span of two blocks, as indicated with arrows below:

Photo #4
Now fold the top four blocks down and the bottom four blocks up, with the pivot on the red line in the diagram. Your new photo #3 that you just attached will fold in on itself and become hidden inside. You'll end up with eight blocks showing in a rectangle.

Apply the pieces of photo #4 to the tops of the eight blocks, taking care to use the spacer whenever covering a span of two blocks, as indicated with arrows below:

Photo #5
Fold the two leftmost blocks and two rightmost blocks up towards the center, pivoting on the red lines in the diagram. Your new photo #4 that you just attached will become hidden inside. You'll end up with a cube shape.

Apply the pieces of photo #5 to the tops of the four blocks.

You won't need the spacer anymore, so you can set it aside. Save it to reuse on your next photo cube, though!
Photo #6
Rotate the entire cube to the left, so that photo #5 moves from the top side to the left side. You will expose a new surface with no photo on it.

Apply the pieces of photo #6 to the tops of the four blocks.

Photo #7
Rotate the entire cube to the left, so that photo #6 moves from the top side to the left side (and #5 is now face-down on the table). You will expose a new surface with no photo on it.

Apply the pieces of photo #7 to the tops of the four blocks.

Photo #8
Rotate the entire cube to the left, so that photo #7 moves from the top side to the left side (and #6 is now face-down on the table and #5 is now on the right). You will expose a new surface with no photo on it.

Apply the pieces of photo #8 to the tops of the four blocks.

Photo #9
Rotate the entire cube to the left, so that photo #8 moves from the top side to the left side. You will now have photo #5 showing on top.

Now rotate again, this time towards you, so that #5 becomes the side closest to you and the top has no photos on it.

Apply the pieces of photo #9 to the tops of the four blocks.

Photo #10
Rotate the entire cube towards you, so that photo #9 moves from the top side to the side closest to you. You will now have photo #7 showing on top. Now rotate again, towards you, so that #7 becomes the side closest to you and the top has no photos on it.

Apply the pieces of photo #10 to the tops of the four blocks.

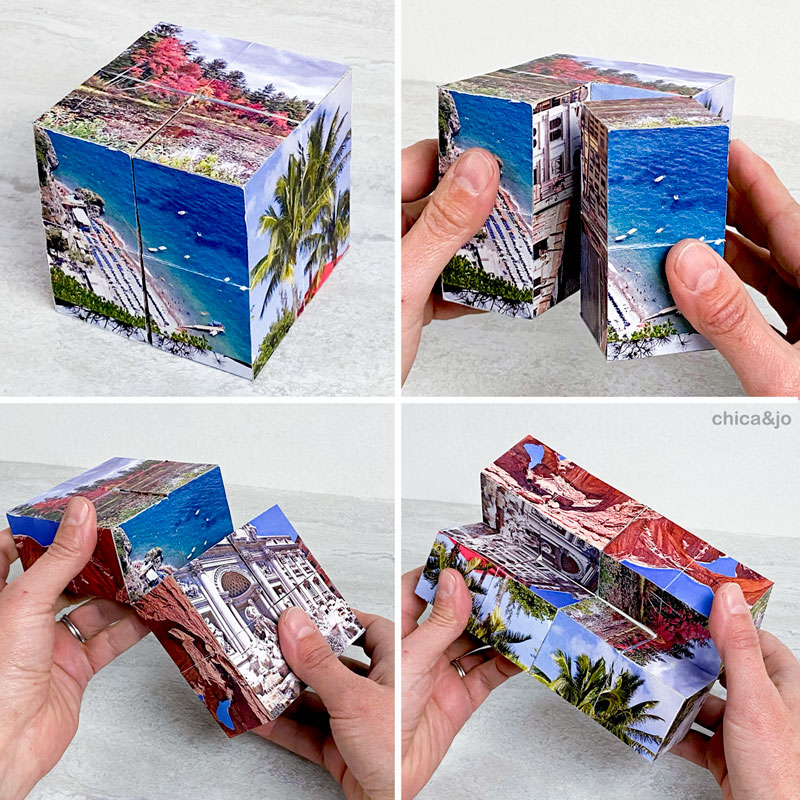
Step 7: Admire and play!
That's it! You're done! To view all the photos, just fold and unfold the cube, revealing a new side with every twist. You can display the cube with any photo showing that you want.
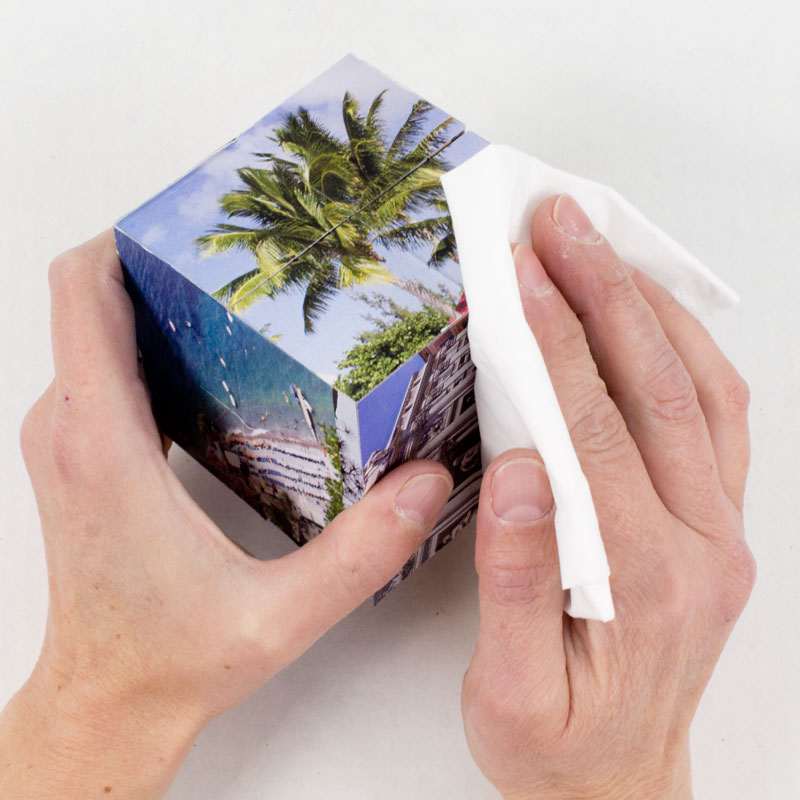
If you find that the edges of the cubes are sticky from the exposed tape, just rub a tissue over them. The fibers will adhere to the tape and reduce the stickiness.
Now you have a custom photo cube that makes a great toy, gift, or even unique commemorative "album". I made my mother a photo cube last year on Mother's Day, with pictures of all of her kids and grandkids. Jo made one for her sister-in-law featuring pictures of the family dog. Because they will have 12 sides, you can also make a desk calendar out of them. Now that I think about it, they would even make a lovely, unique bridesmaid gift if made with pictures of the bride and bridesmaid together!
similar projects
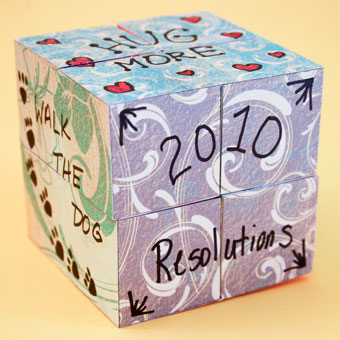
New Year's Resolution Cube
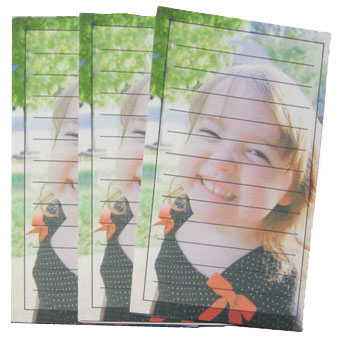
Make Your Own Custom Photo Notepads
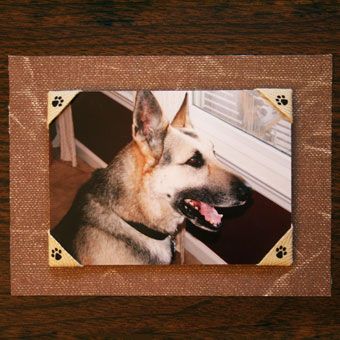
How to Make Photo Corners


71 comments so far:
Hey folks, one more hint I just thought of. When you finish your photo cube, the pictures that will be on the outside six sides are photos #5, 6, 7, 8, 9, and 10. So, if you want to have certain pictures show up on the outside, plan on using those pictures in these numbered positions.
My daughter and I made one of these for her cheerleading coach as a thank you gift with pictures of the squad throughout the season. She was thrilled with it! She said it was the most unique coaching gift she had ever received. Now all the girls on the squad want one too! Thanks for the great idea!
WOW!!! This ROCKS HARD!! I CANNOT wait to make this. I am going to devote Friday to making them. I teach preschool and only have 5 kids, I always take tons of pictures, I might make these as gifts for the parents. If I do, I am pretty sure I will become EVERYONE'S "Most Favorite-est Teacher" ever... ;-)
We made one for a friend's 30th birthday - it was a big hit at the party!! TIP: we were in a rush and couldn't find the Red Line tape paper, so we printed the pics from a color laser printer directly onto full-sheet labels.
Then we made the spacer from scraps of the full-sheet label material. We stuck the pics directly onto the cubes, THEN we cut between the blocks as per the diagrams, with a utility knife, turning the cube upside-down to trim the edges. It came out real nice; however, I'm sure it wasn't quite as "finished-looking", as it could have been, had we cut the pics before sticking them on. Also, although we got the more 'permanent' adhesive-backed labels, I'm not sure how they compare to the Red Line.
It was so much FUN!! Thanks for the instructions, they were great!! We'll be making many more photo cubes!!
Maria, we're so delighted to hear your story, and glad you had fun with the project.
I admire your cleverness in coming up with the idea of using the full-sheet labels for printing your photos. You sure did make it work in a pinch, but I'm worried about how well your cube is going to hold up over time. The problem is that the adhesive paper is really thin, and as you fold the cubes over and over, you'll find that the hinges will crease and probably tear. The biggest benefit of our double-sided tape sheets is not just its super-sticky nature — it's their durability. The tape is actually a layer of flexible plastic that's sticky on both sides. You can NOT tear it (trust me, I've tried!), so your cube's hinges are going to be much more durable and last for ages. I really do love your creative thinking, but I suggest using the tape in the future, if at all possible.
Hi - Following Maria's lead, I used sheet sticker paper as well and applied an 8x10 sheet of adhesive clear laminate to the top of each sheet, which not only adds strength to the hinges (which, as you noted, might be a concern with the sticker paper alone) but also has the benefit of making the whole thing glossy and water-resistant, in one easy step!! Worked like a charm and i was able to easily cut through the sheets after they had been applied. I made 25 for my son's birthday party invitation, so avoiding all that pre-cutting saved time and prevented me from losing various bits in the process!!
Claudia, I'm glad to hear you had success with the laminate. I've tried something similar once before, but found that the laminate was a bit too stiff to allow the blocks to bend easily, and it also wrinkled along the fold points, so I wasn't very happy with the results. Sounds like it worked great for you, though. You must have had really thin laminate. Do you remember the brand?
Thanks so much for sharing your results with us. I can't believe you made 25 photo cubes. Wow! Using them as a party invitation is a fun idea. We'd love to see them if you've got a picture.
I used Avery brand laminating sheets. To be honest, since they were for invitations and not for all posterity, I didnt mind too much if they wrinkled over time, But the extra one I kept has been duly handled by the 6yo birthday boy and seems to be holding up well with minimal wrinkling. I'll post a picture soon.
Wow, what an absolutely fantastic idea. I'm itching to have a go at this now.
Is it possible to use larger blocks? For a project we are planning to make 9" x 9" blocks.. do you think that would work?
Asdfjkl;, in theory this project would work with any size of block, as long as you follow the same steps and are able to find the supplies you need in the sizes you want.
Hi, I have a question in regards to the spacer. I'm up to adding the spacer on the second photo. The instructions say to slide the spacer in with some of it sticking out- do we trim these? Do they span one block or 2 blocks? How do they stay in place? Thank you!
Julie, the spacer is only used temporarily, to hold the blocks apart while you attach the sticky photo. It doesn't matter if it sticks out or not, and you should not trim it. You will remove it completely after you stick the photo on, so it does not actually need to stay in place. Hope that helps!
LOVE this project!! but i am wondering if the photos will run and smudge if any moisture gets on them. we have a little guy at our house that loves to chew on things and i would hate for them to be ruined if he got a hold of them.
darcymae, I am afraid that these will not hold up to little baby chewing. If you make one of your little man's pictures, I would suggest giving it to a family member as a Christmas present or placing it on a high shelf!
Hey guys! Thanks for the tutorial I've been looking for this like crazy ovre the internet, but thank God I found you!! So wohoo for both of us! :)
Ok, so I have a little problem, maybe I'm wrong, but did you explain how we are going to make the hinges so the cube can have the proper movement because I didn't see it! If you did please tell me where it is cuz I want to do this so badly!!
THANKS AGAIN AND KEEP UP THE GOOD WORK! ^___^ <3
Hi Candy Lover! So glad we were able to end your search with the tutorial you needed! The hinges between the cubes are formed by the double-sided tape itself. Our tape sheets are durable, non-tearing plastic film with adhesive on both sides that works great for a hinge.
Ok, what I meant was that if you explained how we are going to tape all the cubes together so they don't fall apart. I don't know if you know what I'm talking about because I can't explain it so good! lol xD
Candy Lover, the double-sided tape does more than just attach the photos to the blocks. It also spans across the blocks, joining them in the right places. For example, look at the diagram for photo #2 above. There are two green rectangles of photos that are backed with tape. Each rectangle will span across two blocks and hold them together, also forming a hinge where they meet. Hope that helps!
Ohhh ok!! Now I get it!! Thanks a lot! :D
I made my first cube last night. I cut all pictues to size before applying the tape, then cut all photos as directed. I felt like I wasted a lot of tape. I found I cut them a bit too big and had a lot of trimming to do.
I made a second one tonight and this time I cut all picture not quite so big, the applied to tape and then cut them to size. I also did not make the individual cuts before applying to cube. I applied the entire picture to the cubes then made my cuts afterward. This worked way better (for me atleast if you don't count the slice to my thumb!) although when I got to the last 2 pictures I did cut them in half, applied then made the final cuts. This one came out near perfect, this time my only issues was when trimming the edges I actually cut a bit of the corner off of the cube! Go slowly when cutting once applied so you are cutting and not tearing.
I intend to Modge Podge this one to get some glossiness to the photos, but I had a thought: can I Modge Podge the photos before applying them to the cubes??? This would solve the problem of the drying time however I was concerned the edge that are cut after application would not be coated.
One thing I want to try to pay a little more attention to on my next one is which photos will be cut in which way. On one of my pics, it was cut into 4 squares and my honey looks like he is missing a tooth as the 4 corners met right in the middle of his smile!!!
I can't wait to make another, I am hopelessly addicted!
Stacy, thanks for sharing your results with us. Several people have told us they had good luck with cutting the pieces after applying them to the blocks. I've never tried it that way myself, but I'm glad it worked out for you! I haven't tried using Mod Podge either before or after, so I'm not sure if that would work well or not. If you give it a try, please let us know how it goes.
And I know what you mean about cutting the photos... I always try to choose the ones for each type of cut that work best with the layout. Sometimes you can't avoid problems like people's heads getting cut off though :)
These are so cute. i would love to make them and give them as gifts to my teachers!
Hi Guys
Just had to come on here and tell you my news.
Have made a couple of these cubes as presents before but decided to make an extra special one recently.
I found some of mine and my girlfriend's favourite pictures together and made the cube ...
but with a difference.
One of the cubes I had hollowed where I secreted a sponge, and in that sponge a slit holding an engagement ring!
I can happily say, she said yes!! The cube went down a storm!
Thanks again for a great guide!
Adam
Adam, that's a wonderful story! We love your creativity and thank you for telling us about it. We'd love to see a picture of your special photo cube :) Congrats on your engagement!
I was given one of these for a gift and have been looking for instructions for YEARS! Thank you so much for posting this....and you did it on my birthday too!
Barb, we're so glad we could give you what you've been looking for, and on your birthday, no less!
I couldn't be more delighted with this amazing project! I wanted to give my daughter a unique present for her 35th birthday when I found this page! WOW! There's a "learning curve" to this but the final outcome was dazzling. I can hardly wait to give it to her. I assembled it at my workplace and my co-workers are already placing orders for me to make one for them too!!
Wondering if you have ever tried to use Create a Sticker by Xyron as the adhesive.
Hi Rae. I have used the Xyron sticker machines for many things, and they have worked very well. However, for this project, we feel it's important to use a double-sided tape that offers a substantial strength on its own. If you just use sticky paper, then the handling and unfolding of the blocks will eventually wear down the creases and the paper will tear. A layer of tape film, though, will form a non-tearing hinge under the paper that will give a lot more life to your cube. Hope that helps!
Hi ladies! I was wondering if you had any advice on altering photos to make them look okay in a 3x3 or 3x6 format. I have a ton of photos, and have the ones I want to use picked out, but I'm not sure how to go go about editing them to get the sizes. One of them ended up with some very squished looking faces! Any ideas?
Alexis, the squished faces are most likely the result of you resizing the photo without keeping the "aspect ratio" intact. How to do that depends on what tool you are using to edit your photos, and since there are so many pieces of software available, it's hard for me to advise you. This old-school approach might work: print your photos out at whatever size they are, then cut them to size afterwards. You can make a 3x3 template to use first and position it over the photo, then trace and cut it to size. Hope that helps!
Do u need spacers everytime it says use spacer here or do u just reuse one of them that u made like how it showed putting the three together and having scraps on the other side cause I don't get it like is it not supposed to stick it the blocks do I need to buy three packs to keep putting a new spacer everytime it says use spacer here
Jaime, you can reuse the same spacer over and over. You just need to put it there while completing each step that requires it, then take the spacer out.
Has anyone tried this using clear Contact paper on the tops of the photos to protect them from wear and moisture? It seems this would be a simpler solution than applying mod podge. And if you adhered them with ordinary glue on the back, wouldn't the contact paper on the front also serve as the hinges?
Emlee, we haven't tried this, not sure it if would hold up over time but if you do try it, please let us know how it works out!
Your presentation for making the magic cube is awesome!! I wanted to gift my dad something like this and you saved me at the right time !! Thank you so much. My wishes for you from all over from India !
Thank you for sharing such detailed instructions for these cubes - your generosity is appreciated!
Can I print the photos on Printer copy paper? Will it work? I dont have a home photo printer.
Bernie, you can use any paper that's thin enough to bend easily without creasing. (Don't use photo paper or cardstock).
I made this and it's so amazing and cute, I love it! I made it for a valentine's gift (last minute). I didn't have time to order anything online so I got 1-inch wood blocks and Recollections 1/4-inch adhesive tape from Michael's. Awesome tutorial! Took me about two hours to make. The only thing I would do differently is maybe add an extra piece of tape to the spacer. Thank you!
Amber, so glad you enjoyed this project! It does make a great Valentine's Day gift :)
I get it that we cut all the pictures and tape it as instructed. But my question is, how does the individual blocks stick to itself creating the whole cube? For example, the 1st picture is cut into 4 individuals and we stick it to the 4 individual blocks. Then we proceed with picture 2, the two rectangles. The tape for the picture 2 rectangles is supposed to be one individual strip across one rectangle (2 rectangles) and so forth. I feel like I'm missing something here. If you can clarify, will greatly appreciate it.
Ian, it is true that some of the photos are cut into a little piece that only goes on one block and some span multiple. Every time you put a piece on that spans multiple blocks, it creates a hinge that holds the blocks together and lets the cube open. If there were no hinges, nothing would hold together. If there were hinges on everything, nothing would come apart. It's a careful balance! I hope that helps. If not, you might just need to make one to see. :)
Hi. For the photos, you advise not to print them on photo paper. So don;t have photos printed from a CVS or Walmart, or someplace like that? Just print them on regular paper, like the type you suggest?
Dorothy, you can use an office supply store, just make they print the photos onto regular paper, and not photo paper. Saying you want a "flyer" might help them understand the difference.
I am going to use this as a craft project at our county 4-H camp. Thanks for these excellent instructions.
I have all the supplies to do this project for my dad's 70th birthday. One question. When u stick the photos to the adhesive and then cut each one according to directions #1-10, the first photo is in 4 pieces correct? Where is the extra part of the photo supposed to lay on the inner or outer part of the cube? Thanks and will send pics when finished.
Elena, the first photo is in four pieces. When lining up the cut pieces on the cube, you'll want to let any excess paper hang off the outer edges of whatever surface area you're working with. You never want to trim the inside cuts on the photos. So for #1, you'll line the inside corners of the four pieces up with the inside corners of the blocks, and let the photo's edges/borders hang off for trimming later. Hope that helps!
Hey, how do you print images in specific sizes? I went to the shop, the photos that I got are not of 3x3 size.
Please help!
Deblina, printing to the exact size will require either some photo editing software/skills or fancy printer settings that let you adjust the overall size. If you've got your pictures printed already, I recommend just cutting them down to size with scissors :) [UPDATED Dec 2024] We now have a Canva template available that will help with sizing and cropping!
Do you think mod podge to seal the photos would work? Or would it not allow a hinge?
MoGeek85, you could probably apply a very light coat of Mod Podge, but be careful not to make it too thick or else it will keep the cube from closing properly. Also, be wary of the hinge area, as the Mod Podge will most likely crack with use.
So my daughter and I have decided that you could teach ANYTHING with the way your tutorials are so easy to follow. We'd like you to do a tutorial on how to build a house from scratch. :) This was absolutely awesome! Thank you for thinking of all the small, but extremely important intricacies for those of us who are challenged in these areas! We are so appreciative!
CRC, that's so kind of you to say! We try our best to cover all the bases in our tutorials, and I'm pleased to hear we accomplished that with you. If we ever DO decide to build a house from scratch, we'll be sure to share the steps :)
Can anyone answer this - Do I have to use the expensive ($3+\sheet) adhesive paper as a spacer? ? I just skimmed the directions so I could definitely be wrong but it seems like something else could be used for that part without affecting the outcome.
Kayla, your spacer only needs to be about 1/2" wide and 3" long, so you should be able to make it from a scrap of the tape sheets leftover from this project. The goal is to have something that's the same thickness as the layers of tape and paper you're using, so using the actual tape is the best way to accomplish that. However, you're welcome to use anything you'd like, as long as you can get it to the correct thickness.
I just made this with my 9yo grandson. Every year we do a Christmas craft as a gift for his parents. It's getting harder to find something challenging that holds his interest. He (and I) LOVED making this. We can't wait for his mom and dad to open it! Your instructions were spot on and he was following right along and telling me the next steps. Thank you so much!!! Merry Christmas!!!
Cindy, we're so happy to hear your story. It's wonderful that in the process of documenting memories for his parents, you and he ended up creating more of your own. Merry Christmas!
Haven't made it yet. Love this idea. I'm thinking about trying this with larger blocks. Either 2" square or 2.5" square blocks? Would the larger resulting cube put too much tension on the hinge and maybe create a tear? What do you think?
Vicki, we haven't tried that size of blocks but it seems like the technique would still work. You'll need to increase the size of your pictures accordingly, of course. As long as you use our recommended double-sided tape sheets, I think the hinges will still perform fine over time. If you try it out, let us know how it goes!
Thank you for such a detailed, clear tutorial! I'm a bit of a mechanical dunce, but I was able to follow your directions! I made one as a Christmas present. My question is, do you know of any way to seal the paper after it's done for durability? I was thinking cutting a sheet of laminate, if it were thin enough, or a satin acrylic spray. I have done mod podge on blocks before and they always wanted to stick together, no matter how long they dried. Thank you again!!
Jessica, thank you so much! I'm glad our directions worked out for you. Sealing the paper is a tricky challenge we've toyed around with over the years. Any applied coating that's too thick will interfere with the function of the hinges or possibly keep the blocks from fitting next to each other because of the extra material in the gap. A quick spray of sealer is probably your best bet.
What method do you use to trim the edges that stick over the side of the cube? I used a razor but it left some of the pictures ragged on the ends. Perhaps just a pair of sharp scissors? Thanks for these awesome instructions.
Eileen, just holding the scissors tight against the edge of the block seems to work fine for me. If you go with a blade approach, I would put the block face down on a table and be sure the blade is SUPER sharp for best results.
Your directions are so clear and thorough! Thank you for posting such an awesome tutorial! I have one question, though. We have only an inkjet printer. Where might you recommend going to have images laser printed on regular paper, not photo paper?
Diana, thank you so much for the kind words! Any office supply store should be able to laser print onto regular paper for you. Just make sure you tell them you want a regular printout not a photo print (maybe calling it a "flyer" will help).
Thank you so much for these painstakingly detailed directions and very helpful video. I’m curious if there were a way to use the red line tape to create the infinity cube and then paint over the wooden blocks instead of collaging over them. Just an idea that’s simmering in my head and curious if you’ve tried it or anyone else you know who has…
Mansi, you're very welcome! While I applaud your creativity, I'm not sure your idea would work, because the tape completely covers all the wood surfaces, making them inaccessible to paint. Also, since the tape is sticky on both sides, you wouldn't be able to paint on the exposed sticky side. You would need some sort of paper on it... but you could possibly paint the paper after assembly?
I had an issue with making this and asked for help, and Chica replied via email almost instantly! Very impressed. Have to admit it did take me a few tries because I was using photos of people. So very happy with my final attempt. I can't wait to make more and thank you so much for your support!
Peggy, you're very welcome! Glad I could help you get the hang of this project so you can make even more :)