


Make Your Own Wedding Veil

As you plan your wedding, you'll fast discover that most wedding-related things are quite expensive, and you can easily overspend almost without realizing it. One of the surprise costs as you shop for your wedding day attire is the veil, which can easily cost a couple hundred dollars for even the simplest of designs.
Before you casually add a veil on to your wedding gown purchase, consider making it yourself. With as little as $10 in supplies and an hour or two, you can DIY your own wedding veil that suits you to a tee.
DIY wedding veil video tutorial
If you're a visual person who likes to see things in action, check out our video tutorial showing you how to make your own DIY wedding veil. In this demonstration, I make a scaled-down version of the veil to keep everything small enough to fit on my table and in front of the camera, but you can easily apply this technique to create a veil of any size.
If you can't see the video, try viewing it directly on YouTube.
DIY wedding veil step-by-step photos
If you like to slow things down, then you'll enjoy this step-by-step tutorial that you can print out or reference on your tablet while you work!
Supplies needed to make your own wedding veil
The main thing you'll need, of course, is some tulle (a.k.a. netting). This is available in any fabric store and can be found in 72" and 108" widths. For a fuller veil, use the 108" wide tulle.
The length of fabric you'll need will vary depending on your desired veil length. Measure from the top of your head to where you want the veil to end and double that length. For example, a typical fingertip-length veil will be between three and four feet long, so you'll need 6 to 8 feet (2 to 2-1/2 yards) of tulle.
Additional supplies you'll need include a needle and thread, a comb or barrette to attach the veil to, and any trim you optionally want to add.
Step 1: Cut the tulle to length for your veil
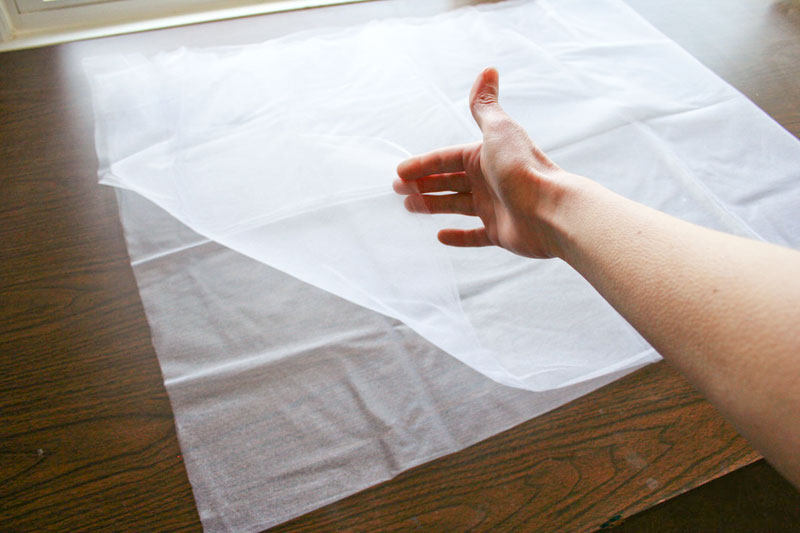
Lay the tulle out on a large table (or a clean floor) and keep it folded in half lengthwise (this is how it was at the store). Put the folded edge nearest to you. At this point you have two layers of tulle.
Now fold the tulle in half crosswise by grabbing the rightmost edge and folding it over so that it touches the leftmost edge. At this point you have four layers of tulle.
Measure again how long you want the tulle to be (from the top of your head down) and cut the tulle to that length (keep it folded) if needed.

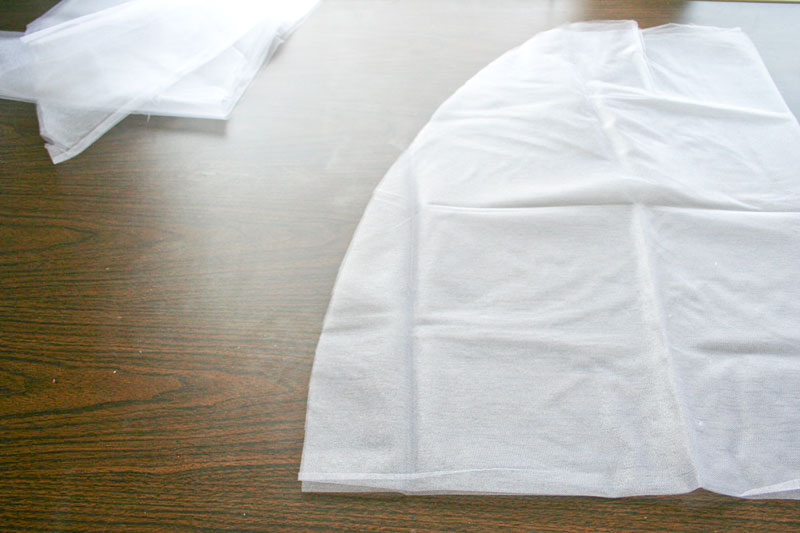
Step 2: Round out the corners of the tulle
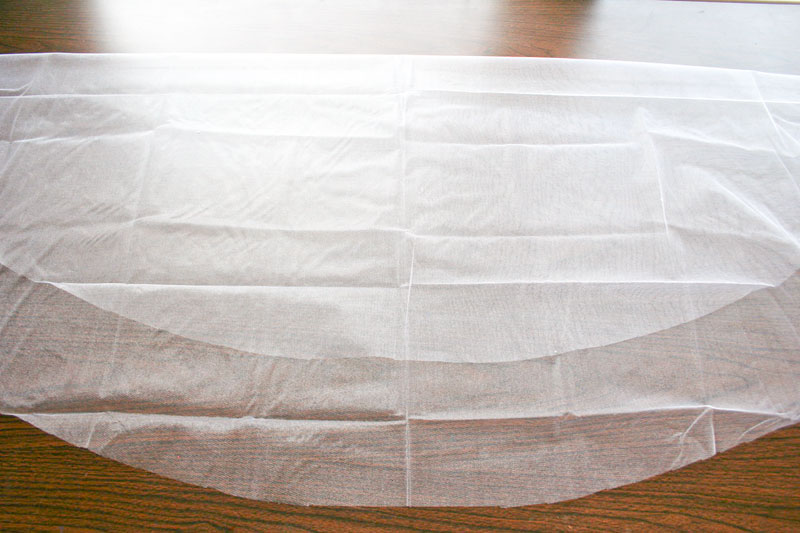
Now round off the top left edge of the fabric by pinning to mark it and then cutting in a smooth motion. If you need a guide, try a large serving platter. You want to be left with a quarter-circle shape:

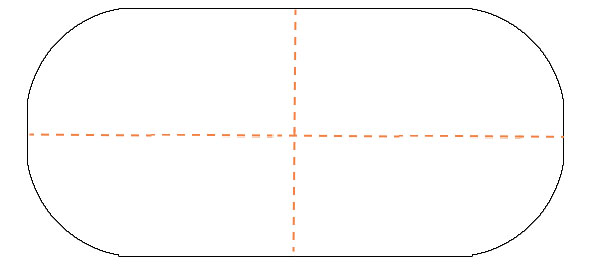
Step 3: Refold the tulle into veil layers
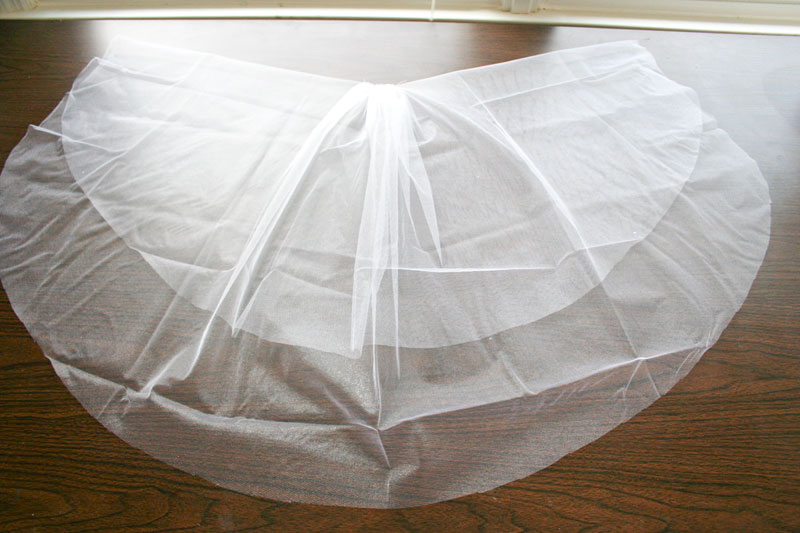
Unfold the tulle completely. At this point you have one layer of tulle. The dashed orange lines below show where the folds used to be:
Fold the tulle crosswise from right to left, but you don't have to bring it all the way over. You can match the ends up for a single-length veil, or you can leave a few inches between the edges for a nice layered look. If you keep a shorter layer, it can be used as a blusher if you like. At this point you should verify that the length is exactly what you want and if it's too long, cut one of the rounded ends shorter, as needed.
Turn the veil 90 degrees counter-clockwise so that the folded edge is at the top, farthest away from you, and the open rounded edges are closest to you.
Don't be surprised if the veil seems wider than it is long, especially if you are using a really wide tulle or making a fairly short veil. Once you gather it all up in the following step, the proportions will make a lot more sense.
Step 4: Gather the center of the tulle
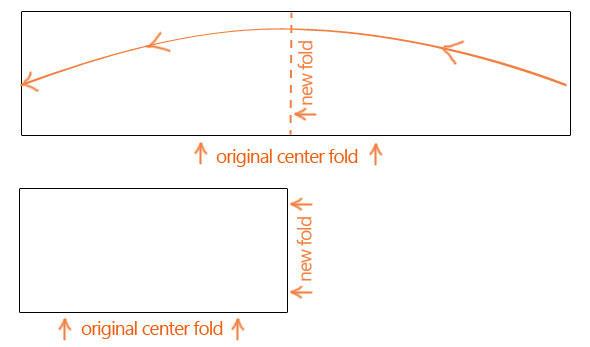
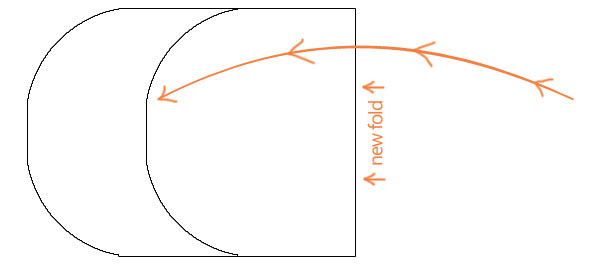
You will now have to decide whether or not you want the side edges of your veil's two layers to come all the way up to the top. If you choose to have the edges come up to the top, the top of your veil will be fuller and puffier.
This decision is particularly noticeable if you plan to put a ribbon trim on the edges, because the ribbon will clearly be only at the bottom or will go up to your head, depending on your choice. This diagram illustrates the two variations:

Once you choose from these two styles, you will be ready to gather the top of your veil. Depending on your choice, you will either gather up only the center portion of your tulle (diagram on left), or you'll gather the entire width of the tulle (diagram on right).

Once you have decided how much tulle to gather, do so with a needle and strong thread, weaving in and out with small stitches.
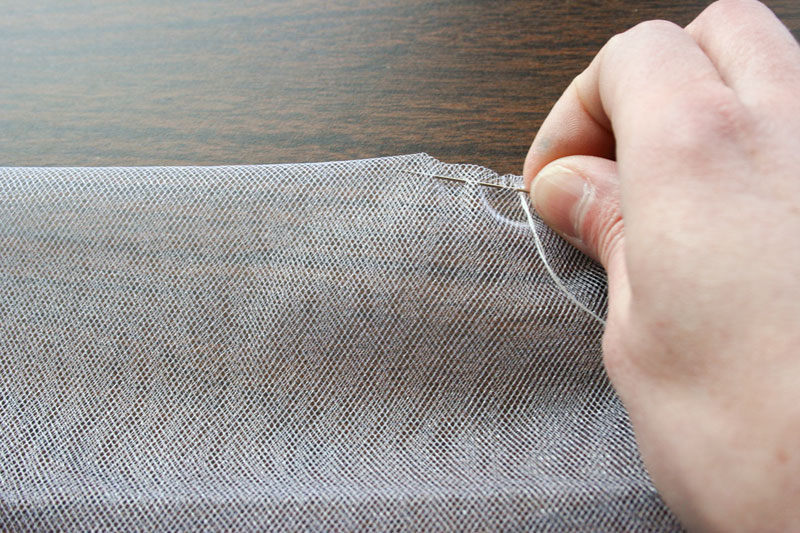
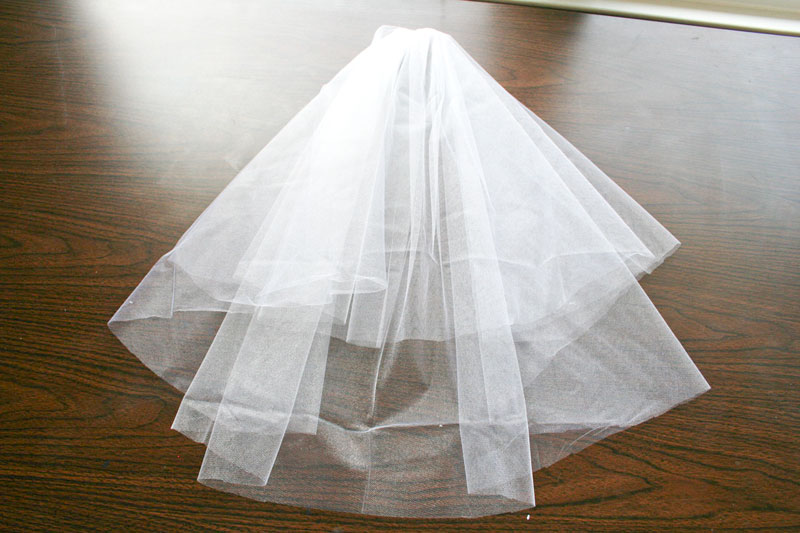
Pull the thread to gather the stitched tulle so that it is only about 2 inches wide. Knot the thread securely.
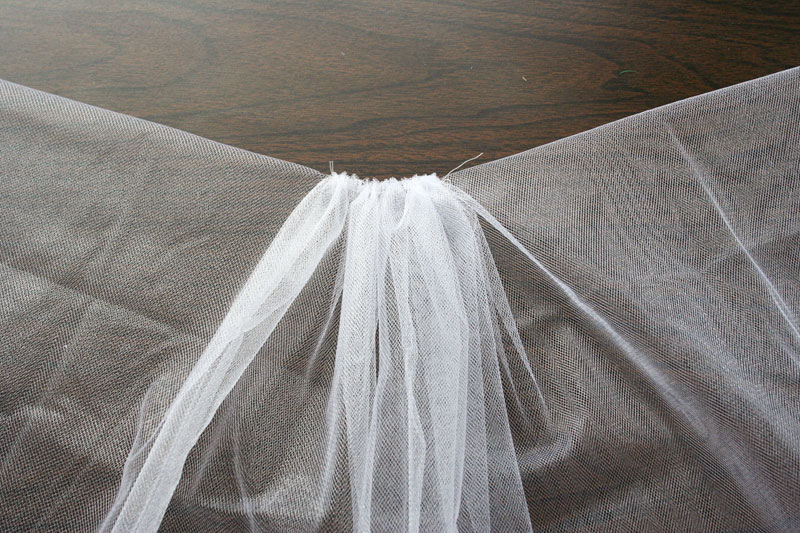
This veil was gathered in the middle only, so there is no stitching on the sides.
Hold the tulle by the gathered area and give it a gentle shake, which will allow the sides to fall gracefully down with the rest of the tulle.
Step 5: Attach the veil to a clip or comb
To be able to wear the veil in your hair, you'll need to attach it to something. You can use a simple French comb, a barrette, or any headpiece you already have picked out.
Just take the gathered portion of tulle at the top center and sew it securely to your clip.
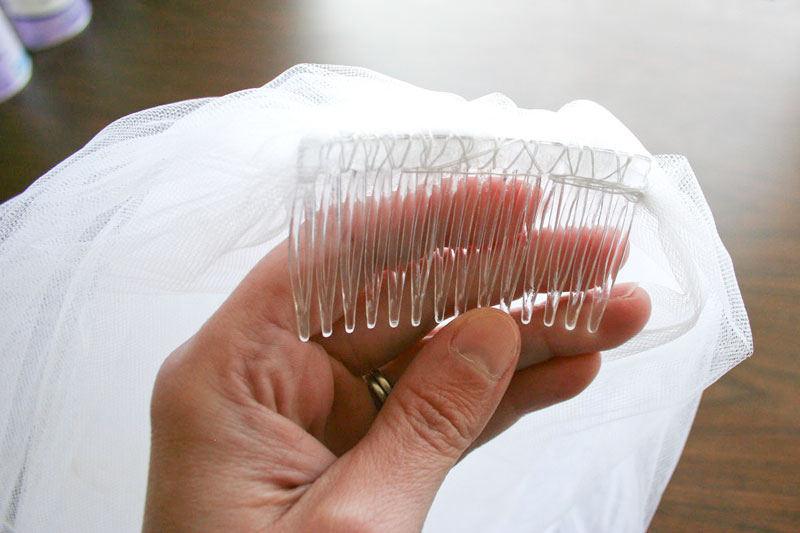
If you are planning to wear a fancy tiara and want to be able to remove the veil for the reception but still keep the tiara on, just sew the veil to a simple French comb and you can wear both pieces at once, then easily take just the veil off later.
Step 6: Add optional ribbon trim to your veil
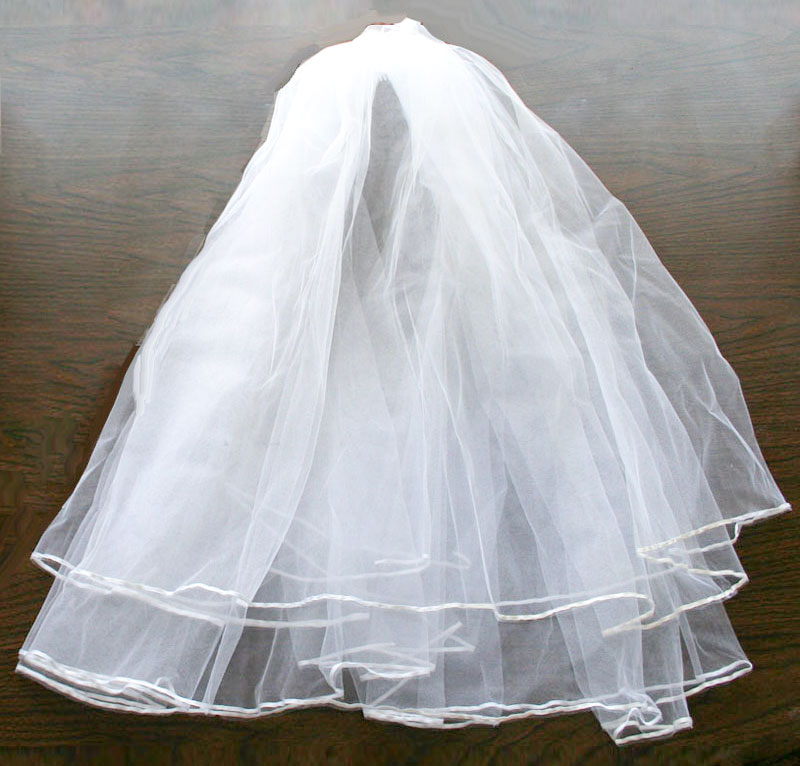
Your veil is ready to wear at this point, but you may want to decorate it further. A popular finishing touch is to sew a thin satin ribbon along the edges of the veil. You can do so easily with a sewing machine and some white thread.
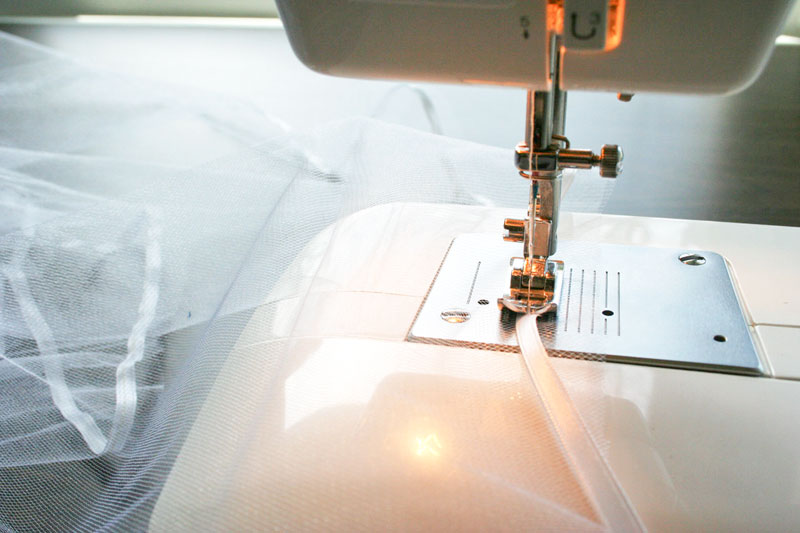
When sewing, don't bother to try to get the ribbon right up against the end of the tulle -- it's far easier to just leave some extra and then come back and trim it later.

Now go back with scissors and trim the excess tulle right next to the ribbon. And don't worry about trimming it perfectly. I promise that nobody more than 2 feet away from you will even be able to see it!

Step 7: Add optional decorative elements to your veil
You may also choose to sew or glue tiny sparkling beads or gemstones randomly on your veil. If that's what you like, then do it. It's your veil, so it should be special and exactly the way you want it!
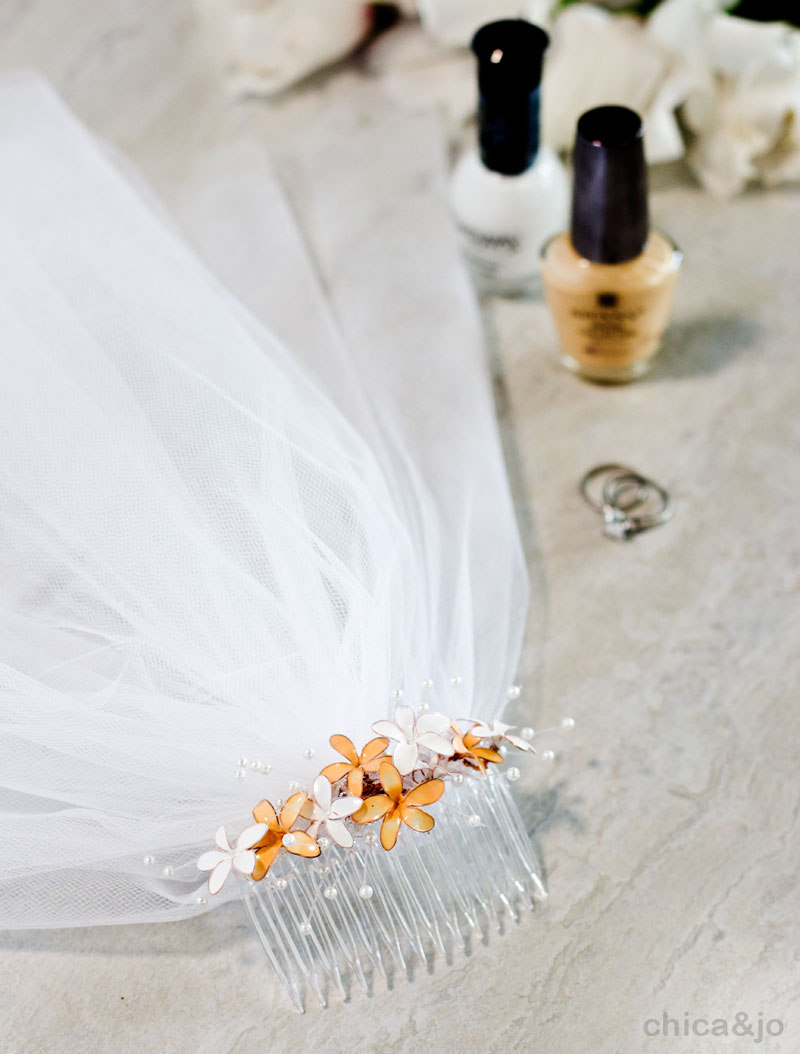
And if you want to spiff up your veil with a decorative clip at the top, check out this crazy idea we came up with. We created tiny flowers using wire and nail polish. (Yes, nail polish!) You can learn all about the technique and see the step-by-step in our book, Craft with Nail Polish.
Idea: Make a veil for First Communion, costumes, or for dress-up play
I did make my own veil for my wedding, but I didn't stop there. I used this same technique to make my niece a smaller veil with some leftover tulle, so she could play dress-up bride. You can make inexpensive veils for costumes, too. And I even used this same technique to make my niece's First Communion veil a few years later.
Other DIY wedding veil patterns
Our DIY veil technique works great for your basic veil, and the better you are at sewing, the more elaborate you can make your veil. But if you're looking for something extra fancy such as draped styles, angel cut veils, etc, here are some great patterns you can try to help you make more complicated veil styles.
Here is a list of 10 beautiful patterns for making your own special wedding veil:
- Simple fingertip length veil pattern
- Long draped wedding cape pattern
- Cathedral length wing cape pattern
- Cathedral length lace veil pattern
- Fingertip length lace Mantilla veil pattern
- Simple Cathedral length veil pattern
- Long Cathedral draped veil pattern
- Fingertip length lace veil pattern
- Short cape shawl wrap pattern
- First Communion lace veil pattern
Other handcrafted artisanal wedding veils
If you're really not a seamstress but still want a handcrafted wedding veil, there are lots of gorgeous ones available. Here is a list of 10 affordable handcrafted veils that cover a wide variety of styles:
Here is a list of 10 affordable handmade veils:
- Chapel-length simple raw edge veil
- Scallop lace fingertip veil
- Extra long single tier royal wedding veil
- Fingertip length veil with French lace trim
- Detachable blusher veil with raw edge
- Fingertip length Mantilla veil with lace trim
- Juliet cap beaded veil with blusher
- Chapel length silk cascade one tier veil
- Fingertip length single tier veil with ribbon trim
- Simple elbow length single tier veil with cut edge


195 comments so far:
Thank you so much, my daughter is getting married in October and asked if I would make her veil, this site is a godsend.
Thank you for the detail instructions and pictures. I am getting married this fall and I just made my veil with tulle and satin ribbon. It came out great!!!!
I was so happy to find these detailed instructions with pictures on the web when beginning to create the veil for my wedding. Every other website I saw left me confused as to how to begin. My veil is beautiful... thank you for your help! I can't wait to walk down the aisle wearing my own creation!
Daughter is getting marraied in 2 weeks in Maui so we are going to make her own veil this time and I just got done spending over an hour looking on line for how to make it the easiest way, with diagrams, and you were the last one I came across. No one else had diagrams..!!! THANK YOU,THANK YOU, for your detailed instructions, Exactly what I was looking for...
hey, thank you so much for this website! my best friend asked me to make her a veil for halloween as she's going as a corpse bride! ill be following your instructions, only i plan to double the tulle, one black sheet and one red sheet! thank you once again for your help! :)
Thank you for the easy to follow directions all the other web site's just did not show the detailed instructions as yours did. Just finished a veil for my daughter who will be getting married in October. Thanks again Carmie
What a wonderful site! I've been looking how to make a veil for my daughter's wedding in May 2010. These are definately the instructions I'll be following, they are so well explained and the best bit - the actual diagrams... I'm off to get started as I've the cake to ice too. Thanks very much.
Heather
Chica, Could anyone tell me what the pattern cut for a shoulder length Angel Cut Veil would look like? thank you! Joyce
Hi Joyce. I had never heard of an angel-cut veil before, but I did some Googling and from what I can tell, it's almost the same as the "gathered in the middle" veil we describe above, with one exception -- the bottom of the angel-cut veil comes to a point instead of being rounded. So I think you could just adjust the shape of the tulle so that it comes more to a point and then use our instructions and get what you are looking for. Hope that helps!
Wow! Where to start? How to fold the tulle! This very basic point was the missing link. Thank you for starting at the very beggining!
Rita, you're welcome, and we're glad you like our tutorial :)
I'm making my daughters veil. The veil she tried on at the bridal shop was a circular "center gathered" veil with a rolled hem edge embellished with beading at the hem. My question is this.. when you (as you did with the ribbon) fold the tulle over wouldn't the ribbon be on the wrong side of one layer? With the small rolled hem front back doesn't matter, but when I go to apply the small beads above the hem at what point would I switch to the other side so both layers have the beads on top? If the veil was gathered across the entire top you could switch over at the top fold, but when it's only gathered in the center you can't do that. Does this make sense? Hope you can help.. You're posting has been the best and easiest instructions I've found to date. Thanks
Karen, I know exactly what you mean. For the ribbon edging, it will technically be on the "wrong" side of the tulle for half of the veil. However, as long as you use a nice satin ribbon that is finished on both sides, I promise you that nobody will notice. The tulle is so thin that unless you are just a few inches away from the veil, you won't even be able to tell that it's on top of the ribbon on part of it.
As for placing the beads, I think the best way to ensure that you switch over to the other side at the right point is to actually put the veil on your daughter (or hold it in the air, or tape it to the top of a bookshelf) and let the tulle lay exactly like it wants to. Then start applying the beads wherever you think they are needed, on whichever side of the tulle is on top at that point. That way you'll get a nice, even distribution and you know it will look pretty when it's on her head!
We're so happy you like our instructions and I hope my answers have been equally helpful. We would really love to see the veil when you're finished, so tag us at @chicaandjo
I followed your website, very easy to follow steps. However, my 2 layer veil looks very thin from the back, and I am not sure how to create a fuller look. Should I make a 4 layer veil, or should I make the width wider? (w: 1m length: 1.4m when it is opened like your first diagram) The shop sells the width as 1.8m, so I can't have a 108" wide veil. Will a 4 layer veil option be better?
Joyce, if the tulle you are using is as wide as you can find and you're not happy with the fullness, then I think doubling the tulle and making a 4-layer veil would be a good idea to try. Please let us know how it comes out!
I thought I was an accomplished seamstress. I remember making two veils years ago. Now that it is time to help a dear friend's daughter I could find nothing online that showed the cutting diagrams. Your simple drawing brought it all back and made sense. And this was the last time I was going to look online as I have been looking for two weeks or more. Thank you so very much I will be able to sleep tonight and make the veil tomorrow.
Liz, we are so happy that you kept searching long enough to find us! Let us know how the veil comes out :)
Oh this is wonderful! I've been thinking about making my own veil for my wedding in July '10, but all the other directions I've found make it look impossible! This makes perfect sense! I will definitely be doing this! Thanks so much for your website! I am excited to save money and have a personalized veil!
Beth, we're so glad we could help you out. Congrats on your wedding and we'd love to see the veil you make!
Can I use tulle that is 54 wide? That is all that I see at JoAnn Fabrics. What kind of thread should I use to attach to the comb? Can I use stitchwitchery or glue to put the satin ribbon on the tulle? I don't have a sewing machine.
Kate, if you use 54" wide tulle, the veil will not be very wide or full. You could make it look fuller by using two layers. I'm not sure if you will get results you like, but tulle is very inexpensive, so you could try it and see. For the thread, I would use the same color as the tulle (white or ivory). I have not worked with Stitch Witchery before, so I'm not sure if it would work for attaching the ribbon. Glue might work, depending on what kind you use. Perhaps you can try some samples on a scrap of tulle and see if it works? If not, your best bet might be to just sew everything by hand.
The Butterick 4487 pattern for wedding veils is sold out everywhere near us so I hope you won't mind helping me.
My daughter wants a single-tier, Cascading Veil. I thought, "no problem" until I actually got started.
HOW do I cut the tulle to give that cascading effect? Every website I've seen offers directions for every kind EXCEPT the cascade.
I'm getting frantic!! Can you help?
Thanks so very much!
Julie, I've done some playing around with some tulle and here's my best guess at how you can make a cascading veil:
Start with a very large circle of tulle. Get the widest tulle you can for a fuller veil. Lay it flat on the table and fold the top down about one foot. Gather about 8-10 inches of the seam, in the middle, by running a needle and thread through it (like I describe in my tutorial above) and pulling the thread tight. Attach the gathered part to a comb.
In my tests, this made a good cascading effect down the sides. Hope that helps you. Let us know how it comes out!
As everyone has been saying - what great instructions!!! I was feeling nervous about making my own veil, but after seeing this I was really excited!! I made my veil, and it looks fab - and really was easy to make. Thanks!
Hi there! Wonderful tutorial and clear instructions!
However, I was asked by family to make an adult wedding veil for my future sister-in-law, I don't know how much satin ribbon in total to get if I were to get 8 1/2 yards of tulle?
JoAnn doesn't sell 108" wide tulle, but fabric.com sells it at 1.98, around $16 for 8 1/2 yards.
Thanks so much for your time :)
Coffeebean, if you were to lay that piece of tulle out flat, it would measure 25.5 feet long (8.5 yards) and 9 feet wide (108 inches), so that means it would take about 70 feet of ribbon (about 23 yards) to go all the way around. Granted, your veil isn't going to be a rectangle after you cut it to shape, but that would be a good rule of thumb to start with. Hope that helps!
Hi Chica! Thanks so much for your help!
I misread the first step so I was confused in my question! I have 3 yards of tulle now, I would love to know how much ribbon would be needed for that. The bride would love to have ribbon on the ends of the veil. I'm hoping it is around 12 yards.
I'm so sorry to intrude again! Again, thanks for your help :)
Coffeebean, for a 3 yard length of tulle, your total distance around all four edges would be 36 feet, so if I were you I would start with 12 yards of ribbon. Let us know how it goes :)
Hi, I have the same comment as everyone else, that this tutorial is extremely clear and useful, but I am pleased to say that it was the second search result (and the first one I clicked), so it didn't take me weeks to find it! : )
This "how-to" for making a bridal veil was exactly what I was looking for! I googled "How to make a bridal veil", and that's how I found this site. And the figures/drawings you provide were perfect! I got it done within two hours... Thanks ladies! :)
I have spent hours looking for a site that would show me how to make my veil. All the ones i've been to just have written directions. Your site is the best. It helps when there are actual pictures showing you how to put it together. Thank you. You have made my life easier.
This is exactly what I needed to find! I need to make my daughter's first communion veil. One question, if I want to attach it to a headband that also has a clear comb on it, what's the best way to put the headband, veil, and comb all together securely? I think a comb will be required to keep even a short veil in my daughter's thin hair. These are the best directions I've found. Thanks!
Patti, I'm glad we had what you were looking for. I think the best approach to take to have a comb and a headband on the veil would be to sew the veil to the headband, making sure it's all nice and pretty. Then sew the comb onto the headband, underneath where you can't see it, to add the extra security you need. Hope that helps. Let us know how it comes out!
This is a great tutorial, thanks so much for posting it! I have some questions about making veils with blushers, though. I'd like to make a 2-layer veil with an additional layer for a blusher, but I'm not sure of the best way to construct that. Should all of the layers be sewn in the same direction, or should the blusher face forward? Would you decorate the comb the same way if the top layer was intended to be a blusher? Thanks in advance for any input!
Dee, I haven't worked with blushers before, but my instinct would be to just create one more layer of gathered tulle and attach it on top of the regular veil pieces. Since the blusher is only worn over the face for a few minutes out of the whole day, I would be inclined to sew it in the same direction as the other layers, so that it lays nice and smooth for the majority of the day. Hope that helps, and let us know how it goes!
Thanks so much for this... Doing a wedding on a budget and trying to find a good tutorial showing how to make a veil... Yours was so easy to follow... Thanks so much. I love the way my veil turned out!
the best way to remove wrinkles from your veil is to bring it into a small bathroom with the shower on high. the steam in the room will do the rest. I use to model wedding gowns and that is where I learned of this trick.
Lorrie, that's a great tip for getting wrinkles out of a veil. Thanks for sharing!
I am making my own veil and was curious if I'm sewing straight ribbon onto the curve of how I've cut the tulle if any adjustments need to be made? Also, I will be sewing by hand, and would like to try using a wide lace and folding it over the unfinished edge of the tulle so that both sides are finished...thoughts?
Elena, curves in the tulle aren't a big deal for really narrow ribbon, but for a wider lace, you may run into issues. Once your tulle is cut to the shape you want it, lay it flat on a table and try to pin the lace along the edge so that it lies flat. Depending on the actual lace you use and if it unravels or not, you may be able to cut notches in the top edge so that you can overlap the cut and curve it around the shape. As for covering the unfinished edge, my thoughts are that tulle is so fine and delicate that the edge won't even show, so I wouldn't worry about it. In face, if your lace is very lacy and has lots of open areas in it, you may find that folding it over doubles up the design and makes the lace look weird from a distance. I hope all that makes sense and is helpful. Good luck and let us know how it goes!
Thanks for the advice...I'm in Bolivia so the materials I have are limited...but it came out really well
I used a lace with a flower pattern that had 1/2 an inch of straight edge and folded it over like I said...the flowers on the outside and the straight edge on the inside...instead of tulle I used a sheer white fabric, almost like what you would use for curtains so the edge had to be finished.
But I used hot glue to put the lace in place and fold it over, then with transparent thread I'm sewing all along the edge stopping to put small pearl beads in the center of each flower on the lace...the lace was puckering a little bit after gluing it but now that I'm sewing it's laying flat and looks so pretty! If I figure out how to put pictures up I will show you, or I could email them :) Thanks for the great advice, I can't wait to wear it!!!!
Although I am an experienced seamstress I have never sewn a wedding veil before. While testing a row of machine gathering stitches on a scrap of tulle I couldn't get the results I wanted, your suggestion to gather by hand was a godsend as well as your illustrations for the entire veil. I really love your website, I'm sure I'll be using it again, thank you so much, sabreen
Thank you SO much for the diagrams and the folding instructions!!! My biggest issue is that the veil my friend wanted had a very thin trim. I can't figure out the best way to attach it - would you suggest hand sewing? And if so, would I just wrap the bottom edge of tulle around the trim and sew it in the crease? I'm going to experiment but was just wondering if you had any suggestions! Thanks again, I really love the information!!
Sara, glad we could get you started with this tutorial. Without seeing the actual trim you plan to use, it's hard to say for sure what the best approach would be, but I would definitely recommending hand-sewing if it's very delicate. The crease idea might work as long as the trim shows through the tulle clearly. Good luck with your experiments and let us know how it goes!
Thankyou so much for this page! My sister is getting married this September and has asked me and my daughter to be bridesmaids and help out where we can, so I'm currently making two bridesmaids dresses, a cornish tartan garter and her veil. I'm fine with making the other things but really didn't know where to start with the veil as I didn't have one for my own wedding. This page has given me all of the info I need in an easy to understand way and I'm just very grateful for it's existence. Thanks :-)
Thank you! I'm being married in a lavender dress and nowhere could I find a lavender veil. Now I will be able to make my own.
What a wonderful site. I am making my daughter's wedding dress and veil. The tulle overlay on the dress is the same fabric as I will use for the veil. I have been reading about veils with edgings. I have seen one called a "pencil edge". It looks to me like it's done with an overlocker (I think you say serger - I'm from New Zealand). Do you have an idea how I can replicate this edge? Is it just the case of a fine stitch with specialist thread do you think?
Cathy, making your daughter's dress and veil is such a lovely idea. I did a quick Google search for pencil edge veils to see what you mean, and it looks like they are usually done with a bunch of stitches on the very edge, probably with an overlocker/serger like you suggested. However, i think the look could be very easily replicated by sewing a very thin ribbon on the edge, like I discuss in this tutorial. From a distance of a few feet away, I bet you'd never know the difference!
Hi, I am a beginner in making veils more or less to sewing. Yet, your instructions were very easy to follow. Thank you for this instructional on veils. Mine is almost done.
Thanks, Chica, for your directions for making a veil. I'm also not much into sewing, but your directions were easy to follow! I'm assembling a corpse bride costume for Halloween. The veil turned out great! I bought the tulle for $2.50 at JoAnns and attached the veil to an old pearl barrette I had laying around the house. Perfect!! I can also see how easily the veil could be made into a very elegant bridal veil. Thanks for keeping the site up!
Hi thank you so much, for the easy instructions, I wasn't sure how to begin, most other instructions on other sites only talk about the decorating, and not how to cut the tulle. I haven't started yet, I'm making this for my daughter's wedding, I am making a two tier veil at different lengths, not ribbon, with a comb with small flowers on it, I bought all from Spotlight, a large store in Australia, as I am Australian.
Hello girls and thanks for an awesome site. Hubby and I are renewing our 10th anniversary vows and I wanted to make my own veil. I have never had a "real" wedding and I feel like a princess when I put it on. Your step by step instructions ROCKED! Lol. I will post a picture when I get decked out. Again thanks so much for your help.
Chica, thank you so much for the easy instructions! Any thoughts on how I might attach a scalloped-lace edge? And do you think it would be too heavy for the tulle?
Lillian, it seems like you could just sew the lace on the edge, either with a sewing machine or by hand (if you have the patience). Depending on the material and thickness of the lace, it may or may not be too heavy. Perhaps you could pin it on first and see how it feels before sewing it?
Thank you so much for these wonderful instructions - very easy to follow. I plan to do a thin lace edging and attach to a barrette, and decorate with flowers. This is the first time on this page, but think that I will be visiting in the future :) Thank you!
Finally!! Diagrams make me very happy, thank you! My daughter is not getting married til next August but I work full time so thought I would get this one detail out of the way since she already has her dress. I had the general idea in my head but wanted confirmation that I was right.
Thanks for the instructions and discussion. I have been asked to make my future daughter-in-law's veil and her dress is a gold one. I have experimented with tea staining white tulle and have purchased (for $10) one lace-edged veil and tea-dyed it. Have you got any other suggestions of how to dye the tulle? I do not have a sample of the fabric and I can't wrap my brain around the color gold for a wedding dress.
Belinda, you certainly have a unique challenge at hand! Unfortunately, I don't think I have any advice to share. I've never really done anything with tea stain or other dyes. Good luck and we'd love to hear how it comes out.
Thank you so much for these clear instructions. I am making my daughter's veil and we are very happy with it. The only problem has been the static electricity, but the 1 tsp fabric softener mixed with some warm water in a spray bottle works beautifully. I plan to take the spray bottle to the March wedding.
I have searched the internet high and low and this is by far the best literature and graphic combination I have seen to make a veil. My wedding is in two weeks and I will be making a center gathered elbow length veil, thanks to you.
Hi! Great instructions/diagrams. How would you recommend cutting scallops on a center gathered veil? Thanks!
Kris, that sounds like quite a challenge. I think it might work to start with a round item (plate, cup, etc) that's the size you want the scallop to be, and then use that as a template to trace your scallops onto the edge with a marker. Then you could cut along the lines, making sure to cut away all of the marker.
I found your site today through an online search and am SO glad I did! After viewing the outlandish prices at the bridal salons, my future daughter-in-law wanted to try making her own veil to save money. She doesn't sew, so she asked if I would help her. We have already purchased the tulle and she wants to have ribbon stitched on the edges, which is where I would really come in. I was a little shaky about that even though I have some extensive sewing background. We were going to attempt all of that without a pattern and fly by the seat of our pants with some ideas of our own. Your photos and diagrams have given us the extra encouragement we needed to show us that we are on the right track. The comments section of your site and the responses you give other women were very helpful to read as well. Thank you so much for putting this all together!
Denise, we're so happy that we've helped you with this project. And big thanks to all our readers who always offer such great tips and ideas in the comments!
After several days of searching the internet, I'm happy to have found your site! I have a couple of questions though before I begin this project. First of all my daughter and son are getting married within 3 months of each other. Both weddings obviously have smaller budgets, therefore I am making the cakes, helping with food, flowers, etc....and I am now surprising both my daughter and soon to be daughter-in-law with veils customized to each individual girl. They both want 1 tier and each want different lengths. Each want 1/8" Satin "Rat Tail" Ribbon/Cord. Neither girl wants anything that might look "poofy" as they call it. So would the pattern you list still work for that, and what would be the best way to trim the veil with the cord/ribbon? I'm thinking hand sewing, but I have never done anything with such tiny edging. Would love any help you can give! I want to make their "BIG Days" extra special with a gift from my heart!
Debbie, I'll be honest with you — I had to look up rattail cord before I knew what you were talking about, but now it makes perfect sense. What a funny name! Anyway, I think hand sewing is going to be your best bet, since the cord is so round and thick. I would suggest getting matching thread and just whip-stitching it in place, so that the thread actually goes around in a wide spiral, securing the cord to the tulle. As long as your thread matches, you'll never notice unless you're up really close. To keep the veils from being too "poofy", use a 72" width of tulle instead of 108" and that should help. And try not to worry about messing up, because this is a pretty forgiving project. And even though you are on a budget, tulle is really inexpensive, so even if you don't like how the first one comes out, you could always start over. Good luck and let us know how it goes!
Thank you so much for your diagram and pictures for the bridal wedding veil. I do not sew, so I never thought in a million years of making my own veil. I have searched around, looked at bridal stores, etc for a veil. I really want something unique and special... What I like in bridal stores are over $100.00 a veil (on sale) $250 regular... way more than I want to spend. With your site I have decided to tackle the task of making my own wedding veil. I can't wait. With your instructions I think I can actually pull it off. Thank you. Thank you.
Sherry, I applaud your courage and wish you the best of luck with your veil.
Thank you so much for taking the time and effort to publish this information. I, too, thought the price of a veil outlandish in consideration of materials and skill required. Now I feel confident about making one for my daughter. I probably could have figured it out on my own, but having your pattern will make the process SO MUCH simpler and easier. Thanks!!
I was asked by my daughter to make her wedding veil. I got online and saw your instructions after looking at many others. I read the many different reviews and saw where people was saying JoAnn Fabric didn't carry the 108 inch wide tulle. Not sure where are living but the Joanne fabric store here in Ohio has a good choice of all widths including the 108" wide. I am anxious to get started on this veil. Thank you for giving such detailed instructions.
I have never sewn in my life, with the exception of maybe a button :) I was very interested in giving this a shot since I have a few months until my wedding. I'm having difficulty telling if all this can be done by hand (with no sewing machine) if the time is available. It seems like it is possible, but I thought I would check on what you guys thought for someone who has never sewn before. Should I break down and just spend the $150? I'm looking to do some beads, etc. to match my dress on the edging... and if I was OH SO LUCKY, I would love to figure out if I could stitch a few small smiley faces in it somehow. Any thoughts? Bluntess appreciated if I shouldn't try it with no sewing skills! I was quite inspired by the ease you demonstrated and the helpful comments in all the posts. Thank you for making this available on the internet!
April, we're so glad you found us and hope you'll continue to poke around our site at some of our other wedding projects while you're here! You can definitely do this veil by hand without much sewing experience. In fact, the only part that I used a sewing machine for was the trim, so if you don't want trim on it, you'll definitely be set. You can still do the trim, of course, and by hand. If you do, I'd say the biggest risk would be that the trim won't be straight. To help avoid that, I would recommend that you make longer, easy stitches rather than tiny, tight ones. If it doesn't feel secure, you can always go back and add a second set of stitches. That will help you keep things loose and not overworked. Sewing on the beads is something you'd definitely do by hand, too. To help you with the placement of those, perhaps you can lay them out and tape them in place, and then sew them one by one? Unless your budget is incredibly tight, I would suggest you go ahead and risk the $20 or so that it'll cost you for tulle and trim and see what you come up with. If you like it, continue by adding the beads. If not, scrap it and go for something pre-made. Good luck and let us know how it goes!
please give me some advise I have been looking for days online on how to make a cascade... angel.. waterfall veil. They are all considered the same style. I want to make a a cascade veil that has wavey sides from top to bottom. How do I cut the tulle? Is it a circle or rounded oblong. I will be making it about 50" long in the back and I want a blusher too.. thanks.
Here is a sample picture of cascade veil what I would like to make.
http://www.whitedovebridal.com/Files/veil_faqs.htm
Peggy, I think you will be able to make the cascading veil you're looking for with our tutorial. Just be sure to only gather it in the middle, and not all the way across. You may want to experiment with where you fold the tulle to get the length and effect you want. You can always gather it then remove the thread and try again if you don't like it. Note that a cascading veil doesn't really work as a blusher, so you may need to gather a separate piece of tulle and attach it to the comb as well so that it can be flipped over your face. Hope that helps!
I agree wholeheartedly that these are by far the best instructions I have been able to find. Thanks for sharing them. I am making a veil for my daughter's First Communion. She would like it on a headband. Do you have any suggestions for how to attach it? Other sites suggest a hot glue gun, but that doesn't make sense to me as I imagine it would be uncomfortable to feel the glue bumps on the underside of the headband. Would there be a specific technique you would recommend for trying to sew it to the headband? Thanks for your help.
Diane, I would have to agree that hot glue could create bumps that would be uncomfortable. I suggest sewing the veil to the headband, starting in loose basting stitches to make sure all the tulle is going to fit, Then gather it together and add smaller stitches until it's secure. Hope that helps!
How much fabric will I need for a child's communion veil? Your directions are AWESOME! I have searched everywhere for directions made simple for a novice like me. Thank you!
Ahma, I'm so glad you love our tutorial! To determine how much tulle you need for your veil, measure from the top of the child's head to where you want the veil to end and double that length.
Wow your tutorial makes it so easy. We have a very tight budget for my daughter's wedding in November so we are getting really creative in order to stay in our budget w/o being "tacky". This tutorial assures me that I can make a beautiful veil for my daughter's special day. Thank you so much for taking the guess work out of it for me!
Great tutorial! One question, is the ribbon applied with one row of stitching or two? It's not like I'll be washing this often, but usually I try to "bomb-proof" my sewing...Does the ribbon lie flat with a single row of stitches?
momof4, I only applied one row of stitches to the ribbon on my veil. I have no intention of washing it, though, so no idea how well it will hold up to that.
My daughter wants to make a veil for her wedding..... She wants it made from the lace of my wedding gown which has a lace trim on the bottom already.... How do I make a veil out of this kind of fabric ? Please HELP !!!!!!!!
Darlene, that is a lovely idea to reuse your wedding gown to make a veil for your daughter. If it were me, I would enlist the help of a professional seamstress for the job, though... I would hate to make a mistake and ruin such a treasured item.
Thank you so much for the tutorial. I just made a veil using your instructions; it was easy and it came out great! I'm going on safari in Africa with my best friend who is getting married in September, and the veil is a surprise gift for her on the trip. I can't wait to get photos of her wearing the veil with elephants and giraffes in the background! Thanks again, she's going to love it!
Rebecca, that sounds like a pretty amazing wedding, and your handmade veil will be a lovely gift. Glad the tutorial worked out for you, and we'd love to see a photo of the veil in action :)
I would love to thank you a million and one times. I used your method to make my wedding veil and it cost me about $3 to purchase the tulle. I did a elbow length veil and it was absolutely gorgeous. You saved me hundreds of dollars and added a personal touch to my wedding day. Thanks for inspiring.
Ellie, we're so happy to have helped. It's amazing how much money can be saved by making your own veil, and I agree that the personal touch is the best part.
I am having some problems getting the veil just right. It has two tiers with wide decorative lace trim that has peakes and valleys reaching up about 5 inches at the widest points...and has a lovely scalloped edge. It definitely adds weight. My daughter did not want the trim to go up to the top, so I did the center gather. Okay, so after trying 108" and 72", I felt that the 54" was going to show off the lace trim without folding over on itself too many times and loosing the look of this amazing lace. But after I pinned it on I had some problems. Maybe you can help :) I folded the tule so that there are two tiers with the intention of using the top layer for a blusher. I gathered the 54" in the center (1/3 of the 54"). I spaced the layers about 7 inches apart- enough to nicely clear the first tier lace. It is still too wide I think, because the lace still folds over itself a lot and looks too busy to see the lace's pattern. It seems especially bunched around the upper sides and it is just pretty bunched. When I put the top layer over as the blusher the sides are higher and it looks "wrong". The sides fall heavy with the tule folding over itself and it just doesn't look attractive. I am thinking if I used less width I could get less folding over and see the lace pattern and that it might have a simplier, less heavy folding over on the sides/at the arms...? I could raise the 2nd layer up much more, but I'm not sure that will solve the problem of so much tulle gathering at the sides/arms-shoulders and the problem of it hanging shorter there, too. If I can get the two layers to lay with only a slight ruffle, without too much folding over, I am thinking I should just attach another piece of tulle for the blusher (although the lace bottom did make a beautiful bottom to the blusher). One last thing is that the lace adds quite a bit of weight (and this is just a fingertip length). Okay I know I wrote a lot... hope I made sense with what I am getting and what I am trying to get.
Sally, I think I understand your situation, though I'm not sure how much I will be able to help without actually being there. It sounds like the main problem you're having is too much tulle, which is creating too much veil to work with. You said that the results got better when you moved down from the wide 108" tulle to the 72" and then the 54", right? Can you go even smaller, maybe? Or perhaps you can gather less of it in the middle and then trim the shape of what's left into more of a teardrop than an oval, to get rid of some of the extra tulle? Good luck and let us know how it comes out!
I decided to try this: I cut off the top part of the lace, leaving just the lace's scalloped bottom at the front of each side of the veil. [This is a 54" center gathered two tiered veil where each front side drops in a fold to just below the shoulders at the shortest point]. So instead of seeing the full lace you see just a scalloped edge from the fold on each side to just in front of the arm/elbow. I think this lightened the look considerably and I believe I can make this work. I agree that starting with a smaller width would have probably helped a lot! I think rather than use the first tier as a blusher, maybe I should add another piece of tule as the blusher (without lace). I would get back some poof at the top. When I pull the first tier over as a blusher it looked a little funny because it falls in short gathers on the sides.
I do have a question about the best way to sew the lace on. I will be doing by hand. I have gone around the lace's scalloped bottom with transparent thread. Now I have the top of the lace - embroidery look filigree flowers and stems that reach up and down. Maybe tack it in strategic places or do you go completely around every piece?
Sally, I'm glad to hear you're making progress. Sounds like trimming the lace was a good way to lighten the veil, and I do like your idea about making the blusher just be tulle with no lace on it. I think for sewing the lace in place, how much work you put into it is up to you. Veils don't generally get a lot of wear and tear, so strategic tacking will likely do the job just fine. However, if you have time (and patience) to sew more, it certainly wouldn't hurt!
Do you have any guidelines for adding the additional piece of tulle as a blusher to a finished veil?
Thanks!!
Sally, I would just take a gathered piece of tulle, whip-stitch it to the comb or clip at the top of the veil, drape it over the face, then trim carefully to the desired length. Cut it long at first -- you can always make it shorter if need be!
Ok - that sounds good. Should I get a 54" piece and gather all of it?
I am still stitching the lace on and it is looking very nice. Long process by hand :)
You know how wedding dresses have little satin buttons and thread loops to bustle up the dress post ceremony? Well I am going to hide a small satin button and thread loop in the bottom front pieces of the veil so it can be pulled under and behind, then brought together in back. Don't know if anyone has ever done that. when I tried it; tucked the front under and to the back underneath the first and second tier it looked fine (it's the part with just the scalloped edge of lace). Because my daughter wanted to wear the veil at the reception, I thought this would just clear her face and the front of the dress a bit. For later; not for the ceremony or post-ceremony pictures.
Sally, you may need to experiment with the width for the blusher. You want the fullness to match the veil, I would think, but you also want to make sure there's not too much or too little fabric across the bride's face, so that it looks right. And I love the idea of bustling the veil. You definitely need to share photos with us after your creation is complete!
Thanks so much for all your advice. I will play around with the tulle for the blusher just as you have suggested. And...I'll let you know how it comes out. Going out of town for several days but I'll post soon.
Hi. Thank you for the amazing instructions. I made a beautful ivory fingertip veil yesterday following your directions. I can't believe how much money I am saving making my own, plus I was able to choose tulle that matched my ivory dress perfectly. I'm so glad I found your sight. Thanks for sharing with us.
I want to add just a little sparkle to my veil now. I make jewelry and have a huge selections of beads. I want to add silver lined bugle beads and small swarovski bicone beads to the edges of the veil. I would prefer to sew them on, rather than use glue, but I'm not sure what kind of "thread" to use. I think that the veils I looked at in stores had a thin fishing type line attaching the beads, but I don't have any experience with that. Issume that is so the stiches don't show. Do you have any suggestions on how to attach beads? Thank you and best wishes.
Kristi, I would recommend using a clear thread, so that it doesn't compete with the beads. Look in the thread section of your local craft/sewing store and you should be able to find a spool of it. We'd love to see your veil, btw!
I found your site several months ago while sewing my daughter's wedding gown. I used 108 inch tulle and created a long and a short veil (tulle is so inexpensive) for her to choose from. I'd encourage everyone to get creative since you can inexpensively alter this wonderful basic design by adding beads, ribbons, headpieces, etc. I'd send pictures, but the hairdresser used the wrong veil...but I still have two daughters to go yet! LOL
Barbara, thanks for the encouragement to our readers. Glad you enjoyed this project, and hopefully your other two daughters will make use of your sewing skills.
Thank you so much! My granddaughter is dressing as a bride for Halloween, bought a pattern made the dress, also made her bouquet. The veil had me worried this was so simple and very pretty. I'm happy and I know she'll love it.
Hi, first I would like to tell you that your diagram is extremely helpful. I would also like to ask, what may be a silly question. I have never worn a veil before so I am not 100% on how they work while on. If I were to make the center gathered veil, would I still be able to wear the top layer over my face while walking down the aisle? Or would this only work with the full gathered veil? Also, if I were to sew it onto a tiara, what would "the right type" be? Thanks for the instructions! And I hope the answers to my questions aren't to obvious! Thanks again!
Amanda, I'm happy to answer your questions as best I can. I have not experimented with making a blusher that would go over your face, but my instinct tells me that the full-gathered style will work better. You may want to try it both ways and see which you like better (just remove the thread and start over if you need to). As for the tiara, I think you can use either style just fine.
Thank you so much for this tutorial! I'm getting married next year on a shoestring budget, but I am determined that it will be as beautiful as as possible. I was so confused about veils in general (having never even seen one up close) and had never thought of making my own. Now I feel confident to have a go and create something stunning. Thanks again!
Jodie, we're so happy to have given you the confidence to create your own veil. You'll love it that much more knowing that you made it yourself :)
I just bought some tulle today just to play with and I'm SO glad I didn't buy a veil! So easy and now I can have exactly what I want and it's not going to cost me an arm and a leg!
Hi, I was just wondering how to make the bottom part detachable? I have dreamed of a cathedral length veil with a short blusher. Problem is, I want to wear the blusher only during the reception as the long veil will be too much
Cassie, the easiest way to do this is to make two veil pieces, each with its own comb/barrette, and layer them. For the ceremony, put the long one on first and the shorter one on top of it. Then take the longer one off for the reception.
Here are some comments about making the veil: Once I decided on the width and length of tulle to use and where it would be gathered; all wonderful directions from your site, I had some issues to work through. Where to turn the lace so both tiers would be seen right side out. Wonderful that your site gave the “heads up” on this need. I didn’t really like the way the first tier looked when used as a blusher, so adding a piece of tulle as a blusher worked perfectly – just as you suggested, Chica ? It also helped add a little lift at the top which was an issue with the heavy lace. I had also attached at the comb a couple short pieces of stiffer tulle underneath the veil to add some lift (again because of the heavy lace).Still working to help lighten the weight and also the look I removed all but the border of the lace from the very front (two tiers/folded – approx. 28” total on each side or as folded about 14” visually on each side). With the wide lace we used and because the veil folds back and forth over itself, esp. at the sides, this created a cleaner look. Then, as the veil began its fall from just below the shoulder the full width of lace was not as gathered and the tiers had more of a separation so it showed the beautiful pattern better. I also added a satin button and loop hidden at the sides so later the veil could be brought together underneathand & behind (because my daughter wanted to wear it throughout the reception) - kind of like bustling the veil only side to side. She didn't actually use it but pushed the sides of the veil behind her shoulders. It really looked lovely bustled as well. You can see a hint of the loop by her bare arm in the third picture. All in all, we thought it turned out great!
Additionally, I used clear thread to attach the lace to the tulle.It’s a little hard to work with (better not to have too long a piece to work with), kinda like fishing wire, but it is invisible and I wanted that.
I pinned the lace all on making sure it was exactly as I needed it to be before I stiched.
I worked my way up and down around the lace pattern with moderate length stitches – probably shorter than basting, but not nearly like regular stitching either.
Your instructions are look thorough! I would like to make my daughter's wedding veil but first I have two questions: 1. she only wants a single layer veil. How do I make the edge near the comb look finished w/o a fold there? 2. what brand of glue/adhesive do you suggest to attach gems/rhinstones to the tulle? Thanks!!
Mary, I think you'll find that the edge of the tulle on a single-layer veil is pretty easy to disguise because the tulle is so thin that it bunches up nicely. You could just add a strip of ribbon or some gems across the edge to cover it up. As for gluing gems/rhinestones to the tulle, I have not tried that and can't make a recommendation to you. I suggest asking the helpful folks at the craft store where you purchase your supplies.
Chica, I note that the length should be double the end length however how wide should the veil be. The lenght I want is approx 15'' however dont know how wide to cut the fabric. Any advice is appreciated.
Tiffany, the width you cut the tulle will determine how full and ruffled it is. Tulle is usually available in 72" or 108" widths in the store, so you can choose either width depending on how full you want your veil to be.
I have a question about the method where you just gather the middle. What happens to the rest of that folded edge? Does it just hang down?
Also, I want to add a strand of tiny pearls all the way around. Definitely hand sewn, not glued. Do you suggest sewing it to the very edge? Or would it be simpler to sew it in a bit from the edge and then trimming away the excess tulle when it's finished?
I'm making this veil for my future daughter-in-law and can't wait to get started!
Mary Beth, it's so nice that you are making a veil for your future daughter-in-law. What a personal touch to the wedding!
When you only gather the middle of the tulle, the remaining tulle on each side will just hang down. Fortunately, this gathering is easy and forgiving, so if you don't like the way it hangs, you can cut out the thread and try again with different amounts in your gather.
If I were adding a string of pearls, I would be concerned about keeping them straight and not getting too wavy. For that reason, I would recommend cutting the tulle first, ensuring you have a nice smooth curve, then sewing the pearls on to the very edge. If you work up from the edge, you might have trouble keeping it even and straight. Also, make sure those pearls are as lightweight as possible, so that it doesn't weigh the veil down.
Thank you for this lovely tutorial. What a nice thing to be able to do for your own wedding (as well as saving bucket loads of money) In South Africa, I can rent a veil for about R900 and buy one for about R1400- buying my materials has cost me just over R200. I have cut my beautiful veil and was wondering if adding the lace trim before I attach it to the comb is better? The lovely tulle and lace trim I found work so nicely together that it does not matter which way they are placed, they work both ways (lace trim over net or net over lace). Is it better to attach the comb first, or can I go ahead with the lace trim first. Any advice would be much appreciated!
Beth, I'm so glad we were able to help you save some money and also add a personal touch to your wedding veil. I think the lace trim will be easier to attach if the tulle is still flat, so I would suggest adding it before you gather it and attach it to the comb. One risk to that approach, though, is that if you don't like the way it looks gathered with the lace, you might have to remove the lace and start again. Best of luck!
Hi Chica, this site has been very helpful. I have 2 daughters getting married this year, one being within 2 weeks. What is the best way to cut out the fabric for a 3 tier fingertip veil? She also wants 1/8th inch ribbon attached all around so I think I would like the veil like the waterfall style. She doesn't know what she wants. She said I could decide. The third layer will not be to put forward on her face. That much she knows. Thanks, Linda
Linda, I think the best idea for an uncertain bride is to cut some pieces of tulle into large ovals like I described, gather them, and have her try them on. She'll know right away if she likes the look or not, and you can then adjust the gather if needed to make it fuller. Do as much fitting as you can before adding the finishing details. And even if you get the cut wrong and have to start over, at least tulle is pretty cheap!
My soon to be mother in law bought some beautiful lace for me to make a veil with. This is completely finished on top and bottom but is raw on the sides ( where it was cut from the bolt). How would I go about making a veil form this? I want to keep the gorgeous beading and detail that is on the edges. HELP! - Getting married in 3 weeks :)
Stephanie, it's really hard to suggest a solution without seeing the lace, but perhaps you can trim it along some of the natural curves of the lace to make the raw edge look nice? If not, you might need to hem it. Good luck!
Just finished my veil for my wedding, only got the decorations left and it looks fantastic! Picked up the for only a couple of pounds and the beads, pearls and gems were resonable too so instead of spending a bomb (I was quoted £150+!!!) I'll be spending around £25!!! And it's something unique that I'm hoping to pass on in the family! Thank you so much for your fabulous instructions, it really is so easy!
Sounds wonderful, Kimberley. Saving money AND getting something personal... hard to top that!
I was so shocked at the price of veils for my daughters small budget. Your instructions gave us confidence to give this a go. Thank you !
For a two tier elbow length veil would it look better to turn the ribbon to the outside half way round so it all ends up facing out if you see what I mean.
Fran, we're happy we could help keep your daughter's wedding on budget in a small way. As for the ribbon, unless you are using something very wide or ornate, it probably won't make a difference which side it's sewn on, because the tulle will be so thin you'll see through it anyway. Try pinning it on both ways and see what works best for you.
Hi I am making my daughter's veil for her wedding this August this is by far the best instructions I've seen. I just wanted to clarify how much do I gather in the middle to do the first illustration you showed? do I just leave a few inches off that are not gathered? My comb is 4" long do do I gather the middle part until it's just 2" and attached the 1" of ungathered tulle at each end? I'm using 108" width. Although the wedding it's not till August I have to start now because I have to sew a lot of beadwork on the veil.thank you
Cathy, thank you for the compliments on our instructions! When deciding how much of the tulle to gather in the middle, you'll need to adjust based on how far down you want the sides to hang. If you want the sides to hang down far, don't gather very much. If you want just a little, then gather more. Try basting some thread through loosely and play around until you get it the way you want, then attach it to the comb. Hope that helps!
I used this to make my wedding veil! I think it turned out GREAT! I could not find one with purple satin ribbon,but because of this I now HAVE one!
I'm getting married in just 2 months. Thought of making my own veil. Could you please tell me, how long the tulle should be for a cathedral veil???
Ruu, the beauty of making your own veil is that you can make it any length you want. Just determine how long you want your veil to be and adjust your tulle length accordingly :)
Hi, I want to make my wedding veil too and was excited when I came across your one. Very simple steps and easy to follow. I was wondering, I need a four layered veil, can this be done by doing the same steps? I have a curved spine and want to use the veil to hide it...
Ana, I think you could just follow our instructions twice, making two double-layers, then stack them up for the four-layer veil you're looking for.
Chica, thank you so much for setting this page up. The instructions were very clear and I loved how clearly you illustrated the instructions. I have a question regarding the shape of the veil. If I decide to cut a circular veil, will it come out very different from how your veil looks like? I plan to fold mine back with no folds at al. i plan to make a fingertip length veil.
Also, I am amazed at how responsive you are to all the comments and questions ever since you started this page in 2009. Thank you thank you thank you!
Hi Melissa. Thanks for the nice compliments! Whether your veil is circular or oval doesn't matter as much to the overall outcome as the width of the tulle does. The wider the tulle, the fuller your veil will be. I hope that helps!
Hi there! I was wondering if you had a mantilla tutorial? It is difficult to find much more online other than "cut a circle or oval and put trim on it"... is it really that simple? I'd like to end up with a fingertip length tulle mantilla trimmed with wide lace. I plan on wearing my hair in a low lying bun and will position the mantilla just above it so that it sort of "hugs" the bun and then cascades over my shoulder. Any info that you could pass my way would be greatly appreciated!
Hi Emma. I haven't tried creating a mantilla veil before, but I just Googled some pictures and I think the guidance you've gotten so far is pretty right on. Looks like a big oval with trim is about all it will take. Best of luck creating your veil, and let us know how it goes!
I'm getting married in 3 weeks and cut my veil out weeks ago but got busy with all the other DIY tasks! Now my focus is back and I have a couple of questions. I am beading the entire edge of my veil, so do I bead the inside or outside of the blusher portion? Also should I bead before I gather and attach to the comb or afterwards? Your help would be gratefully appreciated!
Liz, are your beads pretty on all sides, or are they flat and only have one nice side? If they are nice all around, it won't matter which side you sew them to because the tulle will be thin enough to see the bead through it. If they are flat, then it's up to you whether you want them to show when the blusher is on or off. As for beading before or after gathering, it would probably be easier to bead before, but you'll get better in-progress views of it if you bead after. It would drive me crazy to bead the whole thing and then gather it and realize I'd added too much!
This site is great and makes it sound very easy to make the veil. Great comments and compliments from everyone who has visited the site. Also, love that you respond to every question! I am making a cathedral veil for my nieces wedding and I plan on gathering the full width of the 108". Have you found that it is difficult to attach it to the comb? Also, I am planning on doing a rolled edge around the perimeter of the veil with my serger. Do you have any experience with that or suggestions? I am actually Monogramming the veil as well and have been practicing with a small piece of tulle and will be practicing the other steps before cutting the actual veil. Any other suggestions you have would be appreciated.
Hi Cindy. Thanks for the kind words! When gathering a 108" width, I don't think you'll have any trouble at all attaching it to the comb... my experience is that tulle is so crazy thin that it gathers down to almost nothing, so it should fit just fine for you. Unfortunately I don't have any tips to share on the rolled edge, as that's not something I've done before. And I love the idea of adding a monogram... would love to see a photo after you're done! (email to chicaandjo@chicaandjo.com)
Chica, I have finished my veil a week ago now ready to sew the comb to the veil, however a little nervous to do this. I see the pictures posted my question is how do you secure the ends where you gathered it so that it doesn't come undone after you get it sewed to the comb? I have tied off the thread / string that was used to gather but don't know it if need to do any special stitching. Thanks in advance for advice.
Cindy, if you're worried that your gathering thread might break, you could always double it, or run a needle through the gather again to put another thread through. But once you sew the gathered area to the comb, even if the original gathering thread were to break, the new stitches should hold it in place. Does that make sense?
Thanks Chica, it makes sense. I am excited to finish it now.
Just starting out on planning for my wedding and saw how expensive veils are to buy. When I was close to deciding I wouldn't wear one, this site showed up on BuzzFeed.com when I was looking at other DIY's. This is a Godsend! I hope mine comes out looking this wonderful! I'm going with a Spring/FaerieLand wedding and your sparkly idea made me NEED them on my veil!
I plan to make my daughter's veil for her wedding in July.She wants it short, but I could only find 54" wide. If I turn it and use 2 yards long and gather on the long edge does it matter that I turn it that way? She only wants it 24" long and single layer, and I'll be using a 2" metal comb to attach it to. She's wearing it at the bottom of her updo. For some reason this may or may not have posted
Marge, it shouldn't matter which way you turn the tulle, as long as you can get the length and width you need.
Just wondering if it makes sense to sew the lace around the edges first before gathering/sewing in place on the comb. If not, is it hard to sew the lace as it gets close to the comb?
Marisa, it would be easier to sew all the lace on first, then gather. I don't think the lace will get in your way, because there will only be a little bit of it on each side of the comb. Hope that helps!
Feeling inspired by your great site--but have two questions I'm hoping you can answer as my daughter's wedding is in 2 weeks and she just decided she wanted a veil! Here goes: I bought 2 1/2 yards of 108 in. tulle as you described to make a fingertip veil. When I laid it out from the store, it was 108 in. long, folded double, providing a width of about 29 in. Do I leave it like this, fold it again, and cut the curve? I'm wondering if the guy at the store refolded it differently somehow. Question #2: (you can tell by now I have no math skills, I'm sure) I found some wonderful trim, bought 2.5 yards, and am pretty sure that's woefully inadequate. How much trim do I need if I was using it as you used the satin ribbon? Thanks so much (btw, I'd already made her hair pieces, and knitted a shawl!)
Mary, I'm not exactly sure I understand how your tulle was folded when you brought it home, so let's start over. Unfold the whole thing and lay it flat. Then fold it in half lengthwise, then again crosswise. That should bring you up to where the tutorial instructions assume you will be. As for the ribbon, you'll need to measure around the entire piece of cut tulle to see how much ribbon you'll need.
Thanks, Chica! I did that, and dear daughter has decided that she likes the look of the veil actually doubled, all the same length, instead of tiered. I don't see many photos of veils like that, and while holding it up to her head unsewn seems to show it will be all right, I'd hate to sew on the trim, gather and then find out it looks wrong. Is doubled a look you see in veils?
Mary, I don't know a lot about all the veil options out there, but I do know one thing... if the Bride likes it, it's right! :)
Ha! You're so right, Chica! The veil looks great, the trim looks great, but now I'm stressing about exactly how to attach the comb. I've tried following Internet directions but friends have said I might have sewn it on backwards and I'm hoping you can help me understand this. I've sewn the raw gathered edge onto the convex (rounded out) side, with the teeth pointed down. The raw edge disappears when the comb is flipped over to insert into the hair. Does this make sense? I can't believe I'm so dense! I don't seen any other comments about comb attachment, so any help you can offer is appreciated. Thanks a million.
Mary, does it look bad on the comb, or do you just think it's wrong? I bet nobody is going to look at the comb part at all, so as long as the rest of the veil looks good, you'll be fine. If it looks back on the comb, just sew on a piece of ribbon or some silk flowers to cover it up. Or have the hairdresser curl a lock of hair over it. :)
Hi. I'm making a single tier veil for my future daughte-in-law. It is fingertip length. Do you have a tutorial for a single tier? I'm not sure how to cut the edge so it lays right in the front of the shoulder. Also, the lace is only going to go to right above the elbow when you are looking at it from the front. Should I gather the entire width for the comb, or it seems like I would only gather a portion in the center. I appreciate your help!
Joyce, we don't have a separate tutorial for a single tier veil, but the general gathering and stitching would be the same as described above. Just gather at the end rather than at the middle. As for your lace/gathering questions, I'm not sure how to help... I think you'll be better off trying different ways until you see what works for you. Just baste loosely and pin the lace until you figure it out, then sew it more securely afterwards.
What type of thread do you use?
Addie, I keep things pretty simple and just use basic white thread.
If you add a blingy lace to the bottom won't the top tier show the lace inside out when you fold it over?
Denise, most lace will look pretty from both sides, but if you choose a trim that doesn't, you'll definitely need to apply it so that it looks best on all edges. That may require flipping it over for the top layer.
Could I cut the veiling so it's wider at the bottom, 108, cathedral length, but slightly narrower at the top? I want a blusher, elbow length, gathered just in the middle, but not too puffy. Maybe 108 is to wide. I'm having trouble figuring out numbers here. Four inch comb, around 23 in drop. to elbow. The rest gathered onto the comb. That's the problem, how much gathered on the comb.
Joyce, you can make your veil however you want it to be! We haven't done anything quite like you describe, so the best advice I can give is to buy a bunch of tulle and experiment until you get the results you want. Try basting everything together loosely as you play around, so you can remove the thread and try a different technique if you need. Best of luck, and enjoy the process. :)
Chica, your instructions and cutting layout were explained so well. Thanks! To get a good straight, and curved, line I used my quilting cutting mat and roller cutter while using a large quilt ruler to hold the four layers flat. Tada! It worked great.
I did a few variations for the assembly. Instead of hand sewing the gathering line I sewed a long stitch line across the straight fold with my sewing machine, wide enough to insert a hand-band style hair barrette. Thus the gathering was easy by adjusting the fullness of the tulle right on the barrette. I covered the tulle gathering by hand sewing a piece of the 2 inch lace used on the dress. It gave a crown effect - beautiful!
Nancy, thank you and congratulations on making your veil. It means so much more when it's made by hand.
Hi I'm usually not too crafty and don't machine sew at all. I looked all over for DIY veil instructions before finding yours. Took me all of 30 minutes to do. Awesome! The fold/layout/cut diagrams are priceless. As are the gathering stitch options. I used the center gather option and it came out perfect. Thank you.
Gina, we're so glad we could help! We love hearing such success stories :)
I was asked by my future daughter in law to make her veil for their wedding in October 2016. Your detailed and simplified directions with photos and graphics made the project so easy! Thank you Chica and Jo.... you're absolute stars!! Once completed, I neatened the stitched comb by measuring a piece of soft lace (with one straight edge) slightly bigger than the width of the comb. I folded in the raw edges on the lace, and threaded/pushed the edge of the lace up the shafts of the comb. Using a few stitches, I caught the lace's scalloped edge onto the threads of the veil/comb's sewing threads. Voila! All the stitching covered in 5 minutes with a pretty finishing! Thank you again to both of you for helping this mother of the groom here in Africa!!
Thank you so much for this really clear tutorial! I just wondered what width ribbon you used for the veil in the pictures? And was it just standard ivory satin ribbon? Thanks so much
Gemma, you're very welcome! I believe I used 1/4" ribbon to trim my veil, and yes, it was just standard satin ribbon.
I am redoing my 3 layer veil for my niece to wear. One layer is beaded and has lace. I have another long layer that is plain and a short blusher, also plain. (My sister took off the 2 plain layers when she wore it 30 years ago! My question: the short blusher goes on top, but does the other plain layer so second or under the lace edged veil?
Auntie, it's totally up to your personal preference and which way looks better, but my gut instinct is that the plain layer should be under the lace, so that you can see the lace the best.
I love the step by step tutorial! My wedding is in September of this year. I wanted to place a thick (1/2inch-ish) lace band all the way around. The problem is that they lace that i bought has beads on it. Should I apply the lace all in one direction or should i have it flipped (placed on the inside) on the other half? I hope this all make sense.
Susan, I'm afraid I can't answer your question for two reasons... one, I'd really need to be there to see and feel the lace in order to give an opinion. Two, it really would just be my opinion -- you should try different ways and do it exactly how you like it the best! Have fun making your own custom veil :)
This has been the simplest and most helpful tutorial I’ve found thus far! Thank you so much for the excellent instructions and diagrams.
I am about to make my daughter's wedding veil and I really appreciate your instructions. I bought some beautiful lace trimming from Etsy but I am afraid it will be too heavy for a veil. Any advice?. Thank you for your time
Nermin, the best way to see if the lace will work is to pin it to some tulle that you've loosely gathered, and see how it feels. It will be a judgement call for the bride whether it's too heavy or not.
Hi, I love this tutorial! I am making a full circle (90 inches), and am worried about the straight ribbon buckling a bit as it has to go around this curve. Do you have issues with that? I know it's a mild curve but I don't want to finish it and have it look terrible!!
Anita, I haven't had this problem but I've only used very thin ribbon. The wider your ribbon, the more a chance you have of buckling.
Hi! I am making my daughter's veil and am pretty much paralyzed with indecision and fear; I am a pretty accomplished seamstress, but this time it has to be perfect! What is the difference in appearance between the veil that is only gathered in the middle as compared to the one that is gathered all the way across? Is one fuller? Does one fall more smoothly? My daughter wants a 2-tier fingertip length veil but doesn't want a lot of pouf.
Lee, try not to let fear take over. Tulle is inexpensive, and even if you end up making several veils until you get it right, it will still be SO much cheaper than buying a new one! Just jump in and play around. As for the gathering, there will be a slight difference in fullness (all the way across will be fuller) but the biggest noticeable difference will be in the edges coming all the way up to the headpiece or not. If you sew a decorative edge on, this will be very visible. Maybe try just basting the gather in place, so that you can remove it if needed. Do one side in each style, and have her try it on and see which she likes better!
Thank you so much for the wonderful detailed instructions. I am making my daughters veil (as I did for my own veil many years ago) If she doesn't want a two tiered look would I make two tiers the same length or just cut the tulle in half? Thank you
Dee, you're welcome! For a full, single-tiered look, you can make both layers the same length, as you suggested. If that's too full, you can just make one layer, and gather it up at the top without folding it over first.
I'm reconstructing a vintage wedding veil for a modern bride. I've finished the headpiece and I'm ready to re-gather the veil, which I'm thinking I'll outfit with small hooks (with eyes on the headpiece - thinking I'll use a small portion of ribbon at the top to have something solid for the hooks to attach to) to make the veil detachable. The veil is a fingertip double layer of 72" tulle and your suggestion of gathering only in the middle is the first I've seen. The veil is dotted with a handful of pearls and has a serged edge, but I think gathering only the middle will have a nice, less poufy effect. Do you recommend using the middle third in this case? As in, with a 72" veil I'd gather 24" in the middle and leave 24" on each side un-gathered. Totally open to any suggestions!
Cait, gathering the middle third is a good rule of thumb, but it's really personal taste. The more of the middle you gather, the higher the "bottom" edges will be on the sides, and the poufier it will be. Also, your hook idea is pretty clever for making the veil detachable, but you might consider an easier option -- just make two barrettes/clips, so the bride can wear one or both as needed throughout the big day. Hope that helps, and have fun with this!
Chica, any suggestions on how to cut a cascading angel cut veil?
CC, I have not made a veil like that before, but looking at pictures online, my instinct would be to cut a very long oval and only gather a small portion of it at one end.
My daughter chose a fancy tulle with an embroidered scalloped edge. I'm at a loss of which side to gather. The scallops are only on 2 sides of the fabric so you'd see more of the detail making the scallops the sides of the veil but then would the bottom edge just be left as raw cut?
Michelle, that is an interesting situation... I think if I had to choose, I would want the scalloped edge on the bottom rather than the sides, but that's not ideal either. I wonder if you could perhaps cut the edge off some of the tulle and then sew it to the other edges, creating a border all the way around?
Hi. I’ve finished my granddaughters cathedral veil and it’s gorgeous! However, what can I do to make the circle stay in place (maybe tiny weights) and what can I use to keep the veil on her shoulders and not bunch up. Thank you!
Sandra, we're so glad to hear the veil came out great! We unfortunately don't have any advice to offer on your issues, but if you figure out a solution, please come back and share with us.
Thank you for sharing your tutorial. The instructions and the diagrams were very easy to follow and resulted in my being able to finish a flowing, two-layered veil. It’s beautiful! Thanks, again.
Cynthia, we're so glad to hear it! If you share photos on social, please tag @chicaandjo so we can see how it came out. :)
This was very easy to make! And cost effective. I made it for my friends bridal shower.
Just found your site. What a godsend! I'm making a wedding dress for a friend with not a lot of money and body image issues. I promised to make her beautiful on her big day and the veil was the last thing I was worried about. She'll be shining on her day!
Margaret, we're so happy to hear this story! We'd love to see your veil, so if you post it on social, be sure to tag @chicaandjo so we can see it.