


Giant Risk Board Game Party

When my husband turned 30, I wanted to do something special for his birthday. I thought about what he loves to do the most and decided that I would have a game night and invite all of his friends over for food and board games. That seemed a little ordinary, though. The party needed something big... something better... something different... it needed GIANT RISK!
I can't remember the exact thought process that lead to the creation of Giant Risk but it happened and I arrived. The result was a fantastically fun game that he thoroughly loved. Everyone at the party agreed that once you play Giant Risk, you will never want to go back to regular Risk again. Intrigued? Keep reading and I'll tell you how to make your own Giant Risk® game, and amaze all your friends!
Choosing the right Risk game board
The best thing to have before you start is an actual Risk board game, which will serve as a useful guide. There are many different Risk games available (and Chica and I owned three different ones between us), but choose the one you like the best. We used the 1993 version because it had the cleanest look and was the easiest to copy.
Choosing the right material for your board
The most instrumental part of preparing for your project will be the selecting the canvas you will use for the board. This choice is important because the quality and size of your canvas can't be changed later, and will be the most noticed thing about your finished result. You can buy large rolls of canvas from your local art supply store or online.
Which type of canvas you choose will depend a lot on how large you want your board to be. My finished board was about 5' x 9', which was (by pure luck) the perfect size to cover our ping-pong table. You also have a choice in whether or not you want your canvas to have a primed surface. I used an unprimed canvas for my board. The benefits were that it was cheaper and the fabric was softer.
However, the unprimed canvas puckered a bit from the paint, and it required that I use the fabric additive in my paint. Had I gone with a primed canvas, though, I think the end result would've remained flatter and I don't think I would have needed the fabric additive. You need to weigh the pros and cons and choose either unprimed or unprimed canvas.
Transferring the image to the canvas
Next, I found an image of the Risk board online and hooked my laptop up to a projector that I already owned. (If you don't have a projector, check your local library to see about borrowing one. You might also be able to borrow from a local school or your office. This will be the most difficult thing to get for this project, but it will make the end result MUCH nicer than drawing it freehand.
After hooking up the projector, I hung the canvas on the wall and adjusted the image onto the canvas until it fit perfectly. I made it as large as I possibly could on the width of canvas I had.
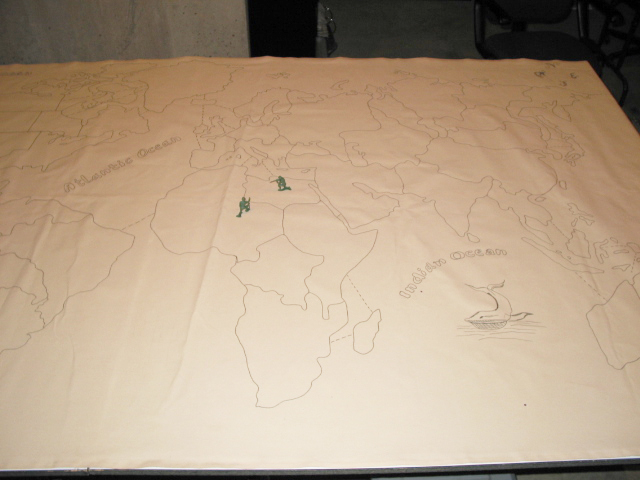
The most difficult task then ensued. I started to trace the image onto the canvas with pencils. When I finished outlining all of the countries, Chica did freehand drawings of the compass, boat, etc. on the canvas (since she can actually draw and I can't). I tried to trace those images as well but they didn't look nearly as good as Chica's drawings. We also added rectangles along the edge to serve as placeholders for the cards that players trade in during the game for more troops.
Painting the countries
I was now ready to begin the really fun part -- the painting! I took the actual Risk game board to our local craft store and matched all of the colors of the countries to the small tubes of acrylic craft paint. I also picked up some fabric medium that allows acrylic paint to be used on fabric (extra insurance to make sure my paint stuck well).
I took it all home and labeled the lids with the abbreviations for the countries just in case we got confused and needed to go back and make touch ups. With all the paints available, we made short work of painting in the countries.
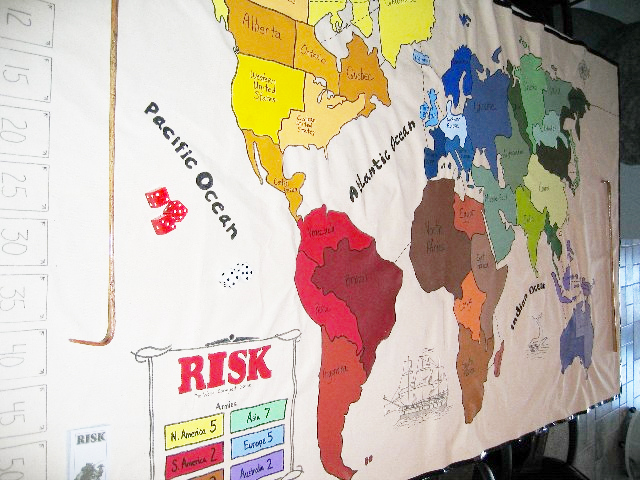
Next, we took a black permanent marker and outlined everything. This gave all of the countries on the board a nice, finished edge and cleaned up any spots where the paint went outside the lines (oops!). We also used the marker to write the names of the countries and to do any small detail work on Chica's drawings.
At this point, the board was almost finished, but we still needed a solution for the edges of the entire canvas. We thought about painting a border but that would still leave a bad edge on the ends that were cut from the roll. We needed something that was easy and durable and that would prevent the edges from unraveling in the future.
After a couple of brainstorming sessions, we decided on applying black duct tape along each edge, folding it so that it covered both the front and back of the canvas. It worked perfectly! It was easy to apply and the duct tape had a texture and feel similar to the canvas, so the end result looked really nice.
Additional game pieces
Now the board was done at last. However, you can't really play Risk without army men, dice and the cards, so I had to think about what to do for those. You need six different sets of armies in black, gray, red, green, yellow and blue. For the men, I bought a bunch of classic green plastic army soldiers. They are really cheap, so I bought hundreds of them to serve as the regular army men the game needed.
The game also has special pieces that count for 5 or 10 armies each, so I also bought a few sets that included flags, fences and machinery to serve that purpose. Make sure you get enough pieces for six players -- each person will need at least 40 armies to start the game, and even more will be required during gameplay!
My army men were the perfect size, but they were all green, and I needed them to be different colors. So, I divided up all the pieces into six distinct piles and then laid them all out on cardboard in my backyard. I then spray painted them with Krylon Fusion paint that's specially created for painting plastic. The lighter colors took quite a few coats for good coverage, but it did the job. And the green ones were the easiest one to paint!
After all of my soldiers dried, I needed containers to store them in so they wouldn't get mixed up or lost. At first I considered ordinary plastic storage bins, but then I had a brilliant idea. While visiting my local Army surplus store (for additional supplies for the party) I found some wonderful ammunition boxes! They work great and add to the "world domination" feel of the game.
Chica created the cards you need for the game by first scanning her existing game cards into her computer. She then printed them onto half-sheets of white cardstock and then laminated them with clear contact paper so that they would be durable.
As a finishing touch, I bought some giant dice to use instead of regularly-sized ones (you need 2 white and 3 red dice). I also got a stick (normally used for playing "craps") that you can use to scoop and push the troops around the board. Everyone loves pushing the armies around with the stick!
The finished Giant Risk game
We love having a group of friends over to play Giant Risk! The last thing I want to do to the board is add grommets along the top so I can hang it on the wall when we aren't playing it. The board is so neat-looking that it's a shame to keep it rolled up and on a shelf!
If you're not sure how to play, take a look at the official instructions for Risk.


11 comments so far:
I have also done a giant game of risk. I took a totally different route and actually had it printed. (you can read about it on my blog) the drawback to this is the cost and I was limited to a much smaller size. But it fits nicely where I can play. I wanted to use giant men, but the map isntt quite big enough for that. I do have a question. Where did you get the Craps stick, and do you have a way to contact the other giant risk people you link to?
You can look on eBay for them and they are basically just called Craps Sticks. I also believe they are called Croupier sticks, which sounds very James Bond to me.
Nice board! good to see I'm not the only nut out there. I am also turning 30 this year and have also created my own giant Risk board. It measures 1.2 by 1.5 feet, made from a sheet of plywood with latitude and longitude grooves cut into it with a cedar edging. Thin plywood used for the continents that sit in relief to the board, each painted in the traditional colors set against a dark blue ocean, with white and Antarctic. My board has 80 countries plus Arctic and Antarctic. My father came to the party providing color-coded dice for each color.
This is a fantastic looking Risk map. Quite impressed. Nicely done. Makes me feel like I want to have one of these too. Perhaps I should put this in my wish list for my next birthday, may be my wife will come up with something too :-)
Please tell me you have a single twin sister. Please.
If you made these and sold them on Ebay you would make millions...lol
Great idea... was thinking of the same kind of party for my husband and when I googled it came across your site... AWESOME JOB!!! Can't wait for my husbands party to come together now :)
Michelle, I am sure your husband will be thrilled with his party. We would love for you to stop back by and tell us how it goes and any other ideas you might have for this party theme.
That is awesome! Great gift idea.
Wow...I am so impressed! My husband and father would both love one of these!
That is an amazing board, I love Risk! I wanted to do a similar idea for my wife's birthday, but her favorite game is Ticket to Ride so I'll probably be going that route.
Andrew, that's a wonderful idea! We love Ticket to Ride, and would love to hear how your version comes out.